Page 209 of 345

Other status indicators of the naviga-
tion system The navigation system displays additional infor-
mation and the vehicle status.
Possible displays
R New route...
New route... orCalculating route... Calculating route...
A new route is calculated.
R Road not mapped
Road not mapped
The vehicle position is inside the area of the
digital map but the road is not recognised, e.g.
new roads, car parks or private land.
R No route
No route
No route could be calculated to the selected
destination.
R O
You have reached the destination or a stop-
over. Audio menu
Selecting a radio station :
Active station list
; Station with preset position
The multifunction display shows station ;with
station frequency or station name. The preset
position is only displayed in addition if station ;
has been stored.
X Switch on the multimedia system and select
radio; see the separate operating instruc-
tions.
X Press the =or; button on the steering
wheel to select the Audio Audiomenu. X
To select a preset list or station list: press
and briefly hold the 9or: button until
the preset list or station list in the desired
frequency range is shown.
X To select a station: briefly press9
or :.
i DAB radio mode (Digital
AudioBroadcast-
ing) is an optimised digital transmission
standard designed for the mobile reception of
radio transmissions.
Audio player or audio media operation :
Current track
Audio files from various audio players or media
can be played, depending on the equipment fit- ted in the vehicle.
X Switch on the multimedia system and activate
audio CD or MP3 mode; see the separate
operating instructions.
X Press the =or; button on the steering
wheel to select the Audio Audiomenu.
X To select the next/previous track: briefly
press the 9or: button.
X To select a track from the track list (rapid
scrolling): press and hold the 9or:
button until the desired track appears.
If you press and hold the 9or: button,
the rapid scrolling speed is increased. Not all audio players or media support this function.
If track information is saved on the audio player
or media, the multifunction display will show the number and title of the track.
DVD-Video operation 206
Menus and submenusOn-board computer and displays
Page 210 of 345
.
X Press the =or; b")
Only for vehicles with COMAND Online: you can
use the Audio
Audiomenu to play video DVDs.
X Switch on COMAND Online and select video
DVD (see the separate operating instruc-
tions).
X Press the =or; button on the steering
wheel to select the Audio
Audio menu.
X To select the next or previous scene:
briefly press the 9or: button.
X To select a scene from the scene list
(rapid scrolling): press and hold the 9
or : button until desired scene :
appears. Telephone menu
Introduction G
WARNING
Operating the integrated information systems and communications equipment in the vehicle
while driving will distract you from traffic con-
ditions. You could then lose control of the
vehicle. There is a risk of an accident.
Only operate these devices if road traffic con-
ditions permit. If you are unsure about the
surrounding conditions, pull over to a safe
location and make entries only while the vehi-
cle is stationary.
When telephoning, you must observe the legal
requirements for the country in which you are
currently driving.
X Switch on the mobile phone, see the manu-
facturer's operating instructions.
X Switch on the multimedia system; see sepa-
rate operating instructions.
X Insert the mobile phone into the mobile phone
bracket (Y page 277).
or
X Establish a Bluetooth ®
connection to the mul-
timedia system; see the separate operating
instructions.
X Establish a Bluetooth ®
connection to the mul-
timedia system; see the separate operating
instructions.
X Press the =or; button on the steering
wheel to select the Tel
Tel menu. You will see one of the following display mes-
sages in the multifunction display:
R
Telephone ready Telephone ready or the name of the net-
work provider: the mobile phone has found a
network and is ready to receive.
R Telephone
Telephone No
Noservice
service: there is no network
available or the mobile phone is searching for a network.
i You can obtain further information about
suitable mobile phones and connecting
mobile phones via Bluetooth ®
:
R at any Mercedes-Benz Service Centre
R on the Internet at http://www.mercedes-
benz.com/connect
Accepting a call If someone calls you when you are in the
Tel Tel
menu, a display message appears in the multi-
function display.
You can accept a call at any time, even if you are
not in the Tel Telmenu.
X Press the 6button on the steering wheel
to accept an incoming call.
Rejecting or ending a call You can reject or end a call any time even if you
are not in the Tel
Telmenu.
X Press the ~button on the steering wheel
to reject or end an incoming call.
Selecting an entry in the phone book X
Press the =or; button on the steering
wheel to select the Tel
Telmenu.
X Press the 9,:ora button to
switch to the phone book.
X Authorise access to the phone book on the
phone.
X Press the 9or: button to select the
desired name.
or
X To begin rapid scrolling: press and hold the
9 or: button for longer than one sec-
ond.
Rapid scrolling stops when you release the
button or reach the end of the list. Menus and submenus
207On-board computer and displays Z
Page 211 of 345

X
If only one telephone number is stored for
a name: press the 6ora button to
start dialling.
or X If there is more than one number for a
particular name:press the 6ora
button to display the numbers.
X Press the 9or: button to select the
number you want to dial.
X Press the 6ora button to start dial-
ling.
or
X If you do not want to make the call: press
the ~ or% button.
Redialling The on-board computer saves the last names or
numbers dialled in the redial memory.
X Press the =or; button on the steering
wheel to select the Tel
Telmenu.
X Press the 6button to switch to the redial
memory.
X Press the 9or: button to select the
desired name or number.
X Press the 6ora button to start dial-
ling.
or X If you do not want to make the call: press
the ~ or% button. Assistance menu
Introduction Depending on the equipment fitted in the vehi-
cle, you have the following options in the
Assist.
Assist. menu:
R Showing the assistance graphic
(Y page 208)
R Activating/deactivating the Traffic Sign
Assist message function (Y page 208)
R Deactivating/activating ESP ®
(except
Mercedes‑ AMG vehicles) (Y page 209)
R Activating/deactivating Active Brake Assist
(Y page 209)
R Activating/deactivating ATTENTION ASSIST
(Y page 209) R
Activating/deactivating Blind Spot Assist
(Y page 209)
R Activating/deactivating Lane Keeping Assist
(Y page 209)
Showing the assistance graphic X
Press the =or; button on the steering
wheel to select the Assist. Assist.menu.
X Press 9or: to select Assist.
Assist.
graphic
graphic.
X Press ato confirm.
The multifunction display shows the distance display of Distance Pilot DISTRONIC in the
assistance graphic.
The assistance graphic shows you the status
of and/or information from the following driv-
ing systems or driving safety systems:
R Traffic Sign Assist (Y page 190)
R Distance Pilot DISTRONIC (Y page 167)
R Active Brake Assist (Y page 67)
R ATTENTION ASSIST (Y page 189)
R Lane Keeping Assist (Y page 193)
X Press :to display the ATTENTION ASSIST
assessment.
Traffic Sign Assist In the
Traffic Sign Assist Traffic Sign Assist menu, you can
switch the Traffic Sign Assist message function
on or off. When the message function is activa-
ted, detected traffic signs and information
appear in the multifunction display for five sec-
onds.
X Press the =or; button on the steering
wheel to select the Assist. Assist.menu.
X Press the 9or: button to select
Traffic Sign Assist
Traffic Sign Assist .
X Press ato confirm.
The current selection appears.
X To activate/deactivate the message func-
tion: press aagain. 208
Menus and submenusOn-board computer and displays
Page 212 of 345
.
Activating/deactivating ESP ®Observe the important safety notes on ESP
®
(Y page 70). G
WARNING
If you deactivate ESP ®
, ESP ®
no longe")
Further information about Traffic Sign Assist
(Y page 190).
Activating/deactivating ESP ®Observe the important safety notes on ESP
®
(Y page 70). G
WARNING
If you deactivate ESP ®
, ESP ®
no longer sta-
bilises the vehicle. There is an increased risk
of skidding and an accident.
Only deactivate ESP ®
in the situations descri-
bed in the following.
It may be best to deactivate ESP ®
in the follow-
ing situations:
R when using snow chains
R in deep snow
R on sand or gravel
Deactivating/activating ESP ®
on Mercedes-
AMG vehicles (Y page 71).
For further information about ESP ®
, see
(Y page 69).
X Start the engine.
X Press the =or; button on the steering
wheel to select the Assist. Assist.menu.
X Press 9or: to select ESP ESP.
X Press ato confirm.
The current selection appears.
X To activate/deactivate: pressaagain.
ESP ®
is deactivated if the åwarning lamp
in the instrument cluster lights up continu-
ously when the engine is running.
If the ÷ andå warning lamps light up
continuously, ESP ®
is not available due to a mal-
function.
Observe the information on warning lamps
(Y page 252).
Observe the information on display messages
(Y page 217).
Activating/deactivating Active Brake
Assist X
Press the =or; button on the steering
wheel to select the Assist. Assist.menu.
X Press the 9or: button to select
Brake Assist
Brake Assist. X
Press ato confirm.
The current selection appears.
X To activate/deactivate: pressaagain.
When Active Brake Assist is deactivated, the
æ symbol appears in the multifunction dis-
play in the assistance graphic display.
Further information on Active Brake Assist
(Y page 67).
Activating/deactivating ATTENTION
ASSIST X
Press the =or; button on the steering
wheel to select the Assist. Assist.menu.
X Press the 9or: button to select
Attention Assist
Attention Assist.
X Press ato confirm.
The current selection appears.
X Press ato confirm.
X Press the :or9 button to set Off
Off,
Standard
Standard orSensitive
Sensitive.
X Press the abutton to save the setting.
When ATTENTION ASSIST is deactivated, the
é symbol appears in the multifunction dis-
play in the assistance graphic display.
For further information about ATTENTION
ASSIST, see (Y page 189).
Activating/deactivating Blind Spot
Assist X
Press the =or; button on the steering
wheel to select the Assist. Assist.menu.
X Press the 9or: button to select
Blind Spot Assist
Blind Spot Assist.
X Press ato confirm.
The current selection appears.
X To activate/deactivate: pressaagain.
Further information about Blind Spot Assist
(Y page 192).
Activating/deactivating Lane Keeping
Assist X
Press the =or; button on the steering
wheel to select the Assist. Assist.menu.
X Press the 9or: button to select
Lane Keeping Assist
Lane Keeping Assist.
X Press ato confirm.
The current selection appears.
X Press aagain to confirm. Menus and submenus
209On-board computer and displays Z
Page 213 of 345

X
Press the :or9 button to set Off Off,
Standard Standard orAdaptive
Adaptive.
X Press the abutton to save the setting.
When Lane Keeping Assist is activated, the
multifunction display shows the lane mark-
ings as bright lines in the assistance graphic.
For further information about Lane Keeping
Assist, see (Y page 193). Service menu
Depending on the equipment fitted in the vehi-
cle, you have the following options in the Serv. Serv.
menu:
R Calling up display messages in the message
memory (Y page 216)
R Restarting the tyre pressure loss warning sys-
tem (Y page 315)
R Calling up the service due date
(Y page 285) Settings menu
Introduction Depending on the equipment fitted in the vehi-
cle, in the Settings Settings menu you have the follow-
ing options:
R Changing the instrument cluster settings
R Changing the light settings
R Changing the vehicle settings
R Changing the heating settings
R Changing the convenience settings
R Restoring the factory settings
Instrument cluster Selecting the unit of measurement for dis-
tance
The Display unit Speed-/odometer:
Display unit Speed-/odometer: func-
tion allows you to choose whether certain dis-
plays appear in kilometres or miles in the mul-
tifunction display.
X Press the =or; button on the steering
wheel to select the Settings
Settings menu.
X Press the :or9 button to select the
Instrument cluster
Instrument cluster submenu.
X Press ato confirm. X
Press the :or9 button to select the
Display unit Speed-/odometer Display unit Speed-/odometer function.
You will see the selected setting: km
kmormiles
miles.
X Press the abutton to save the setting.
The selected unit of measurement for distance
applies to the following:
R digital speedometer in the Trip Tripmenu
R total distance recorder and the trip meter
R trip computer
R current fuel consumption and approximate
range
R navigation instructions in the Navi Navimenu
R cruise control
R speed limiter
R Distance Pilot DISTRONIC
R ASSYST PLUS service interval display
Switching the additional speedometer
on/off United Kingdom: this function is unavailable.
If the additional speedometer is switched on,
the speed is shown in the status bar of the mul- tifunction display instead of the outside tem-
perature.
The speed display is inverse to your speedome-
ter.
X Press the =or; button on the steering
wheel to select the Settings Settingsmenu.
X Press the :or9 button to select the
Instrument cluster
Instrument cluster submenu.
X Press ato confirm.
X Press the :or9 button to select the
Dig. speedo [mph]
Dig. speedo [mph] function.
You will see the selected setting: on
onoroff
off.
X Press the abutton to save the setting.
Selecting permanent display
United Kingdom: this function is unavailable.
The Permanent display: Permanent display: function allows you
to choose whether the multifunction display
always shows the outside temperature or the
speed.
The speed display is inverse to your speedome-
ter.
X Press the =or; button on the steering
wheel to select the Settings Settingsmenu.
X Press the :or9 button to select the
Instrument cluster
Instrument cluster submenu.
X Press ato confirm. 210
Menus and submenusOn-board computer and displays
Page 214 of 345
![MERCEDES-BENZ CLA COUPE 2016 Owners Manual X
Press the :or9 button to select the
Permanent display:
Permanent display: function.
The current setting, outside temperature
outside temperature
or Dig. speedo [mph]:
Dig. speedo [mph]:, appears.
X](/manual-img/4/55479/w960_55479-213.png "MERCEDES-BENZ CLA COUPE 2016 Owners Manual X
Press the :or9 button to select the
Permanent display:
Permanent display: function.
The current setting, outside temperature
outside temperature
or Dig. speedo [mph]:
Dig. speedo [mph]:, appears.
X")
X
Press the :or9 button to select the
Permanent display:
Permanent display: function.
The current setting, outside temperature
outside temperature
or Dig. speedo [mph]:
Dig. speedo [mph]:, appears.
X Press the abutton to save the setting.
Lights Switching the daytime driving lights
on/off
The Daytime driving lights Daytime driving lights function can
only be switched on with the engine turned off.
X Press the =or; button on the steering
wheel to select the Settings
Settingsmenu.
X Press the :or9 button to select the
Lights
Lights submenu.
X Press ato confirm.
X Press the :or9 button to select the
Daytime driving lights
Daytime driving lights function.
If the Daytime Daytime driving drivinglights
lightsfunction has
been switched on, the cone of light and the
W symbol in the multifunction display are
shown in orange.
X Press the abutton to save the setting.
Further information on daytime driving lights
(Y page 107).
Vehicle Setting permanent SPEEDTRONIC
You can set the permanent limiter using the
Limit speed (winter tyres):
Limit speed (winter tyres): function.
X Press the =or; button on the steering
wheel to select the Settings Settingsmenu.
X Press the :or9 button to select the
Vehicle
Vehicle submenu.
X Press ato confirm.
X Press :or9 to select the Limit
Limit
speed (winter tyres):
speed (winter tyres): function.
You will see the current setting.
X Press ato confirm.
X Press the :or9 button to adjust the
permanent speed limiter in increments of ten
(160 km/h 160 km/h to240 km/h
240 km/h). The Off
Offsetting
switches the permanent speed limiter off.
X Press the abutton to store the entry.
Further information on the permanent speed
limiter (Y page 166). Activating/deactivating the automatic
locking feature
X Press the =or; button on the steering
wheel to select the Settings
Settings menu.
X Press the :or9 button to select the
Vehicle Vehicle submenu.
X Press ato confirm.
X Press the :or9 button to select the
Automatic door locks
Automatic door locks function.
If the Automatic door locks
Automatic door locks function is
switched on, the multifunction display shows
the doors in orange.
X Press the abutton to save the setting.
If you activate the Automatic door locks
Automatic door locks
function, the vehicle is centrally locked above a
speed of around 15 km/h.
For further information on the automatic locking feature; see (Y page 85).
Activating/deactivating the acoustic
locking confirmation
If you switch on the Acoustic AcousticLock Lockfunction, an
acoustic signal sounds when you lock the vehi-
cle.
X Press the =or; button on the steering
wheel to select the Settings Settingsmenu.
X Press the :or9 button to select the
Vehicle
Vehicle submenu.
X Press ato confirm.
X Press the :or9 button to select the
Acoustic Lock
Acoustic Lock function.
If the Acoustic Lock
Acoustic Lock function is activated,
the & symbol in the multifunction display
lights up orange.
X Press the abutton to save the setting.
Heating Auxiliary heating departure time
G
DANGER
If the exhaust pipe is blocked or sufficient
ventilation is not possible, toxic exhaust
fumes can enter the vehicle, especially car-
bon monoxide. This is the case, e.g. in
enclosed spaces, or if the vehicle is stuck in
snow. There is a risk of fatal injuries.
You should switch off the auxiliary heating in
enclosed spaces which do not have an extrac- Menus and submenus
211On-board computer and displays
Z
Page 215 of 345

tion system, e.g. a garage. If the vehicle is
stuck in snow and you must leave the auxiliary heating running, keep the exhaust pipe and
the area around the vehicle clear of snow. To guarantee a sufficient supply of fresh air, open
a window on the side of the vehicle away from
the wind. G
WARNING
When the auxiliary heating is switched on,
parts of the vehicle can become very hot.
Flammable materials such as leaves, grass or twigs may ignite if they come into contact
with:
R hot parts of the exhaust system
R the exhaust gas itself
There is a risk of fire.
When the auxiliary heating is switched on,
make sure that:
R no flammable materials come into contact
with hot vehicle components
R the exhaust gas can escape from the
exhaust pipe unhindered
R the exhaust gas does not come into contact
with flammable materials.
! Operating the auxiliary heating/ventilation
draws on the vehicle battery. After you have
heated or ventilated the vehicle a maximum of two times, drive for a longer distance.
Only vehicles with auxiliary heating have this
function.
In the Heating
Heating submenu, you can select a
stored departure time or change a departure
time.
The auxiliary heating timer function calculates
the switch-on time according to the outside
temperature so that the vehicle is preheated by the departure time. When the departure time isreached, the auxiliary heating continues to heat
for a further five minutes and then switches off. The auxiliary heating adopts the set air condi-
tioning or THERMOTRONIC temperature set-
ting.
You can switch off the auxiliary heating by using
the remote control or the auxiliary heating but-
ton on the centre console. i
Switch the auxiliary heating on regularly
once a month for about ten minutes.
Further information on auxiliary heating
(Y page 126).
Selecting the departure time or deactivat- ing a selected departure time
X Press the =or; button on the steering
wheel to select the Settings
Settings menu.
X Press the :or9 button to select the
Heating Heating submenu.
X Press ato confirm.
The current setting appears.
X Press aagain.
X Press the :or9 button to select one
of the three departure times or Timer
Timeroff
off(no
timer active).
X Press ato confirm.
If a departure time is selected, the yellow
indicator lamp lights up on the auxiliary heat-
ing button.
Changing the departure time
X Press the =or; button on the steering
wheel to select the Settings
Settingsmenu.
X Press the :or9 button to select the
Heating
Heating submenu.
X Press ato confirm.
The current setting appears.
X Press the :or9 button to select
Change A
Change A, Change B
Change BorChange C
Change C.
X Press ato confirm.
You can now change the departure time.
X Press the =or; button to select the
display to be changed: hours, minutes.
X Press the :or9 button to set the
selected display.
X Press the abutton to store the entry.
The yellow indicator lamp on the auxiliary
heating button lights up.
Comfort Switching belt adjustment on/off
X Press the =or; button on the steering
wheel to select the Settings Settingsmenu.
X Press the :or9 button to select the
Convenience
Convenience submenu.
X Press ato confirm. 212
Menus and submenusOn-board computer and displays
Page 216 of 345

X
Press the :or9 button to select the
Belt adjustment
Belt adjustment function.
When the Belt adjustment
Belt adjustment function is acti-
vated, the seat belt is displayed in orange in
the multifunction display.
X Press the abutton to save the setting.
For further information on belt adjustment, see
(Y page 43).
Switching the fold mirrors in when lock-
ing function on/off This function is only available when the vehicle is
equipped with the electrical fold-in function.
When you activate the Auto. fold-in mir‐ Auto. fold-in mir‐
rors
rors function, the exterior mirrors are folded in
when the vehicle is locked. When you unlock the vehicle and then open the driver's or front-
passenger door, the exterior mirrors fold out
again.
If you have switched on the Auto. fold-in Auto. fold-in
mirrors
mirrors function and you fold in the exterior
mirrors using the button on the door
(Y page 104), they will not fold out automati-
cally. The exterior mirrors can then only be fol-
ded out using the button on the door.
X Press the =or; button on the steering
wheel to select the Settings
Settings menu.
X Press the :or9 button to select the
Convenience
Convenience submenu.
X Press ato confirm.
X Press the :or9 button to select the
Auto. fold-in mirrors
Auto. fold-in mirrors function.
If the Auto. fold-in mirrors Auto. fold-in mirrors function is
switched on, the multifunction display shows the exterior mirror in orange.
X Press the abutton to save the setting.
Resetting to factory settings X
Press the =or; button on the steering
wheel to select the Settings
Settings menu.
X Press the :or9 button to select the
Factory setting
Factory setting submenu.
X Press ato confirm.
The Reset all settings?
Reset all settings? function
appears. X
Press the :or9 button to select No
No or
Yes
Yes.
X Press the abutton to confirm the selec-
tion.
If you have selected Yes Yes, the multifunction
display shows a confirmation message.
For safety reasons, not all functions are reset:
the Limit Limit speed
speed(winter
(winter tyres)
tyres)function of
the permanent speed limiter can only be set in
the Vehicle
Vehicle submenu. AMG menu (Mercedes-AMG vehicles)
Warm-up :
Digital speedometer
; Gear indicator
= Upshift indicator
? Engine oil temperature
A Coolant temperature
B Transmission oil temperature
X Press the =or; button on the steering
wheel to select the AMG AMGmenu.
Upshift indicator: upshift indicatorUP
UP=
indicates that the engine has reached the
overrevving range when in the manual drive
program.
Engine and transmission oil temperature:
when the engine and transmission are at nor- mal operating temperature, oil tempera-
ture ?and Bare displayed in white in the
multifunction display.
If the multifunction display shows oil temper-
ature ?orB in blue, the engine or the
transmission are not yet at normal operating
temperature. Avoid using the full output of the engine during this time. Menus and submenus
213On-board computer and displays Z
 1
1 2
2 3
3 4
4 5
5 6
6 7
7 8
8 9
9 10
10 11
11 12
12 13
13 14
14 15
15 16
16 17
17 18
18 19
19 20
20 21
21 22
22 23
23 24
24 25
25 26
26 27
27 28
28 29
29 30
30 31
31 32
32 33
33 34
34 35
35 36
36 37
37 38
38 39
39 40
40 41
41 42
42 43
43 44
44 45
45 46
46 47
47 48
48 49
49 50
50 51
51 52
52 53
53 54
54 55
55 56
56 57
57 58
58 59
59 60
60 61
61 62
62 63
63 64
64 65
65 66
66 67
67 68
68 69
69 70
70 71
71 72
72 73
73 74
74 75
75 76
76 77
77 78
78 79
79 80
80 81
81 82
82 83
83 84
84 85
85 86
86 87
87 88
88 89
89 90
90 91
91 92
92 93
93 94
94 95
95 96
96 97
97 98
98 99
99 100
100 101
101 102
102 103
103 104
104 105
105 106
106 107
107 108
108 109
109 110
110 111
111 112
112 113
113 114
114 115
115 116
116 117
117 118
118 119
119 120
120 121
121 122
122 123
123 124
124 125
125 126
126 127
127 128
128 129
129 130
130 131
131 132
132 133
133 134
134 135
135 136
136 137
137 138
138 139
139 140
140 141
141 142
142 143
143 144
144 145
145 146
146 147
147 148
148 149
149 150
150 151
151 152
152 153
153 154
154 155
155 156
156 157
157 158
158 159
159 160
160 161
161 162
162 163
163 164
164 165
165 166
166 167
167 168
168 169
169 170
170 171
171 172
172 173
173 174
174 175
175 176
176 177
177 178
178 179
179 180
180 181
181 182
182 183
183 184
184 185
185 186
186 187
187 188
188 189
189 190
190 191
191 192
192 193
193 194
194 195
195 196
196 197
197 198
198 199
199 200
200 201
201 202
202 203
203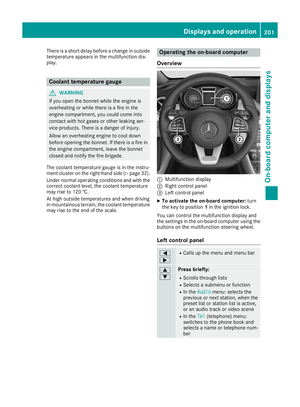 204
204 205
205 206
206 207
207 208
208 209
209 210
210 211
211 212
212 213
213 214
214 215
215 216
216 217
217 218
218 219
219 220
220 221
221 222
222 223
223 224
224 225
225 226
226 227
227 228
228 229
229 230
230 231
231 232
232 233
233 234
234 235
235 236
236 237
237 238
238 239
239 240
240 241
241 242
242 243
243 244
244 245
245 246
246 247
247 248
248 249
249 250
250 251
251 252
252 253
253 254
254 255
255 256
256 257
257 258
258 259
259 260
260 261
261 262
262 263
263 264
264 265
265 266
266 267
267 268
268 269
269 270
270 271
271 272
272 273
273 274
274 275
275 276
276 277
277 278
278 279
279 280
280 281
281 282
282 283
283 284
284 285
285 286
286 287
287 288
288 289
289 290
290 291
291 292
292 293
293 294
294 295
295 296
296 297
297 298
298 299
299 300
300 301
301 302
302 303
303 304
304 305
305 306
306 307
307 308
308 309
309 310
310 311
311 312
312 313
313 314
314 315
315 316
316 317
317 318
318 319
319 320
320 321
321 322
322 323
323 324
324 325
325 326
326 327
327 328
328 329
329 330
330 331
331 332
332 333
333 334
334 335
335 336
336 337
337 338
338 339
339 340
340 341
341 342
342 343
343 344
344