Page 321 of 544

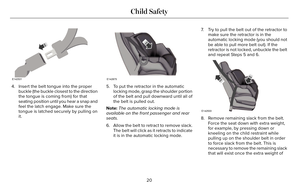
1. Remove the valve cap from the tire valve.
2. Unhook the black hose from the side ofthe compressor and fasten firmly on the
valve stem by turning clockwise.
3. Push and turn the dial clockwise to the air position. Turn on the kit by pressing
the on button.
E144622
4. Adjust the tire to the recommendedinflation pressure from the tire label
located on the driver door or door jamb
area. The tire pressure has to be checked
with the compressor in the OFF position
to get the correct tire pressure reading.
5. Turn the compressor off by pressing the on/off button. 6. When the tire pressure reading with the
compressor in the off position is correct,
disconnect the hose, re-install the valve
cap on the tire valve, unplug the
compressor, and return the kit to the
stowage area.
What to do after the Tire has been
Sealed
After using the kit to seal your tire, you will
need to replace the sealant canister and
clear tube (hose). You can obtain and replace
sealing compound and spare parts at an
authorized Ford dealer or tire dealer. Empty
sealant bottles may be disposed of at home.
However, liquid residue from the sealing
compound should be disposed by your local
Ford Motor Company dealer or tire dealer,
or in accordance with local waste disposal
regulations.
Note: After the sealing compound has been
used, the maximum vehicle speed is 50 mph
(80 km/h) and the maximum driving distance
is 120 mi (200 km). The sealed tire should
be inspected immediately. Note:
After sealant use, the tire pressure
monitoring system sensor and valve stem
on the wheel must be replaced by an
authorized Ford dealer.
You can check the tire pressure any time
within the 120 mi (200 km) by performing the
procedure from Second stage: Checking tire
pressure listed previously.
Removal of the sealant canister from the
kit
E144623
1. Unwrap the clear tube from the compressor housing.
318
Wheels and Tires
Page 322 of 544
E144624
2. Locate the yellow cap at the end of theclear tube.
E144625
3. Using the yellow cap tool, press the tablocated on the kit compressor housing
while pulling up on the sealant canister. Installation of the sealant canister to the
kit
E144626
1. Align the sealant canister with the kit
housing.
E161567
2. Once aligned, seat the sealant canisterby lightly pushing down until you hear an
audible click.
E144628
3. Wrap the clear tube around thecompressor housing.
Note: If you experience any difficulties with
the removal or installation of the sealant
canister, consult your Ford Motor Company
authorized dealer for assistance.
319
Wheels and Tires
Page 323 of 544
E144629
Be sure to check the sealant compound's
use by date regularly. The use by date is on
the lower right hand corner of the label
located on the sealant canister (bottle). The
sealant canister should be replaced after four
years of non-use.
Type 2
Note:The temporary mobility kit contains
enough sealant compound in the canister
for one tire repair only. See your authorized
Ford dealer for replacement sealant
canisters. The kit is located under the load floor in the
trunk. The kit consists of an air compressor
to re-inflate the tire and a canister of sealing
compound that will effectively seal most
punctures caused by nails or similar objects.
This kit will provide a temporary tire repair
allowing you to drive your vehicle up to 120
(200 km) at a maximum speed of 50 mph
(80 km/h) to reach a tire service location.
E175977
Air compressor (inside)
A
Selector switch
B
On and off button
C
320
Wheels and Tires
Page 324 of 544

Air pressure gauge
D
Sealant bottle and canister
E
Dual purpose hose: air and repair
F
Tire valve connector
G
Accessory power plug
H
Casing/housing
I
Bike/raft/sports ball adapters
J
General Information
WARNING
Failure to follow these guidelines could
result in an increased risk of loss of
vehicle control, injury or death.
Note: Do not use the kit if a tire has become
severely damaged. Only punctures located
within the tire tread can be sealed with the
kit.
Do not attempt to repair punctures larger
than ¼ inch (6 millimeters) or damage to the
tire's sidewall. The tire may not completely
seal. Loss of air pressure may adversely affect tire
performance. For this reason:
Note:
Do not drive the vehicle above 50 mph
(80 km/h).
Note: Do not drive further than 120 mi
(200 km). Drive only to the closest authorized
Ford dealer or tire repair shop to have your
tire inspected.
• Drive carefully and avoid abrupt steering maneuvers.
• Periodically monitor tire inflation pressure in the affected tire; if the tire is losing
pressure, have the vehicle towed.
• Read the information in the Tips for Use of the Kit section to make sure safe
operation of the kit and your vehicle.Tips for Use of the Kit
To ensure safe operation of the kit:
• Read all instructions and cautions fully.
• Before operating the kit, make sure yourvehicle is safely off the road and away
from moving traffic. Turn on the hazard
lights. • Always set the parking brake to ensure
the vehicle doesn't move unexpectedly.
• Do not remove any foreign objects, such as nails or screws, from the tire.
• When using the kit, leave the engine running (only if the vehicle is outdoors or
in a well-ventilated area) so the
compressor does not drain the vehicle's
battery.
• Do not allow the compressor to operate continuously for more than 15 minutes.
This will help prevent the compressor
from overheating.
• Never leave the kit unattended during operation.
• Sealant compound contains latex. Those with latex sensitivities should use
appropriate precautions to avoid an
allergic reaction.
• Keep the kit away from children.
• Only use the kit when the ambient temperature is between -22°F (-30°C) and
158°F (70°C).
321
Wheels and Tires
Page 325 of 544

• Only use the sealing compound beforethe use-by date. The use-by date is on a
label on the sealant canister and can be
seen through the rectangular viewing
window on the bottom of the compressor.
Check the use-by date regularly and
replace the canister after four years of
non-use.
• Do not store the kit unsecured inside the passenger compartment of the vehicle
as it may cause injury during a sudden
stop or crash. Always store the kit in its
original location.
• After sealant use, the tire pressure monitoring system sensor and valve stem
on the wheel must be replaced by an
authorized Ford dealer.
• Operating the kit could cause an electrical disturbance in radio, CD, and
DVD player operation.
E175978
* When inflation only is required for
a tire or other objects, the selector
must be in the Air position.
What to do when a Tire Is Punctured
A tire puncture within the tire's tread area
can be repaired in two stages with the kit.
• In the first stage, the tire will be reinflatedwith a sealing compound and air. After
the tire has been inflated, you will need
to drive the vehicle a short distance
(about 4 miles [6 kilometers]) to distribute
the sealant in the tire.
• In the second stage, you will need to check the tire pressure and adjust, if
necessary, to the vehicle's specified tire
inflation pressure.
First Stage: Reinflating the Tire with
Sealing Compound and Air
WARNINGS
Do not stand directly over the kit while
inflating the tire. If you notice any
unusual bulges or deformations in the tire's
sidewall during inflation, stop and call
roadside assistance.
If the tire does not inflate to the
recommended tire pressure within 15
minutes, stop and call roadside assistance.
WARNINGS
Do not run the engine during kit
operation unless the vehicle is
outdoors or in a well-ventilated area.
Preparation: Park the vehicle in a safe, level
and secure area, away from moving traffic.
Turn the hazard lights on. Apply the parking
brake and turn the engine off. Inspect the
flat tire for visible damage.
Sealant compound contains latex. Use
appropriate precautions to avoid any allergic
reactions.
Do not remove any foreign object that has
pierced the tire. If a puncture is located in
the tire sidewall, stop and call roadside
assistance.
1. Remove the valve cap from the tire valve.
2. Unwrap the dual purpose hose (black tube) from the back of the compressor
housing.
3. Fasten the hose to the tire valve by turning the connector clockwise. Tighten
the connection securely.
322
Wheels and Tires
Page 326 of 544
E175979
4. Plug the power cable into the 12-voltpower point in the vehicle. 5. Remove the warning sticker found on the
casing/housing and place it on the top of
the instrument panel or the center of the
dash.
6. Start the vehicle leave the engine running so the compressor does not drain the
vehicle’s battery.
E175981
7. Turn dial (A) clockwise to the sealantposition. Turn the kit on by pressing the
on/off button (B).
323
Wheels and Tires
Page 327 of 544

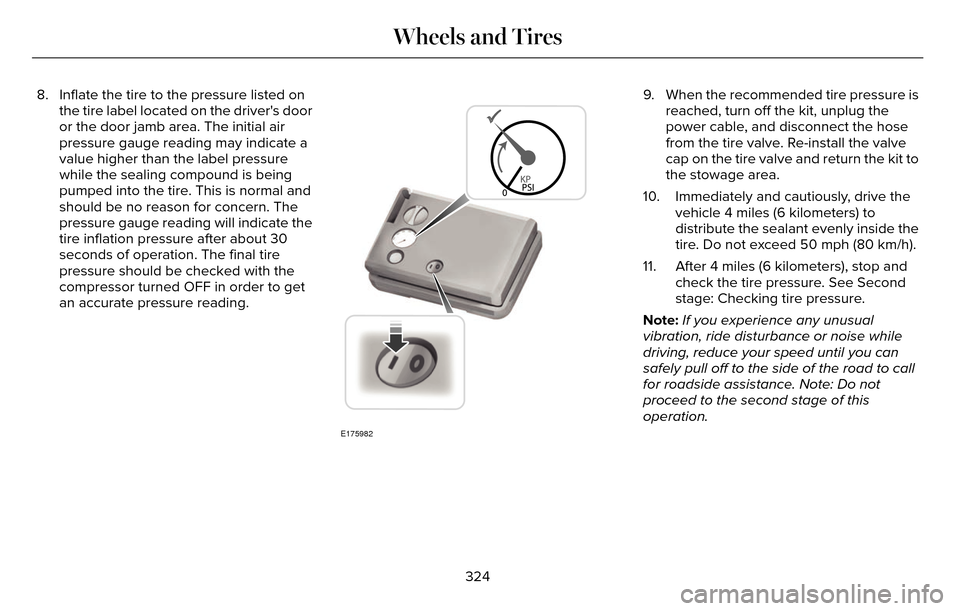
8. Inflate the tire to the pressure listed onthe tire label located on the driver's door
or the door jamb area. The initial air
pressure gauge reading may indicate a
value higher than the label pressure
while the sealing compound is being
pumped into the tire. This is normal and
should be no reason for concern. The
pressure gauge reading will indicate the
tire inflation pressure after about 30
seconds of operation. The final tire
pressure should be checked with the
compressor turned OFF in order to get
an accurate pressure reading.
E175982
9. When the recommended tire pressure isreached, turn off the kit, unplug the
power cable, and disconnect the hose
from the tire valve. Re-install the valve
cap on the tire valve and return the kit to
the stowage area.
10. Immediately and cautiously, drive the vehicle 4 miles (6 kilometers) to
distribute the sealant evenly inside the
tire. Do not exceed 50 mph (80 km/h).
11. After 4 miles (6 kilometers), stop and check the tire pressure. See Second
stage: Checking tire pressure.
Note: If you experience any unusual
vibration, ride disturbance or noise while
driving, reduce your speed until you can
safely pull off to the side of the road to call
for roadside assistance. Note: Do not
proceed to the second stage of this
operation.
324
Wheels and Tires
Page 328 of 544

Second Stage: Checking Tire Pressure
WARNINGS
If you are proceeding from the First
Stage: Re-inflating the Tire with Sealing
Compound and Air section and have injected
sealant in the tire and the pressure is below
20 psi (1.4 bar), continue to the next step.
The power plug may get hot after use
and should be handled carefully while
unplugging.
Check the air pressure of your tires as
follows:
E175983
1. Remove the valve cap from the tire valve. 2. Firmly screw the air compressor hose
onto the valve stem by turning clockwise.
3. Push and turn the dial clockwise to the air position.
4. If required, turn on the compressor and adjust the tire to the recommended
inflation pressure shown on the tire label
located on the driver's door or door jamb
area. The tire pressure should be
checked with the compressor turned OFF
in order to get an accurate pressure
reading.
5. Unplug the hoses, re-install the valve cap on the tire and return the kit to the
stowage area.
What to do after the Tire has been
Sealed
After using the kit to seal your tire, you will
need to replace the sealant canister. Sealant
canisters and spare parts can be obtained
at an authorized Ford dealer. Empty sealant
canisters may be disposed of at home.
However, canisters still containing liquid
sealant should be disposed of by your local
authorized Ford dealer or tire dealer, or in
accordance with local waste disposal
regulation.
Note: After the sealing compound has been
used, the maximum vehicle speed is 50 mph
(80 km/h) and the maximum driving distance
is 120 mi (200 km). The sealed tire should
be inspected immediately.
You can check the tire pressure any time
within the 120 mi (200 km) by performing the
steps listed previously in the Second stage:
Checking Tire Pressure procedure.
325
Wheels and Tires