Page 385 of 504

5-72
Driving your vehicle
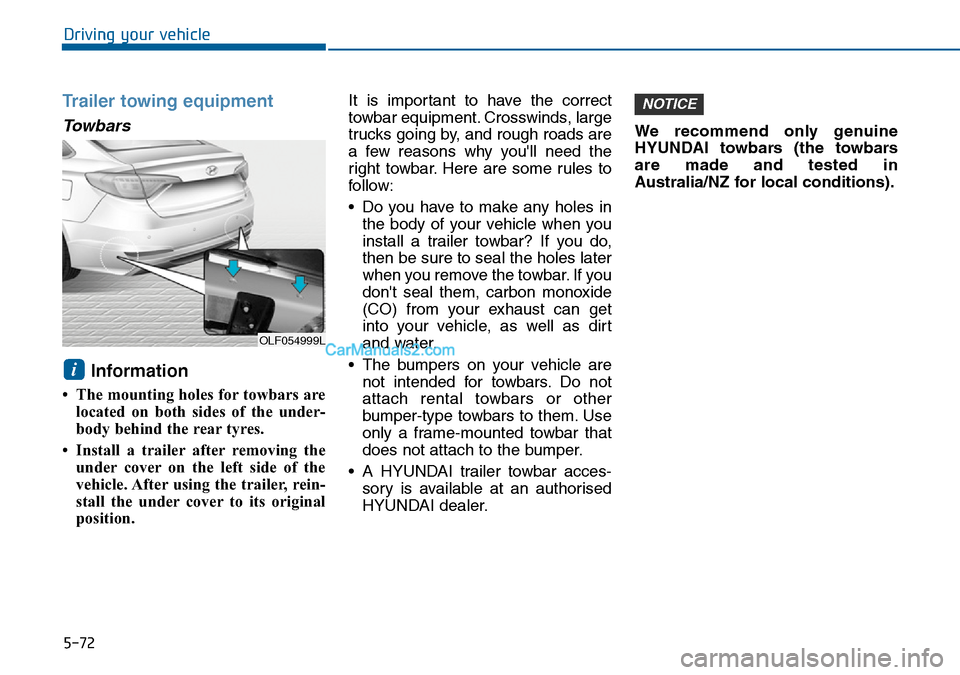
Trailer towing equipment
Towbars
Information
• The mounting holes for towbars are
located on both sides of the under-
body behind the rear tyres.
• Install a trailer after removing the
under cover on the left side of the
vehicle. After using the trailer, rein-
stall the under cover to its original
position.It is important to have the correct
towbar equipment. Crosswinds, large
trucks going by, and rough roads are
a few reasons why you'll need the
right towbar. Here are some rules to
follow:
• Do you have to make any holes in
the body of your vehicle when you
install a trailer towbar? If you do,
then be sure to seal the holes later
when you remove the towbar. If you
don't seal them, carbon monoxide
(CO) from your exhaust can get
into your vehicle, as well as dirt
and water.
• The bumpers on your vehicle are
not intended for towbars. Do not
attach rental towbars or other
bumper-type towbars to them. Use
only a frame-mounted towbar that
does not attach to the bumper.
• A HYUNDAI trailer towbar acces-
sory is available at an authorised
HYUNDAI dealer.We recommend only genuine
HYUNDAI towbars (the towbars
are made and tested in
Australia/NZ for local conditions).
NOTICE
i
OLF054999L
Page 386 of 504

5-73
Driving your vehicle
5
Safety chains
You should always attach chains
between your vehicle and your trail-
er. Cross the safety chains under the
tongue of the trailer so that the
tongue will not drop to the road if it
becomes separated from the towbar.
Instructions about safety chains may
be provided by the towbar manufac-
turer or trailer manufacturer. Follow
the manufacturer's recommendation
for attaching safety chains. Always
leave just enough slack so you can
turn with your trailer. And, never
allow safety chains to drag on the
ground.
Trailer brakes
If your trailer is equipped with a brak-
ing system, make sure it conforms to
your country's regulations and that it
is properly installed and operating
correctly.
If your trailer weighs more than the
maximum trailer weight without trail-
er brakes loaded, then it needs its
own brakes and they must be ade-
quate. Be sure to read and follow the
instructions for the trailer brakes so
you'll be able to install, adjust and
maintain them properly. Be sure not
to tap into your vehicle's brake sys-
tem.
Driving with a trailer
Towing a trailer requires a certain
amount of experience. Before setting
out for the open road, you must get
to know your trailer. Acquaint your-
self with the feel of handling and
braking with the added weight of the
trailer. And always keep in mind that
the vehicle you are driving is now
longer and not nearly as responsive
as your vehicle is by itself.
Before you start, check the trailer
towbar and platform, safety chains,
electrical connector(s), lights, tyres
and brakes.
During your trip, occasionally check
to be sure that the load is secure,
and that the lights and trailer brakes
are still working.
Do not use a trailer with its own
brakes unless you are absolute-
ly certain that you have proper-
ly set up the brake system. This
is not a task for amateurs. Use
an experienced, competent
trailer shop for this work.
WARNING
Page 387 of 504

5-74
Driving your vehicle
Distance
Stay at least twice as far behind the
vehicle ahead as you would when
driving your vehicle without a trailer.
This can help you avoid situations
that require heavy braking and sud-
den turns.
Passing
You will need more passing distance
up ahead when you're towing a trail-
er. And, because of the increased
vehicle length, you'll need to go
much farther beyond the passed
vehicle before you can return to your
lane.
Reversing
Hold the bottom of the steering
wheel with one hand. Then, to move
the trailer to the left, move your hand
to the left. To move the trailer to the
right, move your hand to the right.
Always reverse slowly and, if possi-
ble, have someone guide you.
Making turns
When you are turning with a trailer,
make wider turns than normal. Do
this so your trailer won't strike soft
shoulders, kerbs, road signs, trees,
or other objects. Avoid jerky or sud-
den manoeuvres. Signal well in
advance.
Turn signals
When you tow a trailer, your vehicle
has to have a different turn signal
flasher and extra wiring. The green
arrows on your instrument cluster will
flash whenever you signal a turn or
lane change. Properly connected,
the trailer lights will also flash to alert
other drivers you're about to turn,
change lanes, or stop.
When towing a trailer, the green
arrows on your instrument cluster will
flash for turns even if the bulbs on
the trailer are burned out. Thus, you
may think drivers behind you are
seeing your signals when, in fact,
they are not. It's important to check
occasionally to be sure the trailer
bulbs are still working. You must also
check the lights every time you dis-
connect and then reconnect the
wires.
Page 388 of 504

5-75
Driving your vehicle
5
Driving on hills
Reduce speed and shift to a lower
gear before you start down a long or
steep downgrade. If you don't shift
down, you might have to use your
brakes so much that they would get
overheated and may not operate effi-
ciently.
On a long uphill grade, shift down
and reduce your speed to around 70
km/h to reduce the possibility of
engine and transaxle overheating.
If your trailer weighs more than the
maximum trailer weight without trail-
er brakes and you have an automat-
ic transaxle, you should drive in D
(Drive) when towing a trailer.
Operating your vehicle in D (Drive)
when towing a trailer will minimise
heat build-up and extend the life of
your transaxle.To prevent engine and/or
transaxle overheating:
• When towing a trailer on steep
grades (in excess of 6%) pay
close attention to the engine
coolant temperature gauge to
ensure the engine does not
overheat. If the needle of the
coolant temperature gauge
moves towards "H" (HOT), pull
over and stop as soon as it is
safe to do so, and allow the
engine to idle until it cools
down. You may proceed once the
engine has cooled sufficiently.
• You must decide your vehicle
speed according to the trailer
weight and uphill grade.
NOTICE
Do not connect a trailer lighting
system directly to your vehi-
cle's lighting system. Use an
approved trailer wiring harness.
Failure to do so could result in
damage to the vehicle electrical
system and/or personal injury.
Consult an authorised
HYUNDAI dealer for assistance.
WARNING
Page 389 of 504

5-76
Driving your vehicle
Parking on hills
Generally, if you have a trailer
attached to your vehicle, you should
not park your vehicle on a hill.However, if you ever have to park
your trailer on a hill, here's how to do
it:
1.Pull the vehicle into the parking
space.
Turn the steering wheel in the
direction of the kerb.
2.Shift the vehicle to P (Park, for
automatic transaxle vehicle) or
neutral (for manual transaxle vehi-
cle).
3.Set the parking brake and turn off
the vehicle.
4.Place wheel chocks under the trail-
er wheels on the down hill side of
the wheels.
5.Start the vehicle, hold the brakes,
shift to neutral, release the parking
brake and slowly release the
brakes until the trailer chocks
absorb the load.
6.Reapply the brakes and parking
brakes.7.Move the shift lever to P (Park, for
automatic transaxle vehicle) or 1st
gear when the vehicle is parked on
a uphill grade and in R (Reverse)
on a downhill (for manual transaxle
vehicle).
8.Turn off the vehicle and release the
vehicle brakes but leave the park-
ing brake set.
To prevent serious or fatal
injury:
Do not get out of the vehicle
without the parking brake firmly
set. If you have left the engine
running, the vehicle can move
suddenly. You and others could
be seriously or fatally injured.
WARNING
Page 390 of 504

5-77
Driving your vehicle
5
Ready to leave after parking on
a hill
1.With the shift lever to P (Park, for
automatic transaxle vehicle) or
neutral (for manual transaxle vehi-
cle), apply your brakes and hold
the brake pedal down whilst you:
• Start your engine;
• Shift into gear; and
• Release the parking brake.
2.Slowly remove your foot from the
brake pedal.
3.Drive slowly until the trailer is clear
of the chocks.
4.Stop and have someone pick up
and store the chocks.
Maintenance when towing a
trailer
Your vehicle will need service more
often when you regularly pull a trail-
er. Important items to pay particular
attention to include engine oil, auto-
matic transaxle fluid, axle lubricant
and cooling system fluid. Brake con-
dition is another important item to
frequently check. If you are planning
a trip with a trailer, it's a good idea to
review these items before you start
your trip. Don't forget to also maintain
your trailer and towbar. Follow the
maintenance schedule that accom-
panied your trailer and check it peri-
odically. Preferably, conduct the
check at the start of each day's driv-
ing. Most importantly, all towbar nuts
and bolts should be tight.To prevent vehicle damage:
• Due to higher load during trailer
usage, overheating might occur
on hot days or during uphill driv-
ing. If the coolant gauge indi-
cates over-heating, switch off
the air conditioner and stop the
vehicle in a safe area to cool
down the engine.
• When towing check automatic
transaxle fluid more frequently.
NOTICE
Page 391 of 504

5-78
Driving your vehicle
Two labels on your driver's door sill
show how much weight your vehicle
was designed to carry: the Tyre and
Loading Information Label and the
Certification Label.
Before loading your vehicle, famil-
iarise yourself with the following
terms for determining your vehicle's
weight ratings, from the vehicle's
specifications and the Certification
Label:
Base Kerb Weight
This is the weight of the vehicle
including a full tank of fuel and all
standard equipment. It does not
include passengers, cargo, or option-
al equipment.
Vehicle Kerb Weight
This is the weight of your new vehicle
when you picked it up from your deal-
er plus any aftermarket equipment.
Cargo Weight
This figure includes all weight added
to the Base Kerb Weight, including
cargo and optional equipment.GAW (Gross Axle Weight)
This is the total weight placed on
each axle (front and rear) - including
vehicle kerb weight and all payload.
GAWR (Gross Axle Weight Rating)
This is the maximum allowable
weight that can be carried by a single
axle (front or rear). These numbers
are shown on the Certification Label.
The total load on each axle must
never exceed its GAWR.
GVW (Gross Vehicle Weight)
This is the Base Kerb Weight plus
actual Cargo Weight plus passen-
gers.
GVWR (Gross Vehicle Weight
Rating)
This is the maximum allowable
weight of the fully loaded vehicle
(including all options, equipment,
passengers and cargo). The GVWR
is shown on the Certification Label
located on the driver's door sill.
Overloading
VEHICLE WEIGHT
The Gross Axle Weight Rating
(GAWR) and the Gross Vehicle
Weight Rating (GVWR) for your
vehicle are on the Certification
Label attached to the driver's
(or front passenger's) door.
Exceeding these ratings can
cause an accident or vehicle
damage. You can calculate the
weight of your load by weighing
the items (and people) before
putting them in the vehicle. Be
careful not to overload your
vehicle.
WARNING
Page 392 of 504

What to do in an emergency
Hazard warning flasher ........................................6-2
In case of an emergency whilst driving .............6-3
If the engine stalls whilst driving ..................................6-3
If the engine stalls at a crossroad or crossing .........6-3
If you have a flat tyre whilst driving ...........................6-3
If the engine will not start ...................................6-4
If the engine doesn't turn over or turns over
slowly....................................................................................6-4
If the engine turns over normally but doesn't
start.......................................................................................6-4
Jump starting ..........................................................6-5
If the engine overheats ........................................6-8
If you have a flat tyre ........................................6-10
Jack and tools ..................................................................6-10
Changing tyres .................................................................6-11
Towing ...................................................................6-17
Towing service .................................................................6-17
Removable towing hook ................................................6-18
Emergency towing ..........................................................6-19
6