Page 49 of 82

90 || 91
DRIVING
DRIVING
DRIVING
Learn about preparation for driving, as well as other features.
Before Driving
Check the following items before you begin driving.
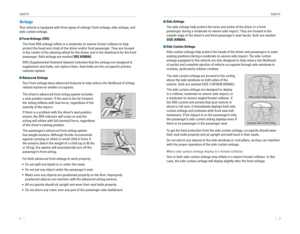
Exterior Checks
• Make sure there are no obstructions on the windows, door mirrors, exterior
lights, or other parts of the vehicle.
•
remove any frost, snow, or ice.
• Make sure the hood is securely closed.
• Heat from the engine and exhaust can ignite flammable materials left u\
nder
the hood, causing a fire. If you’ve parked your vehicle for an exte\
nded period,
inspect and remove any debris that may have collected, such as dried grass
and leaves that have fallen or have been carried in for use as a nest by\
a small
animal. Also check under the hood for leftover flammable materials aft\
er you or
someone else has performed maintenance on your vehicle.
• Make sure the tires are in good condition.
• Make sure there are no people or objects behind or around the vehicle.
Interior Checks
• Store or secure all items on board properly.
• Do not pile items in the cargo area higher than the seatback height.
• Do not place anything in the front seat footwells. Make sure to secure t\
he floor
mats.
• If you have any animals on board, do not let them move freely around in \
the
vehicle.
• Securely close and lock all doors and the trunk.
• Adjust your seating position, mirrors, and steering wheel properly.
• Make sure items placed on the floor behind the front seats cannot roll\
under the
seats.
•
everyone in the vehicle must fasten their seat belt.
• Make sure that the indicators in the instrument panel come on when you s\
tart
the vehicle, and go off soon after.
If the doors are frozen shut, use warm water around the door edges to me\
lt any
ice. Do not try to force them open, as this can damage the rubber trim a\
round the
doors. When done, wipe dry to avoid further freezing.
NOTICE In addition:
• During the first 600 miles (1,000 km) of operation, avoid sudden acc\
eleration or
full throttle operation so as not to damage the engine or powertrain.
• Avoid hard braking for the first 200 miles (300 km). You should also follow this
when the brake pads are replaced.
Improper accessories or modifications can affect your vehicle’s handling,
stability, and performance, and cause a crash in which you can be seriously
hurt or killed.
Follow all instructions in the vehicle owner’s manual regarding accessories
and modifications.
WARNING
Page 50 of 82

92 || 93
DRIVING
DRIVING
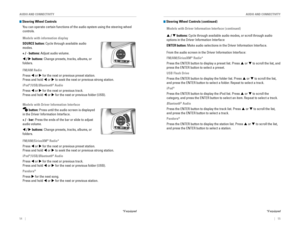
Maximum Load Limit
Carrying too much cargo or improperly storing it can affect your vehicle\
’s handling,
stability, stopping distance, and tires, and make it unsafe.
The maximum load for your vehicle is 850 lbs (385 kg). See the Tire and Loading
Information label on the driver’s doorjamb.
This figure includes the total weight of all occupants, cargo, and
accessories, and the tongue load if you are towing a trailer. Below are the
steps for determining the correct load limit:
1. Locate the statement “The combined weight of occupants and cargo
should never exceed XXX kg or XXX lbs.” on your vehicle’s placard.
2. Determine the combined weight of the driver and passengers that will be \
riding in your vehicle.
3. Subtract the combined weight of the driver and passengers from XXX kg
or XXX lbs.
4. The resulting figure equals the available amount of cargo and luggage \
load capacity. For example, if the “XXX” amount equals 1,400 lbs. and
there will be five 150 lb. passengers in your vehicle, the amount of
available cargo and luggage load capacity is 650 lbs. (1,400 - 750 (5 \
x 150)
= 650 lbs.)
5. Determine the combined weight of luggage and cargo being loaded on
the vehicle. That weight may not safely exceed the available cargo and
luggage load capacity calculated in step 4.
6. If your vehicle will be towing a trailer, load from your trailer will be
transferred to your vehicle. Consult this manual to determine how this
reduces the available cargo and luggage load capacity of your vehicle.
In addition, the total weight of the vehicle, all occupants, accessories\
,
cargo, and trailer tongue load must not exceed the Gross vehicle Weight
rating (GvWr) or the Gross Axle Weight rating (GAWr). Both are on a label
on the driver’s doorjamb.
Label example
The headlight aim on your vehicle was set by the factory, and does not need to be
adjusted. However, if you regularly carry heavy items in the cargo area or pull a
trailer, have the aiming readjusted at your dealer or by a qualified technici\
an.
Your vehicle is not designed to tow a trailer. Attempting to do so can void your
warranties.
Load limits example
Example 1
Max load
850 lbs
(385 kg) Passenger weight
150 lbs x 2 = 300 lbs (68 kg x 2 = 136 kg )Cargo weight
550 lbs
(249 kg)
Example 2
Max load
850 lbs
(385 kg) Passenger weight
150 lbs x 5 = 750 lbs (68 kg x 5 = 340 kg) Cargo weight
100 lbs
(45 kg)
overloading or improper loading can affect handling and stability and cau\
se a
crash in which you can be hurt or killed.
Follow all load limits and other loading guidelines in this guide.
WARNING
Page 51 of 82

94 || 95
DRIVING
DRIVING
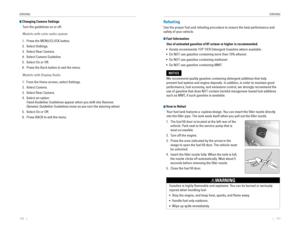
Remote Engine Start*
Start your vehicle’s engine using the remote transmitter before you enter the vehicle.
Make sure the vehicle is in a safe location when using remote engine start (i.e., a
well ventilated area, away from any flammable materials).
Starting the Engine
Press the Lock button, then press and hold the engine button within 5 seconds to
remotely start the engine.
The engine runs for up to 10 minutes. To extend the run time for another 10
minutes, repeat the procedure during the initial 10 minutes.
While the engine is running, the climate control system adjusts the cabi\
n
temperature, the security system remains on, and lights and accessories remain
off.
Stopping the Engine
Press and hold the engine button.
The engine will also stop if it has been running for more than 10 minute\
s, or if any
door is opened without using the remote or smart entry.
engine exhaust contains toxic carbon monoxide gas.
Breathing carbon monoxide can kill you or cause unconsciousness.
Never use the remote engine starter when the vehicle is parked in a gara\
ge or
other area with limited ventilation.
WARNING
Lock button
Engine button
Starting to Drive
Turn on the vehicle and start the engine to begin driving.
Before Starting the Engine
Continuously Variable Transmission (CVT)
Check that the shift lever is in Park (P), then press
the brake pedal. Keep your foot firmly on the brake
pedal when starting the engine.
Manual transmission
Check that the shift lever is in Neutral (N), then
press the brake pedal with your right foot and the
clutch pedal with your left foot. The clutch must be
fully pressed to start the engine.
The engine is harder to start in cold weather and in thinner air found a\
t altitudes
above 8,000 feet (2,400 m). When starting the engine in cold weather, turn off
all electrical accessories such as the lights, climate control system, a\
nd rear
defogger in order to reduce battery drain.
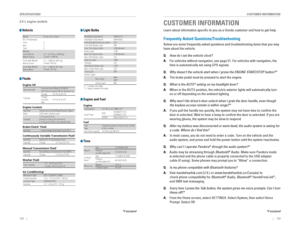
Starting the Ignition*Insert the key into the ignition and turn to turn on the vehicle or star\
t the engine.
0 LOCK: Insert and remove the key in this position.
I ACCESSORY: operate the audio system and other
accessories in this position.
II ON: This is the position when driving.
III START: This position is for starting the engine.
The switch returns to oN when you release the key.
Manual transmission models
*if equipped
Brake pedal
Brake pedal
Clutch pedal
removing the key from the ignition switch while driving locks the steerin\
g.
This can cause you to lose control of the vehicle.
remove the key from the ignition switch only when parked.
WARNING
Page 52 of 82

96 || 97
DRIVING
DRIVING
Changing the Power Mode*
Use the
eNGINe STArT/SToP button to cycle through power modes or start the
engine.
Accessory or On mode:
Press eNGINe STArT/SToP
once without pressing the brake pedal for Accessory
mode. Press it again for on mode.
Starting the engine: Press and hold the brake pedal
or clutch, then press eNGINe STArT/SToP. Keep
your foot firmly on the brake pedal when starting the
engine.
Turning the vehicle off: Shift to Park (P) or apply the parking brake, then press
eNGINe STArT/SToP. If you press the button and the shift lever is not in Park (P),
the vehicle goes into Accessory mode.
*if equipped
When you change the shift lever from D to r and vice versa, come to a complete
stop and keep the brake pedal depressed. operating the shift lever before the
vehicle has come to a complete standstill can damage the transmission.
Do not operate the shift lever while pressing the accelerator pedal. You could
damage the transmission.
NOTICE
Shifting
Change the shift position based on your driving needs.
Continuously Variable Transmission (CVT)*Park (P): Used for parking or starting/stopping
the engine. Press the brake pedal, then press the
release button to shift.
Reverse (R): Used for reversing.
Neutral (N): Used for idling.
Drive (D): Used for normal driving.
Drive (S): Used for better acceleration, increased
engine braking, or driving in hilly terrain.
Low (L): Used for stronger engine power and
braking when driving in hilly terrain.
Release button
Manual Transmission*Fully press the clutch pedal to operate the shift lever and change gears\
.
*if equipped
Shift up 1 to 2
2 to 3
3 to 4
4 to 5
5 to 6 Normal acceleration
16 mph (25 km/h)
26 mph (42 km/h)
35 mph (56 km/h)
41 mph (66 km/h)
43 mph (69 km/h)
Recommended shift points
Before downshifting, make sure the engine will not go into the tachomete\
r’s red
zone. This can severely damage your engine.
NOTICE
Do not shift to reverse (r) before the vehicle comes to a complete stop. This can
damage the transmission.
NOTICE
Page 53 of 82

98 || 99
DRIVING
DRIVING
Braking
Slow down or stop your vehicle, and keep it from moving when parked.
Foot Brake
Press the brake pedal to slow down or stop your
vehicle from moving.
Brake Assist System During hard or emergency braking, the system
increases braking force. The brake pedal may move
slightly or make a noise; this is normal. Continue to
hold the brake pedal firmly down.
Anti-Lock Brake System (ABS) During hard or emergency braking, the system
rapidly pumps the brakes to prevent wheel lockup
and help you maintain steering control. The brake
pedal may pulsate slightly during ABS operation;
this is normal. Do not pump the brake pedal, and
continue to hold it firmly down.
Brake pedalCVT
Brake pedal
The ABS may not function correctly if you use an incorrect tire type and\
size.
NOTICE
Electric Parking Brake Keep your vehicle from moving while parked using a simple switch.
To apply:
Pull up the switch. The BrAKe indicator
appears in the instrument panel.
To release: Press the brake pedal and make sure
your seat belt is fastened. Press the switch down
to release.
You can also lightly press the accelerator
pedal (and release the clutch pedal for manual
transmission) if your seat belt is fastened, the
vehicle is on, and the shift lever is in Drive (D)
or reverse (r) (or a gear is engaged for manual
transmission).
Pull up to apply.
Press down to release.
Manual transmission
Automatic Brake Hold Maintains rear brake hold even after the brake pedal is released. Make sure the
vehicle is on and your seat belt is fastened when operating this feature\
.
1. Press the BrAKe HoLD button behind the shift
lever. The BrAKe HoLD indicator appears in the
instrument panel.
2. With the shift lever in Drive (D) or Neutral (N),
press the brake pedal and come to a complete
stop. The HoLD indicator appears, and brake
hold is applied. release the brake pedal.
Press the accelerator pedal (or shift into a gear and release the clutc\
h pedal
for manual transmission) to cancel brake hold and start moving.
To turn off brake hold:
Press the brake pedal and press the BrAKe HoLD button
again.
Automatic brake hold cancels when:
• Braking is applied for more than 10 minutes.
• The electric parking brake is engaged.
•
The foot brake is pressed and the shift lever is moved to P or r.
• The engine stalls (manual transmission).
• The driver’s seat belt is unfastened.
• The engine is turned off.
Activating the automatic brake hold system on steep hills or slippery ro\
ads
may still allow the vehicle to move if you remove your foot from the bra\
ke
pedal.
If a vehicle unexpectedly moves, it may cause a crash resulting in serio\
us
injury or death.
Never use the automatic brake hold system or rely on it to keep a vehicl\
e from
moving when stopped on a steep hill or slippery roads.
WARNING
Using the automatic brake hold system to park the vehicle may result in \
the
vehicle unexpectedly moving.
If a vehicle moves unexpectedly, it may cause a crash, resulting in serious
injury or death.
Never leave the vehicle when braking is temporarily kept by automatic brake
hold and always park the vehicle by putting the transmission in Park (P\
) and
applying the parking brake.
WARNING
Page 54 of 82

100 || 101
DRIVING
DRIVING
Eco Assist™ System*
Can help improve fuel economy by adjusting the performance of the engine\
,
transmission, climate control system, and cruise control.
ECON Button
Press the eCoN button behind the shift lever to
turn the system on or off. The eCoN Mode indicator
appears when the system is turned on.
Ambient Meter
Color-coded bars change based on your driving
style and brake or accelerator pedal operation.
Green: Fuel-efficient driving
Light green: Moderate acceleration/deceleration
White: Aggressive acceleration/deceleration
*if equipped
Ambient meter
Vehicle Stability Assist (VSA®), aka Electronic Stability Control
(ESC) System
Helps to stabilize the vehicle during cornering if the vehicle turns mor\
e or less
than what was intended. It assists in maintaining traction on slippery s\
urfaces by
regulating engine output and selectively applying the brakes.
Turning VSA On or Off
Press and hold the vSA oFF button until you hear a
beep to turn vSA on or off. The vSA oFF indicator
appears when the system is off.
Traction control stops fully functioning, which may
make it easier when trying to free your vehicle if it is
stuck in mud or snow.
vSA is turned on every time you start the engine, even if you previously \
turned it
off. If you turn vSA off, your vehicle has normal braking and cornering ability, but
traction and stability enhancement become less effective.
VSA OFF
indicator
Cruise Control*
Maintain a constant vehicle speed without having to keep your foot on th\
e
accelerator pedal. Use cruise control on highways or open roads where yo\
u can
travel at a constant speed with little acceleration or deceleration.
*if equipped
reS/+ button
CANCeL button
CrUISe button
-/SeT button
Improper use of cruise control can lead to a crash.
Use cruise control only when traveling on open highways in good weather.
WARNING
Activating and Setting the Vehicle Speed
1. Press the CrUISe button. The CrUISe MAIN
indicator appears.
2. Accelerate to the desired speed (above 25 mph/
40 km/h). Take your foot off the pedal and press
the -/SeT button to set the speed. The CrUISe
CoNTroL indicator appears.
Adjusting the Vehicle Speed
Press the reS/+ button to increase speed, or the -/SeT
button to decrease speed.
each time you press the button, the vehicle speed is
increased or decreased by about 1 mph (1.6 km/h). If you
keep the button pressed, the vehicle speed increases or
decreases until you release it.
Canceling Cruise Control
Press the CANCeL button or the brake pedal. The CrUISe
CoNTroL indicator goes off.
After cruise control has been canceled, you can still
resume the prior set speed by pressing reS/+ while
driving at a speed of at least 25 mph (40 km/h).
Press the CrUISe button to turn the system off.
Page 55 of 82
 with Low Speed Follow (LSF)*
Helps maintain a constant vehicle speed and a set following interval beh\
ind a
vehicle detected ahe")
102 || 103
DRIVING
DRIVING
Adaptive Cruise Control (ACC) with Low Speed Follow (LSF)*
Helps maintain a constant vehicle speed and a set following interval beh\
ind a
vehicle detected ahead of yours.
reS/+ button
CANCeL button
Distance button
-/SeT button
MAIN button
Activating and Setting the Vehicle Speed
1. Press the MAIN button. The ACC indicator appears.
2. Accelerate to the desired speed.
Above 25 mph (40 km/h): Take your foot off the pedal
and press the -/SeT button to set the speed.
Below 25 mph (40 km/h) (Low Speed Follow): Press
the -/SeT button to set the speed at 25 mph (40 km/h)
if a vehicle is detected in front of you.
Adjusting the Vehicle Speed
Press the reS/+ button to increase speed, or the -/SeT
button to decrease speed.
each time you press the switch up or down, the vehicle
speed is increased or decreased by about 1 mph or
1 km/h. If you keep the switch pressed up or down, the
vehicle speed increases or decreases by 5 mph or
5 km/h until you release it.
Adjusting the Following Interval
Press the Distance button to change the following
interval. each time you press the button, the following-
interval setting cycles through short, middle, long, and
extra long.
Switching to Standard Cruise ControlPress and hold the Distance button.
Cruise mode appears in the Driver Information Interface. Press and hold \
the
button again to switch back to ACC.
*if equipped
When in OperationIf a vehicle is detected ahead of you when ACC is turned on, the system \
maintains,
accelerates, or decelerates your vehicle’s set speed to keep the vehicle’s set
following interval from the vehicle ahead.
If a vehicle detected ahead of you slows down
abruptly, or if another vehicle cuts in front of you,
a beep sounds and BrAKe appears on the Driver
Information Interface to alert you.
When a vehicle detected ahead is within range and
stops, your vehicle also stops. The Stopped message
appears on the Driver Information Interface.
When the vehicle ahead of you starts again, the vehicle icon on the Driv\
er
Information Interface blinks. Press the reS/+ button or the -/SeT button, or press
the accelerator pedal to resume the prior set speed.
Canceling ACC
Press the CANCeL button the brake pedal. The ACC
indicator goes off.
Certain conditions may cause ACC to cancel
automatically. When this happens, a message
appears on Driver Information Interface.
After adaptive cruise control has been canceled,
you can still resume the prior set speed by pressing
the reS/+ button.
Press the MAIN button to turn the system off.
exiting a vehicle that has been stopped while the ACC with LSF system is
operating can result in the vehicle moving without operator control.
A vehicle that moves without operator control can cause a crash, resulti\
ng in
serious injury or death.
Never exit a vehicle when the vehicle is stopped by ACC with LSF.
WARNING
ACC with LSF has limited braking capability and may not stop your vehicl\
e in
time to avoid a collision with a vehicle that quickly stops in front of \
you.
Always be prepared to apply the brake pedal when conditions require.
WARNING
Beep
Improper use of ACC with LSF can lead to a crash.
Use ACC with LSF only when driving on expressways or freeways and in goo\
d
weather conditions.
WARNING
Page 56 of 82
*
Provides steering input to help keep the vehicle in the middle of a dete\
cted lane and
visual and tactile alerts if the veh")
104 || 105
DRIVING
DRIVING
Lane Keeping Assist System (LKAS)*
Provides steering input to help keep the vehicle in the middle of a dete\
cted lane and
visual and tactile alerts if the vehicle is detected drifting out of its\
lane while driving
between 45–90 mph (72–145 km/h).
If your vehicle is getting too close to detected left or
right side lane markings without a turn signal activated,
a message appears on the Driver Information Interface,
and the steering wheel vibrates. Steering torque is also
applied to help keep your vehicle within your driving
lane.
Turning the System On or Off
1. Press the MAIN button. LKAS appears in the
Driver Information Interface.
2. Press the LKAS button. Lane outlines appear
in the Driver Information Interface. Dotted lane
lines turn solid when the system starts operating.
3. Press the MAIN button or the LKAS button to turn
the system off.
Important Safety Reminder
LKAS is for your convenience only. It is not a substitute for your vehicle control. The
system does not work if you take your hands off the steering wheel or fa\
il to steer
the vehicle.
Do not place an object on the top of the instrument panel. It may refl\
ect onto the
windshield and prevent the system from detecting lane lines properly.
MAIN button
*if equipped
Steering assistance
LKAS button
Road Departure Mitigation (RDM)*
Alerts and helps to assist you if the system determines a possibility of\
your vehicle
unintentionally crossing over detected lane markings while driving betwe\
en 45–90
mph (72–145 km/h).
If your vehicle is getting too close to detected lane
markings without a turn signal activated, a message
appears in the Driver Information Interface. Steering
wheel torque and vibrations are applied to help your
vehicle stay in the lane.
Braking may also be applied if the lane lines are solid
and continuous.
If the system operates several times without detecting
driver response, the system beeps to alert you.
Changing Settings Determine the warning type.
1. From the HoMe screen, select Settings.
2. Select vehicle. The vehicle must be in Park (P).
3. Select Driver Assist System Setup.
4. Select road Departure Mitigation Setting.
5. Select from the options.
Normal (default): Steering control starts from inside the lane edge.
Wide: Steering control starts from outside the lane edge.
Warning Only: The system only provides a BrAKe message and steering wheel
vibrations, but does not apply steering torque or braking.
6. Press BACK to exit the menu.
Important Safety Reminder
The rDM system has limitations. over-reliance on it may result in a collision. It is
always your responsibility to keep your vehicle within the driving lane.\
*if equipped
Turning the System On or Off
Press the rDM button to turn the system on or off.
A green indicator appears on the button when the
system is on.
RDM button
Indicator
Steering assistance