Page 25 of 82

42 || 43
V
EHICLE CONTROLSVEHICLE CONTROLS
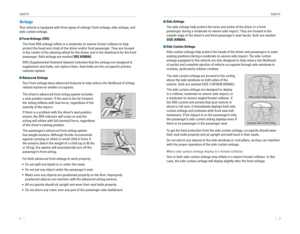
Adjusting the Head Restraints
Your vehicle is equipped with head restraints in all seating positions. H\
ead
restraints are most effective for protection against whiplash and other \
rear-impact
crash injuries.
The center of the back of the occupant’s head
should rest against the center of the restraint. The
tops of the occupant’s ears should be level with the
center height of the restraint.
To raise the head restraint: Pull it upward.
To lower the head restraint: Push it down while
pressing the release button.
To remove the head restraint: Pull the restraint up
as far as it will go. Then push the release button,
and pull the restraint up and out.
To reinstall a head restraint: Insert the legs back in place, then adjust the head
restraint to an appropriate height while pressing the release button. Pu\
ll up on the
restraint to make sure it is locked in position.
In order for the head restraint system to work properly:
• Do not hang any items on the head restraints, or from the restraint legs\
.
• Do not place any object between an occupant and the seat-back.
• Install each restraint in its proper location.
Position head in the
center of the head
restraint.
Improperly positioning head restraints reduces their effectiveness and
increases the likelihood of serious injury in a crash.
Make sure head restraints are in place and positioned properly before dr\
iving.
WARNING
Failure to reinstall, or correctly reinstall, the head restraints can re\
sult in
severe injury during a crash.
Always replace the head restraints before driving.
WARNING
Folding Down the Rear Seats
The rear seat-back(s*) can be folded down to make room for large items\
in the
trunk.
1. Pull the release lever in the trunk to release the
lock.
2. Fold down the seat-back.
Push the seat-back up firmly until it locks into
place to return it to its original position.
Make sure all items in the trunk or items
extending through the opening into the rear
seats are properly secured. Loose items can fly
forward if you have to brake hard.
*if equipped
Release
lever*
Release lever
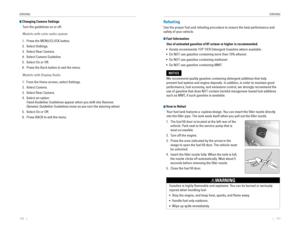
Adjusting the Steering Wheel
The steering wheel height and distance from your body can be adjusted so\
that you
can comfortably grip the steering wheel in an appropriate driving postur\
e.
1. Pull up the steering wheel adjustment lever.
2. Move the steering wheel up or down, and in or out.
3. Push down the steering wheel adjustment lever to
lock the steering wheel in position.
Adjusting the steering wheel position while driving may cause you to los\
e
control of the vehicle and be seriously injured in a crash.
Adjust the steering wheel only when the vehicle is stopped.
WARNING
To adjust
To lock Lever
Page 26 of 82

44 || 45
V
EHICLE CONTROLSVEHICLE CONTROLS
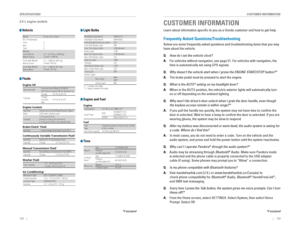
Adjusting the Mirrors
Adjust the angle of the mirrors for the best visibility when you are sit\
ting in the
correct driving position.
Rearview Mirror with Day/Night Positions*
Manually adjust the position to reduce headlight
glare from vehicles behind you. Flip the tab to
switch between day and night positions.
Automatic Dimming Rearview Mirror*When driving after dark, the automatic dimming
function reduces the glare from headlights behind
you based on the mirror sensor.
The function cancels when the shift lever is in
reverse (r).
Power Door MirrorsAdjust the power door mirrors when the vehicle is on.
L/R selector switch: Select the left or right mirror.
After adjusting the mirror, return the switch to the
center position.
Mirror position adjustment switch: Press the switch
left, right, up, or down to move the mirror.
Tab
Daytime
position
Night position
*if equipped
Selector
switchAdjustment
switch
Sensor
Heating System*
Maintains your preferred interior temperature by selecting the proper mi\
x of heated
or ambient air and fan speed. Use the buttons on the dashboard to contro\
l the
system.
*if equipped (Canadian models)
Fan control
dial AUTO button: Press, then
use the temperature
control dial to set your
preferred temperature.
Windshield
defroster
button Temperature
control dial
Fresh air button:
Maintains outside
ventilation. Rear defogger/
heated door
mirrors button
Mode button:
Change
airflow
location.Recirculation
button:
recirculates air from the
vehicle’s interior. ON/OFF
button
Page 27 of 82

46 || 47
V
EHICLE CONTROLSVEHICLE CONTROLS
Climate Control System*
Maintains your preferred interior temperature by selecting the proper mi\
x of heated
or cooled air and fan speed. Use the buttons on the dashboard to control\
the system.
Models with color audio system
*if equipped
AUTO button: Press, then
use the temperature
control dial to set your
preferred temperature.
Temperature
control dial
A/C
button
Fan control
dial
Recirculation button:
Recirculation mode (indicator on): recirculates air from the vehicle’s interior. Fresh Air mode (indicator off): Maintains outside
ventilation. Rear defogger
button
Windshield
defroster
button ON/OFF
button
Mode button:
Change airflow
location.
Models with Display Audio
A/C: Turn air
conditioning
on or off.
MODE: Select
airflow
location.
Fan speed:
Select a
setting.
AUTO button: Press, then
use the temperature
control dial to set your
preferred temperature.
Temperature
control dial
Fan control
dial
Rear defogger/
heated door
mirrors button
Windshield
defroster
button ON/OFF
buttonCLIMATE button:
Select climate
options on the
touchscreen.
Fresh air button:
Maintains outside
ventilation.
Recirculation
button:
recirculates air from the
vehicle’s interior.
Selected
temperature
display
Page 28 of 82

48 || 49
V
EHICLE CONTROLSVEHICLE CONTROLS
Models with Display Audio and SYNC button
A/C: Turn air
conditioning
on or off.
MODE: Select
airflow
location.
Fan speed:
Select a
setting.
AUTO button:
Press, then use
the temperature
control dial to set
your preferred
temperature.
Driver’s
temperature
control dial
Passenger’s
temperature
control dial
ON/OFF
buttonCLIMATE
button: Select
climate
options on the
touchscreen.
Selected
temperature
display
Rear defogger/
heated door
mirrors button
Windshield
defroster
button
Recirculation button: Recirculation mode (indicator on): recirculates air from the vehicle’s interior. Fresh air mode (indicator off): Maintains outside
ventilation. SYNC button: Set
the passenger’s
side temperature
to the same as
the driver’s side.
Seat Heaters*
Quickly warm the seats when the vehicle is on.
Front Seat Heaters
Press the seat heater button in the front console. An
indicator appears for the selected setting.
once: HI setting (three indicators)
Twice: MID setting (two indicators)
Three times: Lo setting (one indicator)
Four times: oFF setting (no indicators)
Rear Seat HeatersPress the seat heater button on the back of the
center console to heat the two rear outer seats.
Press the Lo or HI side of the switch, and an
indicator appears for the selected setting. return
the switch to the middle position to turn off.
Heat-induced burns are possible when using seat heaters.
Persons with a diminished ability to sense temperature (e.g., persons w\
ith
diabetes, lower-limb nerve damage, or paralysis) or with sensitive skin should
not use the seat heaters.
WARNING
*if equipped
Page 29 of 82

50 || 51
V
EHICLE CONTROLSVEHICLE CONTROLS
Customized Features*
Use the Settings menu to customize certain features when the vehicle is stopped.\
Models with color audio system
Use the selector knob to make and enter selections.
1. Press the MeNU/CLoCK button.
2. Select Settings.
3. Select a setting option, and make your preferred
changes.
4. Press the Back button to exit the menus.
Models with Display Audio
Select items on the touchscreen to make selections.
1. From the HoMe screen, select SeTTINGS.
2. Select an option (Phone, Audio, Bluetooth, Info,
Camera, System, or Navi*).
3. Select a setting option, and make your preferred
changes.
4. Press BACK to exit the menus.
*if equipped
(Back) button
Selector knob MENU/
CLOC
K
button
VO LHOME
MENUBACK
AUDIO
Setting the Clock
Adjust the time using the steps described for your vehicle type.
Models with color audio system
Use the selector knob to make and enter selections.
1. Press and hold the MeNU/CLoCK button.
2. Select the hour and adjust as necessary.
3. Select the minutes and adjust as necessary.
4. Select Set when complete.
Models with Display Audio
Touch items to make selections. on vehicles with navigation, the time is
automatically set using GPS signals.
1. From the HoMe screen, select Settings.
2. Select Clock.
3. Select Clock Adjustment.
4. Adjust the hour and minute values.
5. Select oK when complete.
VO LHOME
MENUBACK
AUDIO
*if equipped
Page 30 of 82

52 || 53
AUDIO AND CONNECTIVITY
AUDIO AND CONNECTIVITY
AUDIO AND CONNECTIVITY
*if equipped
Learn how to operate the vehicle’s audio system.
Basic Audio Operation
Connect audio devices and operate the audio system.
USB Port
Connect a USB flash drive or other audio device, such as an iPod
® or iPhone®.
Install the flash drive or cable connector to the USB port.
Models with color audio system
The USB port is located in the front console and is
for playing audio and charging devices.
Models with Display Audio
The USB port is located in the front console and is
for playing audio, charging devices, and connecting
to Apple CarPlay
® (see page 65) or Android
Auto™ (see page 66).
An additional port* is located inside the center
console. It can be used for playing audio and
charging devices.
iPod and iPhone are trademarks of Apple, Inc.
Do not insert an automotive type cigarette lighter element. This can ove\
rheat the
power socket.
NOTICE
Accessory Power Socket
open the socket cover in the front console to use
power when the vehicle is on.
Wireless Charger*
Charge your compatible device when the vehicle is on.
1. Press and hold the power button. A green
indicator appears when the charger is on.
2. Place the chargeable side of the device on the
charge area. The system begins charging the
device when the amber indicator appears.
3. The green indicator appears when charging is
complete. on some devices, the amber indicator
may stay on even when charging is complete.
Green indicato r
Amber indicator
Charging area (Power) button
Notes:
• This system consumes a lot of power. It is best to charge your device when the
engine is running.
• If the indicator light is blinking, there may be an obstacle between the\
device and charging area, the device may have moved, or the charger is
malfunctioning.
• The device may not charge if you are near strong electromagnetic waves, \
such
as at a gas station.
• The device and charging area may get warm during charging. This is norma\
l.
Do not place any magnetic devices, credit cards, or watches within the c\
harge
area while charging. The data on credit cards can be lost, and watches m\
ay stop
working.
NOTICE Metal objects between the charge pad and the device to be charged will g\
et
hot and can burn you.
•
Always remove foreign objects from the charge pad before charging the
device.
• Be sure the surface is clear of dust and other debris before charging.
• Do not spill liquids on the charger and device.
• Do not use oil, grease, alcohol, benzine, or thinner for cleaning the ch\
arge
pad.
• Do not cover the system with towels, clothing, or other objects while
charging etc.
• Avoid using spraying hair spray, insecticides, etc, that may contact the
charge pad surface.
WARNING
*if equipped
Page 31 of 82

54 || 55
AUDIO AND CONNECTIVITY
AUDIO AND CONNECTIVITY
Steering Wheel Controls
You can operate certain functions of the audio system using the steering \
wheel
controls.
Models with information display
SOURCE button: Cycle through available audio
modes.
+ / - buttons: Adjust audio volume.
t / u buttons: Change presets, tracks, albums, or
folders.
FM/AM Radio
Press t or u for the next or previous preset station.
Press and hold t or u to seek the next or previous strong station.
iPod
®/USB/Bluetooth® Audio
Press t or u for the next or previous track.
Press and hold t or u for the next or previous folder (USB).
Models with Driver Information Interface
button: Press until the audio screen is displayed
in the Driver Information Interface.
+ / - bar: Press the ends of the bar or slide to adjust
audio volume.
t / u buttons: Change presets, tracks, albums, or
folders.
FM/AM/SiriusXM
® Radio*
Press t or u for the next or previous preset station.
Press and hold t or u to seek the next or previous strong station.
iPod
®/USB/Bluetooth® Audio
Press t or u for the next or previous track.
Press and hold t or u for the next or previous folder (USB).
Pandora
®
Press u for the next song.
Press and hold t or u for the next or previous station.
*if equipped
Steering Wheel Controls (continued)
Models with Driver Information Interface (continued)
p / q buttons: Cycle through available audio modes, or scroll through audio
options in the Driver Information Interface
ENTER button: Make audio selections in the Driver Information Interface.
From the audio screen in the Driver Information Interface:
FM/AM/SiriusXM
® Radio*
Press the eNTer button to display a preset list. Press p or q to scroll the list, and
press the eNTer button to select a preset.
USB Flash Drive
Press the eNTer button to display the folder list. Press p or q to scroll the list,
and press the eNTer button to select a folder. repeat to select a track.
iPod®
Press the eNTer button to display the iPod list. Press p or q to scroll the
category, and press the eNTer button to select an item. repeat to select a track.
Bluetooth® Audio
Press the eNTer button to display the track list. Press p or q to scroll the list,
and press the eNTer button to select a track.
Pandora®
Press the eNTer button to display the station list. Press p or q to scroll the list,
and press the eNTer button to select a station.
*if equipped
Page 32 of 82
56 || 57
AUDIO AND CONNECTIVITY
AUDIO AND CONNECTIVITY
Adjusting the Sound
Adjust various sound settings.
Models with color audio system
Use the selector knob to make and enter selections.
1. Press the Sound button.
2. Select a sound mode to change, and adjust it
using the selector knob.
3. Press the Back button to exit the menu.
Models with Display Audio
Make and enter selections using the touchscreen.
1. From the audio screen, select MeNU.
2. Select Sound.
3. Select the tabs to change the sound mode and
adjust the setting.
4. Select oK when complete.
VO LHOME
MENUBACK
AUDIO
Selector kno b
Sound
button
Models with color audio system
Color Audio System
Use the buttons to control the display and audio system.
Selector knob:
Make and enter
selections.
Volume knob/
power button MENU/CLOCK
button: Display menu
options.
BACK button:
Go back to the
previous display.
Display button:
Adjust display
brightness. Sound button:
Adjust sound.