Page 17 of 82

26 || 27
I
NSTRUMENT PANELINSTRUMENT PANEL
Condition Indicators
These indicators may require you to perform an action.
Parking brake
release the parking brake before driving. You will hear a beep if you drive
with it not fully released.
Seat belt reminder
Make sure seat belts are fastened for you and all passengers. The indica\
tor
blinks and beeps sound continuously if you or your front passenger has not
fastened your seat belts when you begin driving. If the indicator remain\
s on
after seat belts are fastened, see your dealer.
Door/trunk open
A door or the trunk is not closed. A beep sounds if open while driving.
Low fuel
refuel as soon as possible. If the indicator blinks, there is a problem w\
ith the
fuel gauge. See your dealer.
Low tire pressure*
Stop in a safe place, check tire pressures, and inflate tire(s) if n\
ecessary.
The indicator also appears if the system has not been calibrated (see p\
age
118).
Washer fluid level (Canadian models)*
The washer fluid is low. refill the washer fluid (see page 137).
System message*
When a condition or malfunction indicator comes on, a message also
appears on the Driver Information Interface. Check the display for more \
information. Press the display/information button on the steering wheel \
to
clear the message.
Maintenance Minder™*
Scheduled maintenance for your vehicle is due.
Immobilizer/security system
Your key or remote transmitter cannot be recognized by the vehicle. If th\
e
indicator blinks, you may not be able to start the engine. Turn the vehicle
off, remove the key from the ignition*, press and hold the brake pedal, \
and
restart the vehicle. If it continues to blink, there may be a problem wi\
th the
system. See your dealer.
Canadian models: To reset the immobilizer system, follow the steps above
after the battery has been disconnected.
U.S.
Canada
*if equipped
vSA off
vSA engaged (blinking)
CrUISe MAIN on
CrUISe CoNTroL on
ACC* on
CMBS™* off
LKAS* on
Turn signals/hazards on
Fog lights* on
High beams on
exterior lights on
eCoN mode* on
Automatic brake hold on
Automatic brake hold
activated
U.S.
Canada
On/Off Indicators
These indicators remind you when an item is on or off.
Brake depress
You must press the brake pedal before activating the electric parking bra\
ke
or automatic brake hold. If the indicator blinks, automatic brake hold i\
s
canceled during operation. Immediately press the brake pedal.
CV T models
MT models
Page 18 of 82

28 || 29
I
NSTRUMENT PANELINSTRUMENT PANEL
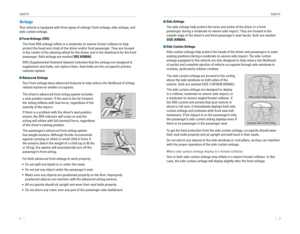
Information Display*
Consists of several displays that provide you with useful information.
Press the TrIP knob to cycle through the displays shown below.
(TRIP) knob
Instant fuel economyOdometerTrip meter AOutside temperature
Engine oil life
*if equipped
Instant fuel economyrangeTrip meter Aoutside temperature
Instant fuel economy
Average fuel economy A Trip meter A
outside temperature
Instant fuel economy
Average fuel economy B Trip meter B
outside temperature
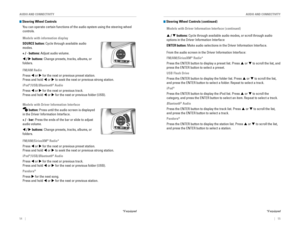
Driver Information Interface*
Consists of several displays that provide you with useful information.
*if equipped
Display button
(TRIP) knob
Driver Information
Interface
odometerTrip A Trip B
Main Displays
Press the Display button to scroll through the different icons shown bel\
ow.
Detailed information for the selected icon appears after a few seconds, \
or you can
press the eNTer button to view it.
You can customize the contents in the Driver Information Interface. For c\
omplete
instructions, see the owner’s Manual on the owner Information CD or at owners.
honda.com (U.S.) or myhonda.ca (Canda).
Trip Computer
Press the TrIP knob to cycle through the lower displays shown below.
AAAAA
Warning
MessagesChange Unit (or blank)
Maintenance
Minder™ Phon
e*Turbo
Meter*Audio*Compass /*Navigation*Range/
average fuelCustomize*
Page 19 of 82

30 || 31
V
EHICLE CONTROLSINSTRUMENT PANEL
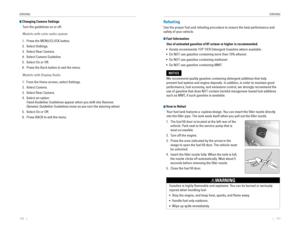
Vehicle Settings*
Use the Driver Information Interface to customize certain features. Use \
the
steering wheel controls to select the vehicle Settings screen when the vehicle is
stopped.
butto n
Pr ess to go to the next
display.
ENTER button
Pr ess to make a selection .
display/info butto n
Scroll to Vehicle Settings.
button
Press to scroll upwards.
butto n
Press to go back to the
previous display.
button
Press to scroll downwards .
*if equipped
Below is an example of how to change a setting.
1. Press the display/info button until you see the
vehicle Settings screen. Press the eNTer button
to select it.
2. Press the p or q button to scroll to Meter
Setup, and select it.
3. Scroll to “Trip A” reset Timing, and select it.
4. Scroll to the option you want, and select it.
5. Scroll to the exit option, and select it. repeat to
exit the menus.
VEHICLE CONTROLS
*if equipped
Learn about the various controls necessary for operating and driving the\
vehicle.
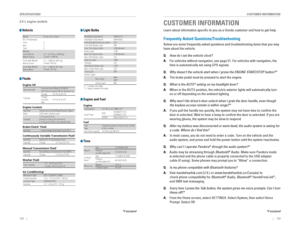
Using the Key or Remote Transmitter*
Lock or unlock the doors and trunk.
Unlock button: Press once to
unlock the driver’s door. Press
again to unlock all doors.
Trunk button: Press
and hold to unlock and
open the trunk. Lock button: Press to lock the
doors. Press again for audible
verification.
Panic button: Press to sound
the alarm for 30 seconds.
Press again to cancel.
Built-in key*: Slide the
release knob on the back
of the transmitter and pull
out the built-in key.
release knob
Built-in key
Leaving the key or remote transmitter in the vehicle can result in theft\
or
accidental movement of the vehicle. Always take it with you whenever you\
leave
the vehicle unattended.
NOTICE
Engine button*: remotely start the engine (see page 94).
Page 20 of 82
 and it
is outside the vehicle and within range")
32 || 33
V
EHICLE CONTROLSVEHICLE CONTROLS
Smart Entry System*
When you carry the remote transmitter (for example, in a pocket or purs\
e) and it
is outside the vehicle and within range (about 32 inches or 80 cm), yo\
u can lock or
unlock the doors and trunk without handling the transmitter.
Unlocking/Locking the Doors
To unlock: Grab the driver’s door handle when the
vehicle is off to unlock the driver’s door. Grab the
front passenger’s door handle to unlock all doors.
To lock: Press the door lock button on the front
door handle when the vehicle is off. If the remote
transmitter is inside the vehicle, the doors will not
lock.
Unlocking the TrunkPress the trunk release button to unlock and open
the trunk.
*if equipped
Door lock button
Trunk release button
Walk Away Auto Lock*When you walk away from the vehicle while carrying the remote transmitter, the
doors can automatically lock if the following conditions are met:
• The remote transmitter is within a range of 6 feet (2 m).
• All doors and the hood are closed.
• There is not an additional remote transmitter inside the vehicle.
When you are within the range, the system is activated and a beep sounds\
. When
you go outside the range, the lights flash and a beep sounds again. Th\
e doors
automatically lock.
To turn on this feature, follow the steps below:
1. From the HoMe screen, select Settings.
2. Select vehicle. The vehicle must be in Park (P).
3. Select Door/Window Setup.
4. Select Walk Away Auto Lock.
5. Select on.
6. Select BACK to exit the menus.
*if equipped
Page 21 of 82

34 || 35
V
EHICLE CONTROLSVEHICLE CONTROLS
Door Operation
Use several methods to lock or unlock the doors.
Using the Lock Tab
To unlock: Pull the lock tab rearward. When you
unlock the door using the lock tab on the driver’s
door, only the driver’s door unlocks.
To lock: Push the lock tab forward. When you lock
the door using the lock tab on the driver’s door, all
the other doors lock at the same time.
Using the Front Door Inner HandleWhen you pull either front door inner handle, the
door unlocks and opens. Unlocking and opening the
driver’s door from the inner handle unlocks all other
doors.
Using the Master Door Lock SwitchTo unlock: Press the unlock side of the switch to
unlock all doors.
To lock: Press the lock side of the switch to lock all
doors.
Childproof Door LocksThe childproof door locks prevent the rear doors
from being opened from the inside regardless of the
position of the lock tab.
Slide the lever in the rear door to the lock position,
and close the door.
open the door using the outer door handle.
Using the Trunk Release ButtonPress the trunk release button on the driver’s door
to open the trunk.
To unlock
Lock ta bTo lock
To unlock
Master door
lock switch
To lock
Lock
Unlock
Trunk release
button
Power Window Operation
The power windows can be opened and closed when the vehicle is on by usi\
ng the
switches on the doors. The switches on the driver’s side can be used to open and
close all the windows.
Automatic Operation
To open: Push the switch down firmly.
To close: Pull the switch up firmly.
The window opens or closes completely. To stop the
window at any time, push or pull the switch again
briefly.
Manual OperationTo open: Push the switch down lightly.
To close: Pull the switch up lightly.
release the switch when the windows reach the desired position.
Power Window LockPush in the power window lock button so only the driver’s window can be
operated.
Power window
lock button
Driver’s
window
switchFront passenger’s
window swi tch
Closing a power window on someone’s hands or �ngers can cause serious
injury.
Make sure your passengers are away from the windows before closing them.
WARNING
Page 22 of 82

36 || 37
V
EHICLE CONTROLSVEHICLE CONTROLS
Power Moonroof Operation*
The moonroof can be opened and closed when the vehicle is on by using th\
e switch
on the ceiling.
Automatic Operation
To open: Push the switch back firmly to the second
detent, then release.
To close: Push the switch forward firmly to the
second detent, then release.
The moonroof opens or closes completely. To stop
the moonroof at any time, push the switch briefly.
Manual OperationTo open: Push and hold the switch back to the first detent until the desired p\
osition
is reached.
To close: Push and hold the switch forward to the first detent until the desir\
ed
position is reached.
Moonroof TiltTo tilt: Push the center of the switch.
To close: Push the switch forward firmly, then release.
*if equipped
Open
Clos eTilt
opening the moonroof in below freezing temperatures or when it is covered\
with
snow or ice can damage the moonroof panel or motor.
NOTICEClosing the moonroof on someone’s hands or fingers can cause serious injury.
Make sure your passengers are away from the moonroof before closing it.
WARNING
Interior and Exterior Lights
operate interior and exterior lights when the vehicle is on or off.
Brightness Control
Adjust instrument panel brightness when the vehicle is on.
To brighten: Turn the knob to the right.
To dim: Turn the knob to the left.
A beep sounds when the brightness reaches
minimum or maximum.
Interior LightsChange the interior light settings using the front and rear switches on \
the ceiling.
ON position (rear): Interior lights remain on.
Door-activated position (front): Interior lights come
on when any of the doors are opened, the driver’s
door is unlocked, or the vehicle is turned off.
OFF position: Interior lights remain off.
Map lights: Press the map lights to turn on or off.
Exterior Lights
rotate the switches on the headlight lever to operate the exterior lights\
.
OFF: All exterior lights are off.
: Turn on exterior lights except headlights.
AUTO: Turn on the automatic lighting feature.*
Headlights turn on or off depending on ambient
brightness when the vehicle is on. Headlights
automatically come on after the wipers are
engaged for a certain time.
: Turn on all exterior lights including headlights.
: Turn fog lights* on or off.
*if equipped
TRIP knob
Door-activated position
Of f
Fron t
Map lights
High beams
Flash the high beams
Low beams
Fog
lights*
One-Touch Turn Signal
Use this quick and convenient method to signal a lane change.
Lightly push the turn signal lever up or down for a
three-blink sequence.
For a continuous signal, push the lever up or down
until it locks into place.
Page 23 of 82

38 || 39
V
EHICLE CONTROLSVEHICLE CONTROLS
Wiper Operation
The windshield wipers and washers can be used when the vehicle is on. Move the
wiper lever up or down to the desired position.
*if equipped
Pull to
use
washer.
MIST
OFF
INT: Low speed intermittent
LO: Low speed wipe
HI: High speed wipe
Headlight-Wiper Integration*
When the headlights are in the AUTo position, they automatically turn on when the
front wipers operate several times within a certain interval. The headli\
ghts turn off
shortly after the wipers are turned off, or if there is enough ambient l\
ight.
Do not use the wipers when the windshield is dry. The windshield will get
scratched, or the rubber blades will get damaged.
In cold weather, the blades may freeze to the windshield, becoming stuck.
operating the wipers in this condition may damage the wipers. Use the def\
roster
to warm the windshield, or manually clear the windshield of ice and snow before
turning on the wipers.
NOTICE
Intermittent (INT) Wipers* When you move the lever to the INT position, the
wipers operate based on the delay adjustment.
rotate the adjustment ring to adjust the wiper delay.
Rotate the
adjustment ring.
Long delay
Short delay
INT position
Automatic (AUTO) Rain-Sensing Wipers*
When you move the lever to the AUTo position
while driving in rainy weather, the wipers operate
based on the amount of detected rainfall.
Put the lever in the AUTo position only when driving
in rainy weather.
rotate the adjustment ring to adjust the rainfall
sensor sensitivity.
return the lever to the oFF position when rain stops.
Rotate the
adjustment ring.
Low sensitivity:
Wipers operate when
more rainfall is detected.
High sensitivity:
Wipers operate when
less rainfall is detected.
AUTO position
Always ensure the wiper lever is in the OFF position before entering a car wash to
prevent severe damage to the windshield wiper system.
NOTICE
*if equipped
Page 24 of 82

40 || 41
V
EHICLE CONTROLSVEHICLE CONTROLS
Adjusting the Seats
Make seat adjustments before driving to ensure the best comfort and safe\
ty.
Adjusting the Front Seats
Adjust the driver’s seat as far back as possible while
allowing you to maintain full control of the vehicle.
You should be able to sit upright and well back in the
seat, adequately press the pedals without leaning
forward, and grip the steering wheel comfortably.
The passenger’s seat should be adjusted in a similar
manner, so that it is as far back from the front airbag
in the dashboard as possible.
The National Highway Traffic Safety Administration and Transport Canada
recommend that drivers allow at least 10 inches (25 cm) between the ce\
nter of the
steering wheel and the chest.
Power Seats*
*if equipped
Move back and allow sufficient space.
Horizontal position
adjustment
Height adjustment
(driver’s seat only) Seat-back angle
adjustment
Reclining the seat-back too far can result in serious injury or death in \
a crash.
Adjust the seat-back to an upright position, and sit well back in the se\
at.
WARNING
Sitting too close to a front airbag can result in serious injury or deat\
h if the
front airbags inflate.
Always sit as far back from the front airbags as possible while maintain\
ing
control of the vehicle.
WARNING
Manual Seats*
*if equipped
Floor Mats*
Position the front seat floor mats properly, and anchor
them. If they are not properly positioned, the floor
mats can interfere with the front seat functions.
Do not put additional floor mats on top of the
anchored mats.
Horizontal position
adjustment
Pull up on the bar to move the
seat, then release the bar.
Height adjustment(driver side only )
Pull up or push down the lever
to raise or lower the seat .
Seat-back angle
adjustment
Pull up the lever to
change the angle.
Sitting improperly or out of position can result in serious injury or de\
ath in a
crash.
Always sit upright, well back in the seat, with your feet on the floor\
.
WARNING
Unlock
Lock