Page 57 of 82
*
Can assist you when there is a possibility of your vehicle colliding wit\
h a vehicle or a
pedestrian detecte")
106 || 107
DRIVING
DRIVING
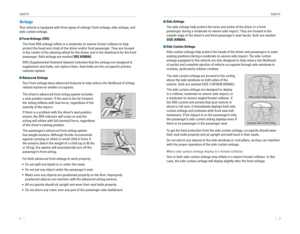
Collision Mitigation Braking System™ (CMBS™)*
Can assist you when there is a possibility of your vehicle colliding wit\
h a vehicle or a
pedestrian detected in front of yours.
The system can give you visual, audible, and tactile
alerts when a potential collision is determined, and
reduce your vehicle speed to help minimize collision
severity when a collision is deemed unavoidable.
When a potential collision with a detected oncoming
vehicle is determined, the system also alerts you with
rapid vibrations on the steering wheel.
The system activates when:
• The speed difference between your vehicle and a vehicle or pedestrian de\
tected
in front of you is about 3 mph (5 km/h) and over with a chance of a co\
llision.
• Your vehicle speed is about 62 mph (100 km/h) or less and there is a ch\
ance of a
collision with an oncoming detected vehicle or a pedestrian in front of \
you.
Changing Settings
Determine the warning timing.
1. From the HoMe screen, select Settings.
2. Select vehicle. The vehicle must be in Park (P).
3. Select Driver Assist System Setup.
4. Select Forward Collision Warning Distance.
5. Select Long, Normal, or Short.
6. Press BACK to exit the menu.
*if equipped
Alert StagesThe system has three alert stages for a possible collision. Depending on\
the
circumstances or CMBS settings, CMBS may not go through all of the stage\
s
before initiating the last stage.
Stage 1:
visual and audible warning, steering wheel vibrations
Stage 2: visual and audible warning and light brake application
Stage 3: visual and audible warning and strong brake application
Beep
Steering vibrationsImportant Safety Reminder
CMBS is designed to reduce the severity of an unavoidable collision. It \
does not
prevent collisions nor stop the vehicle automatically. It is still your responsibility to
operate the brake pedal and steering wheel appropriately according to th\
e driving
conditions.
Turning CMBS On or Off
Press and hold the CMBS oFF button. A beep sounds
and a message appears in the MID. The CMBS
indicator appears when the system is off.
Page 58 of 82

108 || 109
DRIVING
DRIVING
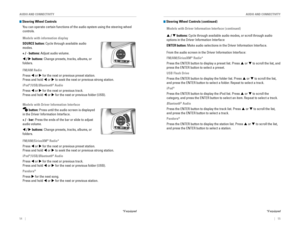
LaneWatch™*
Check the passenger-side rear areas in the upper display when the right turn signal
is activated.
Activating LaneWatch
Activate the right turn signal. The LaneWatch display
appears. Check the display for blind spots, and
visually confirm that it is safe to change lanes.
You can also press the LaneWatch button on the end
of the turn signal switch to view a constant real-time
display. Press it again to turn the display off.
Changing SettingsCustomize the display and how and when the display appears.
1. From the Home screen, select Settings.
2. Select Camera.
3. Select LaneWatch.
4. Select an option and make the preferred changes.
5. Press BACK to exit the menu.
Important Safety Reminder
LaneWatch has limitations. over-reliance on the system may result in a collision.
*if equipped
Failure to visually confirm that it is safe to change lanes before doi\
ng so may
result in a crash and serious injury or death.
Do not rely only on LaneWatch while driving. Always look in your mirrors, to
either side of your vehicle, and behind you for other vehicles before ch\
anging
lanes.
WARNING
LaneWatch display
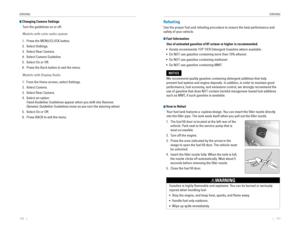
Multi-View Rear Camera*
When you shift into reverse (r), a real-time image of the area behind your vehicle is
shown in the display, along with helpful parking guidelines.
*if equipped
Wide view
Press the selector knob or touch icons on the screen to change views.
Normal viewTop down view
The rear camera view is restricted. You cannot see the corner ends of the bumper or what is underneath the bumper. Its unique lens also makes objects appear closer or farther than they actually are.
Visually confirm that it is safe to drive before backing up. Certain conditions (such as weather, lighting, and high temperatures) may also restrict the rear view. Do not rely on the rearview display, which does not give you all the information about conditions at the rear of your vehicle.
Page 59 of 82

110 || 111
DRIVING
DRIVING
Models with Display Audio
1. From the Home screen, select Settings.
2. Select Camera.
3. Select rear Camera.
4. Select an option:
Fixed Guideline: Guidelines appear when you shift into reverse.
Dynamic Guideline: Guidelines move as you turn the steering wheel.
5. Select on or off.
6. Press BACK to exit the menu.
Changing Camera Settings
Turn the guidelines on or off.
Models with color audio system
1. Press the MeNU/CLoCK button.
2. Select Settings.
3. Select rear Camera.
4. Select Camera Guideline.
5. Select on or off.
6. Press the Back button to exit the menu.
Refueling
Use the proper fuel and refueling procedure to ensure the best performan\
ce and
safety of your vehicle.
Fuel InformationUse of unleaded gasoline of 87 octane or higher is recommended.
•
Honda recommends ToP TIer Detergent Gasoline where available.
• Do NoT use gasoline containing more than 15% ethanol.
• Do NoT use gasoline containing methanol.
• Do NoT use gasoline containing MMT.
We recommend quality gasoline containing detergent additives that help
prevent fuel system and engine deposits. In addition, in order to mainta\
in good
performance, fuel economy, and emissions control, we strongly recommend the
use of gasoline that does NoT contain harmful manganese-based fuel additives
such as MMT, if such gasoline is available.
NOTICE
Gasoline is highly flammable and explosive. You can be burned or seriously
injured when handling fuel.
• Stop the engine, and keep heat, sparks, and flame away.
• Handle fuel only outdoors.
• Wipe up spills immediately.
WARNING
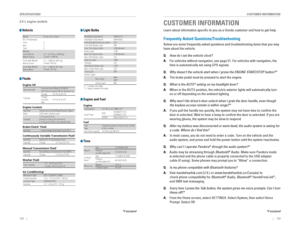
How to Refuel
Your fuel tank features a capless design. You can insert the filler nozzle directly
into the filler pipe. The tank seals itself when you pull out the fi\
ller nozzle.
1. The fuel fill door is located at the left rear of the
vehicle. Park next to the service pump that is
most accessible.
2. Turn off the engine.
3. Press the area indicated by the arrow in the
image to open the fuel fill door. The vehicle must
be unlocked.
4. Insert the filler nozzle fully. When the tank is full,
the nozzle clicks off automatically. Wait about 5
seconds before removing the filler nozzle.
5. Close the fuel fill door.
Page 60 of 82

112 || 113
HANDLING THE UNEXPECTED
DRIVING
Refueling from a Portable Fuel Container
If you need to refuel your vehicle from a portable fuel container, use the funnel
provided with your vehicle.
1. Turn off the engine.
2. Press on the edge of the fuel fill door to open it.
3. Take the funnel out of the tool case in the trunk.
4. Place the end of the funnel on the lower part of
filler opening, then insert it slowly and fully. Make
sure that the end of the funnel goes down along
with the filler pipe.
5. Fill the tank with fuel from the portable fuel
container. Pour fuel carefully so you do not spill
any.
6. remove the funnel from the filler neck. Wipe up
any fuel from the funnel before storing it.
7. Close the fuel fill door.
Funnel
Do not insert the nozzle of a portable fuel container or any funnel othe\
r than the
one provided with your vehicle. Doing so can damage the fuel system.
Do not try to pry open or push open the sealed fuel tank with foreign ob\
jects. This
can damage the fuel system and its seal.
NOTICE
HANDLING THE UNEXPECTED
Learn about what to do in critical or emergency situations.
Smart Entry Remote Battery Strength*
If the battery life in your remote transmitter is weak, a message appear\
s in the
display with information on how to start the engine.
1. Touch the back of the remote transmitter to the
eNGINe STArT/SToP button while the indicator is
flashing.
2. With the brake pedal or clutch pedal pressed,
press the eNGINe STArT/SToP button within 10
seconds.
Shift Lever Does Not Move*
Follow the procedure below if you cannot move the shift lever out of Par\
k (P).
1. Set the parking brake.
2. remove the key from the ignition, or remove the
built-in key from the remote transmitter.
3. Move the removable beverage holder tray
rearward. remove the cover by pulling it with your
fingers.
4. Wrap a cloth around the tip of a small flat-tip
screwdriver to remove the cover of the shift lock
release slot. Put the tip of the flat-tip screwdriver
into the slot and remove it as shown in the image.
5. Insert the key into the shift lock release slot.
6. While pushing the key in, press the shift lever
release button and place the shift lever into Neutral
(N). The lock is now released. Have the shift lever
checked by a dealer as soon as possible.
*if equipped
Slo t
Cove r
Release
butto n
Shift lock
release slot
Page 61 of 82

114 || 115
HANDLING THE UNEXPECTED
HANDLING THE UNEXPECTED
Jump Starting
Turn off the power to electric devices, such as audio and lights. Turn off the engine,
then open the hood.
1. Connect the first jumper cable to your vehicle’s
battery (+) terminal.
2. Connect the other end of the first jumper cable
to the booster battery (+) terminal. Use a 12-volt
booster battery only.
3. Connect the second jumper cable to the booster
battery (-) terminal.
4. Connect the other end of the second jumper cable
to the engine mounting bolt as shown. Do not
connect this jumper cable to any other part.
5. If your vehicle is connected to another vehicle,
start the assisting vehicle’s engine and increase its
rpm slightly.
6. Canadian models only: Before attempting to start
your vehicle, the immobilizer system must be reset.
To do this, press and hold the brake pedal firmly
before turning the vehicle on.
7. Attempt to start your vehicle’s engine. If it turns
over slowly, make sure that the jumper cables have
good metal-to-metal contact.
Booster battery
1.5 � engine models
2.0 � engine model\as
Booster batter\f
1.5 � engine model\
s
2.0 � engine model\
s
WARNING: Battery posts, terminals, and related accessories contain lead and lead\
compounds. Wash your hands after handling.
A battery can explode if you do not follow the correct procedure, seriou\
sly
injuring anyone nearby.
Keep all sparks, open flames, and smoking materials away from the batt\
ery.
WARNING
After the Engine Starts
once your vehicle’s engine has started, remove the jumper cables in the following
order:
1. Disconnect the jumper cable from your vehicle’s ground.
2. Disconnect the other end of the jumper cable from the booster battery (\
-)
terminal.
3. Disconnect the jumper cable from your vehicle’s (+) terminal.
4. Disconnect the other end of the jumper cable from the booster battery (\
+)
terminal.
5. Have your vehicle inspected by a nearby service station or a dealer.
If your vehicle’s battery is disconnected or goes dead: • Some systems are temporarily deactivated. Drive a short distance at 12 mph (20
km/h) or more, and the indicator(s) should go off.
• The immobilizer system needs to be reset (see page 26).*
*Canadian models only
Page 62 of 82

116 || 117
HANDLING THE UNEXPECTED
HANDLING THE UNEXPECTED
Overheating
If the temperature gauge pointer is at the H mark, the engine suddenly l\
oses power,
or steam or spray comes out from under the hood, your engine is overheat\
ing.
1. Immediately park the vehicle in a safe place. Turn
off all accessories and turn on the hazard warning
lights.
2. If steam or spray is not present: Keep the engine
running and open the hood.
If steam or spray is present: Turn off the engine and
wait until it subsides. Then, open the hood.
3. Check that the cooling fan is operating and stop the engine once the tem\
perature
gauge needle comes down. If the cooling fan is not operating, immediatel\
y stop
the engine.
4. once the engine has cooled down, inspect the coolant level and check the \
cooling system components for leaks. If the coolant level in the expansi\
on tank
is low, or no coolant is in the tank, check that the radiator is cool. Cover t\
he
expansion tank cap with a heavy cloth and open the cap. Add coolant unti\
l it
reaches the MAX mark, and put the cap back on.
once the engine has cooled sufficiently, restart it and check the temperature gauge.
If the temperature gauge pointer has gone down, resume driving. If it ha\
s not gone
down, contact a dealer for repairs.
MAX
Expansion tankMIN
Steam and spray from an overheated engine can seriously scald you.
Do not open the hood if steam is coming out.
WARNING
removing the radiator cap while the engine is hot can cause the coolant t\
o
spray out, seriously scalding you.
Always let the engine and radiator cool down before removing the radiato\
r cap.
WARNING
Continuing to drive with the temperature gauge pointer at the H mark may\
damage
the engine.
NOTICE
Emergency Engine Stop*
The eNGINe STArT/SToP button may be used to stop the engine due to an
emergency situation even while driving. If you must stop the engine, cho\
ose one of
the following operations:
•
Press and hold the eNGINe STArT/SToP button for
two seconds, or
•
Firmly press the eNGINe STArT/SToP button two
times.
The steering wheel will not lock. Because turning off the engine also di\
sables the
power assist the engine provides to the steering and braking systems, it\
will require
significantly more physical effort and time to steer and slow the vehi\
cle. Downshift
gears and use both feet on the brake pedal, if necessary, to slow the vehicle and
stop immediately in a safe place
Do not press the button while driving unless it is absolutely necessary \
for the engine
to be switched off.
*if equipped
Emergency Towing
Call a professional towing service if you need to tow your vehicle.
Flat bed equipment: The operator loads your vehicle on the back of a tru\
ck. This is
the best way to transport your vehicle.
Wheel lift equipment: The tow truck uses two pivoting arms that go under the front
tires and lift them off the ground. The rear tires remain on the ground.\
This is an
acceptable way to tow your vehicle.
For CvT models: If you cannot shift the transmission or turn on the engine, your
vehicle must be transported with the front wheels off the ground. Make s\
ure the
parking brake is released. If you cannot release the parking brake, your\
vehicle must
be transported by flat bed equipment.
Trying to lift or tow your vehicle by the bumpers will cause serious dama\
ge. The
bumpers are not designed to support the vehicle’s weight.
Improper towing such as towing behind a motorhome or other motor vehicle\
can
damage the transmission.
NOTICE
Page 63 of 82

Monitors the tire pressure while you are driving. If your vehicle’s tire pressure
beco")
118 || 119
HANDLING THE UNEXPECTED
HANDLING THE UNEXPECTED
Tire Pressure Monitoring System (TPMS)
Monitors the tire pressure while you are driving. If your vehicle’s tire pressure
becomes significantly low, the low tire pressure indicator comes on and a message
appears on the display. Available on U.S. models only.
What to Do
Stop your vehicle in a safe place. Check the tire
pressure and adjust the pressure to the specified
level on the label on the driver’s doorjamb.
TPMS CalibrationAny time you inflate, change, or rotate one or more of the tires, you \
need to
recalibrate the system.
The calibration process requires approximately 30 minutes of cumulative driving at
speeds between 30–65 mph (48–105 km/h). The vehicle must be stop\
ped to begin
calibration, and the process finishes automatically.
Models with TPMS button
Press and hold the TPMS button until the low tire
pressure indicator blinks twice, indicating the
calibration process has begun.
Models with color audio system and Driver Information Interface
Use the steering wheel buttons to make and enter selections in the Drive\
r
Information Interface (see page 29).
1. Scroll to the vehicle Settings screen, and select it.
2. Select TPMS Calibration.
3. Select Calibrate.
Models with Display Audio
Touch items on the screen to make and enter selections.
1. From the HoMe screen, select Settings.
2. Select vehicle.
3. Select TPMS Calibration.
4. Select Calibrate.
TPMS button Low tire pressure/
TPMS indicator
Tire Pressure Monitoring System (TPMS) - Required Federal Explanation
each tire, including the spare (if provided), should be checked monthly\
when cold and inflated to the inflation pressure recommended by the \
vehicle manufacturer on the vehicle placard or tire inflation pressure\
label.
(If your vehicle has tires of a different size than the size indicated \
on the
vehicle placard or tire inflation pressure label, you should determine\
the
proper tire inflation pressure for those tires.)
As an added safety feature, your vehicle has been equipped
with a tire pressure monitoring system (TPMS) that illuminates
a low tire pressure telltale when one or more of your tires is
significantly underinflated.
Accordingly, when the low tire pressure telltale illuminates, you should
stop and check your tires as soon as possible, and inflate them to the\
proper pressure.
Driving on a significantly underinflated tire causes the tire to ove\
rheat and
can lead to tire failure. Underinflation also reduces fuel efficienc\
y and tire
tread life, and may affect the vehicle’s handling and stopping ability.
Please note that the TPMS is not a substitute for proper tire maintenanc\
e,
and it is the driver’s responsibility to maintain correct tire pressure, even
if underinflation has not reached the level to trigger illumination of\
the
TPMS low tire pressure telltale.
Your vehicle has also been equipped with a TPMS malfunction indicator
to indicate when the system is not operating properly. The TPMS
malfunction indicator is combined with the low tire pressure telltale.
When the system detects a malfunction, the telltale will flash for
approximately one minute and then remain continuously illuminated. This \
sequence will continue upon subsequent vehicle start-ups as long as the \
malfunction exists.
When the malfunction indicator is illuminated, the system may not be abl\
e
to detect or signal low tire pressure as intended.
TPMS malfunctions may occur for a variety of reasons, including the
installation of replacement or alternate tires or wheels on the vehicle \
that
prevent the TPMS from functioning properly.
Always check the TPMS malfunction telltale after replacing one or
more tires or wheels on your vehicle to ensure that the replacement
or alternate tires and wheels allow the TPMS to continue to function
properly.
Driving on an extremely underinflated tire can cause it to overheat. A\
n overheated
tire can fail. Always inflate your tires to the specified pressure.
NOTICE
Page 64 of 82

120 || 121
HANDLING THE UNEXPECTED
HANDLING THE UNEXPECTED
Changing a Flat Tire
If a tire goes flat while driving, grasp the steering wheel firmly, and brake gradually
to reduce speed. Then, stop in a safe place. replace the flat tire with the compact
spare tire. Go to a dealer as soon as possible to have the full-size tir\
e repaired or
replaced.
Getting Ready to Change the Tire
Park the vehicle on a firm, level, non-slippery surface. Apply the par\
king brake,
shift to Park (P), and turn the vehicle off. Turn on the hazard warning lights.
1. open the trunk floor lid.
2. Take the tool case out of the trunk. Take the jack
and wheel nut wrench out of the tool case.
3. Unscrew the wing bolt, then remove the spacer
cone. remove the spare tire.
4. Place the compact spare tire (wheel side up)
under the vehicle body, near the tire that needs
to be replaced.
5. If necessary, put the flat tip of the jack handle bar
into the edge of the wheel cover. Carefully pry the
edge and remove the cover.
6. Loosen each wheel nut about one turn using the
wheel nut wrench.
Tool case
Spare tire
Jack handle ba r
Wheel nu t
Wheel
cover
Setting Up the Jack
1. Place the jack under the jacking point closest to
the tire to be changed.
2. Turn the end bracket clockwise (as shown in
the image) until the top of the jack contacts the
jacking point. Make sure that the jacking point
tab is resting in the jack notch.
3. raise the vehicle, using the jack handle bar and
the jack handle, until the tire is off the ground.
Jack
handle
bar Wheel nut
Wrench as jack handle
The vehicle can easily roll off the jack, seriously injuring anyone unde\
rneath.
Follow the directions for changing a tire exactly, and never get under the
vehicle when it is supported only by the jack.
WARNING
The following instructions must be followed to use the jack safely:
• Do not use the jack with people or luggage in the vehicle.
•
Use the jack provided in your vehicle. other jacks may not support the weight
(“load”) or fit the jacking point.
• Do not use while the engine is running.
• Use only where the ground is firm and level.
• Use only at the jacking points.
• Do not get in the vehicle while using the jack.
• Do not put anything on top of or underneath the jack.