Page 97 of 132
 or higher:
1.Push the Power Button (4) to turn on Tire Service Kit and inflate the tire to the pres-
sure indicated on the tire and loading information label o")
If the tire pressure is 19 psi (1.3 Bar) or higher:
1.Push the Power Button (4) to turn on Tire Service Kit and inflate the tire to the pres-
sure indicated on the tire and loading information label on the driver-side door open-
ing.
NOTE:
If the tire becomes over-inflated, push the Deflation Button to reduce the tire pressure
to the recommended inflation pressure before continuing.
2.Disconnect the Tire Service Kit from the valve stem, reinstall the cap on the valve
stem and unplug from 12 Volt outlet.
3.Place the Tire Service Kit in its proper storage area in the vehicle.
4.Have the tire inspected and repaired or replaced at the earliest opportunity at an
authorized dealer or tire service center.
5.Remove the Speed Limit sticker from the instrument panel after the tire has been
repaired.
6.Replace the Sealant Bottle (1) and Sealant Hose (6) assembly at your authorized
dealer as soon as possible.Refer to (F) “Sealant Bottle and Hose Replacement”.
NOTE:
When having the tire serviced, advise the authorized dealer or service center that the
tire has been sealed using the Tire Service Kit.
(F) Sealant Bottle And Hose Replacement:
1.Uncoil the Sealant Hose (6) (clear in color).
2.Locate the round Sealant Bottle release button in the recessed area under the sealant
bottle.
3.Push the Sealant Bottle release button.The Sealant Bottle (1) will pop up.Remove the
bottle and dispose of it accordingly.
4.Clean any remaining sealant from the Tire Service Kit housing.
5.Position the new Sealant Bottle (1) in the housing so that the Sealant Hose (6) aligns
with the hose slot in the front of the housing.Push the bottle into the housing.An
audible click will be heard indicating the bottle is locked into place.
6.Verify that the cap is installed on the fitting at the end of the Sealant Hose (6) and
return the hose to its storage area (located on the bottom of the air pump).
7.Return the Tire Service Kit to its storage location in the vehicle.
WHAT TO DO IN EMERGENCIES
95
Page 98 of 132

If your vehicle has a discharged 12 Volt battery, it can be jump-started using a set of
jumper cables and a battery in another vehicle or by using a port")
JUMP-STARTING PROCEDURE (12 VOLT BATTERY ONLY)
If your vehicle has a discharged 12 Volt battery, it can be jump-started using a set of
jumper cables and a battery in another vehicle or by using a portable battery booster
pack.Jump-starting can be dangerous if done improperly so please follow the procedures
in this section carefully.
NOTE:
When using a portable battery booster pack, follow the manufacturer’s operating instruc-
tions and precautions.
WARNING!
Do not attempt jump-starting if the battery is frozen.It could rupture or explode and
cause personal injury.
CAUTION!
Do not use a portable battery booster pack or any other booster source with a sys-
tem voltage greater than 12 Volts or damage to the battery, power electronics or elec-
trical system may occur.
Preparations For Jump-Start
The battery in your vehicle is located in the underhood compartment under the beauty
cover.To access the battery pull upward on the cover.
Positive Battery Post
WHAT TO DO IN EMERGENCIES
96
Page 99 of 132

WARNING!
•Take care to avoid the radiator cooling fan whenever the hood is raised.It can
start anytime the ignition switch is ON.You can be injured by moving fan blades.
•Remove any metal jewelry such as rings, watch bands and bracelets that could
make an inadvertent electrical contact.You could be seriously injured.
•Batteries contain sulfuric acid that can burn your skin or eyes and generate hydro-
gen gas which is flammable and explosive.Keep open flames or sparks away from
the battery.
1.Set the parking brake, place the transmission into PARK and turn the ignition to
LOCK.
2.Turn off the heater, radio, and all unnecessary electrical accessories.
3.Remove the protective cover over the positive(+)battery post.
4.If using another vehicle to jump-start the battery, park the vehicle within the jumper
cables reach, set the parking brake and make sure the ignition is OFF.
WARNING!
Do not allow vehicles to touch each other as this could establish a ground connection
and personal injury could result.
Jump-Starting Procedure
WARNING!
Failure to follow this jump-starting procedure could result in personal injury or prop-
erty damage due to battery explosion.
CAUTION!
Failure to follow these procedures could result in damage to the charging system of the
booster vehicle or the discharged vehicle.
WHAT TO DO IN EMERGENCIES
97
Page 100 of 132
end of the jumper cable to the positive(+)post of the dis-
charged vehicle.
2.Connect the opposite end of the positive(+)jumper cable to the posit")
Connecting The Jumper Cables
1.Connect the positive(+)end of the jumper cable to the positive(+)post of the dis-
charged vehicle.
2.Connect the opposite end of the positive(+)jumper cable to the positive(+)post of
the booster battery.
3.Connect the negative end(-)of the jumper cable to the negative(-)post of the
booster battery.
4.Connect the opposite end of the negative(-)jumper cable to a good engine ground
(exposed metal part of the discharged vehicle underhood compartment) away from
the battery.
WARNING!
Do not connect the jumper cable to the negative(-)post of the discharged battery.
The resulting electrical spark could cause the battery to explode and could result in
personal injury.Only use the specific ground point, do not use any other exposed metal
parts.
5.Start the engine in the vehicle that has the booster battery, let the engine idle a few
minutes, and then turn the key to RUN position on the vehicle with the discharged
battery.
6.Once the vehicle is started, remove the jumper cables in the reverse sequence:
Disconnecting The Jumper Cables
1.Disconnect the negative(-)jumper cable from the engine ground(-)of the vehicle
with the discharged battery.
2.Disconnect the negative end(-)of the jumper cable from the negative(-)post of the
booster battery.
3.Disconnect the opposite end of the positive(+)jumper cable from the positive(+)
post of the booster battery.
4.Disconnect the positive(+)end of the jumper cable from the positive(+)post of the
discharged vehicle.
If frequent jump-starting is required to start your vehicle, you should have the battery
and charging system inspected at your authorized dealer.
WHAT TO DO IN EMERGENCIES
98
Page 101 of 132

MANUAL PARK RELEASE
WARNING!
Always secure your vehicle by fully applying the parking brake, before activating the
Manual Park Release.Activating the Manual Park Release will allow your vehicle to roll
away if it is not secured by the parking brake or other means.Activating the Manual
Park Release on an unsecured vehicle could lead to serious injury or death for those in
or around the vehicle.
In order to move the vehicle in cases where the transmission will not shift out of PARK
(such as a dead battery), a Manual Park Release is available.Ifadead12voltbatteryis
the cause of the condition refer to “Jump Start Procedure — 12 Volt Battery” before
performing the Manual Park Release.
To perform the Manual Park Release follow these steps:
1.To prevent the vehicle from rolling unintentionally, firmly apply the parking brake.
2.If possible, raise the front driver's side of the vehicle to provide access to the trans-
mission.
3.Working from underneath the vehicle, remove the black rubber plug from the front
of the Park module (a black canister mounted on the front of the transmission).
4.Using a T25 driver bit, rotate the Manual Park Release shaft (located just behind the
rubber plug) clockwise, at least 20 turns, to release the Park mechanism.The vehicle is
now out of PARK and can be moved.
5.Reinstall the rubber plug.
6.Release the parking brake only when a
driver is in the vehicle, or the vehicle is
secured by other means.The Manual
Park Release will be reset automatically
once the vehicle is restarted.
Manual Park Release
WHAT TO DO IN EMERGENCIES
99
Page 102 of 132

TOWING A DISABLED VEHICLE
This section describes procedures for towing a disabled vehicle using a commercial towing
service.
Towing Condition Wheels OFF The GroundSINGLE-SPEED
TRANSMISSION
Flat Tow NONE
NOT ALLOWED
Wheel LiftRear
NOT ALLOWED
Front OK
Flatbed
ALLOK
This vehicle must be towed with the front wheels OFF the ground.
If you must use the accessories (wipers, defrosters, etc.) while being towed, the ignition
must be in the ON/RUN position.
If the ignition key is unavailable, or the battery is discharged, see “Manual Park Release” in
“What To Do In Emergencies” for instructions on shifting the transmission out of PARK
in order to move the vehicle.
CAUTION!
•Do not use sling-type equipment when towing.Vehicle damage may occur.
•When securing the vehicle to a flatbed truck, do not attach to front or rear sus-
pension components.Damage to your vehicle may result from improper towing.
ENHANCED ACCIDENT RESPONSE SYSTEM
In the event of an impact causing air bag deployment, if the communication network and
power remains intact, depending on the nature of the event, the ORC will determine
whether to have the Enhanced Accident Response System perform the following func-
tions:
•Disable the high voltage battery.
•Place the transmission into PARK.
•Flash hazard lights as long as the 12 Volt battery has power or until the ignition key is
turned off.
•Turn on the interior lights, which remain on as long as the 12 Volt battery has power
or until the ignition key is removed.
•Unlock the doors automatically.
WHAT TO DO IN EMERGENCIES
100
Page 103 of 132

In order to move your vehicle to the side of the road the transmission must be in NEU-
TRAL and the 12 Volt system must be functional.To place the transmission into NEU-
TRAL you must turn the ignition OFF and then back to the RUN position (cycle the igni-
tion) then push the NEUTRAL button.
NOTE:
The high voltage battery will remain disabled after an Enhanced Accident Response Event
and must be reset by your authorized dealership.
FREEING A STUCK VEHICLE
If your vehicle becomes stuck in mud, sand or snow, it can often be moved using a rock-
ing motion.Turn the steering wheel right and left to clear the area around the front
wheels.Then shift back and forth between DRIVE and REVERSE while gently pushing the
accelerator.Use the least amount of accelerator pedal pressure that will maintain the
rocking motion, without spinning the wheels.
NOTE:
Push the “ESC Off ” switch, to place the Electronic Stability Control (ESC) system in “Par-
tial Off ” mode, before rocking the vehicle.Refer to “Electronic Brake Control” in “Start-
ing And Operating” on the DVD for further information.Once the vehicle has been
freed, push the “ESC Off ” switch again to restore “ESC On” mode.
CAUTION!
•When “rocking” a stuck vehicle by shifting between DRIVE and REVERSE, do not
spin the wheels faster than 15 mph (24 km/h), or drivetrain damage may result.
•Spinning the wheels too fast may lead to transmission overheating and failure.It
can also damage the tires.Do not spin the wheels above 30 mph (48 km/h) while
in gear.
WARNING!
Fast spinning tires can be dangerous.Forces generated by excessive wheel speeds may
cause damage, or even failure, of the axle and tires.A tire could explode and injure
someone.Do not spin your vehicle's wheels faster than 30 mph (48 km/h) or for lon-
ger than 30 seconds continuously without stopping when you are stuck and do not let
anyone near a spinning wheel, no matter what the speed.
WHAT TO DO IN EMERGENCIES
101
Page 104 of 132

This vehicle is equipped with an Event Data Recorder (EDR).The main purpose of an
EDR is to record, in certain crash or near crash-like situations, such as an air bag deploy-")
EVENT DATA RECORDER (EDR)
This vehicle is equipped with an Event Data Recorder (EDR).The main purpose of an
EDR is to record, in certain crash or near crash-like situations, such as an air bag deploy-
ment or hitting a road obstacle, data that will assist in understanding how a vehicle’s sys-
tems performed.The EDR is designed to record data related to vehicle dynamics and
safety systems for a short period of time, typically 30 seconds or less.The EDR in this
vehicle is designed to record such data as:
•How various systems in your vehicle were operating.
•Whether or not the driver and passenger safety belts were buckled/fastened.
•How far (if at all) the driver was depressing the accelerator and/or brake pedal.
•How fast the vehicle was traveling.
These data can help provide a better understanding of the circumstances in which
crashes and injuries occur.
NOTE:
EDR data is recorded by your vehicle only if a non-trivial crash situation occurs; no data
is recorded by the EDR under normal driving conditions and no personal data (e.g.
name, gender, age, and crash location) is recorded.However, other parties, such as law
enforcement, could combine the EDR data with the type of personally identifying data
routinely acquired during a crash investigation.
To read data recorded by an EDR, special equipment is required, and access to the ve-
hicle or the EDR is needed.In addition to the vehicle manufacturer, other parties such as
law enforcement, that have the special equipment, can read the information if they have
access to the vehicle or the EDR.
WHAT TO DO IN EMERGENCIES
102
 1
1 2
2 3
3 4
4 5
5 6
6 7
7 8
8 9
9 10
10 11
11 12
12 13
13 14
14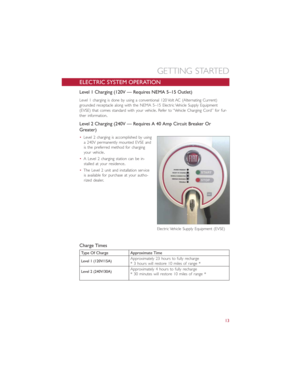 15
15 16
16 17
17 18
18 19
19 20
20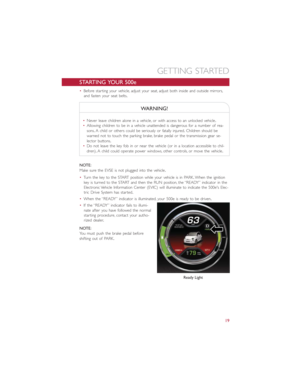 21
21 22
22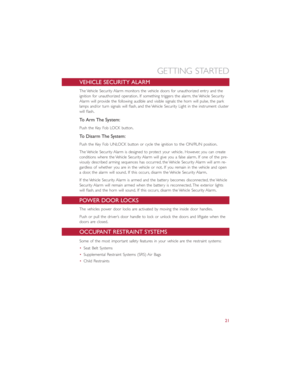 23
23 24
24 25
25 26
26 27
27 28
28 29
29 30
30 31
31 32
32 33
33 34
34 35
35 36
36 37
37 38
38 39
39 40
40 41
41 42
42 43
43 44
44 45
45 46
46 47
47 48
48 49
49 50
50 51
51 52
52 53
53 54
54 55
55 56
56 57
57 58
58 59
59 60
60 61
61 62
62 63
63 64
64 65
65 66
66 67
67 68
68 69
69 70
70 71
71 72
72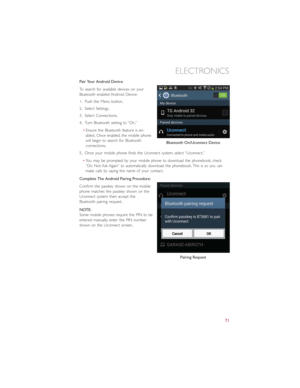 73
73 74
74 75
75 76
76 77
77 78
78 79
79 80
80 81
81 82
82 83
83 84
84 85
85 86
86 87
87 88
88 89
89 90
90 91
91 92
92 93
93 94
94 95
95 96
96 97
97 98
98 99
99 100
100 101
101 102
102 103
103 104
104 105
105 106
106 107
107 108
108 109
109 110
110 111
111 112
112 113
113 114
114 115
115 116
116 117
117 118
118 119
119 120
120 121
121 122
122 123
123 124
124 125
125 126
126 127
127 128
128 129
129 130
130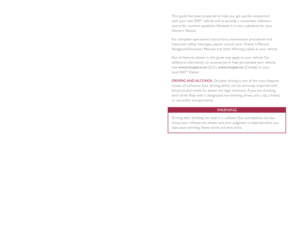 131
131