Page 89 of 132
 per 12° F (7° C) of air tempera-
ture change.Keep this in mind when checking tire pressure inside a garage, especially in
the Winter.Exampl")
NOTE:
Tire pressures change by approximately 1 psi (7 kPa) per 12° F (7° C) of air tempera-
ture change.Keep this in mind when checking tire pressure inside a garage, especially in
the Winter.Example: If garage temperature is 68°F (20°C) and the outside temperature
is 32°F (0°C), then the cold tire inflation pressure should be increased by 3 psi (21 kPa),
which equals 1 psi (7 kPa) for every 12°F (7°C) for this outside temperature condition.
CAUTION!
The TPMS has been optimized for the original equipment tires and wheels.TPMS pres-
sures and warning have been established for the tire size equipped on your vehicle.
Undesirable system operation or sensor damage may result when using replacement
equipment that is not of the same size, type, and/or style.Aftermarket wheels can cause
sensor damage.Do not use tire sealant from a can, or balance beads if your vehicle is
equipped with a TPMS, as damage to the sensors may result.
– Electronic Stability Control (ESC) Activation / Malfunction Indicator Light
The “ESC Activation/Malfunction Indicator Light” in the instrument cluster will come on
for four seconds when the ignition switch is turned to the ON/RUN position.If the “ESC
Activation/Malfunction Indicator Light” comes on continuously with the engine running, a
malfunction has been detected in the ESC system.If this light remains on, see your au-
thorized dealer as soon as possible to have the problem diagnosed and corrected.
NOTE:
•The “ESC Off Indicator Light” and the “ESC Activation/Malfunction Indicator Light”
come on momentarily each time the ignition switch is turned to ON/RUN.
•Each time the ignition is turned to ON/RUN, the ESC system will be ON even if it
was turned off previously.
•ESC Activation/Malfunction Light can blink during a ESC or TC intervention.
WHAT TO DO IN EMERGENCIES
87
Page 90 of 132

INSTRUMENT CLUSTER INDICATOR LIGHTS
– Turn Signal Indicator
The arrows will flash with the exterior turn signals when the turn signal lever is oper-
ated.
NOTE:
If either indicator flashes at a rapid rate, check for a defective outside light bulb.
– High Beam Indicator
Indicates that headlights are on high beam.
– Vehicle Security Light
This light will flash rapidly for approximately 15 seconds when the vehicle security alarm
is arming.The light will flash at a slower speed continuously after the alarm is set.The
security light will also come on for about three seconds when the ignition is first turned
on.
– Electronic Speed Control SET Indicator
This indicator will illuminate when the cruising speed has been set.
– Front Fog Light Indicator
This indicator will illuminate when the front fog lights are on.
– Park/Headlight ON Indicator
This indicator will illuminate when the park lights or headlights are turned on.
– Electronic Stability Control (ESC) OFF Indicator Light
This light indicates the ESC system has been turned off by the driver.
WHAT TO DO IN EMERGENCIES
88
Page 91 of 132
TIRE SERVICE KIT
Small punctures up to 1/4 inch (6 mm) in the tire tread can be sealed with Tire Service
Kit.Foreign objects (e.g., screws or nails) should not be removed from the tire.Tire Ser-
vice Kit can be used in outside temperatures down to approximately -4°F (-20°C).
This kit will provide a temporary tire seal, allowing you to drive your vehicle up to
100 miles (160 km) with a maximum speed of 55 mph (90 km/h).
Tire Service Kit Storage
The Tire Service Kit is located in the rear cargo area.
Tire Service Kit
WHAT TO DO IN EMERGENCIES
89
Page 92 of 132

Tire Service Kit Components And Operation
Using The Mode Select Knob And Hoses
Your Tire Service Kit is equipped with the
following symbols to indicate the air or
sealant mode.
•
Selecting Air Mode
Push in the Mode Select Knob (5) and turn
to this position for air pump operation
only.Use the Black Air Pump Hose (7)
when selecting this mode.
•
Selecting Sealant Mode
Push in the Mode Select Knob (5) and turn
to this position to inject the Tire Service Kit
Sealant and to inflate the tire.Use the Seal-
ant Hose (clear hose) (6) when selecting
this mode.
•
Using The Power Button
Push and release the Power Button (4)
once to turn On the Tire Service Kit.Push
and release the Power Button (4) again to
turn Off the Tire Service Kit.
•
Using The Deflation Button
Push the Deflation Button (2) to reduce
the air pressure in the tire if it becomes
over - inflated.
Tire Service Kit Usage Precautions
•Replace the Tire Service Kit Sealant Bottle (1) and Sealant Hose (6) prior to the expi-
ration date (printed at the lower right hand corner on the bottle label) to assure opti-
mum operation of the system.Refer to “Sealing a Tire with Tire Service Kit” section
(F) “Sealant Bottle and Hose Replacement”.
•The Sealant Bottle (1) and Sealant Hose (6) are a one tire application use and need to
be replaced after each use.Always replace these components immediately at your
original equipment vehicle dealer.
•When the Tire Service Kit sealant is in a liquid form, clean water, and a damp cloth will
remove the material from the vehicle or tire and wheel components.Once the sealant
dries, it can easily be peeled off and properly discarded.
Tire Service Kit Components
1 — Sealant Bottle
2 — Deflation Button
3 — Pressure Gauge
4 — Power Button
5 — Mode Select Knob
6 — Sealant Hose (Clear)
7 — Air Pump Hose (Black)
8 — Power Plug (located on the bottom
side of the Tire Service Kit)
WHAT TO DO IN EMERGENCIES
90
Page 93 of 132

•For optimum performance, make sure the valve stem on the wheel is free of debris
before connecting the Tire Service Kit.
•You can use the Tire Service Kit air pump to inflate bicycle tires.The kit also comes
with two needles, located in the Accessory Storage Compartment (on the bottom of
the air pump) for inflating sport balls, rafts, or similar inflatable items.However, use
only the Air Pump Hose (7) and make sure the Mode Select Knob (5) is in the Air
Mode when inflating such items to avoid injecting sealant into them.The Tire Service
Kit Sealant is only intended to seal punctures less than 1/4 inch (6 mm) diameter in
the tread of your vehicle.
•Do not lift or carry the Tire Service Kit by the hoses.
WARNING!
•Do not attempt to seal a tire on the side of the vehicle closest to traffic.Pull far
enough off the road to avoid the danger of being hit when using the Tire Service
Kit.
•Do not use Tire Service Kit or drive the vehicle under the following circumstances:
•If the puncture in the tire tread is approximately 1/4 inch (6 mm) or larger.
•If the tire has any sidewall damage.
•If the tire has any damage from driving with extremely low tire pressure.
•If the tire has any damage from driving on a flat tire.
•If the wheel has any damage.
•If you are unsure of the condition of the tire or the wheel.
•Keep Tire Service Kit away from open flames or heat source.
•A loose Tire Service Kit thrown forward in a collision or hard stop could endanger
the occupants of the vehicle.Always stow the Tire Service Kit in the place pro-
vided.Failure to follow these warnings can result in injuries that are serious or
fatal to you, your passengers, and others around you.
•Take care not to allow the contents of Tire Service Kit to come in contact with
hair, eyes, or clothing.Tire Service Kit sealant is harmful if inhaled, swallowed, or
absorbed through the skin.It causes skin, eye, and respiratory irritation.Flush im-
mediately with plenty of water if there is any contact with eyes or skin.Change
clothing as soon as possible, if there is any contact with clothing.
•Tire Service Kit Sealant solution contains latex.In case of an allergic reaction or
rash, consult a physician immediately.Keep Tire Service Kit out of reach of chil-
dren.If swallowed, rinse mouth immediately with plenty of water and drink plenty
of water.Do not induce vomiting! Consult a physician immediately.
WHAT TO DO IN EMERGENCIES
91
Page 94 of 132
 Whenever You Stop To Use Tire Service Kit:
1.Pull over to a safe location and turn on the vehicle’s Hazard Warning flashers.
2.Verify that the valve stem (on")
Sealing A Tire With Tire Service Kit
(A) Whenever You Stop To Use Tire Service Kit:
1.Pull over to a safe location and turn on the vehicle’s Hazard Warning flashers.
2.Verify that the valve stem (on the wheel with the deflated tire) is in a position that is
near to the ground.This will allow the Tire Service Kit Hoses (6) and (7) to reach the
valve stem and keep the Tire Service Kit flat on the ground.This will provide the best
positioning of the kit when injecting the sealant into the deflated tire and running the
air pump.Move the vehicle as necessary to place the valve stem in this position be-
fore proceeding.
3.Place the transmission in PARK (auto transmission) or in Gear (manual transmission)
and place the ignition in the OFF position.
4.Set the parking brake.
(B) Setting Up To Use Tire Service Kit:
1.Push in the Mode Select Knob (5) and turn to the Sealant Mode position.
2.Uncoil the Sealant Hose (6) and then remove the cap from the fitting at the end of
the hose.
3.Place the Tire Service Kit flat on the ground next to the deflated tire.
4.Remove the cap from the valve stem and then screw the fitting at the end of the
Sealant Hose (6) onto the valve stem.
5.Uncoil the Power Plug (8) and insert the plug into the vehicle’s 12 Volt power outlet.
NOTE:
Do not remove foreign objects (e.g., screws or nails) from the tire.
(C) Injecting Tire Service Kit Sealant Into The Deflated Tire:
•Always start the engine before turning ON the Tire Service Kit.
NOTE:
Manual transmission vehicles must have the parking brake engaged and the gear selector
in NEUTRAL.
•After pushing the Power Button (4), the sealant (white fluid) will flow from the Sealant
Bottle (1) through the Sealant Hose (6) and into the tire.
NOTE:
Sealant may leak out through the puncture in the tire.
WHAT TO DO IN EMERGENCIES
92
Page 95 of 132
 does not flow within0–10seconds through the Sealant
Hose (6):
1.Push the Power Button (4) to turn Off the Tire Service Kit.Disconnect the Sealant
Hose (6) from the valve")
If the sealant (white fluid) does not flow within0–10seconds through the Sealant
Hose (6):
1.Push the Power Button (4) to turn Off the Tire Service Kit.Disconnect the Sealant
Hose (6) from the valve stem.Make sure the valve stem is free of debris.Reconnect
the Sealant Hose (6) to the valve stem.Check that the Mode Select Knob (5) is in
the Sealant Mode position and not Air Mode.Push the Power Button (4) to turn On
the Tire Service Kit.
2.Connect the Power Plug (8) to a different 12 Volt power outlet in your vehicle or
another vehicle, if available.Make sure the engine is running before turning ON the
Tire Service Kit.
3.The Sealant Bottle (1) may be empty due to previous use.Call for assistance.
NOTE:
If the Mode Select Knob (5) is on Air Mode and the pump is operating, air will dispense
from the Air Pump Hose (7) only, not the Sealant Hose (6).
If the sealant (white fluid) does flow through the Sealant Hose (6):
1.Continue to operate the pump until sealant is no longer flowing through hose (typi-
cally takes 30 - 70 seconds).As the sealant flows through the Sealant Hose (6), the
Pressure Gauge (3) can read as high as 70 psi (4.8 Bar).The Pressure Gauge (3) will
decrease quickly from approximately 70 psi (4.8 Bar) to the actual tire pressure when
the Sealant Bottle (1) is empty.
2.The pump will start to inject air into the tire immediately after the Sealant Bottle (1)
is empty.Continue to operate the pump and inflate the tire to the pressure indicated
on the tire pressure label on the driver-side latch pillar (recommended pressure).
Check the tire pressure by looking at the Pressure Gauge (3).
If the tire does not inflate to at least 26 psi (1.8 Bar) pressure within 15 minutes:
•The tire is too badly damaged.Do not attempt to drive the vehicle further.Call for
assistance.
NOTE:
If the tire becomes over-inflated, push the Deflation Button to reduce the tire pressure
to the recommended inflation pressure before continuing.
If the tire inflates to the recommended pressure or is at least 26 psi (1.8 Bar) pressure
within 15 minutes:
1.Push the Power Button (4) to turn off the Tire Service Kit.
2.Remove the Speed Limit sticker from the top of the Sealant Bottle (1) and place the
sticker on the instrument panel.
3.Immediately disconnect the Sealant Hose (6) from the valve stem, reinstall the cap on
the fitting at the end of the hose, and place the Tire Service Kit in the vehicle storage
location.Quickly proceed to (D) “Drive Vehicle.”
WHAT TO DO IN EMERGENCIES
93
Page 96 of 132
 may get hot after use, so it should be
handled carefully.
•Failure to reinstall the cap on the fitting at the end of the Sealant Hose (6) can
re")
CAUTION!
•The metal end fitting from Power Plug (8) may get hot after use, so it should be
handled carefully.
•Failure to reinstall the cap on the fitting at the end of the Sealant Hose (6) can
result in sealant contacting your skin, clothing, and the vehicle’s interior.It can also
result in sealant contacting internal Tire Service Kit components which may cause
permanent damage to the kit.
(D) Drive Vehicle:
Immediately after injecting sealant and inflating the tire, drive the vehicle 5 miles (8 km)
or 10 minutes to ensure distribution of the Tire Service Kit Sealant within the tire.Do
not exceed 55 mph (90 km/h).
WARNING!
Tire Service Kit is not a permanent flat tire repair.Have the tire inspected and repaired
or replaced after using Tire Service Kit.Do not exceed 55 mph (90 km/h) until the tire
is repaired or replaced.Failure to follow this warning can result in injuries that are seri-
ous or fatal to you, your passengers, and others around you.
(E) After Driving:
Pull over to a safe location.Refer to “Whenever You Stop to Use Tire Service Kit” before
continuing.
1.Push in the Mode Select Knob (5) and turn to the Air Mode position.
2.Uncoil the power plug and insert the plug into the vehicle's 12 Volt power outlet.
3.Uncoil the Air Pump Hose (7) (black in color) and screw the fitting at the end of
hose (7) onto the valve stem.
4.Check the pressure in the tire by reading the Pressure Gauge (3).
If tire pressure is less than 19 psi (1.3 Bar):
The tire is too badly damaged.Do not attempt to drive the vehicle further.Call for assis-
tance.
WHAT TO DO IN EMERGENCIES
94
 1
1 2
2 3
3 4
4 5
5 6
6 7
7 8
8 9
9 10
10 11
11 12
12 13
13 14
14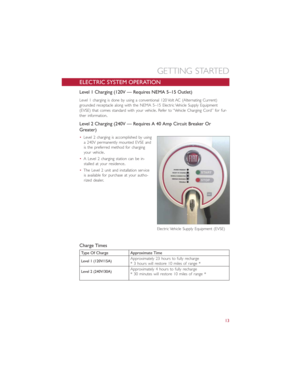 15
15 16
16 17
17 18
18 19
19 20
20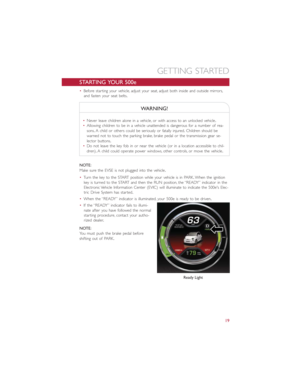 21
21 22
22 23
23 24
24 25
25 26
26 27
27 28
28 29
29 30
30 31
31 32
32 33
33 34
34 35
35 36
36 37
37 38
38 39
39 40
40 41
41 42
42 43
43 44
44 45
45 46
46 47
47 48
48 49
49 50
50 51
51 52
52 53
53 54
54 55
55 56
56 57
57 58
58 59
59 60
60 61
61 62
62 63
63 64
64 65
65 66
66 67
67 68
68 69
69 70
70 71
71 72
72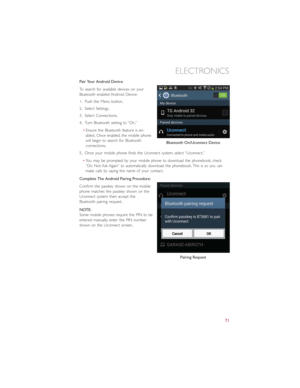 73
73 74
74 75
75 76
76 77
77 78
78 79
79 80
80 81
81 82
82 83
83 84
84 85
85 86
86 87
87 88
88 89
89 90
90 91
91 92
92 93
93 94
94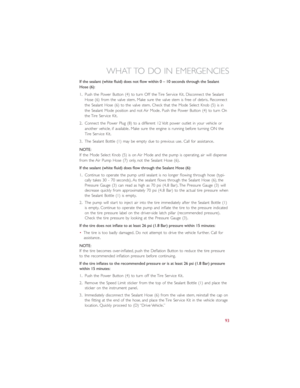 95
95 96
96 97
97 98
98 99
99 100
100 101
101 102
102 103
103 104
104 105
105 106
106 107
107 108
108 109
109 110
110 111
111 112
112 113
113 114
114 115
115 116
116 117
117 118
118 119
119 120
120 121
121 122
122 123
123 124
124 125
125 126
126 127
127 128
128 129
129 130
130 131
131 in the tire tread can be sealed with Tire Service
Kit.Foreign objects (e.g., screws or nails) should not be removed from the tire.Tire Ser-
vice")