Page 57 of 132
Privacy of any wireless and wired communications cannot be assured.Third parties may
unlawfully intercept information and private communications without your consent.For
further information, refer to “Onboard Diagnostic System (OBD II) Cybersecurity” in
“Maintaining Your Vehicle” in your Owner’s Manual on the DVD.
IDENTIFYING YOUR RADIO
Uconnect 5.0
•5.0” Full Color Touchscreen Display
•Bluetooth Connectivity/Bluetooth
Streaming Audio
Uconnect 5.0
ELECTRONICS
55
Page 58 of 132
UCONNECT 5.0
NOTE:
Do NOT attach any object to the touchscreen, doing so can result in damage to the
touchscreen.
Uconnect 5.0 Radio Buttons
1 — On/Off Button
2 — Mute Button
3 — Screen Off Button
4 — Settings Button
5 — Back Button
6 — BROWSE/ENTER Button — TUNE/
SCROLL Knob7 — MORE — Access: Clock, Trip, Com-
pass And Charging Schedule
8 — PHONE Button
9 — NAV Button
10 — MEDIA Button
11 — RADIO Button
ELECTRONICS
56
Page 59 of 132

Clock Setting
To start the clock setting procedure:
1.Push the Settings button on the faceplate and then press the “Clock and Date” button
on the touchscreen.
2.Press the “Set Time” button on the touchscreen.
3.Press the “Up” or “Down” arrows to adjust the hours or minutes, then select the
“AM” or “PM” button on the touchscreen.You can also select 12hr or 24hr format by
pressing the desired button on the touchscreen.
4.Once the time is set press the “Done” button on the touchscreen to exit the time
screen.
NOTE:
In the Clock Setting Menu you can also select Display Clock.Display Clock turns the
clock display in the status bar on or off.
Equalizer, Balance And Fade
1.Push the Settings button on the faceplate.
2.Scroll down and press the “Audio” button on the touchscreen to open the Audio
menu.
3.The Audio Menu shows the following options for you to customize your audio set-
tings.
Equalizer
Press the “Equalizer” button on the touchscreen to adjust the Bass, Mid and Treble.Use
the “+” or “-” button on the touchscreen to adjust the equalizer to your desired settings.
Balance/Fade
Press the “Balance/Fade” button on the touchscreen to adjust the sound from the speak-
ers.Use the arrow buttons on the touchscreen to adjust the sound level from the front
and rear or right and left side speakers.Press the Center “C” button on the touchscreen
to reset the balance and fade to the factory setting.
Speed Adjusted Volume
Press the “Speed Adjusted Volume” button on the touchscreen to select between OFF, 1,
2or3.This will decrease the radio volume relative to a decrease in vehicle speed.
Surround Sound
Press the “Surround Sound” button on the touchscreen, select On or Off followed by
pressing the back arrow button on the touchscreen.When this feature is activated, it pro-
vides simulated surround sound mode.
ELECTRONICS
57
Page 60 of 132
Radio Operation
Store Radio Presets Manually
The Radio stores up to 12 presets in each of the Radio modes.There are four visible
presets at the top of the radio screen.Pressing the “All” button on the touchscreen on
the radio home screen will display all of the preset stations for that mode.
To store a radio preset manually, follow the steps below:
1.Tune to the desired station.
2.Press and hold the desired numbered button on the touchscreen for more than two
seconds, or until you hear a confirmation beep.
Seek Next/Previous Buttons
•Press the up or down button to seek through radio stations in AM, FM or SXM bands.
•Hold either button to bypass stations without stopping.
Radio Operation
1 — Radio Station Preset
2 — All Presets
3 — Seek Next
4 — Audio Settings5 — Station Information
6 — Direct Tune
7 — Radio Band
8 — Seek Previous
ELECTRONICS
58
Page 61 of 132

SiriusXM Premier Over 160 Channels
Get every channel available on your satellite radio, and enjoy all you want, all in one place.
Hear commercial-free music plus sports, news, talk and entertainment.Get all the pre-
mium programming, including Howard Stern, every NFL game, Oprah Radio, every MLB
and NHL game, every NASCAR race and more.And get 20+ Xtra channels, including
SiriusXM Latino, a selection of channels dedicated to Spanish language programming.
NOTE:
To access SiriusXM Satellite Radio, push the RADIO Button on the faceplate and then the
“SXM” button on the touchscreen.
SiriusXM services require subscriptions, sold separately after the 12-month trial included
with the new vehicle purchase.If you decide to continue your service at the end of your
trial subscription, the plan you choose will automatically renew and bill at then-current
rates until you call SiriusXM at 1-866-635-2349 for U.S. residents and 1-888-539-7474
for Canadian residents to cancel. See SiriusXM Customer Agreement for complete
terms at www.siriusxm.com and www.siriusxm.ca for Canadian residents.All fees and
programming subject to change.Our satellite service is available only to those at least 18
and older in the 48 contiguous USA and D.C.Our Sirius satellite service is also available
in PR (with coverage limitations).Our Internet radio service is available throughout our
satellite service area and in AK and HI.© 2015 Sirius XM Radio Inc.Sirius, XM and all
related marks and logos are trademarks of Sirius XM Radio Inc.
Voice Text Reply (Not Compatible With iPhone)
Once your Uconnect system is paired with a compatible mobile device, the system can
announce a new incoming text message, and read it to your over the vehicle audio sys-
tem.You can reply to the message using Voice Recognition by selecting, or saying, one of
the 18 pre-defined messages.
Here’s how:
1.Push the Uconnect Phone button
and wait for the beep, then say “reply.”
Uconnect will give the following prompt: “Please say the message you would like to
send.”
2.Wait for the beep and say one of the pre-defined messages.(If you are not sure, you
can say “help”).Uconnect will then read the pre-defined messages allowed.
3.As soon as you hear the message you would like to send, you can interrupt the list of
prompts by pushing the Uconnect phone button and saying the phrase.Uconnect will
confirm the message by reading it back to you.
4.Push the Phone button and say “Send.”
ELECTRONICS
59
Page 62 of 132

PRE-DEFINED VOICE TEXT REPLY RESPONSES
Ye s.Stuck in Traffic.See you later.
No.Start without me.I’ll be Late.
Okay.Where are you?
I will be minutes
late.
Call me.Are you there yet?
I’ll call you later.I need directions.
See you in of
minutes.
I’m on my way.
Can’t talk right now.
I’m lost.Thanks.
NOTE:
Voice texting reply and voice texting features require a compatible mobile device enabled
with Bluetooth Message Access Profile (MAP).iPhone and some other smartphones do
not currently support Bluetooth MAP.Visit UconnectPhone.com for system and device
compatibility.
Want to dictate a personal message? You must first register with Uconnect Access (U.S.
residents only) to take advantage of a new, cloud-based Voice Texting service, an enhance-
ment to Voice Text Reply.
USB/AUX CONTROL
To select a specific audio source, push the
MEDIA button on the faceplate.To allow
music to play from your portable device
through the vehicle’s speakers, press the
“Source” button then select one of the
following modes:
USB/iPod
•USB/iPod Mode is entered by either in-
serting a USB Jump Drive or iPod cable
into the USB port or by pushing the
MEDIA button on the faceplate located
left of the display.
Audio Jack (AUX)
•The AUX allows a portable device, such
as an MP3 player or an iPod, to be
plugged into the radio and utilize the vehicle’s audio system, using a 3.5 mm audio
cable, to amplify the source and play through the vehicle speakers.
•The functions of the portable device are controlled using the device buttons, not the
buttons on the radio.The volume may be controlled using the radio or portable
device.
USB/Aux Audio Jack
1 — AUX/Audio Jack
2 — USB Port
ELECTRONICS
60
Page 63 of 132
UCONNECT 5.0 VOICE RECOGNITION QUICK TIPS
Introducing Uconnect
Start using Uconnect Voice Recognition with these helpful quick tips.It provides the key
Voice Commands and tips you need to know to control your Uconnect 5.0 system.
Key features:
•Five-inch Color Touchscreen Display with AM/FM/USB/Bluetooth
•Bluetooth with integrated voice control
Uconnect 5.0 Radio
ELECTRONICS
61
Page 64 of 132
Get Started
1.VisitUconnectPhone.comto check mobile device and feature compatibility and to
find phone pairing instructions.
2.Reduce background noise.Wind and passenger conversations are examples of noise
that may impact recognition.
3.Speak clearly at a normal pace and volume while facing straight ahead.The micro-
phone is positioned on the rearview mirror and aimed at the driver.
4.Each time you give a Voice Command, you must first press either the VR or Phone
button, wait untilafterthe beep, then say your Voice Command.
5.You can interrupt the help message or system prompts by pressing the VR or Phone
button and saying a Voice Command from current category.
NOTE:
All you need to control your Uconnect system with your voice are the buttons on your
steering wheel.
Uconnect VR/Phone Buttons
1 — Push To Mute
2 — Push To Initiate Or To Answer A Phone Call, Send Or Receive A Text
3 — Push To End Call
4 — Push For Voice Recognition (VR)
ELECTRONICS
62
 1
1 2
2 3
3 4
4 5
5 6
6 7
7 8
8 9
9 10
10 11
11 12
12 13
13 14
14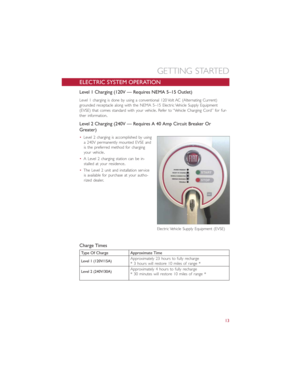 15
15 16
16 17
17 18
18 19
19 20
20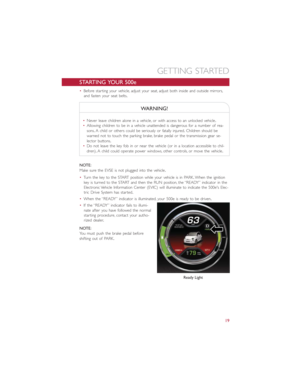 21
21 22
22 23
23 24
24 25
25 26
26 27
27 28
28 29
29 30
30 31
31 32
32 33
33 34
34 35
35 36
36 37
37 38
38 39
39 40
40 41
41 42
42 43
43 44
44 45
45 46
46 47
47 48
48 49
49 50
50 51
51 52
52 53
53 54
54 55
55 56
56 57
57 58
58 59
59 60
60 61
61 62
62 63
63 64
64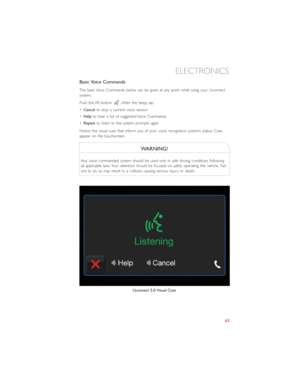 65
65 66
66 67
67 68
68 69
69 70
70 71
71 72
72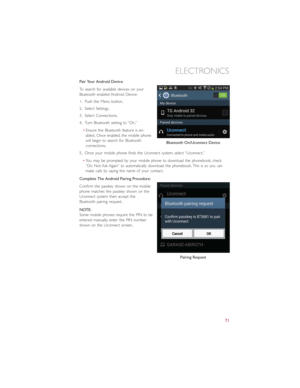 73
73 74
74 75
75 76
76 77
77 78
78 79
79 80
80 81
81 82
82 83
83 84
84 85
85 86
86 87
87 88
88 89
89 90
90 91
91 92
92 93
93 94
94 95
95 96
96 97
97 98
98 99
99 100
100 101
101 102
102 103
103 104
104 105
105 106
106 107
107 108
108 109
109 110
110 111
111 112
112 113
113 114
114 115
115 116
116 117
117 118
118 119
119 120
120 121
121 122
122 123
123 124
124 125
125 126
126 127
127 128
128 129
129 130
130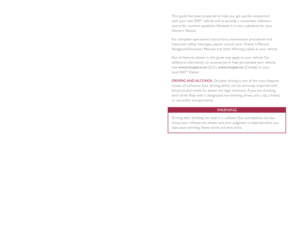 131
131


