2016 AUDI RS7 SPORTBACK infotainment
[x] Cancel search: infotainmentPage 98 of 282
Audi dri ve s elec t
Cur ve ligh t*
The curve ligh t adapts to driving on curves . The
pivoting action and the lighting are also adapted
to the mode .
Adaptive cru is e control *
The behavior when accele rating can be adjusted
from comfortab le to sporty, depending on the
drive select mode. Adaptive cru ise control also
responds to the driving behavior of the vehicle
ahead in a more conservative or sporty manner.
Engine sound
The sound of the engine is adapted to the select
ed mode and ranges from subt le to sporty.
(D Note
- Make sure there is enough clearance above
and below the veh icle when parking. The
height of the vehicle can change once it is
parked due to temperature f luctuations,
changes to the load conditions and changes
to the driving modes, which can affect clear
ance.
- When transporting the vehicle on a car car
rier, train, ship or by other means, only tie
the vehicle down at the running surface of
the tires, which is the outer circumference.
Securing the vehicle at the axle compo
nents, suspension struts or towing eyes is
not permitted because the pressu re in the
a ir suspension struts can change dur ing
transport. The vehicle may not be secured
sufficiently if this happens.
@ Tips
- In some models, the maximum vehicle
speed can only be reached in the
Auto and
D ynami c modes.
- Se lec ting the
D ynami c mode results in spor
ty shifting characterist ics. The S gear posi
tion engages automatica lly.
96
- In veh icles that have dynamic steering *, op
erating noise is heard when starting or stop
ping the engine . This does not indicate a
problem.
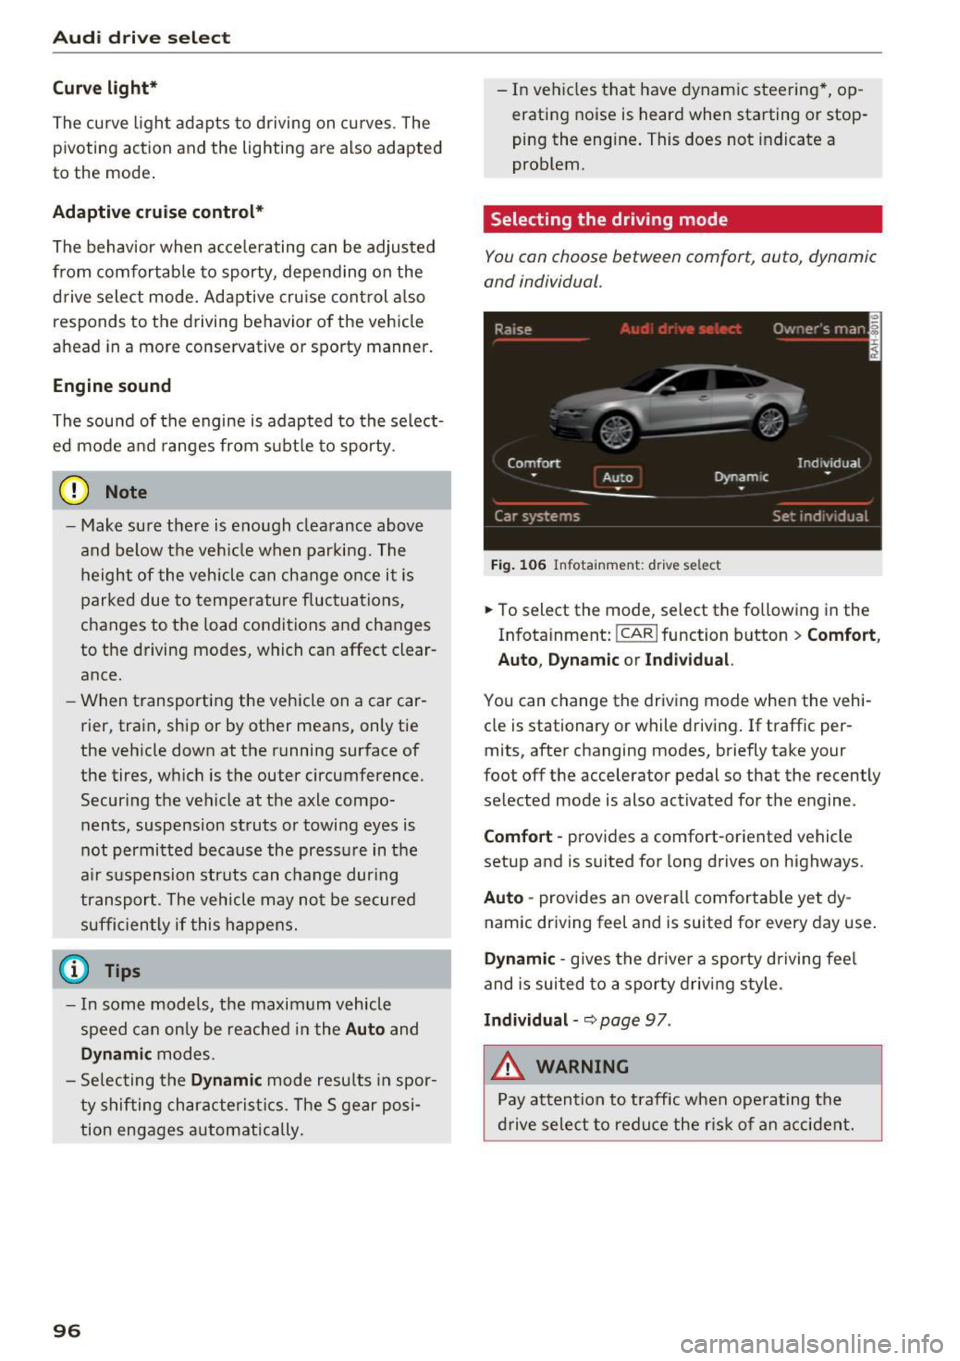
Selecting the driving mode
You con choose between comfort, auto, dynamic
and individual .
Fig. 106 Infota inment: drive se lect
.,. To select the mode, select the following in the
Infotainment:
! CAR ! function button > Comf ort ,
Auto , Dyn amic or In d iv idual.
You can change the driv ing mode when the vehi
cle is stationary or while driving . If traffic per
mits, after changing modes, briefly take your
foot off the accelerator pedal so that the recently
selected mode is also activated for the engine .
Comfo rt -prov ides a comfort-oriented vehicle
setup and is suited for long drives on highways.
Aut o -provides an overall comfortab le yet dy
namic driving feel and is suited for every day use.
Dynami c -gives the drive r a sporty d riving feel
and is suited to a sporty driving style .
Indi vidua l -~ page 97 .
&_ WARNING
Pay attention to traffic when ope rating the
d rive select to reduce the r is k of an accident.
-
Page 99 of 282

Audi drive select
Adjusting the Individual mode
You can adjust the vehicle settings to your personal preferences.
~ Se lect : the ICARI function button > Set indiv id
ual
control button . Once you select the menu,
you wi ll automatically drive in the
Individual
mode .
After you have closed the sett ings, you are auto
mat ica lly dr iv ing in the
Individua l driving mode.
Systems Comfort
Engine/Transmission
balanced
air suspension * comfortable
Steer ing comfortable The equipment in yo
ur vehicle will determine
which sett ings you can adjust. The fo llow ing ta
ble g ives a n overview of the characteristics.
Auto Dynamic
balanced sporty
b alan ced sporty
ba lanced sporty
Dynamic steering * comfort able/in direc t bala nce d/d irect sporty/dire ct
Damper control * comfortable
Sport differential* balan ced
Adaptive cruise control * comfortable
Engine sound * subtle
a} Sub tle in th e se lector leve r po sitio n D a nd sporty in S.
(D Tips
Your Indiv idual mo de settings are automati
cally store d an d assigned to the remote con
t rol key be ing used.
Raising/lowering the
vehicle
Applies to: vehicles with adaptive air suspension
Raising the vehicle
You can raise yo ur vehicle temporarily, for exam
p le to drive ove r a tall curb .
~ Select the followin g in the Infota inment sys
tem : the
ICARI function button > Raise control
button.
~ Wait for the arrows in the Infotainment system display to stop blinking and the vehicle to reac h
its fi na l posi tion.
Lowe ring the vehicle
~ To lower the vehicle, select the following in the
Infotai nment system: the
!CAR I function button
> Lower control button . ba
lanced sporty
ag ile sporty
ba lanced sporty
subtle/sportyal sporty
~ Wa it for the arrows in the In fot ainme nt system
disp lay to stop b linking and the ve hicl e to lowe r
completely.
(D Note
- Remembe r that your vehicle is not s uita ble
for driving offroad even when it is ra ised.
There is not enough ground clearance.
- If the vehicle is raised, it wi ll lower auto
matically when driving 62 m ph (100 km/h)
or faster.
Driver messages
Applies to: vehicles with adaptive air suspension
Air suspension : Veh icle is too high . Controlling
level. . .
Air su spension : Vehicle is too low. Controlling
level. ..
T he driver message switc hes off w hen the leve l
con trol p rocess is com plete.
97
Page 109 of 282

Parking systems
General information
Applies to: vehicl es with parking system plus/rear view cam
era/peripheral cameras
Depending on your vehicle's equipment, various
parking aids will help you when parking and ma
neuvering.
The
parking system plus assists you when park
ing by audibly and visually indicating objects de
tected
in front of and behind the vehicle
¢page 108.
The rear view camera shows the area behind the
vehicle in the Infotainment display. This display
assists you when you are cross or parallel parking
¢ page 109. In addition, you are assisted by the
functions from the parking system plus
¢ page 108.
The peripheral cameras assist you with parking
and maneuvering. You are aided by various cam
e ras depending on the vehicle equipment leve l
¢page 112. In addition, you are assisted by the
functions from the parking system plus
¢page 108.
A WARNING
-Always look for traffic and check the area
around your vehicle by looking at it directly
as well. The parking system cannot replace
the driver's attention. The driver is always
responsible for safety during parking and
for all other maneuvers.
-
-Please note that some surfaces, such as
clothing, are not detected by the system.
- Sensors and cameras have blind spots in
which people and objects cannot be detect ed. Be especially cautious of children and
animals.
- The sensors can be displaced by impacts or
damage to the radiator grille, bumper,
wheel housing and the underbody. The park
ing systems may become impaired as a re
sult. Have your authorized Audi dealer or
qualified workshop check their function.
- Make sure the sensors are not covered by
stickers, deposits or any other obstructions
Parking systems
as it may impair the sensor function. For in
formation on cleaning, refer to
¢page 193.
(D Note
-Some objects are not detected by the sys
tem under certain circumstances:
- Objects such as barrier chains, trailer draw
bars, vertical poles or fences
- Objects above the sensors such as wall ex tensions
- Objects with specific surfaces or struc
tures such as chain link fences or powder
snow.
- If you continue driving closer to a low-lying
object, it may disappear from the sensor
range . Note that you will no longer be
warned about this obstacle.
(D Tips
- The system may provide a warning even
though there are no obstacles in the cover age area in some situations, such as:
- certain road surfaces or for long grass.
- external ultrasonic sources e.g. from cleaning vehicles.
- heavy rain, snow or thick vehicle exhaust.
- We recommend that you practice parking in
a traffic-free location or parking lot to be
come familiar with the system. When doing
this, there should be good light and weath
er conditions.
- You can change the volume and pitch of the
signals as well as the display
¢page 116.
- What appears in the infotainment display is
somewhat time-delayed.
107
Page 112 of 282
Parking systems
-The camera lens enlarges and distorts the
field of vision. The object appears both al
tered and inaccurate on the screen.
- In certain situations, people or objects in
the display appear closer or farther away:
- For objects that do not touch the ground,
such as the bumper of a parked vehicle, a
trailer hitch or the rear of a truck. Do not
use the help lines in this case.
- If driven from a level surface onto an in
cline, or a downward slope.
- If driven toward protruding objects.
- If the vehicle is carrying too much load in
the rear.
(D Note
- Always read and follow the applicable warn
ings r::!>(D
in General information on
page 107 .
-The orange colored orientation lines in the
Infotainment display show the vehicle path
depending on the steering wheel angle. The
front of the vehicle swings out more than
the rear of the vehicle. Maintain plenty of
distance so that your outside mirror or a
corner of your vehicle does not collide with
any obstacles.
Switching on/off
Applies to: vehicles with rearview camera
Switching on
.,. Shift into reverse, or
.,. Press the
P,,, A button in the center console
r:=> page 108, fig. 120. A short confirmation
tone sounds and the LED in the button turns
on.
Switching between the rearview camera and
optical display
.,. Press the Graphic control button ®
r:=> page 110, fig. 125 to see the optical display .
.,. Press the
Rear view control button to see the
. . rearv1ew camera image.
Switching off
.,. Drive forward faster than 10 km/h, or
.,. press the
P,1
1.A button, or
110
.,. Switch the ignition off.
@ Tips
- The visual display in the left part of the dis
play should help you detect the critical vehi
cle areas.
- You can change the volume and pitch of the
signals as well as the display
r:=> page 116.
Cross parking
Applies to: vehicles with rearview camera
This view may be used when parking in a garage
or in a parking space.
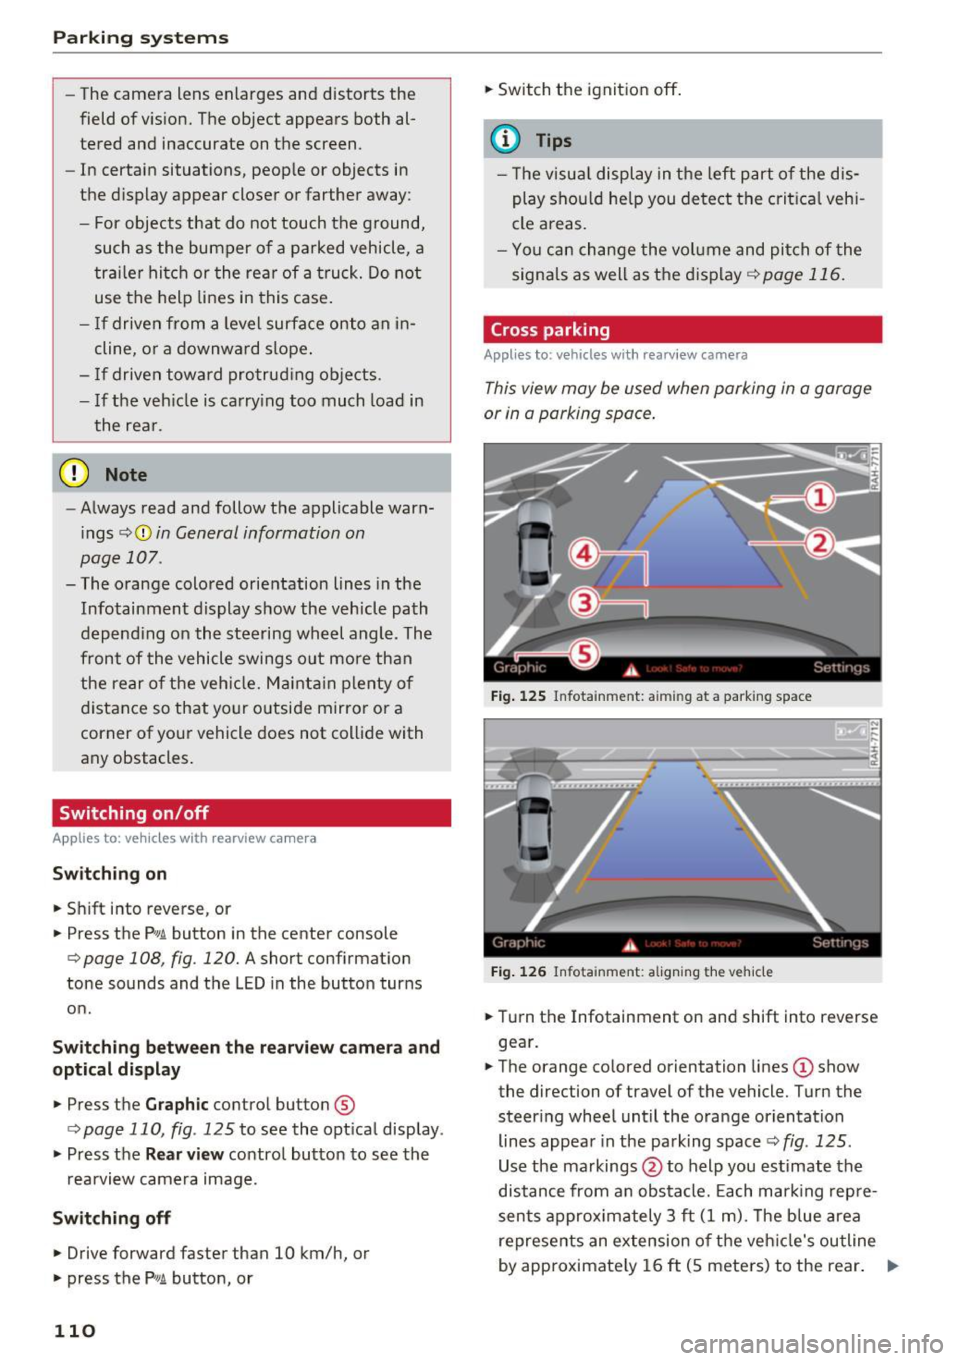
Fig. 125 Infotainment: aiming at a parking space
Fig. 126 Infota inment: aligning the vehicle
.,. Turn the Infotainment on and shift into reverse
gear.
.,. The orange colored orientation lines
(D show
the direction of travel of the vehicle. Turn the
steer ing wheel until the orange orientation
lines appear in the parking space r::!>
fig. 125 .
Use the markings @to help you estimate the
distance from an obstacle. Each marking repre
sents approximately 3 ft
(1 m). The blue area
represents an extension of the vehicle's outline
by approximately
16 ft (5 meters) to the rear. ..,.
Page 113 of 282
.. While driving in reverse gear, adjust the steer
ing wheel ang le to fit the parkin g space with
the a id of the orange orientation lines
c::> A in
General information on page 109 ,
c:>(D in Gen
eral information on page 110. @
displays the
rear bumper . Stop the veh icle, at the latest,
when the red or ientat io n line @ borders an ob
ject.
Parallel parking
App lies to: veh icles wit h rearv iew camera
This view may be used when parallel parking
along the side of a street.
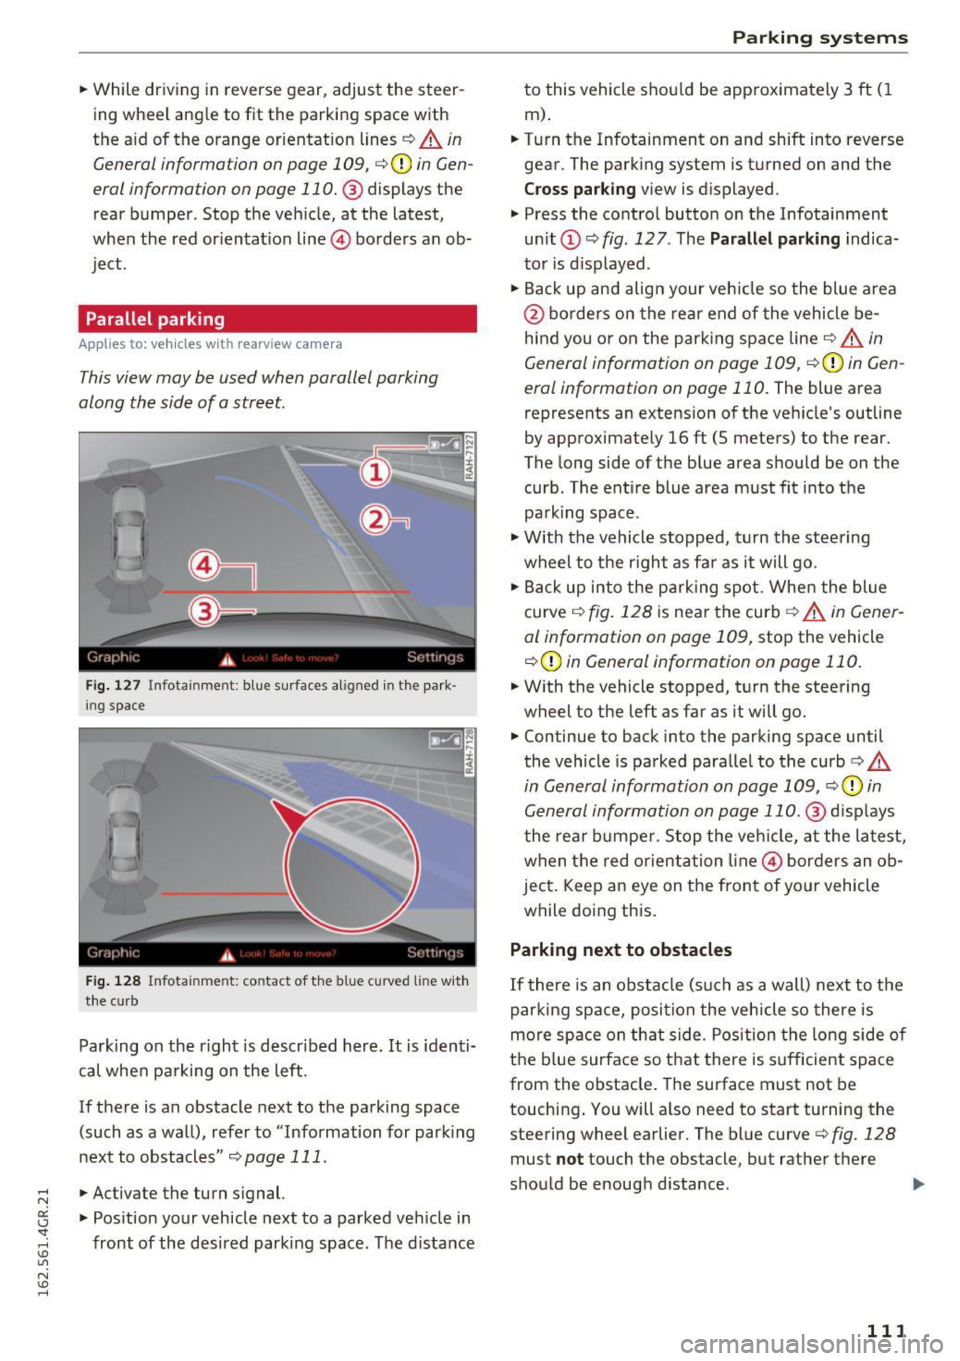
Fi g. 127 Infotai nmen t: b lue surface s alig n ed in t he park
i ng s pace
Fig . 12 8 In fota inmen t: co ntac t of t he blue curved li ne w it h
t he curb
Park ing on the r ight is descr ibed here. It is iden ti
cal whe n pa rking on the left .
If there is an obstacle next to the pa rking space
(such as a wall), refe r to "Information for park ing
nex t to obstacles"
c:> page 111 .
.. Activate the turn s ignal.
.. Pos ition your vehicle next to a parked veh icle in
front of the desired parking space. The d istance
Parking systems
to this vehicle shou ld be app roximately 3 ft ( 1
m).
.. Turn the Infotainment on and shift into reverse
gear . The park ing system is turned on and the
Cross pa rking v iew is displayed .
.,. Press the contro l button on the Infotainment
un it
(D c:> fig . 127 . The Parallel parking indica
to r is d isp layed .
.,. Back up and align your veh icle so the blue a rea
@ bo rde rs on the re a r end of the vehicle be
hind you o r on the park ing spa ce line
c::> A in
General information on page 109,
c::> (D in Gen
eral information on page 110.
The blue area
represents an extension of the veh icle's outline
by approximate ly 16 ft (5 meters) to the rear.
The long side of the b lue area should be on the
curb . The ent ire blue area must fit into the
pa rk ing space .
.,. With the vehicle s topped, t urn the stee ring
wheel to the r ight as far as it will go .
.,. Back up into the park ing spot. Whe n the blue
curve
c::> fig . 128 is near the curb c::> A in Gen er
al information on page 109,
stop the vehicle
c::> (D in General information on page 110 .
.. W ith the vehicle stopped, t urn the steering
wheel to the left as far as it will go .
.. Continue to back into the parking space until
the vehicle is parked para llel to the curb
c:> .&.
in General information on page 109, c::> (D in
Gen eral information on page 110 .@
d isp lays
t he rea r bu mpe r. Stop the ve hicle, at the la test,
when the red o rient ation line @ bor ders an ob
ject. Keep a n eye on the fron t of yo ur vehicle
while do ing this.
Parking next to obstacles
If there is an obstacle (such as a wall) next to t he
par king space, posi tion the vehicle so there is
more space on th at s ide . Pos ition the long side o f
the b lue surface so that there is s ufficient s pace
from the obstacle. The surface must not be
touching . You will a lso need to start turning the
steering wheel earlier. The blue curve
c:> fig. 128
must not touch the obstacle, but rathe r the re
sho uld be enough d istance .
111
Page 114 of 282
Parking system s
(D Note
Keep enough distance from the curb to avoid
damage to the rims .
@ Tips
The left or right orientation lines and surfaces
will be displayed, depending on the turn sig
nal being used.
Peripheral cameras
Introduction
Applies to: vehicles with peripheral cameras
With this equipment, die parking system plus* is
supp lemented with var io us peripheral cameras
¢page 108. Depend ing on vehicle equipment,
you are provided with the following views: a rea
around the vehicle, front corner view and rear
corner view, view in front of the vehicle and be h ind the vehicle.
General information
Applies to : vehicles with peripheral cameras
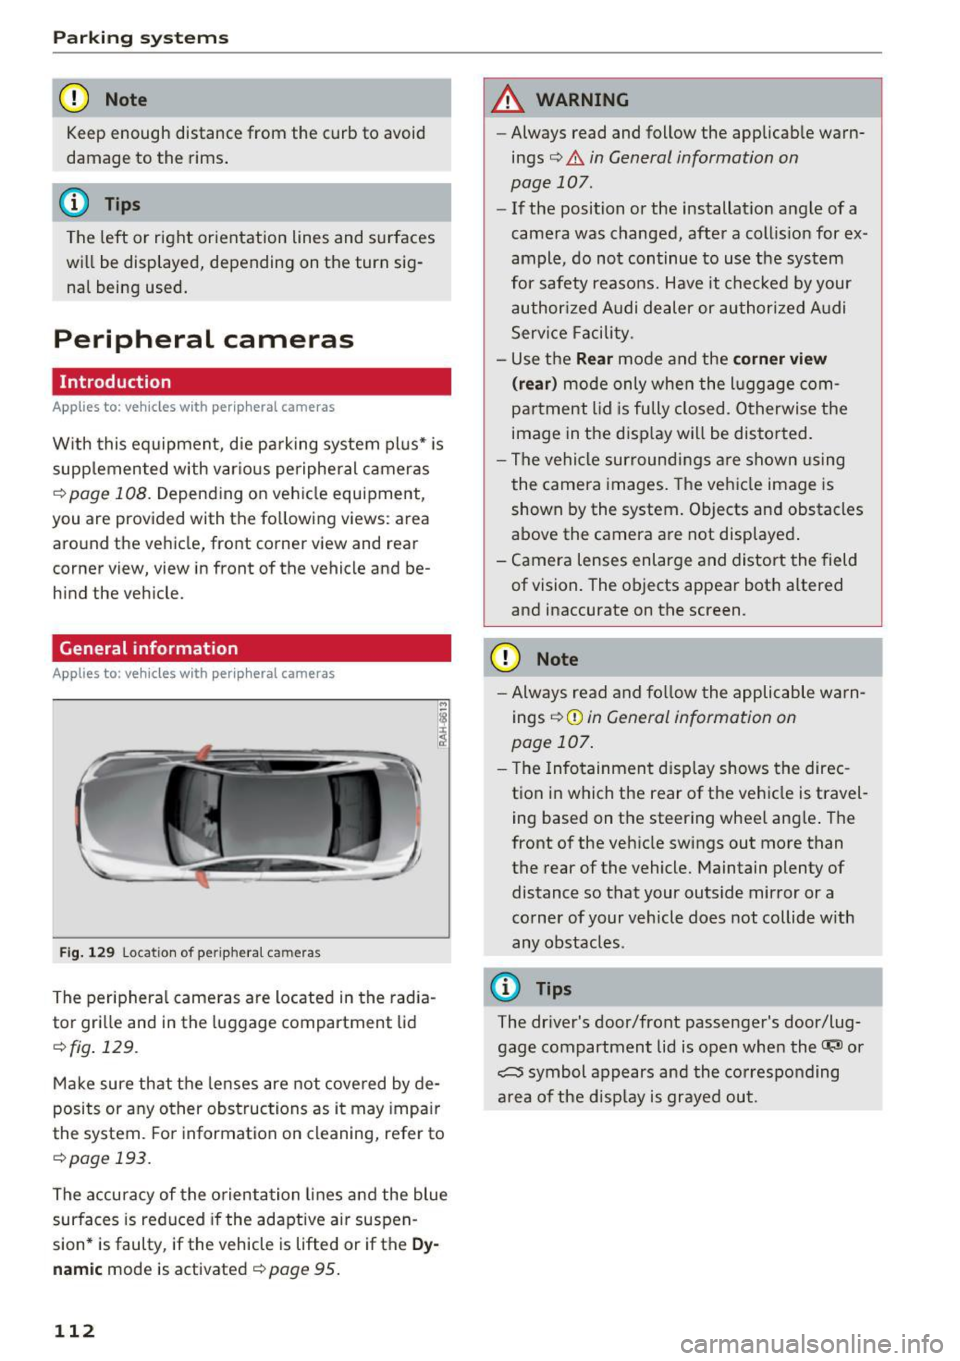
Fig . 12 9 Location of periphera l cameras
The periphera l came ras are located in the radia
tor gri lle and in the luggage compartment lid
¢fig . 129.
Make sure that the lenses are not covered by de
posits or any other obstructions as it may impa ir
the system. Fo r information on cleaning, refer to
¢page 193.
The accuracy of the orientation lines a nd the blue
surfaces is reduced if the adaptive ai r suspen
sion* is faulty, if the vehicle is lifted or if the
Dy
nam ic mode is activated¢ page 95.
112
A WARNING
- Always read and follow the applicab le warn
ings¢ .&
in General information on
page 107.
- If the position or the installat ion angle of a
camera was changed, after a collis ion for ex
ample, do not continue to use the system
for safety reasons. Have it chec ked by your
authorized Audi dealer or authori zed A udi
Serv ice Facility.
- Use the
Rear mode and the corner view
( rear )
mode only when the l uggage com
partment lid is fu lly closed. Otherwise the
image in the d isp lay will be distor ted.
- The vehicle sur roundi ngs a re shown using
the camera images. The vehicle image is
shown by the system. Objects and obstacles
above the camera a re not displayed .
- Camera lenses enlarge and distort the field of vision. The objects appear both altered
and inaccurate on the screen.
{[) Note
- Always read and fo llow the applicable wa rn
ings ¢(!)
in General information on
page 107.
- T he Infotainment d isp lay shows the direc
t ion in which the rear of the vehicle is travel
ing based on the steering wheel ang le . The
front of the vehicle swings out more than
the rear of the vehicle. Maintain plenty of distance so that your outs ide mirror or a
co rner of your vehicle does not collide with
any obstacles .
(D Tips
The driver's door/front passenger's door/lug
gage compartment lid is open when the~ or
~ symbol appears and the co rresponding
a rea of the disp lay is grayed out.
Page 115 of 282
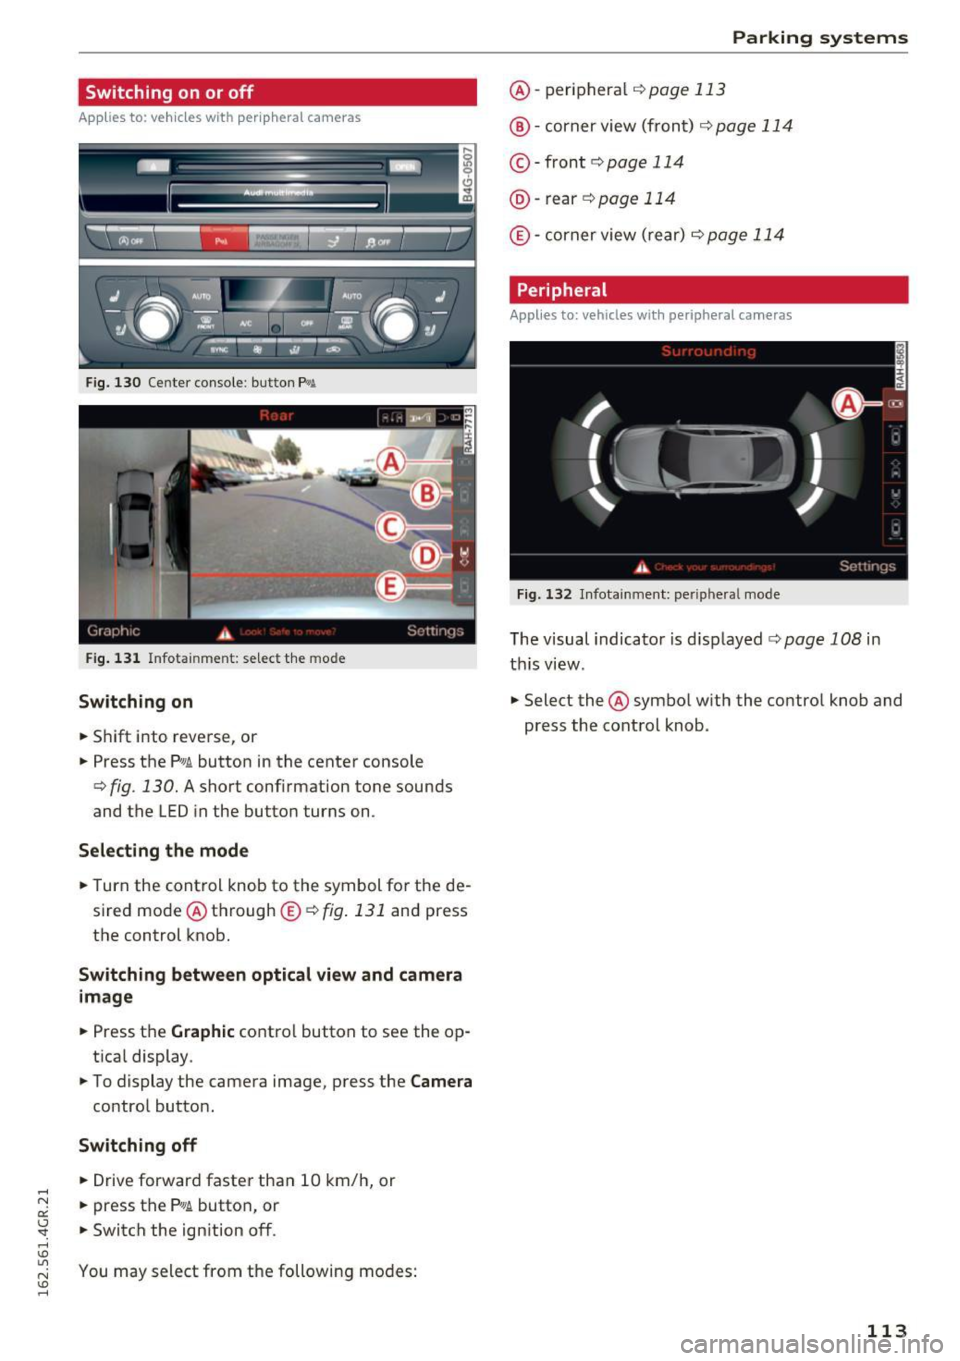
Switching on or off
Appl ies to: ve hicles with per ip heral cameras
Fig . 13 0 Cente r conso le: butto n f¾A
Fig. 1 31 Infotainment: se lect the mode
Switching on
• Shift into reve rse, or
• Press the
p,,, A button in the cente r console
¢ fig . 130. A short conf irmation tone sounds
and the LED in the butto n turns on.
Selecting the mode
• Turn the cont rol knob to the symbol fo r the de
s ired mode @th rough @c:>
fig. 131 and press
the control knob.
Switching between optical view and camera image
• Press t he Graphic co ntrol button to see the op
t ica l display.
• To display the camera image, press the
Camera
co ntro l butto n.
Switching off
• Drive forwar d faste r than 10 km/ h, or
• press the
PwA button, or
• Switch the ign ition off.
You may sele ct from the following modes:
Parking systems
@ -peri phera l ¢page 113
@ -corner view (fron t) c:> page 11 4
©-front c:> page 114
@-rear c:> page 114
® -corner view ( re ar) c:> page 114
Peripheral
Applies to: vehicles wit h peripheral ca meras
Fig. 13 2 In fo tainme nt: per iphera l m ode
The visual indicato r is d isp layed c:> page 108 in
t hi s vi ew .
• Select the @sym bo l w ith the contro l knob and
press the cont rol knob .
113
Page 117 of 282

.. Se lect the @symbol with the control knob .
You can choose between three different v iews in
this mode.
.. To c ross park or pa rallel pa rk, press the ® con
t rol button on the control pane l repeatedly un
ti l the symbol for the desired mode is se lected .
Cross parking
Applies to: vehicles with peripheral cameras
This view may be used when parking in a garage
or in a parking space.
Fig. 137 Infotai nment: aiming at a parking space
Fig. 138 Infotainment: a ligning the vehicle
Requirement: cross parking must be selected
¢ page 114.
.. The orange colored or ientat ion lines (!) show
the direction of trave l of the vehicle. Turn the
steering wheel unt il the orange or ientation
lines appear in the parking space¢
fig. 137.
Use the markings@to help you estimate the
distance from an obstacle. Each marking repre
sents about 1 meter. The blue area represents
an extension of the vehicle's outline by approxi mately S mete rs to the rear.
.,. While dr iv ing in reverse gear, adjus t the steer
ing wheel ang le to fit the parki ng space w ith
Parking systems
the aid of the orange orientation lines¢ .A in
General information on page 112,
¢(1) in Gen
eral information on page
112. @displays the
rear bumper. Stop the vehicle when the red ori
entation line@ borders an obstacle¢
.A in
General information on page 109 .
Parallel parking
Applies to: vehicles with peripheral cameras
This view may be used when parallel parking
along the side of a street.
Fig. 139 In fotainme nt: blue surfaces alig ned in the park·
i ng space
Fig . 140 Infotainment: contac t of the blue curved line w ith
the cu rb
Parking on the right is described here. It is identi
cal when parking on the left .
If there is an obstacle next to the parking space
(such as a wall), refer to Information for park ing
next to obstacles ¢
page 116.
.. Activate the turn signal.
.. Position your vehicle next to a parked vehicle in
front of the des ired parking space. The distance
to this vehicle should be approximately 3 ft (1
m) . .,._
115