Page 41 of 264
 Lil
.... <J:) ....
• Pull the switch briefly to the seco nd st op to au
tomatica lly close the window.
A WARNING
- When you leave your vehicle -even if")
.... N
0 Ico ....
....
• Pull the switch briefly to the seco nd st op to au
tomatica lly close the window.
A WARNING
- When you leave your vehicle -even if only
br iefly- always remove the ign ition key . This
applies particularly when children rema in in
the vehicle. Otherw ise the children could
sta rt the eng ine or operate electr ical equ ip
ment (e .g . power windows). The power w in
dows are functional unt il the dr iver's door or
p assenger's door has been opened.
- Pay close attention when closing the win
dows to prevent p inching of hands o r limbs .
- When loc king the veh icle from outside, the
vehicle must be unoccupied since t he win
dows can no longer be opened in an emer
gency.
(D Tips
- When yo u open the doo rs, the windows au
tomati cally lower abou t 10 mm.
- After the ignition has been switched off, the
windows can st il l be opened or closed for
abo ut 10 m inutes. The window regula to rs
are not sw itched until the driver 's or pas
senger's door is opened .
Convenience opening/closing
The windows and the panoramic tilting sunroof
can be opened and closed with the mechanical
key or the emergency key.
F ig . 3 0 Key tu rns fo r open ing a nd clos ing
Convenience opening feature
• Use the emergency key or pu ll the mechanical
key out of the master key
q page 33 .
-
Opening and cl osing
• Insert the key into the lock of the driver's door.
• Turn the key to position~
fig. 30@ until all
the windows have reached the desired position
and the panoramic ti lting sunroof is ti lted.
Convenience closing feature
• Use the emergency key or pull the mec hanical
key out o f the maste r key
q page 33.
• Turn the key in the lock of the driver's door to
the lock pos ition @ unti l the windows and the
panoram ic tilting sunroof are closed
q ,& .
When the panoramic tilting sunroof is tilted/
closed, the e lectric sun shade* is also opened/
closed.
A WARNING
-- Never close the w indows and the panoramic
tilt ing sunroof inattent ively and without
checking -the re is risk of injury.
- You must a lways watch when the windows
are being ra ised so that no o ne can be trap
ped. If you release the key, the clos ing ac
tion is immed iate ly canceled.
- Always read and heed WA RN ING
q .&. in
General description on page 31.
Correcting window regulator malfunction
After disconnecting the vehicle battery , the one
touch up and down feature must be activated
again.
• Pull and ho ld the power window switch until
the window is comp letely closed.
• Release the switch and pull the swi tch again for
one seco nd .
39
Page 42 of 264

Opening and clo sin g
Panorama roof
Operation
Fig. 3 1 Section of headliner: switch for sunroof
.,. To tilt the sunroof, press the switch briefly.
• To close the sunroof, pu ll the switch briefly .
• To set an intermediate pos it ion, press/pull the
switch unti l the roof reaches the des ired posi
t ion.
After the ign ition is switched off, you can still op·
erate the sunroof for about 10 minutes . As soon
as the d river's or passenge r's door is opened, the
sw itch is inoper ative.
Sun blind
The sun blind can be opened and closed manually in any position .
A WARNING
Pay carefu l attent ion when closing the sun·
roof· otherwise serious injury co uld result!
For this reason, always remove the ign ition
key when leaving the vehicle.
(D Note
Always close your sunroof when leaving yo ur
veh icle. S udden ra in can cause damage to the
interio r equipmen t of your vehicle, particular
ly the elec tronic equipmen t.
- Info rmation on conve nience opening/ clos
i ng
c::>page 39.
40
Emergency closing of the panoramic tilting
sunroof
If the sunroof detects an object in i ts path when
it is closing, it will open again automatically. In
this case, you can close the roof with the power
emergency closing function .
• Within five seconds a fter the sunroof opens au
tomatically, pu ll the sw itch until the roof
closes .
Valet parking
Applies to vehicles: with valet parking function
The valet parking feature protects the luggage
compartment from unauthorized access.
-
Fi g. 32 Glove compartment: va let pa rkin g bu tton
You can switch the "valet pa rking func tion " on
whe n someo ne else is parking your veh icle. When
the f unction is switc hed on, the vehicle can be
dr iven, locked and unlocked using the master
key, but access to the luggage compartment is
not permitted.
• Take the mechanical key o ut of the master key
<=:> page 33.
• Open the glove compartment c::> page 61 .
• Activate c::> fig. 32 the "va let parking" feature by
press ing the
IVA LE T ! button. The ind icator light
in the switch illum inates.
• Close the glove compartment and lock it with
the mechan ica l key .
• Lock bot h rear seatbacks with the mechanical
key
c::> page 64.
• Lock the luggage compartmen t pass -through
with the mechanical key
c::> page 65.
• Leave the master key with the service personnel
for parking and keep the mechanical key with
you.
...
Page 43 of 264

..... I.Cl U\"I
..... I.Cl ......
The following buttons are deactivated when the
va let parking function is sw itched on:
- l-\" I button in the drivers door
- I\"\" I")
..... N
0 1-CX)
..... I.Cl U"I
..... I.Cl ......
The following buttons are deactivated when the
va let parking function is sw itched on:
- l'-"' I button in the driver's door
- I""' I button on the master key
- Handle in the rear lid
When the valet parking feature is activated, the message
Valet parking activated appears in the
instrument cluster d isplay when you sw itch the
ignit ion on .
Garage door opener
(Homelink)
Description
Applies to vehicles: with ga rage door opener (Homelink)
Fig. 33 Garage door o pen er: examples of using with d iffer
ent systems
You can activate var ious systems such as garage
doors, security systems and home light ing from
inside your vehicle using the garage door opener
(Homelink) . There are three buttons for this in
the vehicle headliner that can be in used in p lace
of up to three hand-held transmitters.
To operate systems using the garage door open er , the three buttons in the roof head liner must
be programmed first .
A WARNING
Make sure no people or objects are in the im
mediate v icin ity of the equipment when using
or programming the garage door opener. Peo
ple can be injured and objects can be dam
aged if they are caught in the equipment.
Open ing and closing
(D Tips
-For security reasons, we recommend that
you clear the programmed buttons before selling the vehicle.
- For add itiona l information about Homelink
•
visit www.homelink.com.
- For Declaration of Compliance to United
States FCC and Industry Canada regulations
¢page 247.
Operation
Applies to vehicles: wit h garage door opener (Home link)
Fig. 34 H ead liner: control un it
Requirement: The buttons in the roof headliner
must be programmed
¢ page 41 or
¢ page 42 and the vehicle must be within
range of the system, such as the garage door
opener.
.,. Press the button to open the garage door. The
LED @ blinks or turns on .
.,. Press the button again to close the garage
door.
(D Tips
To open or close the garage door, press the button, but do not hold it for longer than
10 seconds or the garage door opener module
will switch to programming mode .
Programming the buttons (version A )
Applies to vehicles: with garage door opener (Home link)
You can program both fixed code and rolling code
systems using this procedure . ..,.
41
Page 44 of 264

Opening and closing
Programming or reprogramming buttons
.. Swi tch t he ignition on .
.. Press and h old the but ton in the roo f headliner
¢ page 41, fig. 34 that you would like to pro
gram fo r at least 10 seconds. Or
.. Se lect :
I CARI funct ion button> Car systems*
contro l button > Vehicle sett ings > Garage
door opener > Program garage door opener .
If
this path is not availab le, program the button
as describ ed in v ers ion B
<::;, pag e 42 .
.. Fo llow the ins truc tio ns i n t he MM I.
Erasing button programming
The programmed buttons cannot be erased indi
vid ually. They must all be erased toget her . Re
p rogram the but tons if necessary .
.. Select:
ICARI funct ion button> Car systems*
contro l button > Vehicle settings > Garage
door opener > Clear program settings > Yes .
Displaying the version/status/country code
.. Se lect: ICARI funct io n button > Car systems*
contro l button > Vehicle settings > Garage
door opener > Version information .
@ Tips
-Programming th rough the MMI* is not pos
s ible w it h all infotainment systems. If this
i s the case, program the buttons as descri
bed in ve rsion Br::;,
page 42.
- The re quired distance between the ha nd
transmitter and the Homelink mod ule in
the radiato r gri lle r::;,
page 42, fig. 35 de
pends o n the system that you a re prog ram
ming.
- Dep end ing on th e model of the system, you
may n eed to r eleas e the bu tton on the re
mote con trol du ring progra mming an d
pr ess it ag ain . H old each posi tion yo u try for
at least 15 second s before try ing ano ther
p osition . Keep t he tur n sig na ls on yo ur vehi
cle in view w hen do ing t his.
- Aft er progra mming the gar ag e door ope ner,
i t may be necessary to sy nch ronize the mo
tor with the system . Refer to the ma nufac
turer's i nstructions.
42
Programming the buttons (version B)
Applies to vehicles: with garage door opener (Horne link)
Fi g. 35 Dis ta nce between the radiator gril le and the hand
t ransmitter
Programming the button: Part 1 with the
controls
1. S wi tch the ign ition on .
2 . Press and hold both outer buttons in t he roof
headline r
r::;, page 41, fig. 34 unt il the LE D ®
turns off complete ly (after about 20 sec
onds). This p rocedure clears the standard co
des that were set at the facto ry and does
not
need to be repea ted again to prog ram the
othe r bu ttons .
3. Briefly press the bu tton on the roof head liner
t h at y ou wo uld like to progra m.
4 . Wai t until th e LE D@ begins to bli nk qu ickly.
P rogramming mode is active for 5 minutes.
5 . Move in front of your veh icle w hile ho lding
t h e or igina l remote cont rol for the system
t h at wou ld like to program to a button in the
roof headliner.
Programming the button: Part 2 at the
radiator grille
6. Hold the remote control up to t he radiator
grille on your vehicle
¢fig. 35.
7. Press and hold the remote control unt il the
tu rn s ignals on your veh icle blink . This may
t ake up to 30 s econds .
8 .
If the eme rge ncy flashers b link t hree ti mes,
t h e pr ogr amm ing w as s uccessfu l.
If the
emergency fl ashers only blink one time, the
5 m in ute time limit f or the prog ramming has
ended or the prog ramming was not success
f ul. Repeat the prog ramming from t he third
step, or try chang ing the distance to the radi-
ator g rille. ..,_
Page 45 of 264
 Lil
.... <J:) ....
9. If the garage door or other system does not
open using the buttons in the roof headliner
even though the programming was success
f")
.... N
0 Ico ....
....
9. If the garage door or other system does not
open using the buttons in the roof headliner
even though the programming was success
ful, the system may use a rolling code in
stead of a f ixed code.
R o lling code pr og ram
ming
must be performed ¢ page 43.
The other two buttons in the roof headliner can
be programmed according to the instructions
above. Begin w ith the third step .
Erasing button programming
The programmed buttons cannot be erased indi
vidually. They must all be erased together. Re
program the buttons if necessary.
"' Switch the ignition on.
.. Press and hold both outer buttons in the roof
headliner unti l the LED ® turns off completely
(after about 20 seconds).
R eprogramming the buttons
"' Switch the ignition on.
"'T o reprogram an individua l button, press and
ho ld the button until the LED ® starts to flash
quick ly (after about 10 seconds) . Re lease the
button immediately. Programming mode is ac
t ive for 5 minutes.
.. Cont inue with the fifth step.
{D) Tips
- Programm ing us ing the buttons in the roof
headliner is not possib le w ith all Infotain
ment systems. If th is is the case, program
the buttons as descr ibed in version A
¢page 41.
- The required d istance between the hand
transm itter and the Homelink mod ule in
the radiator gr ille¢
fig. 35 depends on the
system that you are programm ing.
- Depending on the model of the system, you
may need to release the button on the re
mote control d uring programm ing and
press it aga in. Hold each position you try for
at least 15 seconds before trying another pos ition. Keep the turn signals on your vehi
cle in view when doing this.
Op ening and cl osing
Rolling code programming
Applies to vehicles: with garage door opener (Home link)
Rolling code programming is also needed for
some systems .
Identifying a rolling c ode
.. Press and hold the b utton in the roof headliner
that was already programmed.
"' Watch the LED @¢
page 41, fig. 34. If the LED
blinks quickly, the systems (such as a garage
door) is equipped w ith a rolling code.
"' Program the rolling code as follows:
Acti vating the motor unit in a system
.. Locate the programming button on the sys
tem's motor un it. The exact location and color
of the button may vary depending on the brand
of the system .
"' Press the programming button on the garage
door opene r motor un it (this will usua lly acti
vate an "ind icator" on the motor unit). You now
have approximately
30 sec ond s to p rogram the
button in the roof headliner.
Programming the button in the roof
h eadl in er
"' Press and hold the previously programmed but
ton in the roof head liner for 2 seconds .
.. To end rolling code programming, press and
hold the button again for 2 seconds.
.. With some systems, the button may need to be
pressed a third time to end the programming process .
After programming, the system should detect
the signal and begin moving when the button in
the roof headliner is pressed. Now you may pro
gram the other buttons as needed.
(D Tips
- The ro lling code can be p rogrammed more
quickly and more easily with the help of a
second person .
- If you have diff icu lty programming the roll
ing code, referring to the user gu ide for the
system may help .
43
Page 46 of 264

Light and Vision
Light and Vision
Exterior lighting
Switching the lights on and off
Fig. 36 Instrument panel : headlig ht co ntrol sw itch
Light switch ·'t/;
T u rn the switch c::> fig. 36 to the co rresponding
position . When the lights are switched on, the :
00
:
symbo l turns on.
O -The lights are off or the daytime r unning
lights are on :
-USA mode ls: The daytime running lig hts are
activated when the light switch
c:) fig . 36 is in
the
O pos it ion or the AUTO position (only in
daylight cond it ions) . The daytime runn ing
l igh ts fu nction can be turned on a nd off in the
r ad io or MM I* menu
Exterior lighting
c:) page 45, c::> & .
-Canada mo del s: T he daytime runn ing lights are
activ ated when t he lig ht switch
c:) fig . 36 is in
the
o pos it ion, :oo : position or the AUTO pos i
tion (only in daylight condit ions). The dayt ime
runn ing lights fu nction cannot be tur ned off
c> & .
AUTO * -Automatic headlights switch on and off
depending on brightness, for example in twilight,
du ring ra in or i n tunne ls
c::> & .
;o o: -Side marker lights
fD -Low beam headlights
Fog lights /rear fog light (s)*
Press the appropriate button c::> fig. 36 :
}0 -Fog lights
O* -Rear fog light(s)
44
adaptive light*
When switched on , adap tive ligh t ad apts to
curves in the roa d depending on the vehicle
speed and the steering ang le. Th is prov ides bet
ter light ing th rough the curve. The system oper
ates at speeds between approximately 6 mph (10 km/h) and 68 mph (110 km/h).
Static cornering light* (veh icles with adaptive
li ght) -the corne ring light switches on at speeds
up to approximately 25 mph (40 km/h) when a
ce rtain steering wheel angle is reached or when a
turn signal is act ivated . The area to the side of
the veh icle is illuminated better when turning .
T he adaptive light and the cornering light only
funct ion when the switc h is in the AUTO position
(automat ic head lights*) .
A WARNING
- Daytime r unning lights and au toma tic head
lights* are o nly intended to ass ist the d river .
T h ey do not relieve the drive r of his res pon
sibility to check t he headlig hts and to tur n
t hem on m anually acco rdi ng to the curren t
light and visibili ty cond itions. For example,
fog cannot be detected by t he light sen
sors*. So a lways switch on the headlights
io
unde r these weather conditions and when
driving in the dark .
- Crashes can happen when you cannot see
the road ahead and when you cannot be
seen by ot her motorists. Always tur n on the
headlights so that yo u can see ahead a nd so
that others can s ee yo ur ca r from the back .
- Please obey all laws w hen us ing the lighting
sys tems described here.
(D Note
The rear fog lights* shou ld only be turned on
i n accordance with traffic regu lation, as the
lights are bright for following traff ic.
{!) Tips
- The light sensor* for headlight contro l is lo
cated in the rear view m irror mount. You
should the refore not apply any stickers to .,.
Page 47 of 264

,-1 I.Cl U\"I
,-1 I.Cl ......
the windshield in this a rea in o rder to
prevent ma lf u nctions or failures .
- Some exterior lighting functions can be ad
ju sted
c")
,-1 N
0 1-CX)
,-1 I.Cl U"I
,-1 I.Cl ......
the windshield in this a rea in o rder to
prevent ma lf u nctions or failures .
- Some exterior lighting functions can be ad
ju sted
c:, pa ge 45 .
-When yo u remove yo ur key from the igni
tion wh ile the vehicle's lights are turne d on,
a buzzer sounds as long as the driver's door
is open .
- In coo l or damp weather, the inside of the
headlights, turn s ignals and tai l lights can
fog over d ue to the temperature d ifference
between the inside and outs ide. They will
clear s hort ly after switch ing them on. This
does not affect the serv ice life o f th e light
i ng.
- In the event of a light sensor malfunction,
t h e d river is not ified in the instr ument clus
te r display
c:, page 21.
Turn signals and high beam lever
The lever operates the turn signals, the high
beams and the headlight flasher.
Fi g. 37 Turn signal and high beam lever
Turn signals ¢¢
g N
0
~ CD
The turn s ignals activate when you move the lev
er into a tu rn s ignal position w hen the ignition is
switched on.
@ -righ t tur n signal
@-left tu rn s ignal
The turn s ignal b links three times if you just tap
the lever .
High beams and headlight flasher ~D
Move the lever to the corresponding positio n:
@-hig h b eams o n
Light and V ision
@ -high beams off or he adlig ht flasher
T he in dicator light
II in t he inst rument cl uste r
tu rns o n.
Notes on these features
- The turn signals on ly wor k w ith the ignition
tur ned on. The indicator lig hts . or
II in the
ins trument clus ter also b link.
- After you have t urned a co rner, the t urn signa l
sw itches off automatica lly.
- The
high beam works only when the headlights
are on. The indicator lig ht
II in the ins trument
cl uste r illumina tes whe n the high beams a re
on.
- The
headlight flash er works only as lo ng as yo u
hold t he leve r - even if there a re no lights
sw itche d on . T he ind ic a tor light
II in the in
s tr umen t clu ster ill umin ates when you use t he
he ad ligh t fla sher.
WARNING
Do not use t he high beam or hea dlight flas her
i f you know that these could blind oncoming
tra ffic.
Adjusting exterior lighting
The func tions are selected in the radio or MMI* .
.,. Select: !CAR I function button> Exterior light
ing .
Or
.,. Sele ct: 1-C~A ~ R-.l func tion button > Car systems *
control button > Vehicle settings > Exterior
lighting .
Coming home (light when leaving car)*,
Leaving home (light when unlocking car)*
The coming home fu nction ill uminates the area
around the vehicle whe n the ignition is switched
off and the d river's door is opened. Depending on
vehicle equipment, the function can be switched o n and off or the length of time the lights rema in
on* can be a djusted .
The
leaving home function illuminates th e a rea
around the vehicle whe n unlock ing it. T his func-
t io n can be switched on and off.
ll>
45
Page 48 of 264

Light and Vision
The coming home and leaving h ome functions
only operate when it is dark and t he light switch
is in the AUTO position
~ page 44, fig. 36.
Auto headlights*
W hen the light swi tch is in the A UTO ~ page 44
position, the sw itch-on po int of the lights can be
cha nged in the automatic driving light function.
Daytime running lights
USA models :
You can switch the daytime r unning
lights
on and off .
Canada models: The funct ion cannot be tu rned
off .
It is activated automatically each t ime the ig
n ition is switched on.
Tra vel mode*
The headlight beam is asymmetrical. This pro
vides stronger illumination on the side of the
road on which you are driving.
If you are driving
in a cou ntry that dr ives on the opposite side of
the road from you r own country, this will cause
g lar e fo r oncom ing dr ive rs . To p revent glare:
- Travel mode must be selected in veh icles w ith
Xenon headlights* .
- In vehicles with halogen headlights, certain
areas of the headlight lenses must be cove red
with waterproof adhesive covers that prev ent
l ight from passing through. For more informa
tion, ple ase see you r auth orized Audi dea le r or
a uthorized repair fa ci lity .
When travel mode is ac tiva ted, a disp lay in
t he dr ive r inf orm ation sys tem in dicates this
e ach t ime yo u sw itch the ignition on .
46
Emergency flashers
Fig. 38 Center console: emergency flashe r switc h
The emergency flashers makes other motorists
aware that you or your ve hicle are in an emergen
cy situat io n .
.. Press the switch~¢
fig. 38 to turn the emer-
gency flashers on or off .
When the emergency flashers are on, all four
turn s ignals b link at the same time. The turn sig
nal indicator lights
RB i n the instrument clus
ter, as well as the light in t he emergency flasher
switch
IA] blink likewise .
You can indicate a lane change or a turn when the
emergency flashers are switched on by using the
turn signal lever . The emergency flashers stop
tempora rily .
The emergency flashe rs a lso wor k when the ign i
tion is turned off.
The emergency flashers will turn on automatical
l y if you a re in an accident where the airbag has
deployed .
@ Tips
You should turn on the emergency flashers
when:
-you are the last vehicle standi ng in a traffic
jam so that any other vehicles com ing can
see yo u, or when
- yo ur ve hicle has broken down or yo u are in
an eme rge ncy sit uat ion, or w hen
-your vehicle is be ing towed by a tow tru ck or
if yo u are towing another vehicle behin d
you.
 1
1 2
2 3
3 4
4 5
5 6
6 7
7 8
8 9
9 10
10 11
11 12
12 13
13 14
14 15
15 16
16 17
17 18
18 19
19 20
20 21
21 22
22 23
23 24
24 25
25 26
26 27
27 28
28 29
29 30
30 31
31 32
32 33
33 34
34 35
35 36
36 37
37 38
38 39
39 40
40 41
41 42
42 43
43 44
44 45
45 46
46 47
47 48
48 49
49 50
50 51
51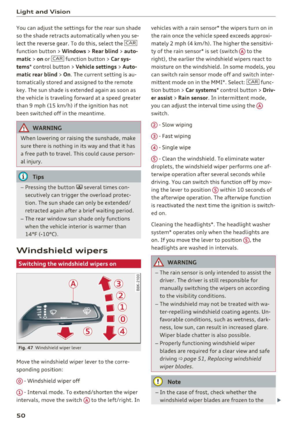 52
52 53
53 54
54 55
55 56
56 57
57 58
58 59
59 60
60 61
61 62
62 63
63 64
64 65
65 66
66 67
67 68
68 69
69 70
70 71
71 72
72 73
73 74
74 75
75 76
76 77
77 78
78 79
79 80
80 81
81 82
82 83
83 84
84 85
85 86
86 87
87 88
88 89
89 90
90 91
91 92
92 93
93 94
94 95
95 96
96 97
97 98
98 99
99 100
100 101
101 102
102 103
103 104
104 105
105 106
106 107
107 108
108 109
109 110
110 111
111 112
112 113
113 114
114 115
115 116
116 117
117 118
118 119
119 120
120 121
121 122
122 123
123 124
124 125
125 126
126 127
127 128
128 129
129 130
130 131
131 132
132 133
133 134
134 135
135 136
136 137
137 138
138 139
139 140
140 141
141 142
142 143
143 144
144 145
145 146
146 147
147 148
148 149
149 150
150 151
151 152
152 153
153 154
154 155
155 156
156 157
157 158
158 159
159 160
160 161
161 162
162 163
163 164
164 165
165 166
166 167
167 168
168 169
169 170
170 171
171 172
172 173
173 174
174 175
175 176
176 177
177 178
178 179
179 180
180 181
181 182
182 183
183 184
184 185
185 186
186 187
187 188
188 189
189 190
190 191
191 192
192 193
193 194
194 195
195 196
196 197
197 198
198 199
199 200
200 201
201 202
202 203
203 204
204 205
205 206
206 207
207 208
208 209
209 210
210 211
211 212
212 213
213 214
214 215
215 216
216 217
217 218
218 219
219 220
220 221
221 222
222 223
223 224
224 225
225 226
226 227
227 228
228 229
229 230
230 231
231 232
232 233
233 234
234 235
235 236
236 237
237 238
238 239
239 240
240 241
241 242
242 243
243 244
244 245
245 246
246 247
247 248
248 249
249 250
250 251
251 252
252 253
253 254
254 255
255 256
256 257
257 258
258 259
259 260
260 261
261 262
262 263
263