Page 81 of 108

PERIODIC MAINTENANCE AND ADJUSTMENT
6-30
6
battery tends to discharge more quick-
ly if the vehicle is equipped with op-
tional electrical accessories.
NOTICE
ECA16522
To char
ge a VRLA (Valve Re gulate d
Lea d Aci d) battery, a special (con-
stant-voltag e) battery char ger is re-
quire d. Usin g a conventional b attery
char ger will d amage the battery.To store the battery
1. If the vehicle will not be used for more than one month, remove the
battery, fully charge it, and then
place it in a cool, dry place.
NOTICE: When removin g the
b attery, be sure the key is
turne d to “OFF”, then discon-
nect the neg ative lead b efore
d isconnectin g the positive lea d.
[ECA16303]
2. If the battery will be stored for
more than two months, check it at
least once a month and fully char-
ge it if necessary.
3. Fully charge the battery before installation. NOTICE: When in-
stallin g the battery, be sure the key is turne
d to “OFF”, then
connect the positive lea d b efore
connectin g the ne gative lea d.
[ECA16841]
4. After installation, make sure that
the battery leads are properly con-
nected to the battery terminals.NOTICE
ECA16531
Always keep the b attery charged .
Storin g a dischar ged battery can
cause permanent b attery damag e.
EAU57983
Replacin g the fusesThe fuse boxes and individual fuses
are located under the seat (See page
3-21.) and behind the right side panel.
To access fuse box 1, remove and in-
stall the right side panel as follows.
1. Remove the bolt and quick fasten- ers.
2. Pull the right side panel off as shown.1. Right side panel
2. Bolt
3. Quick fastener
1
3
2
U1RCE1E0.book Page 30 Wednesday, May 28, 2014 1:10 PM
Page 82 of 108
PERIODIC MAINTENANCE AND ADJUSTMENT
6-31
6MT09 MT09A
3. Place the panel in the original po-sition.
4. Install the bolt and quick fasten- ers.
To access fuse box 2, the main fuse,
and the fuel injection system fuse, re-
move the seat. (See page 3-21.)
1. Fuse box 1
1
1. Ignition fuse
2. Parking lighting fuse
3. Auxiliary fuse
4. Signaling system fuse
5. Headlight fuse
6. Spare fuse
12
6
345
1. Ignition fuse
2. ABS control unit fuse
3. Parking lighting fuse
4. Auxiliary fuse
5. Signaling system fuse
6. Headlight fuse
7. Spare fuse
123
7
456
U1RCE1E0.book Page 31 Wednesday, May 28, 2014 1:10 PM
Page 83 of 108

PERIODIC MAINTENANCE AND ADJUSTMENT
6-32
6
MT09 MT09A
TIPTo access the fuel injection system
fuse, remove the starter relay cover by
pulling it upward.
If a fuse is blown, replace it as follows.
1. Turn the key to “OFF” and turn off the electrical circuit in question.
2. Remove the blown fuse, and then install a new fuse of the specified
amperage. WARNING! Do not
use a fuse of a hi gher ampera ge
ratin g than recommen ded to
avoi d causin g extensive dam-
a g e to the electrical system an d
possi bly a fire.
[EWA15132]
1. Fuse box 2
2. Main fuse
3. Fuel injection system fuse
4. Fuel injection system spare fuse
1. Radiator fan motor fuse
2. Backup fuse (for clock and immobilizer sys-
tem)
3. Electronic throttle valve fuse
4. Spare fuse
2
3
4
1
123
4
1. Radiator fan motor fuse
2. Backup fuse (for clock and immobilizer sys-
tem)
3. Electronic throttle valve fuse
4. ABS solenoid fuse
5. ABS motor fuse
6. Spare fuse
123
6
45
1. Starter relay cover
2. Fuel injection system fuse
3. Fuel injection system spare fuse
1
2
3
U1RCE1E0.book Page 32 Wednesday, May 28, 2014 1:10 PM
Page 84 of 108

PERIODIC MAINTENANCE AND ADJUSTMENT
6-33
63. Turn the key to “ON” and turn onthe electrical circuit in question to
check if the device operates. 4. If the fuse immediately blows
again, have a Yamaha dealer
check the electrical system.
EAU58001
Replacin g the hea dlig ht bul bThis model is equipped with a halogen
bulb headlight. If the headlight bulb
burns out, replace it as follows.NOTICE
ECA10651
Take care not to damag e the follow-
in g parts:
Hea dlig ht bul b
Do not touch the glass part of
the hea dlig ht bul b to keep it free
from oil, otherwise the transpar-
ency of the glass, the luminosity
of the b ulb, an d the b ulb life will
b e ad versely affecte d. Thor-
ou ghly clean off any d irt and fin-
g erprints on the hea dlig ht bul b
usin g a cloth moistene d with al-
cohol or thinner.
Hea dlig ht lens
Do not affix any type of tinte d
film or stickers to the hea dlig ht
lens.
Do not use a hea dlig ht bul b of a
wattag e higher than specifie d.
Specifie d fuses:
Main fuse:
50.0 A
Auxiliary fuse:
2.0 A
Headlight fuse: 15.0 A
Signaling system fuse: 7.5 A
Ignition fuse:
15.0 A
Parking lighting fuse: 7.5 A
Radiator fan motor fuse: 15.0 A
ABS motor fuse:
MT09A 30.0 A
ABS solenoid fuse: MT09A 15.0 A
Fuel injection system fuse: 10.0 A
ABS control unit fuse:
MT09A 7.5 A
Backup fuse: 7.5 A
Electronic throttle valve fuse: 7.5 A
U1RCE1E0.book Page 33 Wednesday, May 28, 2014 1:10 PM
Page 85 of 108
PERIODIC MAINTENANCE AND ADJUSTMENT
6-34
6
1. Remove the headlight unit side
covers by removing the bolts on
each side. 2. Pull up the headlight unit cover to
separate it from the headlight unit.
3. Remove the grommets. 4. Disconnect the auxiliary light cou-
pler.
5. Disconnect the headlight coupler, and then remove the headlight
unit from the vehicle.
1. Do not touch the glass part of the bulb.
1. Bolt
1
1
1. Bolt
2. Headlight unit side cover
1. Headlight unit cover1
1
2
21
1. Grommet
1. Auxiliary light coupler1
1
U1RCE1E0.book Page 34 Wednesday, May 28, 2014 1:10 PM
Page 86 of 108
PERIODIC MAINTENANCE AND ADJUSTMENT
6-35
66. Remove the headlight bulb cover.
7. Unhook the headlight bulb holder,
then remove the burnt-out bulb. 8. Place a new headlight bulb into
position, then secure it with the
bulb holder.
9. Install the headlight bulb cover.
10. Install the headlight unit as shown, and then connect the headlight
coupler. 11. Connect the auxiliary light cou-
pler.
12. Align the holes in the headlight unit with the holes in the headlight
unit cover.
13. Install the grommets.
14. Place the headlight unit side cov- ers in their original position, and
then install the bolts.
15. Have a Yamaha dealer adjust the headlight beam if necessary.
1. Headlight coupler
1. Headlight bulb cover
1
1
1. Headlight bulb holder
2. Headlight bulb
12
1. Headlight unit
2. Headlight coupler1
2
U1RCE1E0.book Page 35 Wednesday, May 28, 2014 1:10 PM
Page 87 of 108
PERIODIC MAINTENANCE AND ADJUSTMENT
6-36
6
EAU24182
Tail/brake li ghtThis model is equipped with an LED-
type tail/brake light.
If the tail/brake light does not come on,
have a Yamaha dealer check it.
EAU24205
Replacin g a turn sig nal light
b ul b1. Remove the turn signal light lens
by removing the screw.
2. Remove the burnt-out bulb by pushing it in and turning it coun-
terclockwise. 3. Insert a new bulb into the socket,
push it in, and then turn it clock-
wise until it stops.
4. Install the lens by installing the screw. NOTICE: Do not over-
ti ghten the screw, otherwise the
lens may break.
[ECA11192]
1. Turn signal light lens
2. Screw
1
2
1. Turn signal light bulb
1
U1RCE1E0.book Page 36 Wednesday, May 28, 2014 1:10 PM
Page 88 of 108
PERIODIC MAINTENANCE AND ADJUSTMENT
6-37
6
EAU58010
Replacing the license plate
li g ht bul b1. Remove the license plate light unit
by removing the nuts and collars,
and then remove the license plate
light bulb socket (together with the
bulb) by pulling it out.
2. Remove the burnt-out bulb by pulling it out. 3. Insert a new bulb into the socket.
4. Install the socket (together with
the bulb) by pushing it in, and then
install the license plate light unit by
installing the collars and nuts.
EAU58021
Replacin g an auxiliary lig ht
b ul bThis model is equipped with two auxil-
iary lights. If an auxiliary light bulb
burns out, replace it as follows.
1. Remove the headlight unit side covers by removing the bolts on
each side.
1. License plate light unit
2. Collar
3. Nut
4. License plate light bulb socket
1
22
4
3
3
1. License plate light bulb
1
1. Bolt
1
1
U1RCE1E0.book Page 37 Wednesday, May 28, 2014 1:10 PM
 1
1 2
2 3
3 4
4 5
5 6
6 7
7 8
8 9
9 10
10 11
11 12
12 13
13 14
14 15
15 16
16 17
17 18
18 19
19 20
20 21
21 22
22 23
23 24
24 25
25 26
26 27
27 28
28 29
29 30
30 31
31 32
32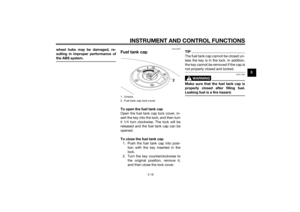 33
33 34
34 35
35 36
36 37
37 38
38 39
39 40
40 41
41 42
42 43
43 44
44 45
45 46
46 47
47 48
48 49
49 50
50 51
51 52
52 53
53 54
54 55
55 56
56 57
57 58
58 59
59 60
60 61
61 62
62 63
63 64
64 65
65 66
66 67
67 68
68 69
69 70
70 71
71 72
72 73
73 74
74 75
75 76
76 77
77 78
78 79
79 80
80 81
81 82
82 83
83 84
84 85
85 86
86 87
87 88
88 89
89 90
90 91
91 92
92 93
93 94
94 95
95 96
96 97
97 98
98 99
99 100
100 101
101 102
102 103
103 104
104 105
105 106
106 107
107


