Page 153 of 208

WARNINGThere is risk of injuries, poisoning, chemical burns, explosions or fire when
working on the battery and on the electrical system. It is essential to com-
ply with the general applicable safety rules as well as the warning instruc-
tions outlined below.■
Keep the vehicle battery away from people who are not completely inde-
pendent, especially children.
■
Do not tilt the battery otherwise battery electrolyte may flow out of the
battery vent openings.
■
Protect your eyes by wearing safety goggles or a face shield – risk of
blindness!
■
Always wear protective gloves, eye and skin protection when handling
the vehicle battery.
■
The battery acid is strongly corrosive and must, therefore, be handled
with the greatest of care.
■
Corrosive fumes in the air irritate the air passages and lead to conjunctivi-
tis and inflammation of the air passages in the lungs.
■
Battery acid corrodes dental enamel and, if it comes into contact with the
skin, causes deep wounds that take a long time to heal.
■
If any battery acid comes into contact with your eyes, rinse the affected
eye immediately with clean water for several minutes and consult a doctor
immediately!
■
Splashes of acid on your skin or clothes should be neutralised as soon as
possible using soap suds and then rinsed with plenty of water.
■
If you swallow battery acid, consult a doctor immediately!
WARNING■ The use of open flames and light should be avoided.■Smoking and radio triggering activities should be avoided.■
Never use a damaged vehicle battery – risk of explosion!
■
Never charge a frozen or thawed vehicle battery – risk of explosion and
chemical burns!
■
Replace a frozen vehicle battery.
■
Never jump-start vehicle batteries with insufficient acid levels – risk of
explosion and chemical burns.
CAUTION
■ Improper handling of the vehicle battery may cause damage.■Ensure that battery acid does not come into contact with the bodywork – risk
of damage to the paintwork.■ If the vehicle has not been driven for more than 3-4 weeks, the battery will
discharge. Prevent the battery from discharging by disconnecting the battery's
negative terminal
or continuously charging the battery with a very low
charging current.■
Do not place the battery in direct daylight in order to protect the vehicle bat-
tery housing from the effects of ultra-violet light.
■
If the vehicle is frequently used for making short trips, the vehicle battery
will not have time to charge up sufficiently and may discharge.
Note
■ We recommend having all work on the vehicle battery carried out by a spe-
cialist garage.■
You should replace batteries older than 5 years.
Opening the cover
Fig. 157
Battery cover
Read and observe and on page 151 first.
The battery is located in the engine compartment.
›
Open the cover in the direction of the arrow.
The battery cover is installed in reverse order.
151Inspecting and replenishing
Page 154 of 208

Checking the battery electrolyte levelFig. 158
Vehicle battery: Electrolyte level
indicator
Read and observe and on page 151 first.
On vehicles with a vehicle battery fitted with a colour indicator, the electrolyte
level can be determined by looking at the change in colour of this display.
Air bubbles can influence the colour of the indicator. For this reason carefully
knock on the indicator before carrying out the check.
Check
Black colour – electrolyte level is correct.
Colourless or light yellow colour – electrolyte level too low, the battery must
be replaced.
For technical reasons, on vehicles with the description “AGM”, the electrolyte
level cannot be checked.
Vehicles with the START STOPsystem are fitted with a battery control unit for
checking the energy level for recurring engine starts.
We recommend that you have the acid level checked regularly by a specialist
garage, especially in the following cases. ▶ High external temperatures.
▶ Longer day trips.
▶ After each charge.
Winter time
The vehicle battery only has a proportion of the starting power in lower tem-
peratures. A discharged vehicle battery may already freeze at temperatures
just below 0 °C .
We therefore recommend that you have the battery checked and, if necessary,
recharged by a specialist garage before the start of the winter.
NoteThe battery acid level is also checked regularly by a specialist garage as part of
the inspection service.
Charging
Read and observe
and on page 151 first.
A properly charged vehicle battery is essential for reliably starting the engine.
A charging operation can be performed if the following conditions are satis-
fied.
The engine is turned off.
The ignition is switched off.
All consumers are turned off.
The bonnet is open.
“Fast charging” with high currents
›
Disconnect both battery cables (first of all “negative”, then “positive”).
›
Attach the terminal clamps of the charger to the battery terminals (red =
“positive”, black = “negative”).
›
Plug the mains cable of the charger into the power socket and switch on the
device.
›
After charging has been successful: Switch off the charger and remove the
mains cable from the power socket.
›
Only then disconnect the charger's terminal clamps.
›
Reconnect the cables to the battery (first “positive”, then “negative”).
Charging with low voltages
It is not necessary to disconnect the cables from the battery if you recharge
the vehicle battery, for example from a mini-charger.
Refer to the instructions of the charger manufacturer .
A charging current of 0.1 multiple of the total vehicle battery capacity (or low-
er) must be used until full charging is achieved.
The vent plugs of the vehicle battery should not be opened for charging.
152General Maintenance
Page 155 of 208

WARNING■When you charge a battery, hydrogen is released, and a highly explosive
gas mixture is also produced. An explosion can be caused through sparkling
over during unclamping or loosening of the cable plug while the ignition is
on.■
Creating a bridge between the poles on the battery (e.g. with metal ob-
jects - cables) creates a short circuit - risk of damage to the battery, explo-
sion and burning of the battery, jets of acid spurting out.
■
Avoid creating sparks when working with cables and electrical devices.
Strong sparking represents a risk of injury.
■
Before carrying out any work on the electrical system, switch off the en-
gine, the ignition and all electrical consumers and disconnect the negative
terminal
.
■
“Quick-charging” the vehicle battery is dangerous and requires a special
charger and specialist knowledge.
■
We therefore recommend that vehicle batteries be “rapidly charged” by a
specialist garage.
CAUTION
On vehicles with the START/STOP system, the pole terminal of the charger
must not be connected directly to the negative terminal of the vehicle battery,
but only to the engine earth » page 168, Jump-starting using the battery from
another vehicle .
Replacing
Read and observe
and on page 151 first.
The new vehicle battery must have the same capacity, voltage, current and
size as the original battery. Suitable vehicle battery types can be purchased
from a specialist garage.
We recommend you have the battery replaced by a specialist garage.
Disconnecting and reconnecting
Read and observe
and on page 151 first.
Disconnecting
›
Switch off the ignition.
›
First, disconnect the negative terminal
first, then the positive
terminal
of the battery.
Connecting›First, connect the positive first, then the negative battery terminal.
After disconnecting and re-connecting the vehicle battery, the following func-
tions or devices are partially or completely inoperative.Function / deviceCommissioningTime settings» page 31
CAUTION
■ Disconnect the vehicle battery only with the ignition turned off - there is a
risk of damaging the electrical system of the vehicle.■
Under no circumstances must the battery cables be connected incorrectly –
risk of a cable fire.
Note
■ After disconnecting and re-connecting the vehicle battery, we recommend
having the vehicle checked by a specialist to ensure that the full functionality
of all electrical systems is guaranteed.■
The data of the multi-function display will be reset.
Automatic load deactivation
Read and observe
and on page 151 first.
The vehicle's electrical system automatically prevents the battery from dis-
charging when the battery is being heavily used. This manifests itself by the
following. ▶ The idling speed is raised to allow the generator to deliver more electricity to
the electrical system.
▶ Where necessary, large convenience consumers such as seat heaters and
rear window heaters have their power limited or are shut off completely in
the event of an emergency.
CAUTION
■ Despite such intervention by the vehicle electric system management, the
vehicle battery may be drained. For example, when the ignition is switched on
a long time with the engine turned off or the side or parking lights are turned
on during longer parking.■
Consumers that are supplied via a 12-V power socket can cause the vehicle
battery to discharge when the ignition is switched off.
153Inspecting and replenishing
Page 156 of 208

NoteDriving comfort is not impaired by consumers being deactivated. The driver is
often not aware of it having taken place.Wheels
Tyres and wheel rims
Introduction
This chapter contains information on the following subjects:
Notes on using wheels
154
Tyre pressure
155
Tyre wear
156
Tyre wear indicator and wheels exchange
156
Tyre damage
157
Unidirectional tyres
157
Spare wheel
157
Spare wheel
157
Tyre label
158
Only use tyres or wheel rims that have been approved by ŠKODA for your mod-
el of vehicle.
WARNINGFor reasons of driving safety, do not replace tyres individually.
Note
■ We recommend that any work on the wheels or tyres is carried out by a spe-
cialist garage.■
We recommend that you use wheel rims, tyres, full wheel trims and snow
chains from ŠKODA Original Accessories.
Notes on using wheels
Read and observe
on page 154 first.
During the first 500 km, new tyres do not offer optimum grip and appropriate
care should therefore be taken when driving.
Always fit the tyres with the deeper tread depth to the front wheels.
Tyre storage
Identify disassembled tyres so that the previous direction of rotation can be
maintained if the tyres are reassembled.
154General Maintenance
Page 157 of 208

Always store wheels or tyres in a cool, dry place that is as dark as possible.
Tyres which are not fixed to a wheel trim should be stored upright.
Tyre age
Tyres age and lose their original characteristics, even if they are not being
used. The service life of the tyres is 6 years. Therefore, we recommend not us-
ing tyres that are older than 6 years.
Wheel bolts
Wheels and wheel bolts are matched to each other in terms of design. We rec-
ommend that you use wheel rims and wheel bolts from ŠKODA Original Acces-
sories.WARNINGNever use tyres if you do not know anything about the condition and age.
Tyre pressure
Fig. 159
Label with a table of tyre sizes and tyre pressure value / inflate
tyres
Read and observe
on page 154 first.
The prescribed tyre inflation is on the sticker with pictograms
A
» Fig. 159 (for
some countries, the pictograms are replaced with a text).
Tyre pressure is always to match the load .
Inflation pressure for half load
Inflation pressure for environmentally-friendly operation
As a result of pressure level adaption to this value, the fuel consumption
and pollutant emissions may fall slightly.
Inflation pressure for full load
Tyre diameter in inches
These details are intended only as information for the specified tyre pres-
sure and does not list approved tyre sizes for your vehicle.
The approved tyre sizes for your vehicle are listed in the vehicle's technical
documentation (the so called COC document) and this also states the dec-
laration of conformity.
The approved tyre diameter for your vehicle is also provided with the vehi-
cle data » page 183 .
Tyre pressure value on the front axle
Tyre pressure value on the rear axle
Check tyre pressures
Check the tyre pressure, including that of the emergency or spare wheel, at
least once a month and also before setting off on a long journey.
Always check the inflation pressure when the tyres are cold. Do not reduce the
higher pressure on warm tyres.
In vehicles with tyre pressure monitoring tyre pressure values are to be stored
every time the tyre pressure changes » page 119.WARNING■
Having the correct tyre inflation pressure is always the driver's responsi-
bility.■
Too low or too high inflation pressure impairs handling.
■
If the inflation pressure is too low, the tyre will have to overcome a higher
rolling resistance. This will cause a significant increase in the temperature
of the tyre, especially at higher speeds. This can result in tread separation
and a tyre blow out.
■
In the event of very fast tyre inflation pressure loss, such as a sudden tyre
failure, an attempt should be made to bring the vehicle carefully to a stop
without sudden steering movements and without any hard braking.
For the sake of the environment
Tyres that are insufficiently inflated increase your fuel consumption. BCDEFG155Wheels
Page 158 of 208
, can be obtained from a ŠKODA1)
partner.
Tyre wear
Read and observe
on page 154 first.
Tyre wear depends on the pressure, driving style, and other c")
NoteThe declaration of conformity (COC document), can be obtained from a ŠKODA1)
partner.
Tyre wear
Read and observe
on page 154 first.
Tyre wear depends on the pressure, driving style, and other circumstances.
Attention to the following notes may affect tyre wear.
Driving style
Fast cornering, sharp acceleration and braking increase the wear of your tyres.
Wheel balance
The wheels of a new vehicle are balanced. When driving, however, there are a
range of factors that may result in an imbalance. This may become apparent by
a “vibration” in the steering. If this is the case, have the wheels checked by a
specialist garage.
Have the wheels likewise rebalanced after replacing the tyres.
Setting the vehicle geometry
Incorrect wheel alignment at the front or rear leads to excess wear on the
tyres and impairs driving safety. With a distinctive tyre wear, we recommend
that you check the setting of the vehicle geometry in a specialist workshop.
WARNING■ An incorrect wheel alignment at the front or rear impairs handling.■Unusual vibrations or pulling of the vehicle to one side could be a sign of
tyre damage. If there is any suspicion that a wheel is damaged, immediately
reduce your speed and stop! If no external tyre damage is evident, drive
slowly and carefully to the nearest specialist garage to have the vehicle
checked.Tyre wear indicator and wheels exchangeFig. 160
Principle sketch: Replace tyre tread with wear indicators /
wheels
Read and observe
on page 154 first.
Wear indicators
The base of the tread of the tyres contains has a 1.6 mm high wear indicator » Fig. 160 -
. In some countries, different tyre wear rates may apply.
Markings on the walls of the tyres through the letters “TWI”, triangular sym-
bols or other symbols identify the position of the wear indicators.
Exchanging the wheels
For uniform wear on all tyres, we recommend that you change the wheels ev-
ery 10 000 km according to the scheme » Fig. 160-
. You will then obtain ap-
proximately the same life for all the tyres.
After a wheel has been replaced, the tyre pressure has to be adjusted.
In vehicles with tyre pressure monitoring, save tyre pressure values » page 120.
WARNING■
You must have your tyres replaced with new ones at the latest when the
wear indicators have been worn down.■
Worn tyres impair necessary adhesion to the road surface, particularly at
high speeds on wet roads. This could lead to “aquaplaning” (uncontrolled vehicle movement – “swimming” on a wet road surface).
1)
Only valid for some countries and some models.
156General Maintenance
Page 159 of 208
 on a regular basis.
Remove any foreign objects in")
Tyre damageRead and observe
on page 154 first.
We recommend checking your tyres and wheel rims for damage (punctures,
cuts, splits and bulges, etc.) on a regular basis.
Remove any foreign objects in the tyre tread immediately (e.g. small stones).
Foreign bodies which have penetrated into the tyre (e.g. screws or nails)
should not be removed and seek help from a specialist garage.
WARNINGNever drive with damaged tyres – there is the risk of an accident occurring.
CAUTION
The tyres must be protected from contact with substances such as oil, grease
and fuel, which could damage them. If the tyres come into contact with these
substances, then we recommend you have this checked out in a specialist
workshop.
Unidirectional tyres
Read and observe
on page 154 first.
The direction of rotation of the tyres is marked by arrows on the wall of the
tyre .
The indicated direction of rotation must be adhered to in order to ensure the
optimal characteristics of these tyres.
These characteristics mainly relate to the following. ▶ Increased driving stability.
▶ Reduced risk of aquaplaning.
▶ Reduced tyre noise and tyre wear.
Spare wheel
Read and observe
on page 154 first.
The size of the spare wheel is identical to that of the vehicle factory installedwheels.
After changing the spare wheel, the tyre pressure should be adjusted.
In vehicles with tyre pressure monitoring, save tyre pressure values » page 120.WARNING■
If, you get a puncture and a spare tyre has to be mounted with opposite
direction of rotation, then drive carefully. The best properties of the tyre
are no longer present in this situation.■
If the dimensions or design of the spare wheel differ from the tyres fitted
to the vehicle (e.g. winter tyres or low-profile tyres), it must only be used
briefly in the event of a puncture and if an appropriately cautious style of
driving is adopted.
■
Never use the temporary spare wheel if it is damaged.
Spare wheel
Read and observe
on page 154 first.
A yellow warning label is always displayed on the rim of the temporary spare
wheel.
Please note the following if you intend to use the temporary spare wheel. ▶ The warning label must not be covered after installing the wheel.
▶ Be particularly observant when driving.
▶ The spare is inflated to the maximum inflation pressure for the vehicle
» page 155 .
▶ The tyre inflation pressure of the spare wheel 125/70 R16 is 4.2 bar.
▶ Only use this temporary spare wheel to reach the nearest specialist garage,
since it is not intended for permanent use.
If you need to use a spare wheel, make sure to fit a standard wheel of the ap-
propriate dimensions and design as soon as possible.
In vehicles with tyre pressure monitoring, save tyre pressure values » page 120.
WARNING■
Never drive with more than one temporary spare wheel mounted!■Only use the temporary spare wheel when absolutely necessary.■
Avoid accelerating at full throttle, sharp braking and fast cornering.
■
The snow chains cannot be used on the temporary spare wheel.
■
If the dimensions or design of the temporary spare wheel differ from the
tyres fitted, never drive faster than 80 km/h (or 50 mph).
■
Never use the emergency spare wheel if it is damaged.
■
Observe the instructions on the warning sign of the temporary spare
wheel.
157Wheels
Page 160 of 208
 and treadpattern on one axle on all four wheels.
When mounting new tyres the tyres")
Tyre labelRead and observe
on page 154 first.
Only use radial tyres of the same type, size (rolling circumference) and treadpattern on one axle on all four wheels.
When mounting new tyres the tyres have to be replaced axle by axle.
Explanation of tyre markings
For example, 225/50R 17 91 T means:
225Tyre width in mm50Height/width ratio in %RCode letter for the type of tyre – Radial17Diameter of wheel in inches91Load indexTSpeed symbol
The date of manufacture is stated on the tyre wall (possibly on the inside).
For example DOT ... 10 15... means that the tyre was manufactured in the 10th
week of the year 2015.
Load index
The load index indicates the maximum permissible load for each individual
tyre.
Load index838485868788Load
(In kg)487500515530545560
Speed symbol
The maximum speed symbol indicates the maximum permissible vehicle speed
with fitted tyres in each category.
Speed
symbolSTUHVWMaximum speed
(in km/h)180190200210240270
WARNING■ Never exceed the maximum permissible load bearing capacity of moun-
ted tyres.■
Never exceed the maximum permissible speed for the mounted tyres.
Winter operation
Introduction
This chapter contains information on the following subjects:
Winter tyres
158
Snow chains
159
Do not use alloy rims with bevelled or polished surfaces during the winter. The
rim surface does not have sufficient corrosion protection and could be perma-
nently damaged (e.g. through grit).
Winter tyres
The handling of your vehicle will be significantly improved when driving on
wintry roads if you fit winter tyres (labelled M+S).
To get best possible handling, winter tyres must be fitted to all four wheels. The minimum tread depth must be 4 mm.
Fit the summer tyres on again in good time as they provide better handling
properties, a shorter braking distance, less tyre noise, and reduced tyre wear
on roads which are free of snow and ice as well as at temperatures above 7 °C.
Speed symbol
Winter tyres (marked with M+S and a peak/snowflake symbol
) of a lower
speed category can be used provided that the permissible maximum speed of
these tyres is not exceeded even if the possible maximum speed of the vehicle
is higher.
On vehicles with the infotainment system with key the speed limit can be
set for winter tyres » Owner´s Manual Infotainment , chapter CAR - Adjust ve-
hicle systems .
For other vehicles with the MAXI DOT display there is the possibility to have
the speed limit set for winter tyres in a specialist workshop.
158General Maintenance
 1
1 2
2 3
3 4
4 5
5 6
6 7
7 8
8 9
9 10
10 11
11 12
12 13
13 14
14 15
15 16
16 17
17 18
18 19
19 20
20 21
21 22
22 23
23 24
24 25
25 26
26 27
27 28
28 29
29 30
30 31
31 32
32 33
33 34
34 35
35 36
36 37
37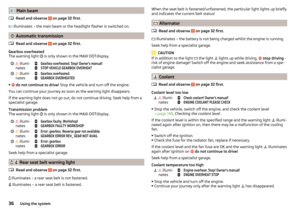 38
38 39
39 40
40 41
41 42
42 43
43 44
44 45
45 46
46 47
47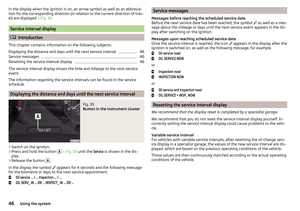 48
48 49
49 50
50 51
51 52
52 53
53 54
54 55
55 56
56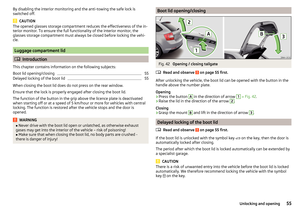 57
57 58
58 59
59 60
60 61
61 62
62 63
63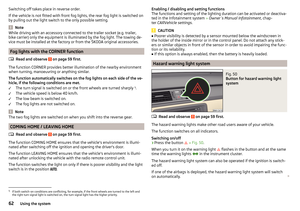 64
64 65
65 66
66 67
67 68
68 69
69 70
70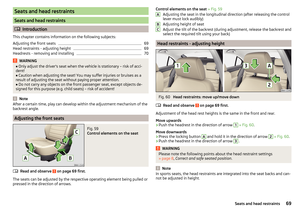 71
71 72
72 73
73 74
74 75
75 76
76 77
77 78
78 79
79 80
80 81
81 82
82 83
83 84
84 85
85 86
86 87
87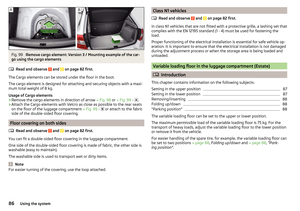 88
88 89
89 90
90 91
91 92
92 93
93 94
94 95
95 96
96 97
97 98
98 99
99 100
100 101
101 102
102 103
103 104
104 105
105 106
106 107
107 108
108 109
109 110
110 111
111 112
112 113
113 114
114 115
115 116
116 117
117 118
118 119
119 120
120 121
121 122
122 123
123 124
124 125
125 126
126 127
127 128
128 129
129 130
130 131
131 132
132 133
133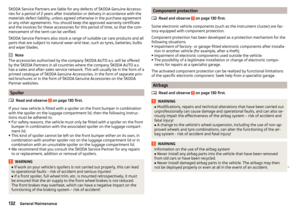 134
134 135
135 136
136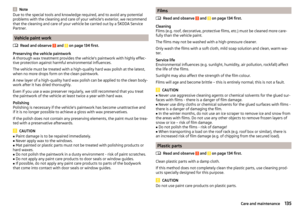 137
137 138
138 139
139 140
140 141
141 142
142 143
143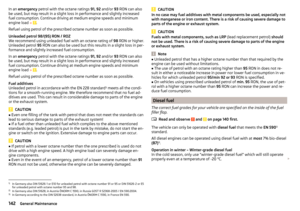 144
144 145
145 146
146 147
147 148
148 149
149 150
150 151
151 152
152 153
153 154
154 155
155 156
156 157
157 158
158 159
159 160
160 161
161 162
162 163
163 164
164 165
165 166
166 167
167 168
168 169
169 170
170 171
171 172
172 173
173 174
174 175
175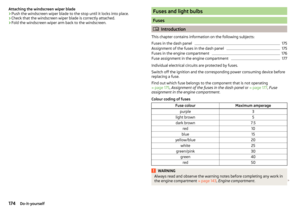 176
176 177
177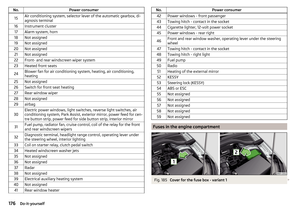 178
178 179
179 180
180 181
181 182
182 183
183 184
184 185
185 186
186 187
187 188
188 189
189 190
190 191
191 192
192 193
193 194
194 195
195 196
196 197
197 198
198 199
199 200
200 201
201 202
202 203
203 204
204 205
205 206
206 207
207