Page 138 of 341
136
208_en_Chap05_conduite_ed01-2015
Road holding
Definition
Electronic Stability Control (ESC) comprising
the following systems:
- anti-lock braking system (ABS) and
electronic brake force distribution (EBFD),
- emergency braking assistance,
- wheel anti-slip regulation (ASR) or traction
control,
- dynamic stability control (DSC).
Anti-lock braking system (ABS)
and electronic brake force
distribution (EBFD)
Definition
These systems improve the stability and
manoeuvrability of your vehicle when braking
and contribute towards improved control in
corners, in particular on poor or slippery road
surfaces.
The ABS prevents wheel lock in the event of
emergency braking.
The electronic brake force distribution system
manages the braking pressure wheel by wheel.
Emergency braking assistance
Definition
In an emergency, this system enables you to
reach the optimum braking pressure more
quickly and therefore reduce the stopping
distance.
It is triggered in relation to the speed at which
the brake pedal is pressed. This is felt by a
reduction in the resistance of the pedal and an
increase in the effectiveness of the braking.
Anti-slip regulation (ASR)
Definition
This system (also known as Traction Control)
optimises traction in order to avoid wheel
slip by acting on the brakes of the driving
wheels and on the engine. It also improves
the directional stability of the vehicle on
acceleration.
Dynamic stability control (DSC)
Definition
If there is a difference between the path
followed by the vehicle and that required by the
driver, this system monitors each wheel and
automatically acts on the brake of one or more
wheels and on the engine to return the vehicle
to the required path, within the limits of the laws
of physics.
Driving
Page 144 of 341
142
208_en_Chap05_conduite_ed01-2015
Eco-driving
Eco-driving is a range of everyday practices that allow the motorist to optimise their fuel consumption and CO2 emissions.
Optimise the use of your gearbox
With a manual gearbox, move off gently and change up without waiting.
During acceleration change up early.
With an automatic or electronic gearbox, give preference to automatic
mode and avoid pressing the accelerator pedal heavily or suddenly.
The gear shift indicator invites you engage the most suitable gear: as
soon as the indication is displayed in the instrument panel, follow it
straight away.
For vehicles fitted with an electronic or automatic gearbox, this
indicator appears only in manual mode.
Drive smoothly
Maintain a safe distance between vehicles, use engine braking rather
than the brake pedal, and press the accelerator progressively. These
practices contribute towards a reduction in fuel consumption and CO
2
emissions and also helps reduce the background traffic noise.
If your vehicle has cruise control, make use of the system at speeds
above 25 mph (40 km/h) when the traffic is flowing well.
Control the use of your electrical
equipment
Before moving off, if the passenger compartment is too warm, ventilate it
by opening the windows and air vents before using the air conditioning.
Above 30 mph (50 km/h), close the windows and leave the air vents
open.
Remember to make use of equipment that can help keep the
temperature in the passenger compartment down (sunroof and window
blinds...).
Switch off the air conditioning, unless it has automatic regulation, as
soon as the desired temperature is attained.
Switch off the demisting and defrosting controls, if not automatic.
Switch off the heated seat as soon as possible.
Switch off the headlamps and front foglamps when the level of light
does not require their use.
Avoid running the engine before moving off, particularly in winter; your
vehicle will warm up much faster while driving.
As a passenger, if you avoid connecting your multimedia devices
(film, music, video game...), you will contribute towards limiting the
consumption of electrical energy, and so of fuel.
Disconnect your portable devices before leaving the vehicle.
Driving
Page 146 of 341
144
208_en_Chap06_Feux-Signalisations_ed01-2015
Direction indicators
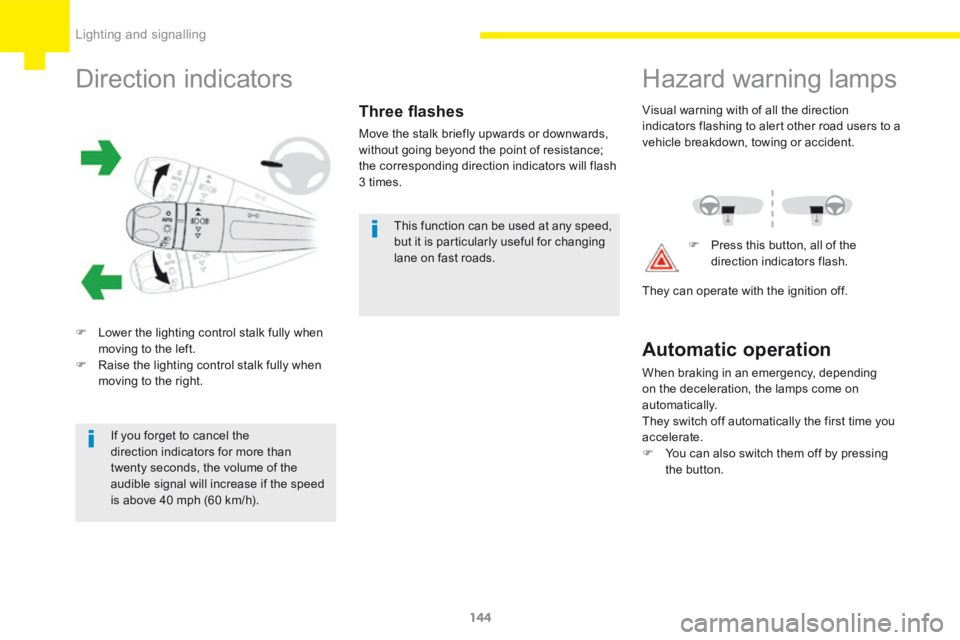
F Lower the lighting control stalk fully when
moving to the left.
F Raise the lighting control stalk fully when
moving to the right.
Three flashes
Move the stalk briefly upwards or downwards,
without going beyond the point of resistance;
the corresponding direction indicators will flash
3 times.
If you forget to cancel the
direction indicators for more than
twenty seconds, the volume of the
audible signal will increase if the speed
is above 40 mph (60 km/h). This function can be used at any speed,
but it is particularly useful for changing
lane on fast roads.
Hazard warning lamps
Automatic operation
When braking in an emergency, depending
on the deceleration, the lamps come on
automatically.
They switch off automatically the first time you
accelerate.
F
You can also switch them off by pressing
the button.F
Press this button, all of the
direction indicators flash.
Visual warning with of all the direction
indicators flashing to alert other road users to a
vehicle breakdown, towing or accident.
They can operate with the ignition off.
Lighting and signalling
Page 156 of 341
154
208_en_Chap06_Feux-Signalisations_ed01-2015
Changing a bulb
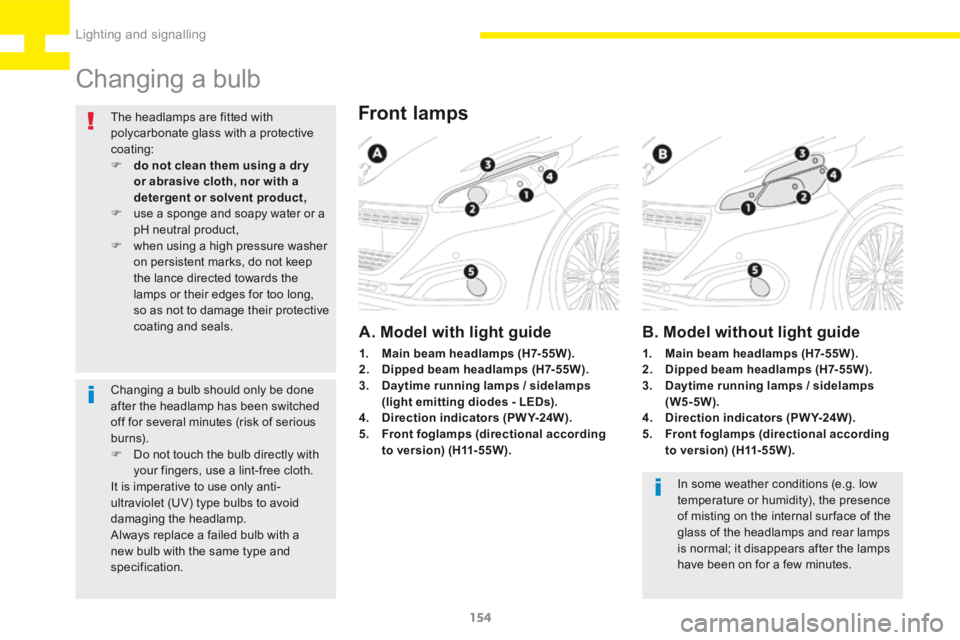
Front lamps
A. Model with light guide
In some weather conditions (e.g. low
temperature or humidity), the presence
of misting on the internal sur face of the
glass of the headlamps and rear lamps
is normal; it disappears after the lamps
have been on for a few minutes.
The headlamps are fitted with
polycarbonate glass with a protective
coating:
F
do not clean them using a dr y
or abrasive cloth, nor with a
detergent or solvent product,
F use a sponge and soapy water or a
pH neutral product,
F when using a high pressure washer
on persistent marks, do not keep
the lance directed towards the
lamps or their edges for too long,
so as not to damage their protective
coating and seals.
B. Model without light guide
1. Main beam headlamps (H7-55W).
2. Dipped beam headlamps (H7-55W).
3. Daytime running lamps / sidelamps
(light emitting diodes - LEDs).
4. Direction indicators (PWY-24W).
5. Front foglamps (directional according
to version) (H11-55W). 1.
Main beam headlamps (H7-55W).
2. Dipped beam headlamps (H7-55W).
3. Daytime running lamps / sidelamps
(W5-5W).
4. Direction indicators (PWY-24W).
5. Front foglamps (directional according
to version) (H11-55W).
Changing a bulb should only be done
after the headlamp has been switched
off for several minutes (risk of serious
burns).
F
Do not touch the bulb directly with
your fingers, use a lint-free cloth.
It is imperative to use only anti-
ultraviolet (UV) type bulbs to avoid
damaging the headlamp.
Always replace a failed bulb with a
new bulb with the same type and
specification.
Lighting and signalling
Page 161 of 341
159
208_en_Chap06_Feux-Signalisations_ed01-2015
Changing reversing lamp and
direction indicator bulbs
These two bulbs are changed from inside the
boot:
F open the boot,
F remove the access grille from the
corresponding side trim panel,
F slacken and remove the nut,
F disconnect the lamp unit connector,
F unclip the lamp unit carefully extract it
pulling in line towards the outside, F
press the four tabs and remove the bulb
h o l d e r,
F turn the bulb a quarter of a turn and
change it.
To reassemble, carry out these operations in
reverse order.
Take care to engage the lamp unit in its guides,
while keeping it in line with the vehicle.
Tighten sufficiently to ensure sealing, but
without damaging the lamp.
Light emitting diodes-LEDs
For replacement, contact a PEUGEOT dealer
or qualified workshop.
6
Lighting and signalling
Page 165 of 341
163
208_en_Chap07_ Amenagements_ed01-2015
Boot
1. Rear parcel shelf
2. Hooks
3. Boot lamp
4. Stowing rings (depending on version)
7
Fittings
Page 166 of 341
164
208_en_Chap07_ Amenagements_ed01-2015
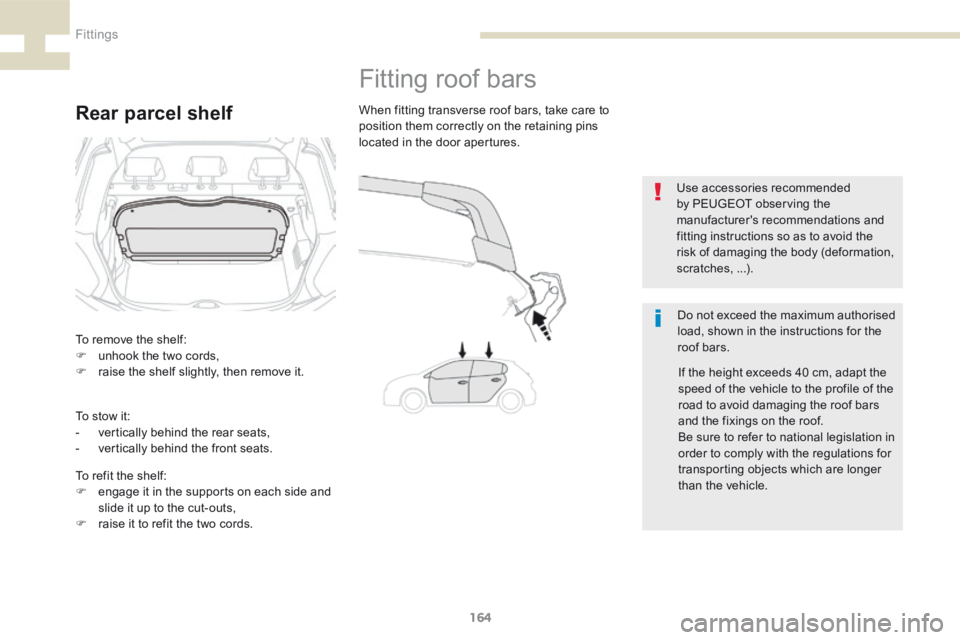
Rear parcel shelf
Fitting roof bars
Do not exceed the maximum authorised
load, shown in the instructions for the
roof bars.
When fitting transverse roof bars, take care to
position them correctly on the retaining pins
located in the door apertures.
Use accessories recommended
by PEUGEOT observing the
manufacturer's recommendations and
fitting instructions so as to avoid the
risk of damaging the body (deformation,
scratches, ...).
If the height exceeds 40 cm, adapt the
speed of the vehicle to the profile of the
road to avoid damaging the roof bars
and the fixings on the roof.
Be sure to refer to national legislation in
order to comply with the regulations for
transporting objects which are longer
than the vehicle.
To remove the shelf:
F
unhook the two cords,
F raise the shelf slightly, then remove it.
To refit the shelf:
F engage it in the supports on each side and
slide it up to the cut-outs,
F raise it to refit the two cords.
To stow it:
-
vertically behind the rear seats,
- vertically behind the front seats.
Fittings
Page 167 of 341
165
208_en_Chap07_ Amenagements_ed01-2015
Towing a trailer
We recommend the use of genuine
PEUGEOT towbars and their harnesses
that have been tested and approved
from the design stage of your vehicle,
and that the fitting of the towbar is
entrusted to a PEUGEOT dealer or a
qualified workshop.
If the towbar is not fitted by a
PEUGEOT dealer, it must still be
fitted in accordance with the vehicle
manufacturer's instructions.
Your vehicle is primarily designed for
transporting people and luggage, but it may
also be used for towing a trailer. Driving with a trailer places greater
demands on the towing vehicle and the
driver must take particular care.
The rear parking sensors will be
deactivated automatically if a genuine
PEUGEOT towbar is used.
7
Fittings