2015 Peugeot 208 tow
[x] Cancel search: towPage 69 of 341
67
208_en_Chap04_confort_ed01-2015
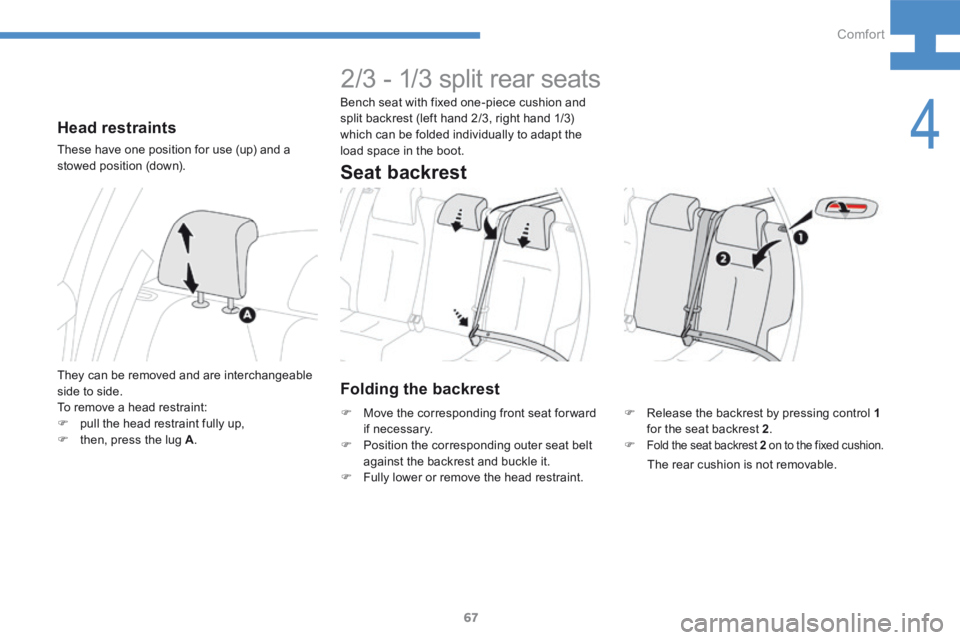
Head restraints
These have one position for use (up) and a
stowed position (down).
They can be removed and are interchangeable
side to side.
To remove a head restraint:
F pull the head restraint fully up,
F then, press the lug A .
2/3 - 1/3 split rear seats
Folding the backrest
F Release the backrest by pressing control 1
for the seat backrest 2 .
F
Fold the seat backrest 2 on to the fixed cushion.
Bench seat with fixed one-piece cushion and
split backrest (left hand 2/3, right hand 1/3)
which can be folded individually to adapt the
load space in the boot.
F Move the corresponding front seat for ward
if necessary.
F Position the corresponding outer seat belt
against the backrest and buckle it.
F Fully lower or remove the head restraint. The rear cushion is not removable.
Seat backrest
4
Comfort
Page 70 of 341
68
208_en_Chap04_confort_ed01-2015
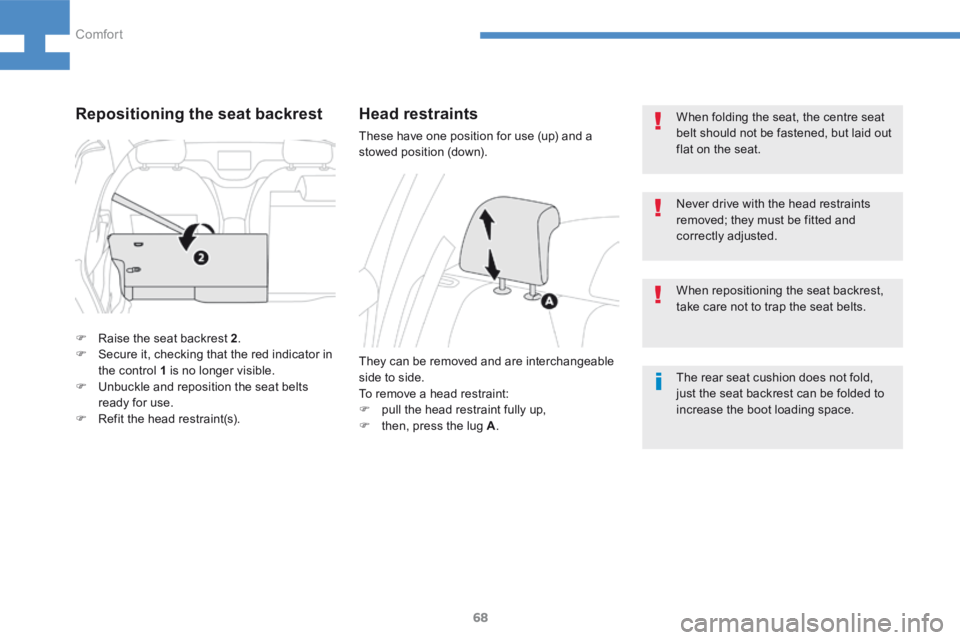
When folding the seat, the centre seat
belt should not be fastened, but laid out
flat on the seat.
The rear seat cushion does not fold,
just the seat backrest can be folded to
increase the boot loading space.Head restraints
These have one position for use (up) and a
stowed position (down).
They can be removed and are interchangeable
side to side.
To remove a head restraint:
F pull the head restraint fully up,
F then, press the lug A . When repositioning the seat backrest,
take care not to trap the seat belts.
Repositioning the seat backrest
F
Raise the seat backrest 2 .
F Secure it, checking that the red indicator in
the control 1 is no longer visible.
F Unbuckle and reposition the seat belts
ready for use.
F Refit the head restraint(s). Never drive with the head restraints
removed; they must be fitted and
correctly adjusted.
Comfort
Page 72 of 341
70
208_en_Chap04_confort_ed01-2015
In order for the ventilation and air conditioning to be fully effective, follow the operation and
maintenance guidelines below:
F To obtain an even air distribution, take care not to obstruct the exterior air intake grilles
located at the base of the windscreen, the nozzles, the vents and the air outlets, as well
as the air extractor located in the boot.
F Do not cover the sunshine sensor, located on the dashboard; this is used for regulation
of the air conditioning system.
F The air conditioning system only works with the engine running.
F Operate the air conditioning system for at least 5 to 10 minutes, once or twice a month
to keep it in per fect working order.
F Ensure that the passenger compartment filter is in good condition and have the filter
elements replaced regularly.
We recommend the use of a combined passenger compartment filter. Thanks to its
special active additive, it contributes to the purification of the air breathed by the
occupants and the cleanliness of the passenger compartment (reduction of allergic
symptoms, bad odours and greasy deposits).
F To ensure correct operation of the air conditioning system, you are also advised to have
it checked regularly as recommended in the warranty and maintenance record.
F If the system does not produce cold air, switch it off and contact a PEUGEOT dealer or
a qualified workshop.
When towing the maximum load on a steep gradient in high temperatures, switching off the
air conditioning increases the available engine power and so improves the towing ability.
Advice
If after an extended stop in sunshine,
the interior temperature is very high, first
ventilate the passenger compartment for
a few moments.
Put the air flow control at a setting high
enough to quickly change the air in the
passenger compartment.
The air conditioning system does not
contain chlorine and does not present
any danger to the ozone layer.
The condensation created by the air
conditioning results in a discharge
of water under the vehicle which is
perfectly normal.
Stop & Start
The heating and air conditioning systems only work when the engine is running. To maintain
a comfortable temperature in the passenger compartment, you can temporarily deactivate
the Stop & Start system (see the corresponding section).
Passenger compartment filter
Depending on the environment (e.g.
dusty atmosphere) and the use of the
vehicle (e.g. city driving), replace it
twice as often if necessar y .
A clogged passenger compartment filter may
have an adverse effect on the per formance
of the air conditioning system and generate
undesirable odours.
Refer to the manufacturer's service schedule.
Comfort
Page 74 of 341
72
208_en_Chap04_confort_ed01-2015
Demist - defrost
These markings on the control panel
indicate the control positions for
rapid demisting or defrosting of the
windscreen and side windows.
Manual air conditioning
With Stop & Start, when demisting has
been activated, the STOP mode is not
available.
Dual-zone digital air conditioning
Auto - Visibility programme
Switching on
Windscreen
Operation
F Press the "A /C " button again;
the indicator lamp in the button
goes off. F
Press the "visibility" button
again or on "AUTO" ; the
indicator lamp in the button goes
off and the indicator lamp in the
"AUTO" button comes on.
Switching on
F Put the air flow, temperature
and distribution controls to the
dedicated marked position. F
Press the " visibility" button to
demist or defrost the windscreen
and side windows as quickly as
possible.
Switching off
The system automatically manages the air
conditioning, air flow and air intake, and
provides optimum distribution towards the
windscreen and side windows.
Switching off
The system reverts to the previous settings.
F
Press the "A /C " button for air
conditioning; the indicator lamp
in the button comes on.
Comfort
Page 82 of 341
80
208_en_Chap04_confort_ed01-2015
Avoid prolonged operation in interior air
recirculation mode (risk of misting and
of deterioration of the air quality).
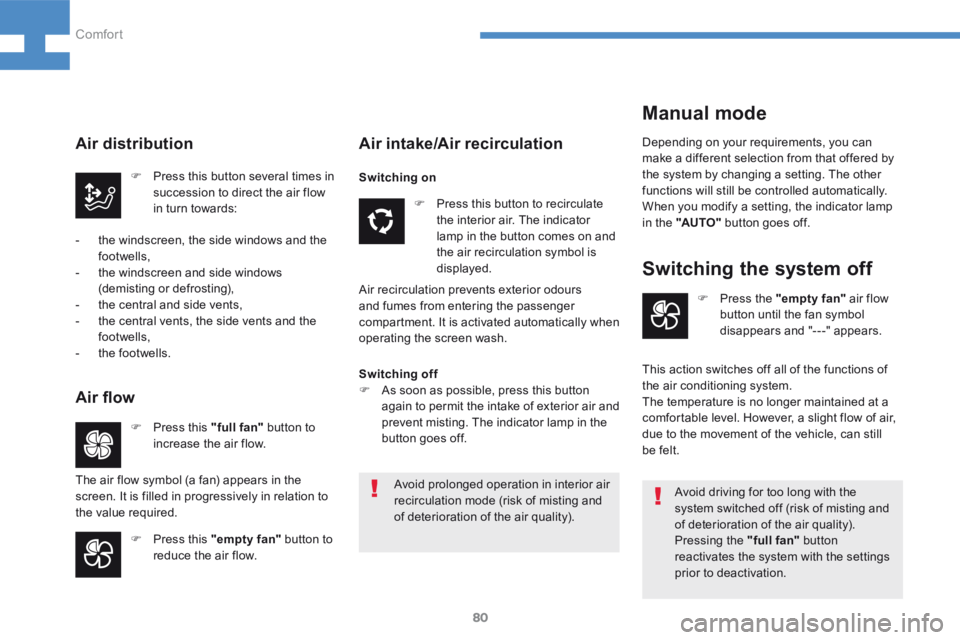
Switching the system off
Air intake/Air recirculation
F Press this "full fan" button to
increase the air flow.
Air distribution
F Press the "empty fan" air flow
button until the fan symbol
disappears and "---" appears.
This action switches off all of the functions of
the air conditioning system.
The temperature is no longer maintained at a
comfortable level. However, a slight flow of air,
due to the movement of the vehicle, can still
be felt.
F
Press this button to recirculate
the interior air. The indicator
lamp in the button comes on and
the air recirculation symbol is
displayed.
Air recirculation prevents exterior odours
and fumes from entering the passenger
compartment. It is activated automatically when
operating the screen wash.
F
Press this button several times in
succession to direct the air flow
in turn towards:
- the windscreen, the side windows and the
footwells,
- the windscreen and side windows
(demisting or defrosting),
- the central and side vents,
- the central vents, the side vents and the
footwells,
- the footwells.
Air flow
The air flow symbol (a fan) appears in the
screen. It is filled in progressively in relation to
the value required.
F Press this "empty fan" button to
reduce the air flow. Avoid driving for too long with the
system switched off (risk of misting and
of deterioration of the air quality).
Pressing the "full fan"
button
reactivates the system with the settings
prior to deactivation.
Switching on
Switching off
F
As soon as possible, press this button
again to permit the intake of exterior air and
prevent misting. The indicator lamp in the
button goes off.
Manual mode
Depending on your requirements, you can
make a different selection from that offered by
the system by changing a setting. The other
functions will still be controlled automatically.
When you modify a setting, the indicator lamp
in the "AUTO" button goes off.
Comfort
Page 86 of 341
84
208_en_Chap04_confort_ed01-2015
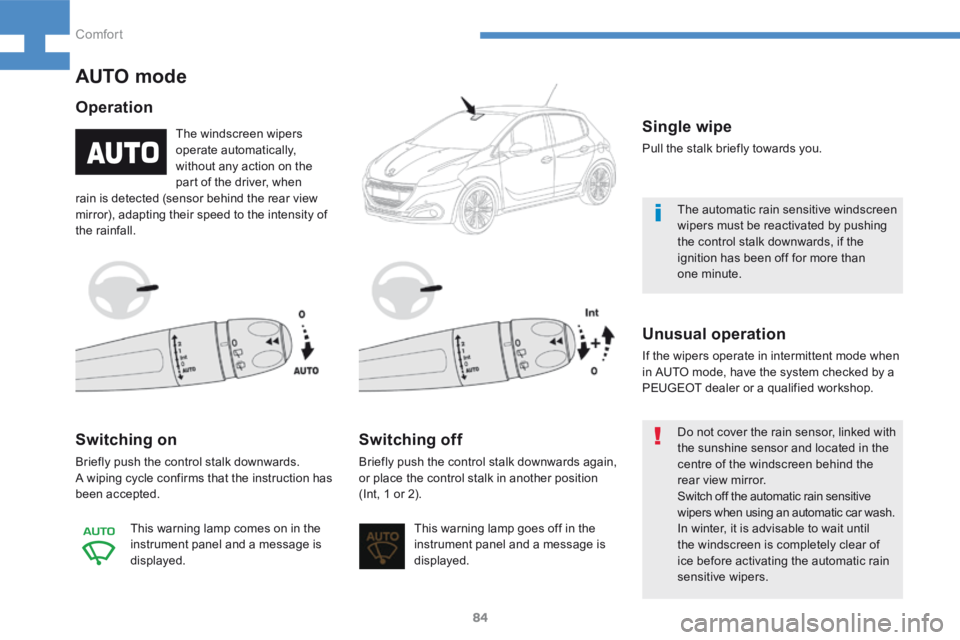
OperationSwitching on
Briefly push the control stalk downwards.
A wiping cycle confirms that the instruction has
been accepted. This warning lamp comes on in the
instrument panel and a message is
displayed. This warning lamp goes off in the
instrument panel and a message is
displayed.
Switching off
Briefly push the control stalk downwards again,
or place the control stalk in another position
(Int, 1 or 2). The automatic rain sensitive windscreen
wipers must be reactivated by pushing
the control stalk downwards, if the
ignition has been off for more than
one
minute.
Do not cover the rain sensor, linked with
the sunshine sensor and located in the
centre of the windscreen behind the
rear view mirror.
Switch off the automatic rain sensitive
wipers when using an automatic car wash.
In winter, it is advisable to wait until
the windscreen is completely clear of
ice before activating the automatic rain
sensitive wipers.
AUTO mode
The windscreen wipers
operate automatically,
without any action on the
part of the driver, when
rain is detected (sensor behind the rear view
mirror), adapting their speed to the intensity of
the rainfall.Single wipe
Pull the stalk briefly towards you.
Unusual operation
If the wipers operate in intermittent mode when
in AUTO mode, have the system checked by a
PEUGEOT dealer or a qualified workshop.
Comfort
Page 87 of 341
85
208_en_Chap04_confort_ed01-2015
Rear
If a significant accumulation of snow or
ice is present, or when using a bicycle
carrier on the boot, deactivate the
automatic rear wiper via the vehicle
configuration menu.
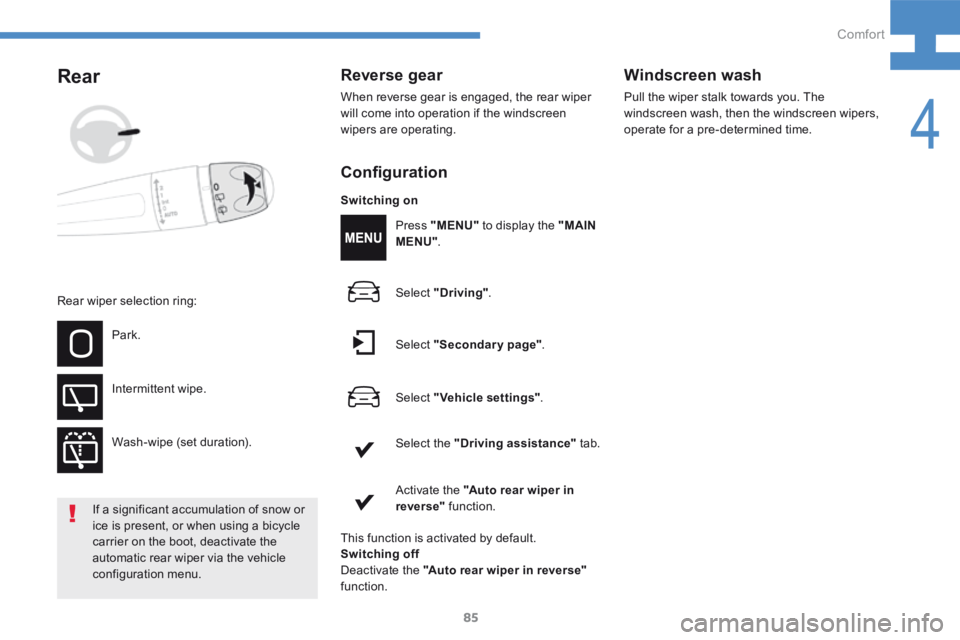
Rear wiper selection ring:
Park.
Intermittent wipe.
Wash-wipe (set duration).
Reverse gear
When reverse gear is engaged, the rear wiper
will come into operation if the windscreen
wipers are operating.
Switching on Press "MENU" to display the "MAIN
MENU" .
Select "Driving" .
Select "Secondary page" .
Select "Vehicle settings" .
Select the "Driving assistance" tab.
Activate the "Auto rear wiper in
reverse" function.
Windscreen wash
Pull the wiper stalk towards you. The
windscreen wash, then the windscreen wipers,
operate for a pre-determined time.
Configuration
This function is activated by default.
Switching off
Deactivate the "Auto rear wiper in reverse"
function.
4
Comfort
Page 94 of 341
92
208_en_Chap04_confort_ed01-2015
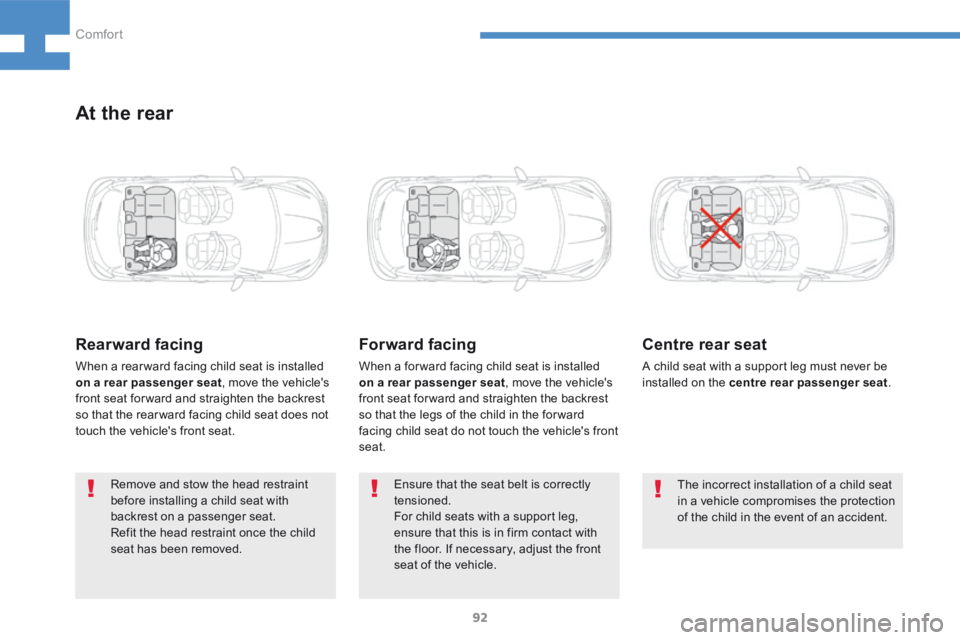
At the rear
Rearward facing
When a rear ward facing child seat is installed
on a rear passenger seat, move the vehicle's
front seat for ward and straighten the backrest
so that the rear ward facing child seat does not
touch the vehicle's front seat.
Forward facing
When a for ward facing child seat is installed
on a rear passenger seat , move the vehicle's
front seat for ward and straighten the backrest
so that the legs of the child in the for ward
facing child seat do not touch the vehicle's front
seat.
Ensure that the seat belt is correctly
tensioned.
For child seats with a support leg,
ensure that this is in firm contact with
the floor. If necessary, adjust the front
seat of the vehicle.
Remove and stow the head restraint
before installing a child seat with
backrest on a passenger seat.
Refit the head restraint once the child
seat has been removed.
Centre rear seat
A child seat with a support leg must never be
installed on the centre rear passenger seat
.
The incorrect installation of a child seat
in a vehicle compromises the protection
of the child in the event of an accident.
Comfort