Page 207 of 341

205
208_en_Chap08_Informations-pratiques_ed01-2015
Take care, the sealant product
is harmful (e.g. ethylene-glycol,
colophony...) if swallowed and causes
irritation to the eyes.
Keep this product out of the reach of
children.
The use-by date is marked on the
cartridge.
After use, do not discard the
cartridge by the roadside, take it to a
PEUGEOT dealer or an authorised
waste disposal site.
Don't forget to obtain a new sealant
cartridge, available from a PEUGEOT
dealer or a qualified workshop. If after around 5 to 7 minutes the
pressure is not attained, this indicates
that the tyre is not repairable; contact
a PEUGEOT dealer or a qualified
workshop for assistance.
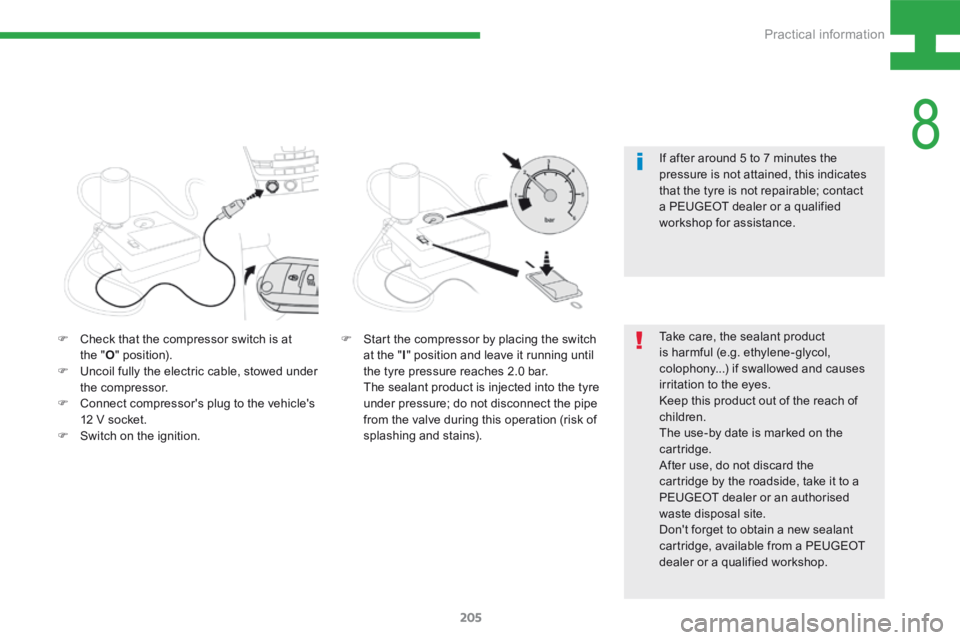
F Check that the compressor switch is at
the " O" position).
F Uncoil fully the electric cable, stowed under
the compressor.
F Connect compressor's plug to the vehicle's
12 V socket.
F Switch on the ignition. F
Start the compressor by placing the switch
at the " I" position and leave it running until
the tyre pressure reaches 2.0 bar.
The sealant product is injected into the tyre
under pressure; do not disconnect the pipe
from the valve during this operation (risk of
splashing and stains).
8
Practical information
Page 208 of 341
206
208_en_Chap08_Informations-pratiques_ed01-2015
Checking and inflating
F Place the switch in the " O" position.
F Remove the kit.
F Drive immediately for approximately
three miles (five kilometres), at reduced
speed (between 15 and 35 mph (20 and
60 km/h)), to plug the puncture.
F Stop to check the repair and the tyre
pressure using the kit. To check and if necessary adjust the tyre
pressures.
F
Remove the valve cap from the tyre and
place it in a clean area.
F Uncoil the pipe stowed under the
compressor.
F Screw the pipe onto the valve and tighten
f i r m l y. F
Check that the compressor switch is at the
"O " position.
F Uncoil fully the electric cable, stowed under
the compressor.
F Connect the compressor's plug to the
vehicle's 12 V socket.
F Switch on the ignition.
Practical information
Page 209 of 341
207
208_en_Chap08_Informations-pratiques_ed01-2015
After using the kit, refer to the previous
pages to check the tyre pressures
and reinitialise the "Under-inflation
detection" function.
F
Start the compressor by placing the switch
at the " I" position and adjust the pressure
to the value shown on the vehicle's tyre
pressure label.
To deflate: press the black button on the
compressor pipe, at the valve connector.
F Once the correct pressure is reached, put
the switch to the " O" position.
F Remove the kit then stow it.
8
Practical information
Page 210 of 341
208
208_en_Chap08_Informations-pratiques_ed01-2015
Spare wheel
The tools are installed in the boot under the
f l o o r.
To gain access to them:
F open the boot,
F lift the floor and remove it,
F remove the carrier box containing the tools.
Access to the tools
List of tools*
4. Socket for the security bolts.
For adapting the wheelbrace to the special
"security" bolts.
5. Towing eye.
See "Towing the vehicle".
Procedure for changing a wheel for the spare
wheel using the tools provided with the vehicle.
All of these tools are specific to your
vehicle and can vary according to the level
of equipment. Do not use them for other
purposes.
1. Wheelbrace.
For removing the wheel trim and removing
the wheel bolts.
2. Jack with integral handle.
For raising the vehicle.
3. "Bolt cover" tool.
For removing the bolt protectors (covers)
on alloy wheels.
* Depending on country of sale.
Practical information
Page 211 of 341
209
208_en_Chap08_Informations-pratiques_ed01-2015
Wheel with trim
When refitting the wheel, refit the trim
starting by placing its notch facing the
valve and press around its edge with
the palm of your hand.
The spare wheel is installed in the boot under
t h e f l o o r.
According to country, the spare wheel may be
steel, alloy or of the "space-saver" type.
To gain access to it, refer to the paragraph
"Access to the tools" on the previous page.
Access to the spare wheel
Taking out the wheel
F Unscrew the yellow central bolt.
F Raise the spare wheel towards you from
the rear.
F Take the wheel out of the boot.
8
Practical information
Page 217 of 341

215
208_en_Chap08_Informations-pratiques_ed01-2015
Level
Brake fluid
The brake fluid level should be close
to the "MA X" mark. If it is not, check
the brake pad wear.
Advice
Changing the fluid
Refer to the manufacturer's service schedule
for details of the interval for this operation.
Brake padsBrake disc wear
For information on checking brake
disc wear, contact a PEUGEOT
dealer or a qualified workshop.
Brake wear depends on the style
of driving, particularly in the case
of vehicles used in town, over short
distances. It may be necessary to
have the condition of the brakes checked, even
between vehicle services.
Unless there is a leak in the circuit, a drop in
the brake fluid level indicates that the brake
pads are worn. Only use products recommended by
PEUGEOT or products of equivalent
quality and specification.
In order to optimise the operation of
units as important as those in the
braking system, PEUGEOT selects and
offers very specific products.
After washing the vehicle, dampness,
or in wintry conditions, ice can form
on the brake discs and pads: braking
efficiency may be reduced. Make light
brake applications to dry and defrost
the brakes.
Fluid specification
The brake fluid must conform to the
manufacturer's recommendations.
It is normal to top up the oil level
between two services (or oil changes).
PEUGEOT recommends that you check
the level, and top up if necessary, every
3 000 miles (5 000 km).
Oil level
The check is carried out either when the
ignition is switched on using the oil level
indicator in the instrument panel (depending
on version), or using the dipstick.
It will only be correct if the vehicle is on level ground and
the engine has been off for more than 30 minutes.
Engine oil change
Refer to the manufacturer's service schedule
for details of the interval for this operation.
In order to maintain the reliability of the engine
and emission control system, never use
additives in the engine oil.
Oil specification
The oil must be the correct grade for your
engine and conform to the manufacturer's
recommendations.
8
Practical information
Page 233 of 341
231
208_en_Chap9b_SMEGplus_ed01-2015
Level 1Level 2 Level 3 Comments
Navigation
Secondary page
Enter destination Address
Curr. location
Address settings.
Points of Interest
Town centre
Save Save the current address.
Add waypoint Add a waypoint to the route.
Navigate to Press to calculate the route.
Contacts Addresses
Select a contact then calculate the route.
View
Navigate to
Search for contact
Call
From map Display the map and zoom to view the roads.
Itinerary Create, add or delete a waypoint or view the
itinerary.
Stop Delete navigation information.
Navigate to Press to calculate the route.
9
Audio and Telematics
Page 238 of 341
236
208_en_Chap9b_SMEGplus_ed01-2015
Navigation - Guidance
Choosing a new destination
Select "Enter destination ". Select "
Save" to save the address
entered as a contact entry.
The system allows up to 200 entries.
Select " Confirm ".
Press " Show route on map " to start
navigation.
Select "
Address ".
Select the " Country:" from the
list offered, then in the same
way the " City:" or its post
code, the " Road:", the " N°:".
Confirm each time. Select "
Navigate to ".
Choose the restriction criteria:
" Include tollroads ", "Include
ferries ", "Tr a f f i c ", "Strict ", "Close ".
Choose the navigation criteria:
"
Fastest " or "Shortest " or "Time/
distance " or "Ecological". To delete navigation information,
press "
Settings ".
Press " Stop navigation ".
To resume navigation press
" Settings ".
Press " Resume navigation ".
Press on Navigation
to display the
primary page.
Press on the secondary page.
Towards a new destination
Or
Audio and Telematics