Page 157 of 341
155
208_en_Chap06_Feux-Signalisations_ed01-2015
Amber coloured bulbs, such as the
direction indicators, must be replaced
with bulbs of identical specifications
and colour.
When refitting, close the protective
cover carefully to preserve the sealing
of the headlamp.
Rapid flashing of the direction indicator
warning lamp (right or left) indicates the
failure of a bulb on that side.
Changing direction indicator
bulbs
F
Turn the bulb holder a quarter of a turn and
extract it.
F Pull out the bulb and change it.
To reassemble, carry out these operations in
reverse order.
C. GTi model
1. Main beam headlamps (H7-55W).
2. Dipped beam headlamps (H7-55W).
3. Daytime running lamps / sidelamps
(light emitting diodes - LEDs).
4. Direction indicators (light emitting
diodes - LEDs).
5. Front foglamps (directional according
to version) (H11-55W).
6
Lighting and signalling
Page 158 of 341
156
208_en_Chap06_Feux-Signalisations_ed01-2015
Changing main beam headlamp
bulbs
F Disconnect the main headlamp connector.
F Remove the protective cover by pulling on
the tab.
Changing daytime running lamp /
sidelamp bulbs
F Turn the bulb holder a quarter turn and pull
it out.
F Pull out the bulb and replace it.
To reassemble, carry out these operations in
reverse order.
F Disconnect the bulb connector.
F Pull out the bulb and replace it.
To reassemble, carry out these operations in
reverse order, positioning the alignment lug at
the bottom.
Changing dipped beam headlamp
bulbs
F Remove the protective cover by pulling on
the tab.
F Disconnect the bulb connector.
F Spread the spring to release the bulb
(model A ).
F Extract the bulb and change it.
To reassemble, carry out these operations in
reverse order, positioning the alignment lug at
the bottom (model A ) or at the top (model B ).
Lighting and signalling
Page 161 of 341
159
208_en_Chap06_Feux-Signalisations_ed01-2015
Changing reversing lamp and
direction indicator bulbs
These two bulbs are changed from inside the
boot:
F open the boot,
F remove the access grille from the
corresponding side trim panel,
F slacken and remove the nut,
F disconnect the lamp unit connector,
F unclip the lamp unit carefully extract it
pulling in line towards the outside, F
press the four tabs and remove the bulb
h o l d e r,
F turn the bulb a quarter of a turn and
change it.
To reassemble, carry out these operations in
reverse order.
Take care to engage the lamp unit in its guides,
while keeping it in line with the vehicle.
Tighten sufficiently to ensure sealing, but
without damaging the lamp.
Light emitting diodes-LEDs
For replacement, contact a PEUGEOT dealer
or qualified workshop.
6
Lighting and signalling
Page 162 of 341

160
208_en_Chap06_Feux-Signalisations_ed01-2015
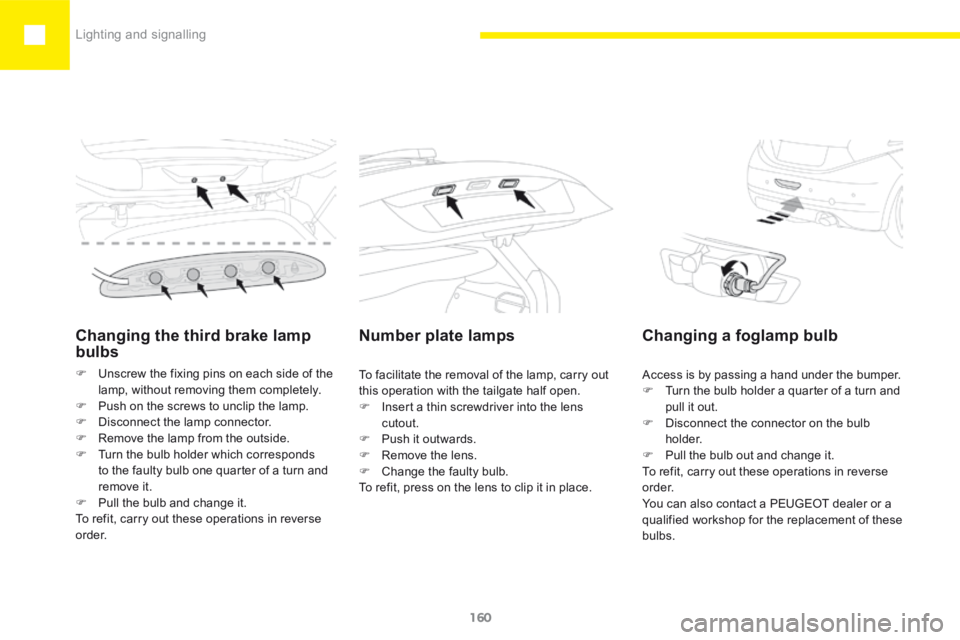
Changing the third brake lamp
bulbs
F Unscrew the fixing pins on each side of the
lamp, without removing them completely.
F Push on the screws to unclip the lamp.
F Disconnect the lamp connector.
F Remove the lamp from the outside.
F Turn the bulb holder which corresponds
to the faulty bulb one quarter of a turn and
remove it.
F Pull the bulb and change it.
To refit, carry out these operations in reverse
o r d e r.
Number plate lamps
To facilitate the removal of the lamp, carry out
this operation with the tailgate half open.
F Insert a thin screwdriver into the lens
cutout.
F Push it outwards.
F Remove the lens.
F Change the faulty bulb.
To refit, press on the lens to clip it in place. Access is by passing a hand under the bumper.
F
Turn the bulb holder a quarter of a turn and
pull it out.
F Disconnect the connector on the bulb
h o l d e r.
F Pull the bulb out and change it.
To refit, carry out these operations in reverse
o r d e r.
You can also contact a PEUGEOT dealer or a
qualified workshop for the replacement of these
bulbs.
Changing a foglamp bulb
Lighting and signalling