Page 137 of 274

The disadvantage of a differential is that the
wheels that have the least grip, get the most
drive. An example: a wheel of a driven axle is
on a snow-covered surface and therefore
does not have any traction. The differential
sends most of the drive force to this wheel
because the force takes the route of the low-
est resistance. The opposite wheel on this
axle, however, which stands on firm ground
and could therefore allow propulsion,
receives no driving power. 4ETS compen-
sates for this disadvantage. 4ETS provides
good steerability by automatically braking the
spinning wheel. 4ETS provides the wheel on
the firm surface with more drive force, which in turn provides propulsion. ESP ®
and 4ETS are traction systems that are
ideal for road driving and suitable for light off-
road driving. The LOW RANGEoff-road gear
also improves off-road capability.
More challenging off-road conditions require
additional measures such as locking one or
more differential. Your vehicle is equipped
with three differential locks:
R a central differential lock for the transfercase
R a differential lock for the front axle and
R a differential lock for the rear axle
Each differential lock can be engaged with the corresponding switch on the center console.
If the differential in the transfer case is
locked, the front and rear wheels rotate at the same speed. If the differential for the rear axle
is locked, both rear wheels rotate at the same
speed, regardless of their respective torque.
Note, engaging the differential lock greatly
impairs the vehicle's steerability.
Note, it is imperative to use the differential
function when driving on firm road surfaces.
Under no circumstances should the differen-
tial be locked when driving on firm road sur-
faces. Otherwise, the vehicle may not be
steerable and you could lose control of the
vehicle. Therefore, only engage the differen-
tial lock when driving off-road. You should
only engage the differential lock if activating 4ETS and ESP
®
driving systems and LOW
RANGE off-road gear prove to be insufficient.
Engaging the differential locks
Important safety notes
GWARNING
When differential locks are engaged on a firm,
high-grip surface, the vehicle's steerability is
greatly impaired. In particular, engaging the
differential locks when cornering could lead
to you losing control of the vehicle. There is a
risk of an accident.
Disengage the differential locks immediately
on firm surfaces with good grip.
GWARNING
When the differential locks are engaged, ABS,
4ETS, ESP ®
and BAS are deactivated. As a
result, the wheels could lock when braking
and the braking distance is increased. There is
a risk of an accident.
Disengage the differential locks immediately
on firm surfaces with good grip.
!Only engage the differential locks when:
R you are driving at walking pace.
R the driven wheels are not spinning.
R you are not driving on a firm road surface.
General notes
The switches are located on the center con- sole.
:Function indicator lamps (red)
;Differential lock for the front axle
Off-road driving systems135
Driving and parking
Z
Page 138 of 274
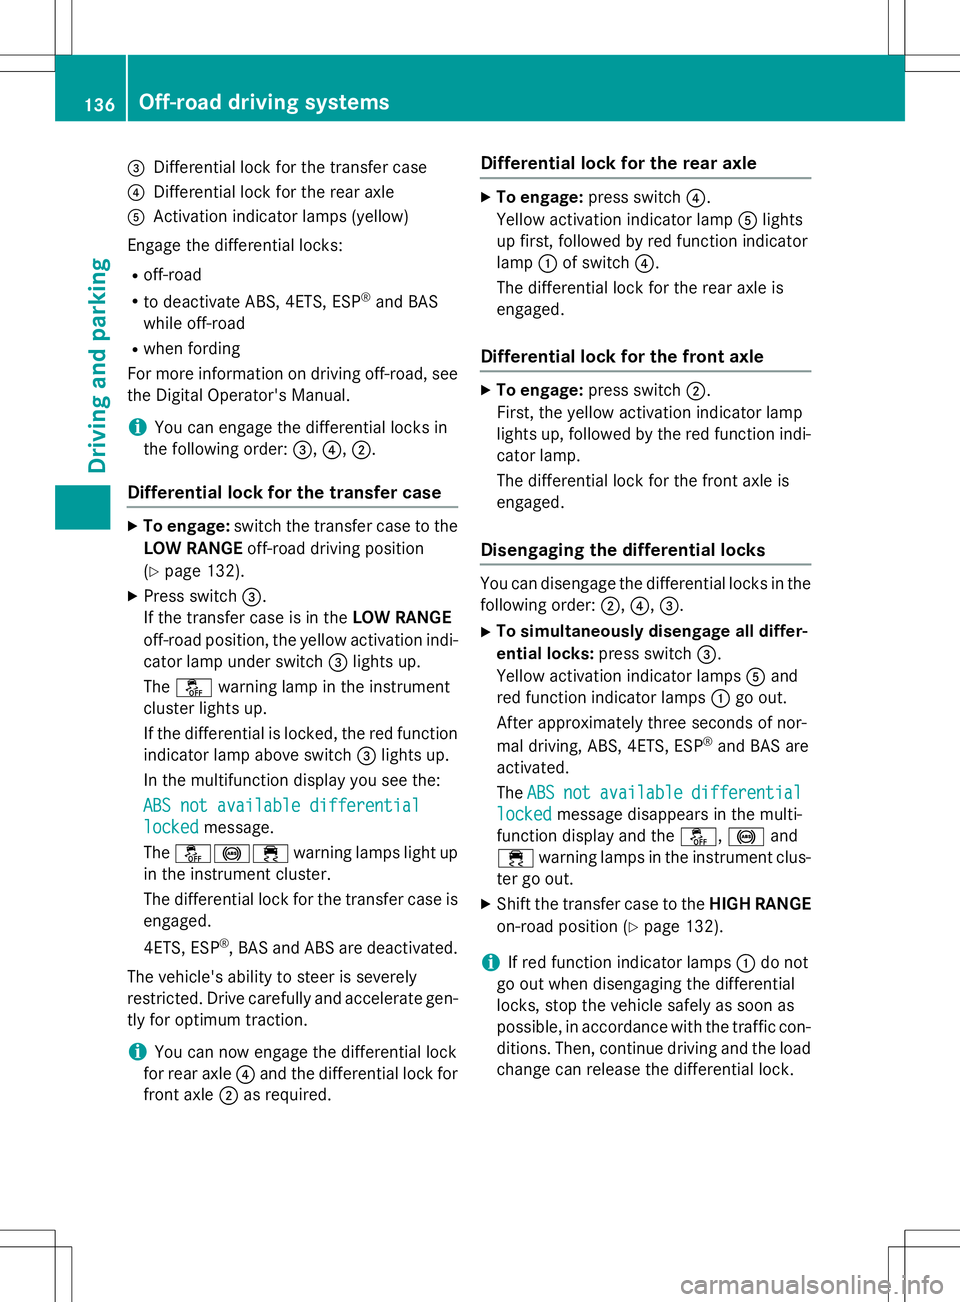
=Differential lock for the transfer case
?Differential lock for the rear axle
AActivation indicator lamps (yellow)
Engage the differential locks: R off-road
R to deactivate ABS, 4ETS, ESP ®
and BAS
while off-road
R when fording
For more information on driving off-road, see the Digital Operator's Manual.
iYou can engage the differential locks in
the following order: =,? ,; .
Differential lock for the transfer case
X
To engage: switch the transfer case to the
LOW RANGE off-road driving position
( Y page 132).
X Press switch =.
If the transfer case is in the LOW RANGE
off-road position, the yellow activation indi- cator lamp under switch =lights up.
The å warning lamp in the instrument
cluster lights up.
If the differential is locked, the red function indicator lamp above switch =lights up.
In the multifunction display you see the:
ABS not available differential
lockedmessage.
The å!÷ warning lamps light up
in the instrument cluster.
The differential lock for the transfer case is
engaged.
4ETS, ESP ®
, BAS and ABS are deactivated.
The vehicle's ability to steer is severely
restricted. Drive carefully and accelerate gen-
tly for optimum traction.
iYou can now engage the differential lock
for rear axle ?and the differential lock for
front axle ;as required.
Differential lock for the rear axle
X
To engage: press switch ?.
Yellow activation indicator lamp Alights
up first, followed by red function indicator
lamp :of switch ?.
The differential lock for the rear axle is
engaged.
Differential lock for the front axle
X To engage: press switch ;.
First, the yellow activation indicator lamp
lights up, followed by the red function indi- cator lamp.
The differential lock for the front axle is
engaged.
Disengaging the differential locks
You can disengage the differential locks in the
following order: ;,? ,= .
X To simultaneously disengage all differ-
ential locks: press switch=.
Yellow activation indicator lamps Aand
red function indicator lamps :go out.
After approximately three seconds of nor-
mal driving, ABS, 4ETS, ESP ®
and BAS are
activated.
The
ABSnotavailabledifferential
lockedmessage disappears in the multi-
function display and the å,! and
÷ warning lamps in the instrument clus-
ter go out.
X Shift the transfer case to the HIGH RANGE
on-road position ( Ypage 132).
iIf red function indicator lamps :do not
go out when disengaging the differential
locks, stop the vehicle safely as soon as
possible, in accordance with the traffic con- ditions. Then, continue driving and the load
change can release the differential lock.
136Off-road driving systems
Driving an d parking
Page 139 of 274
Towing a trailer
Notes on towing a trailer
Important safety notes
GWARNING
If you rest your foot on the brake pedal while
driving, the braking system can overheat. This increases the stopping distance and can even
cause the braking system to fail. There is a
risk of an accident.
Never use the brake pedal as a footrest. Never
depress the brake pedal and the accelerator
pedal at the same time.
GWARNING
When the vehicle/trailer combination begins
to lurch, you could lose control of it. The vehi- cle/trailer combination could even rollover.
There is a risk of an accident.
On no account should you attempt to
straighten up the vehicle/trailer combination
by increasing the speed. Reduce vehicle
speed and do not countersteer. Apply the
brake as necessary.
GWARNING
If you install a ball coupling other than the one
delivered with the vehicle, the trailer tow hitch and the rear axle may be overloaded. This
applies especially if the ball coupling in ques- tion is longer or angled differently. This could seriously impair the driving characteristics
and the trailer can come loose. There is a risk
of an accident.
Only install the ball coupling delivered with
the vehicle or a ball coupling that is designed
to meet your trailer towing requirements. Do
not modify the ball coupling or the trailer tow hitch.
GWARNING
If the ball coupling is not installed correctly or not secured with the bolt provided and the
corresponding spring cotter, the trailer may
come loose. There is a risk of an accident.
Always install and secure the ball coupling asdescribed. Before every journey, ensure that
the ball coupling is secured with the bolt and
the corresponding spring cotter.
Please observe the manufacturer's operating instructions for the trailer coupling if a
detachable trailer coupling is used.
Exceeding the maximum permissible nose-
weight may cause damage to the following: R your vehicle
R the trailer
R the ball coupling
R trailer tow hitch
The vehicle/trailer combination could
become unstable.
If the noseweight used is lower than the min- imum permissible noseweight, the vehicle/
trailer combination could also become unsta-ble.
To avoid hazardous situations:
R make sure to check the noseweight before
each journey
R use a drawbar noseweight as close as pos-
sible to the maximum noseweight
R do not exceed the maximum permissible
noseweight
R do not use a noseweight lower than the
minimum permissible trailer drawbar nose-
weight
When backing up the vehicle towards the
trailer, make sure there is nobody between
the trailer and the vehicle.
The applicable permissible values, which
must not be exceeded, can be found:
R in your vehicle documents
R on the type plate of the trailer tow hitch and
trailer
R on the vehicle identification plate
Couple and uncouple the trailer carefully. If
you do not couple the trailer to the towing
vehicle correctly, the trailer could become
detached.
Towing a trailer137
Driving an d parking
Z
Page 140 of 274

Make sure that the following values are not exceeded:
R the permissible trailer drawbar noseweight
R the permissible trailer load
R the permissible rear axle load of the towing
vehicle
R the maximum permissible gross vehicle
weight of both the towing vehicle and thetrailer
When towing a trailer, your vehicle's handling
characteristics will be different in comparison with when driving without a trailer.
The vehicle/trailer combination:
R is heavier
R is restricted in its acceleration and gradi-
ent-climbing capability
R has an increased braking distance
R is affected more by strong crosswinds
R demands more sensitive steering
R has a larger turning radius
This could impair the handling characteris-
tics. Adapt your driving style accordingly.
Maintain a safe distance. Drive carefully.
When towing a trailer, always adjust your
speed to the current road and weather con-
ditions. Do not exceed the maximum permis- sible speed for your vehicle/trailer combina-tion.
You will find the values approved by the man-
ufacturer on the vehicle identification plates
and those for the towing vehicle in the "Tech- nical data" section ( Ypage 268).
Driving tips
X
On long and steep downhill gradients,
select shift range 1,2 or 3(Y page 107) in
good time.
iThis also applies if you have activated
cruise control or SPEEDTRONIC.
X If necessary, shift the transfer case to LOW
RANGE (Y page 132).
This will use the braking effect of the
engine, so that less braking will be required to maintain the speed. This relieves the
load on the brake system and prevents the
brakes from overheating and wearing too
quickly. If you need additional braking,
depress the brake pedal repeatedly rather
than continuously.
The maximum permissible speed for vehicle/
trailer combinations depends on the type of
trailer. Before beginning the journey, check
the trailer's documents to see what the max- imum permissible speed is. Observe the
legally prescribed maximum speed in the rel-evant country.
For certain Mercedes-Benz vehicles, the max-
imum permissible rear axle load is increased
when towing a trailer. Refer to the "Technical
data" section to find out whether this applies to your vehicle. If you utilize any of the added
maximum rear axle load when towing a trailer, the vehicle/trailer combination may not
exceed a maximum speed of 60 mph
(100 km/h) for reasons concerning the oper-ating permit. This also applies in countries in
which the permissible maximum speed for
vehicle/trailer combinations is above 60 mph (100 km/h).
When towing a trailer, your vehicle's handling
characteristics will be different in comparison
to when driving without a trailer and it will
consume more fuel.
On long and steep downhill gradients, you
must select shift range 1,2 or 3in good time.
iThis also applies if you have activated
cruise control or DISTRONIC PLUS.
This will use the braking effect of the engine,
so that less braking will be required to main-
tain the speed. This relieves the load on the
brake system and prevents the brakes from
overheating and wearing too quickly. If you
need additional braking, depress the brake
pedal repeatedly rather than continuously.
138Towing a trailer
Driving and parking
Page 141 of 274

Driving tips
If the trailer swings from side to side:
X Do not accelerate.
X Do not counter-steer.
X Brake if necessary.
R Maintain a greater distance from the vehi-
cle in front than when driving without a
trailer.
R Avoid braking abruptly. If possible, brake
gently at first to allow the trailer to run on.
Then, increase the braking force rapidly.
R The values given for gradient-climbing
capabilities from a standstill refer to sea
level. When driving in mountainous areas,
note that the power output of the engine
and, consequently, the vehicle's gradient-
climbing capability, decreases with
increasing altitude.
Assembling the ball coupling
Assembling the ball coupling
GWARNING
The ball coupling can be damaged if the nut on the ball coupling is tightened using the incor- rect torque. As a result, the trailer may
detach. There is a risk of an accident.
Immediately after installing, have the tighten-
ing torque checked at a qualified specialist
workshop.
!Mercedes-Benz recommends that you
only use ball couplings tested and
approved for use on Mercedes-Benz vehi-
cles. This helps to avoid damage to the
vehicle.
Observe the manufacturer's installation
instructions if you use a ball coupling other than the one supplied.
X Screw in ball coupling :as far as it will go
through the hole of ball coupling carrier ;.
X
Slide securing bolt ?over the thread of
ball coupling =as far as it will go.
X Screw on nut Aas far as it will go.
X
Using a torque wrench, tighten nut Bwith
a torque of 516 lb-ft (700 Nm) .
X Check that thread Cprotruding below nut
B has the minimum required length of
0.32 in (8 mm).
X Check the assembled ball coupling for cor-
rect installation.
Towing a trailer139
Driving and pa rking
Z
Page 142 of 274
iAlso observe the height of the trailer cou-
pling and the trailer manufacturer's instruc- tions.
iDepending on the height of the trailer
coupling, you may have to turn the ball cou-
pling 180° to install it on the ball coupling
carrier. The assembly is otherwise identi-
cal.
Installing the ball coupling
GWARNING
If the ball coupling is not installed correctly or not secured with the bolt provided and the
corresponding spring cotter, the trailer may
come loose. There is a risk of an accident.
Always install and secure the ball coupling as
described. Before every journey, ensure that
the ball coupling is secured with the bolt and
the corresponding spring cotter.
GWARNING
If the ball coupling is not correctly installed
and secured, it can come loose during the
journey and endanger other road users. There is a risk of an accident and injury.
Always install and secure the ball coupling as
described. Before every journey, ensure that
the ball coupling is secured with the bolt and
the corresponding spring cotter.
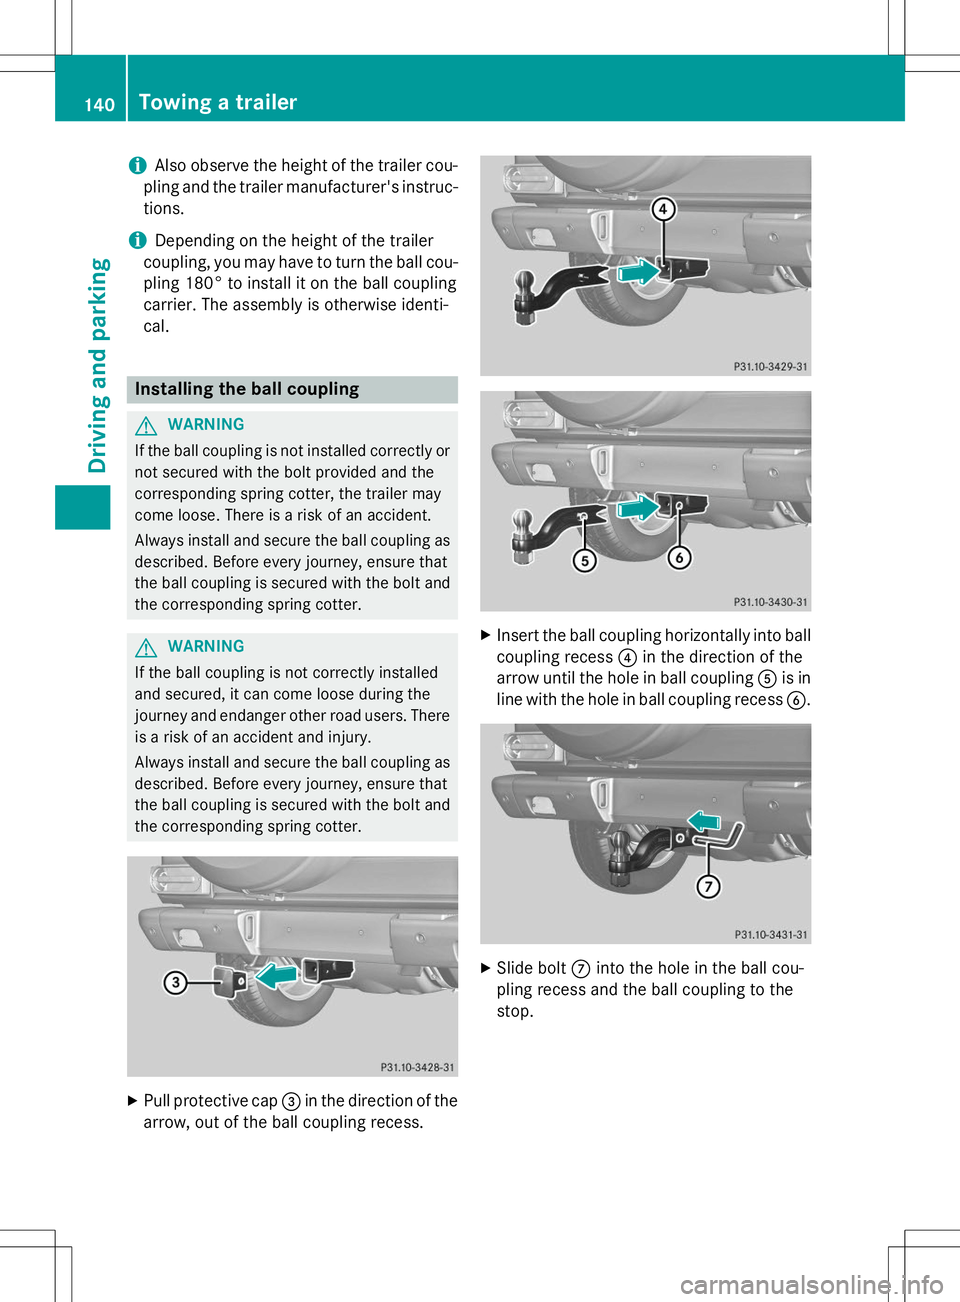
X Pull protective cap =in the direction of the
arrow, out of the ball coupling recess.
X Insert the ball coupling horizontally into ball
coupling recess ?in the direction of the
arrow until the hole in ball coupling Ais in
line with the hole in ball coupling recess B.
X
Slide bolt Cinto the hole in the ball cou-
pling recess and the ball coupling to the
stop.
140Towing a trailer
Driving an d parking
Page 143 of 274

XSecure the bolt using spring cotter D.
Correctly installed and secured ball couplingX
Check the ball coupling, bolt and spring
cotter for correct installation.
Coupling up a trailer
GWARNING
If you uncouple a trailer with the overrun
brake engaged, you could trap your hand
between the vehicle and the trailer drawbar.
There is a risk of injury.
Do not uncouple a trailer if the overrun brake
is engaged.
!Do not connect the trailer's brake system
(if featured) to the hydraulic brake system
of the towing vehicle, as the latter is equip-
ped with an anti-lock brake system. Doing
so will result in a loss of function of the
brake systems of both the vehicle and the
trailer.
Observe the maximum permissible trailer
dimensions (width and length). Most U.S. states and all Canadian provinces
require by law:
R safety chains between the towing vehicle
and the trailer. The chains should be cross-
wound under the trailer drawbar. They must
be fastened to the vehicle's trailer cou-
pling, not to the bumper or the axle.
Allow for enough play in the chains to facil- itate turning tight corners.
R a separate brake system for certain types
of trailer.
R a safety switch for braked trailers. Check
the specific legal requirements applicable
to your state.
If the trailer detaches from the towing vehi-
cle, the safety switch applies the trailer's
brakes.
X Make sure that the automatic transmission
is set to position P.
X Apply the vehicle's parking brake.
X Couple up the trailer.
X Establish all electrical connections.
Towing a trailer
There are numerous legal requirements con-
cerning the towing of a trailer, e.g. speed
restrictions. Make sure that your vehicle/
trailer combination complies with the local
requirements not only in your area of resi-
dence but also at any location to which you
are traveling. The police and local authorities
can provide reliable information.
Please observe the following when towing a
trailer:
R To acquaint yourself with driving with a
trailer and with the resulting changes to
handling, you should practice cornering,
Towing a trailer141
Driving and parking
Z
Page 144 of 274

stopping and backing up in a traffic-free location.
R Before driving, check:
- Trailer tow hitch
- Safety switch for braked trailers
- Safety chains
- Electrical connections
- Lights
- Wheels
R Adjust the exterior mirrors to provide an
unobstructed view of the rear section of the
trailer.
R If the trailer features electronically control-
led brakes, pull away the vehicle/trailer
combination carefully, manually brake
using the brake controller, and check the
brakes for correct function.
R Secure any objects on the trailer to prevent
the cargo from slipping when the vehicle is
in motion.
R If you couple up a trailer, regularly check
the cargo for secure fastening and make
sure that the trailer lamps and (if applica-
ble) the trailer brakes are functioning cor-rectly.
R Bear in mind that the handling will be less
stable when towing a trailer than when driv-
ing without one. Avoid sudden steeringmovements.
R The vehicle/trailer combination is heavier,
accelerates more slowly, has a decreased
gradient climbing capability and a longer
braking distance.
It is more susceptible to side winds and
requires more careful steering.
R If possible, avoid abrupt braking. Depress
the brake pedal moderately at first, so that
the trailer can activate its own brakes. Thenincrease the pressure on the brake pedal.
R If the automatic transmission continues to
shift back and forth between two gears
when driving up or downhill, restrict the
shift range. Select shift range 4, 3, 2,or1.
A lower gear and lower speed reduce the
risk of engine failure. R
When driving downhill, shift to a lower gear
to utilize the engine's braking effect.
Avoid continuous brake application as this
may overheat the vehicle brakes and, if
installed, the trailer brakes.
R If the coolant temperature increases dra-
matically while the air-conditioning system
is switched on, switch off the air-condition-
ing system.
Coolant heat can additionally be dissipated
by opening the windows and by setting the
blower fan and the interior temperature tomaximum.
R When overtaking, pay particular attention
to the extended length of your vehicle/
trailer combination.
Due to the length of your vehicle/trailer
combination, you will have to travel an addi-
tional distance beyond the vehicle you are
overtaking before returning to the previous lane.
Decoupling a trailer
!
Do not disconnect a trailer with an
engaged overrun brake. Otherwise, your
vehicle could be damaged by the rebound- ing of the overrun brake.
X Make sure that the automatic transmission
is set to position P.
X Apply the parking brake.
X Start the engine.
X Close all doors, including the rear door.
X Apply the trailer's parking brake.
X Detach the trailer cable and decouple thetrailer.
X Switch off the engine.
Permissible trailer and drawbar loads
Weight specifications
The gross trailer weight is calculated by add-
ing the weight of the trailer to the weight of
142Towing a trailer
Driving and parking
 1
1 2
2 3
3 4
4 5
5 6
6 7
7 8
8 9
9 10
10 11
11 12
12 13
13 14
14 15
15 16
16 17
17 18
18 19
19 20
20 21
21 22
22 23
23 24
24 25
25 26
26 27
27 28
28 29
29 30
30 31
31 32
32 33
33 34
34 35
35 36
36 37
37 38
38 39
39 40
40 41
41 42
42 43
43 44
44 45
45 46
46 47
47 48
48 49
49 50
50 51
51 52
52 53
53 54
54 55
55 56
56 57
57 58
58 59
59 60
60 61
61 62
62 63
63 64
64 65
65 66
66 67
67 68
68 69
69 70
70 71
71 72
72 73
73 74
74 75
75 76
76 77
77 78
78 79
79 80
80 81
81 82
82 83
83 84
84 85
85 86
86 87
87 88
88 89
89 90
90 91
91 92
92 93
93 94
94 95
95 96
96 97
97 98
98 99
99 100
100 101
101 102
102 103
103 104
104 105
105 106
106 107
107 108
108 109
109 110
110 111
111 112
112 113
113 114
114 115
115 116
116 117
117 118
118 119
119 120
120 121
121 122
122 123
123 124
124 125
125 126
126 127
127 128
128 129
129 130
130 131
131 132
132 133
133 134
134 135
135 136
136 137
137 138
138 139
139 140
140 141
141 142
142 143
143 144
144 145
145 146
146 147
147 148
148 149
149 150
150 151
151 152
152 153
153 154
154 155
155 156
156 157
157 158
158 159
159 160
160 161
161 162
162 163
163 164
164 165
165 166
166 167
167 168
168 169
169 170
170 171
171 172
172 173
173 174
174 175
175 176
176 177
177 178
178 179
179 180
180 181
181 182
182 183
183 184
184 185
185 186
186 187
187 188
188 189
189 190
190 191
191 192
192 193
193 194
194 195
195 196
196 197
197 198
198 199
199 200
200 201
201 202
202 203
203 204
204 205
205 206
206 207
207 208
208 209
209 210
210 211
211 212
212 213
213 214
214 215
215 216
216 217
217 218
218 219
219 220
220 221
221 222
222 223
223 224
224 225
225 226
226 227
227 228
228 229
229 230
230 231
231 232
232 233
233 234
234 235
235 236
236 237
237 238
238 239
239 240
240 241
241 242
242 243
243 244
244 245
245 246
246 247
247 248
248 249
249 250
250 251
251 252
252 253
253 254
254 255
255 256
256 257
257 258
258 259
259 260
260 261
261 262
262 263
263 264
264 265
265 266
266 267
267 268
268 269
269 270
270 271
271 272
272 273
273


