Page 97 of 274

XLightly press bulb ?, turn it counter-clock-
wise and pull it out.
X Insert the new bulb and, applying slight
pressure, turn it clockwise until it engages.
X Insert the bulb holder into housing ;.
X Attach dust cover =.
X Insert housing ;.
X Replace and tighten screws :.
Windshield wipers
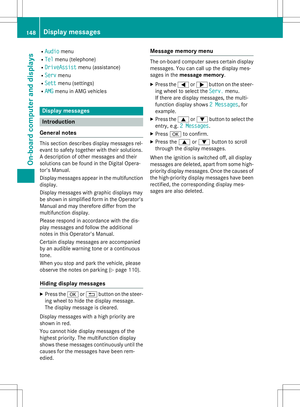
Switching the windshield wipers
on/off
If the wiper blades are worn, the windshield
will no longer be wiped properly. This could
prevent you from observing the traffic condi-
tions, thereby causing an accident.
Combination switch 1
$ Windshield wipers off
2ÄIntermittent wipe, low (rain sensor
set to low sensitivity)
3Å Intermittent wipe, high (rain sensor
set to high sensitivity)
4° Continuous wipe, slow
5¯Continuous wipe, fast
BíSingle wipe
CîTo wipe with washer fluid
X Switch on the ignition.
X Turn the combination switch to the corre-
sponding position.
In the ÄorÅ position, the appropriate
wiping frequency is set automatically accord-
ing to the intensity of the rain. In the Å
position, the rain sensor is more sensitive
than in the Äposition, causing the wind-
shield wipers to wipe more frequently.
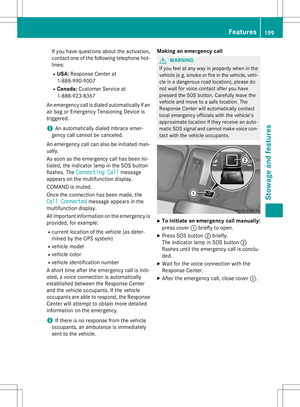
Switching the rear window wiper on/ off
Combination switch :
è Switch
2bWipes with washer fluid
3ISwitches on intermittent wiping
40 Switches off intermittent wiping
5b Wipes with washer fluid
X Turn the SmartKey to position 1or 2in the
ignition lock.
X Turn switch :on the combination switch
to the corresponding position.
When the rear window wiper is switched on,
the icon appears in the instrument cluster.
iThe rear window wiper comes on auto-
matically if you shift the selector lever to R
while the windshield wiper are on.
Windshield wipers95
Lights and windshield wipers
Z
Page 98 of 274

Replacing the wiper blades
Important safety notes
GWARNING
If the windshield wipers begin to move while
you are changing the wiper blades, you could be trapped by the wiper arm. There is a risk of
injury.
Always switch off the windshield wipers and
ignition before changing the wiper blades.
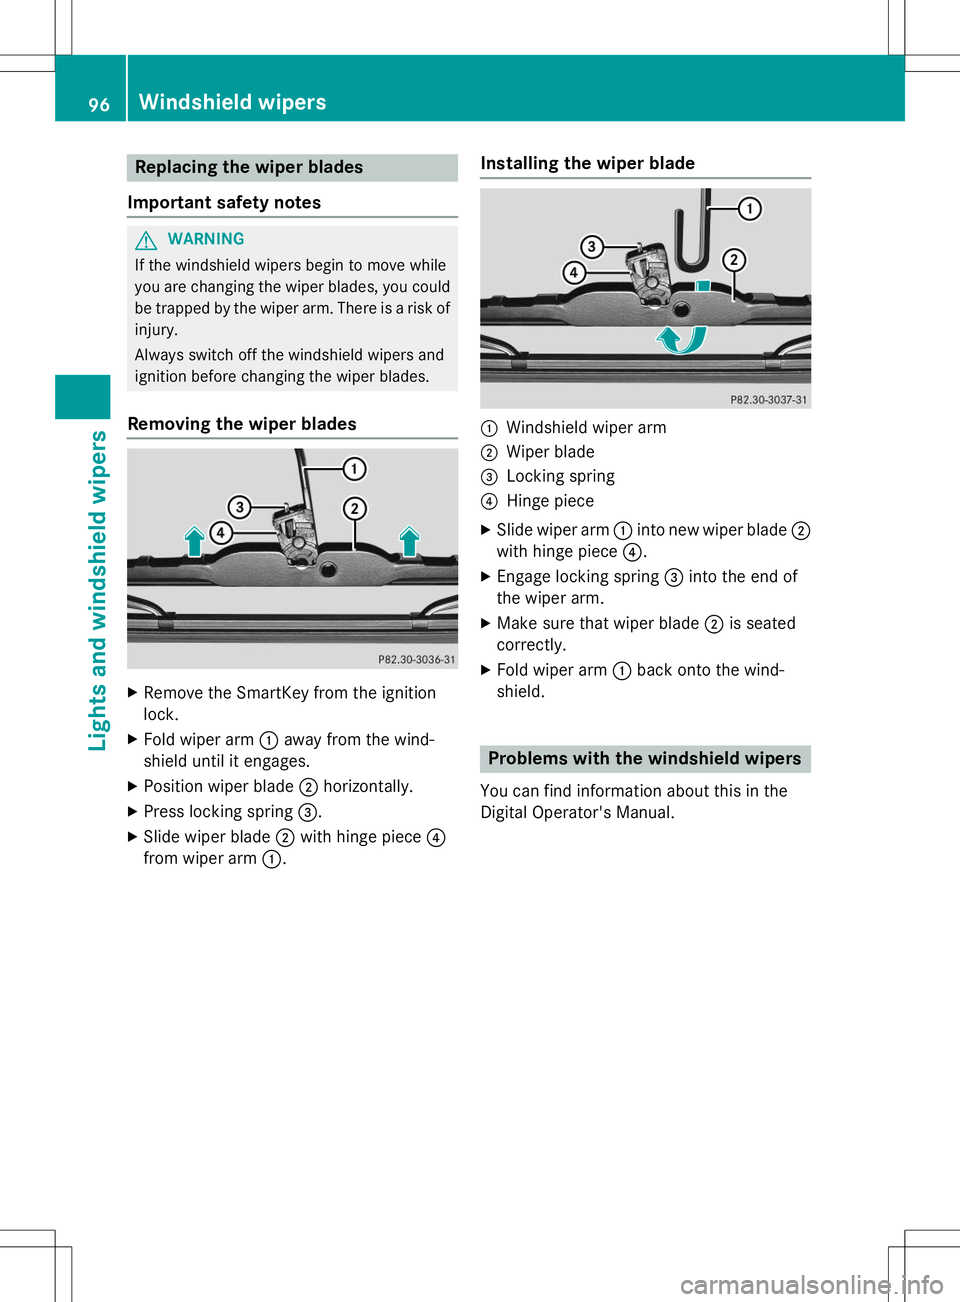
Removing the wiper blades
X Remove the SmartKey from the ignition
lock.
X Fold wiper arm :away from the wind-
shield until it engages.
X Position wiper blade ;horizontally.
X Press locking spring =.
X Slide wiper blade ;with hinge piece ?
from wiper arm :.
Installing the wiper blade
:Windshield wiper arm
;Wiper blade
=Locking spring
?Hinge piece
X Slide wiper arm :into new wiper blade ;
with hinge piece ?.
X Engage locking spring =into the end of
the wiper arm.
X Make sure that wiper blade ;is seated
correctly.
X Fold wiper arm :back onto the wind-
shield.
Problems with the windshield wipers
You can find information about this in the
Digital Operator's Manual.
96Windshield wipers
Lights and windshield wipers
Page 99 of 274
Useful information..............................98
Overview of climate control sys-
tems ..................................................... 98
Operating the climate control sys-
tems ................................................... 100
97
Climate control
Page 100 of 274

Useful information
iThis Operator's Manual describes all
models and all standard and optional equip- ment of your vehicle available at the time of
publication of the Operator's Manual.
Country-specific differences are possible.
Please note that your vehicle may not be
equipped with all features described. This
also applies to safety-related systems and
functions.
iRead the information on qualified special-
ist workshops: ( Ypage 28).
Overview of climate control systems
Important safety notes
Observe the settings recommended on the
following pages. The windows could other-
wise fog up. This could prevent you from
observing the traffic conditions, thereby
causing an accident.
Climate control regulates the temperature
and the humidity in the vehicle interior and
filters undesirable substances from the air.
Dual-zone automatic climate control is only
operational when the engine is running. Opti-
mum operation is only achieved if you drive
with the side windows and sliding sunroofclosed.
The climatic comfort deteriorates whilst the
sliding sunroof is open. The automatic climate control cannot maintain the set temperature
with the sliding sunroof open. You have to
adjust the climate control manually.
iVentilate the vehicle for a brief period
during warm weather, e.g. using the con-
venience opening feature ( Ypage 77). This
will speed up the cooling process and the
desired vehicle interior temperature will be
reached more quickly.
iThe integrated filter can filter out most
particles of dust, and completely filters out
pollen. A clogged filter reduces the amount of air supplied to the vehicle interior. For
this reason, you should always observe the
interval for replacing the filter, which is
specified in the Maintenance Booklet. As it
depends on environmental conditions, e.g. heavy air pollution, the interval may be
shorter than stated in the Maintenance
Booklet.
98Overview of climate control systems
Climate control
Page 101 of 274
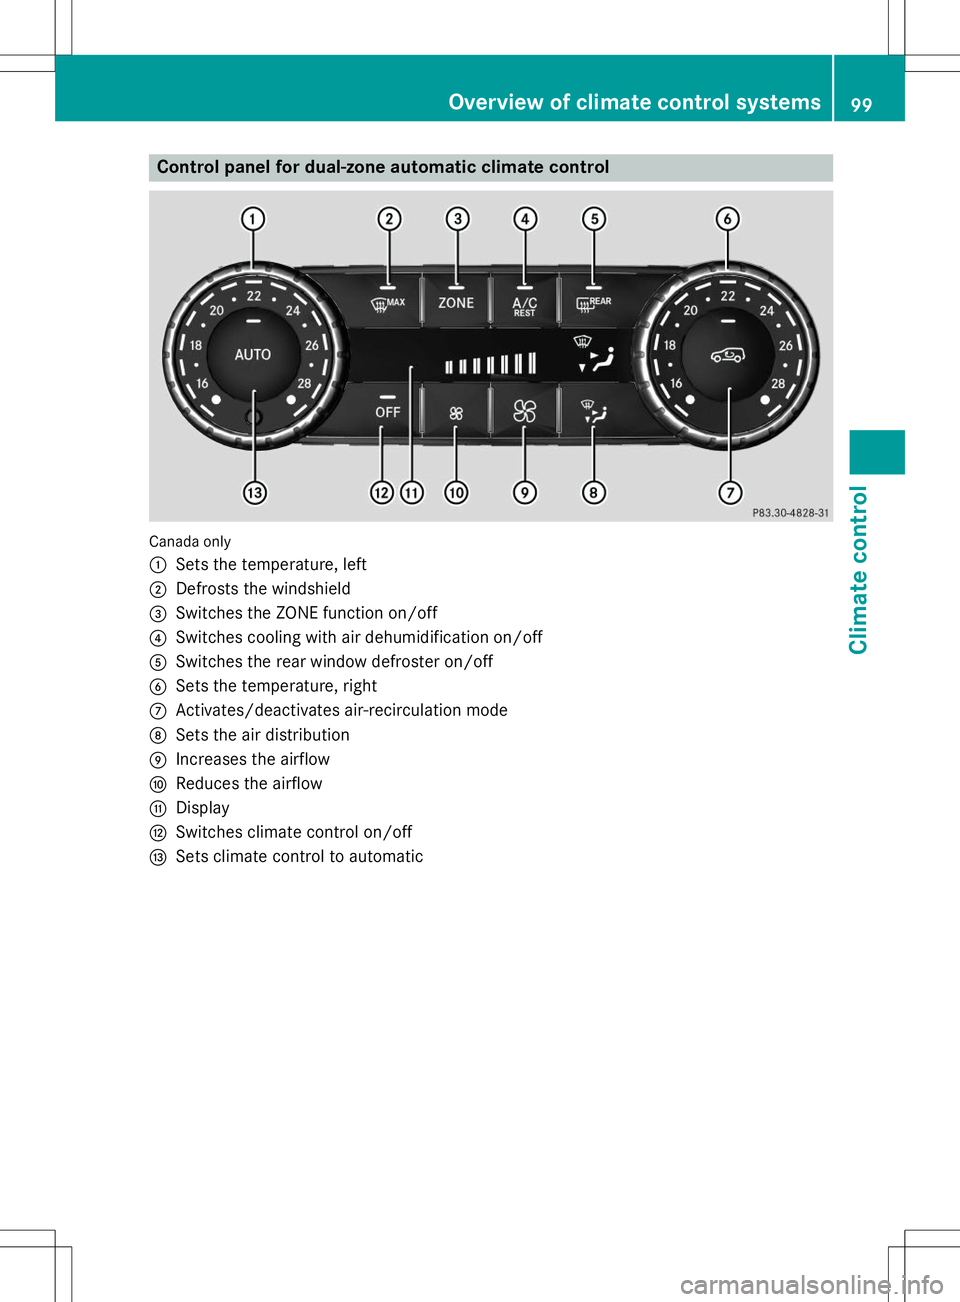
Control panel for dual-zone automatic climate control
Canada only :
Sets the temperature, left
;Defrosts the windshield
=Switches the ZONE function on/off
?Switches cooling with air dehumidification on/off
ASwitches the rear window defroster on/off
BSets the temperature, right
CActivates/deactivates air-recirculation mode
DSets the air distribution
EIncreases the airflow
FReduces the airflow
GDisplay
HSwitches climate control on/off
ISets climate control to automatic
Overview of climate control systems99
Climate control
Page 102 of 274

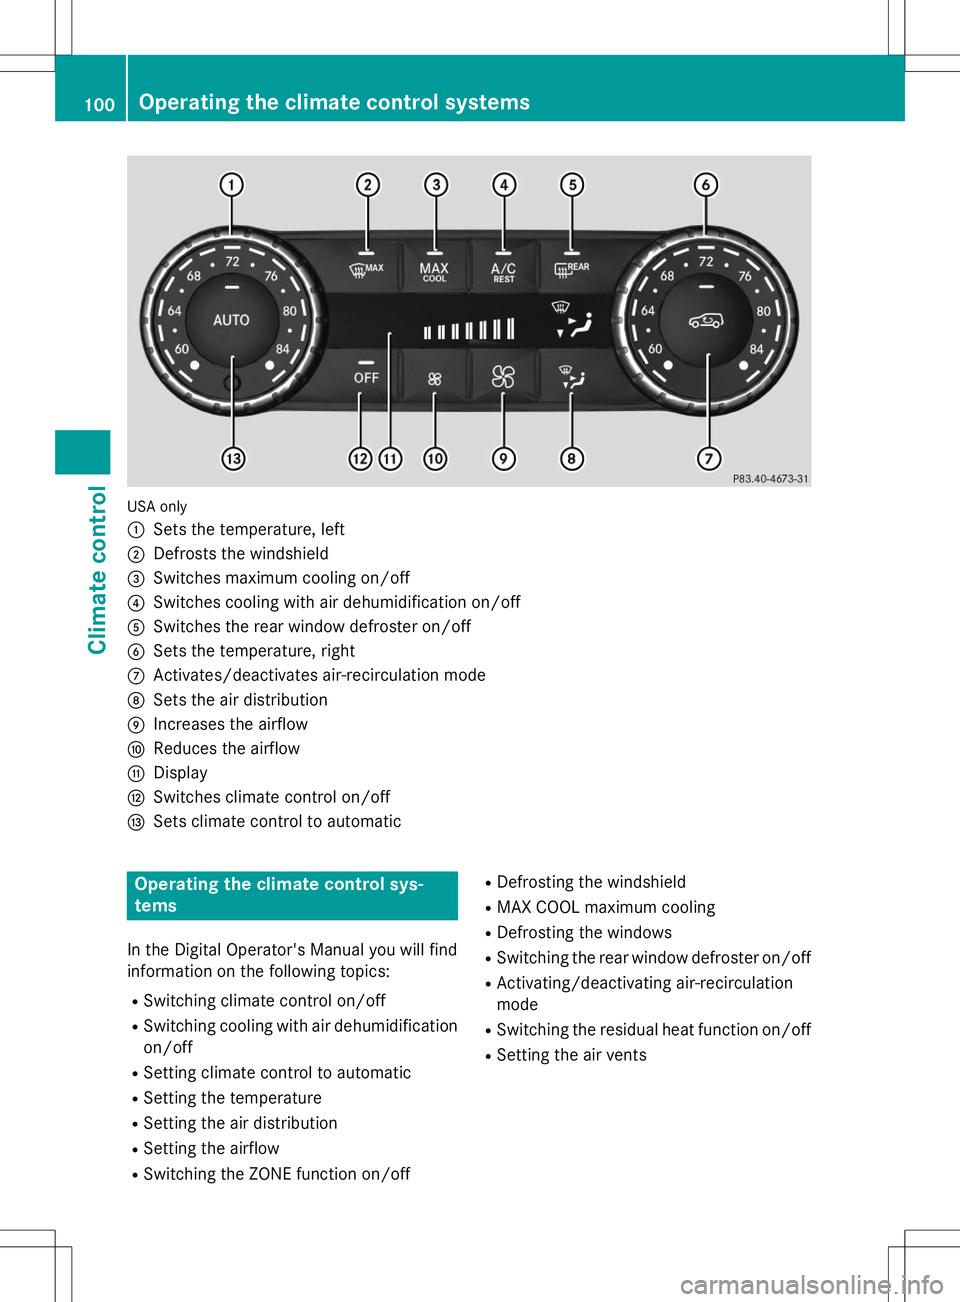
USA only :
Sets the temperature, left
;Defrosts the windshield
=Switches maximum cooling on/off
?Switches cooling with air dehumidification on/off
ASwitches the rear window defroster on/off
BSets the temperature, right
CActivates/deactivates air-recirculation mode
DSets the air distribution
EIncreases the airflow
FReduces the airflow
GDisplay
HSwitches climate control on/off
ISets climate control to automatic
Operating the climate control sys- tems
In the Digital Operator's Manual you will find
information on the following topics: RSwitching climate control on/off
R Switching cooling with air dehumidification
on/off
R Setting climate control to automatic
R Setting the temperature
R Setting the air distribution
R Setting the airflow
R Switching the ZONE function on/off R
Defrosting the windshield
R MAX COOL maximum cooling
R Defrosting the windows
R Switching the rear window defroster on/off
R Activating/deactivating air-recirculation mode
R Switching the residual heat function on/off
R Setting the air vents
100Operating the climate control systems
Climate control
Page 103 of 274
Useful information............................102
Notes on breaking-in a new vehi- cle ....................................................... 102
Driving ............................................... 102
Automatic transmission ...................105
Refueling ............................................ 107
Parking ............................................... 110
Driving tips ........................................ 112
Driving systems ................................ 112
Off-road driving systems ..................132
Towing a trailer ................................. 137
101
Driving and parking
Page 104 of 274

Useful information
iThis Operator's Manual describes all
models and all standard and optional equip- ment of your vehicle available at the time of
publication of the Operator's Manual.
Country-specific differences are possible.
Please note that your vehicle may not be
equipped with all features described. This
also applies to safety-related systems and
functions.
iRead the information on qualified special-
ist workshops: ( Ypage 28).
Notes on breaking-in a new vehicle
Important safety notes
New and replaced brake pads and discs only
reach their optimum braking effect after sev-
eral hundred kilometers of driving. Compen-
sate for this by applying greater force to the
brake pedal.
The first 1000 miles (1500 km)
The more you look after the engine when it is
new, the more satisfied you will be with its
performance in the future. R You should therefore drive at varying vehi-
cle and engine speeds for the first
1,000 miles (1,500 km).
R Avoid heavy loads, e.g. driving at full throt-
tle, during this period.
R Change gear in good time, before the tach-
ometer needle is Ôof the way to the red
area of the tachometer.
R Do not manually shift to a lower gear to
brake the vehicle.
R Try to avoid depressing the accelerator
pedal beyond the point of resistance (kick-
down).
R Only select shift ranges 3,2 or 1when driv-
ing slowly, e.g. in mountainous terrain. After 1,000 miles (1,500 km), you can
increase the engine speed gradually and bring
the vehicle to full speed.
Additional breaking-in notes for AMG vehi- cles:
R Do not drive faster than 85 mph
(140 km/h) for the first 1,000 miles
(1,500 km).
R Only allow the engine to reach a maximum
engine speed of 4,500 rpm briefly.
R Change gear in good time.
R Avoid driving off-road before the differen-
tial oil change at 2,000 miles (3,000 km).
R Ideally, for the first 1,000 miles (1,500 km),
drive in program C.
iYou should also observe these breaking-
in notes if the engine or parts of the drive
train on your vehicle have been replaced.
iAlways observe the respective speed lim-
its.
AMG vehicles with self-locking rear
axle differential
Change the oil after a breaking-in period of
2,000 miles (3,000 km) to improve protection
of the differential. This oil change prolongs
the service life of the differential. Have the oil change carried out at a qualified specialist
workshop. Mercedes-Benz recommends that
you use an authorized Mercedes-Benz Center for this purpose.
Driving
Important safety notes
GWARNING
Objects in the driver's footwell can restrict thepedal travel or obstruct a depressed pedal.
The operating and road safety of the vehicle is
jeopardized. There is a risk of an accident.
Make sure that all objects in the vehicle are
stowed correctly, and that they cannot enter
102Driving
Driving and parking