2015 MERCEDES-BENZ CLA SHOOTING BRAKE battery
[x] Cancel search: batteryPage 95 of 421
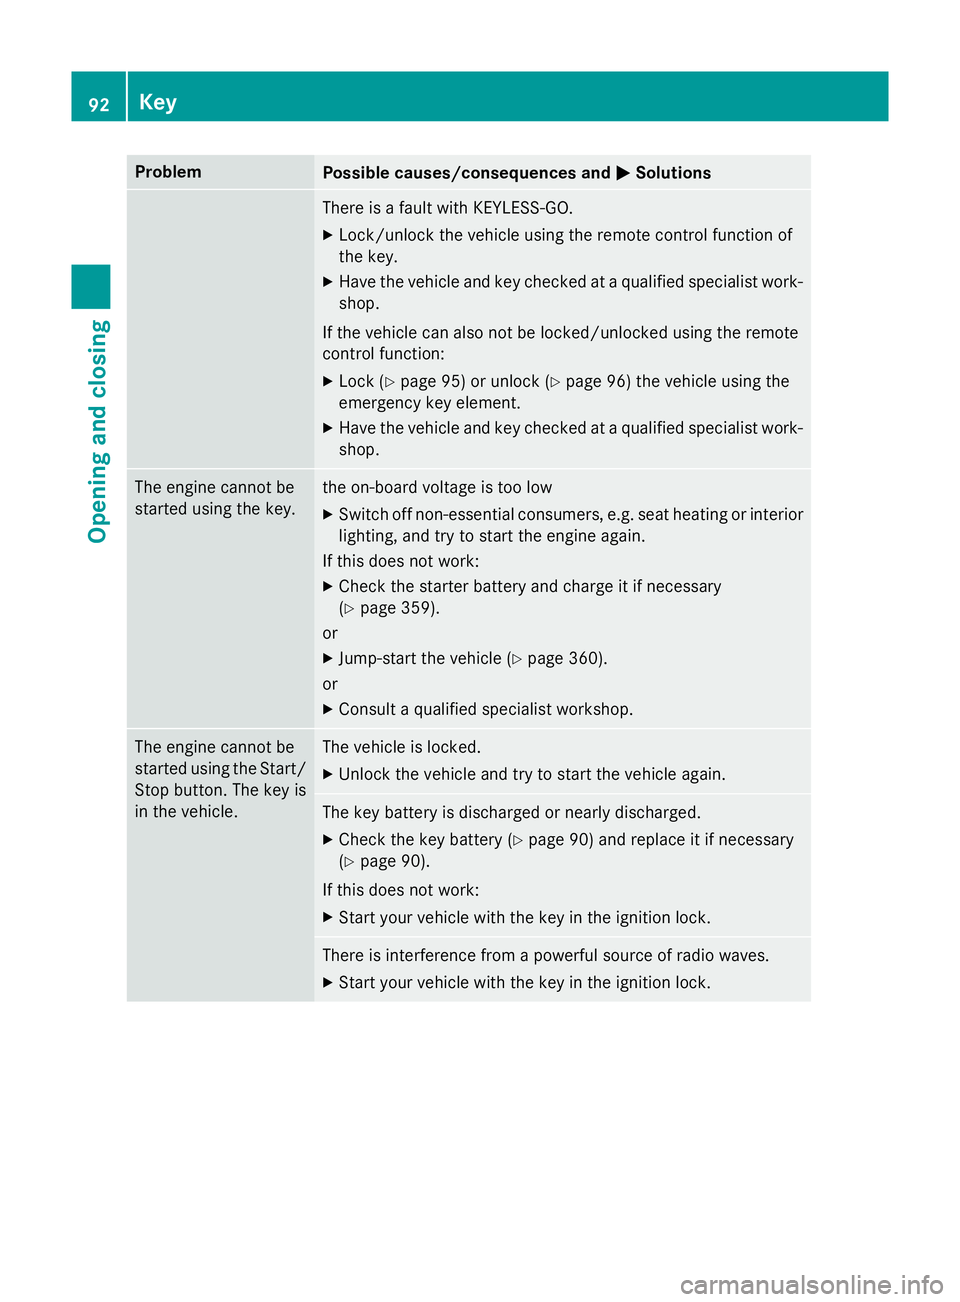
Problem
Possible causes/consequences and
M
MSolutions There is a fault with KEYLESS-GO.
X Lock/unlock the vehicle using the remote control function of
the key.
X Have the vehicle and key checked at a qualified specialist work-
shop.
If the vehicle can also not be locked/unlocked using the remote
control function:
X Lock (Y page 95) or unlock (Y page 96) the vehicle using the
emergency key element.
X Have the vehicle and key checked at a qualified specialist work-
shop. The engine cannot be
started using the key. the on-board voltage is too low
X Switch off non-essential consumers, e.g. seat heating or interior
lighting, and try to start the engine again.
If this does not work: X Check the starter battery and charge it if necessary
(Y page 359).
or
X Jump-start the vehicle (Y page 360).
or
X Consult a qualified specialist workshop. The engine cannot be
started using the Start/
Stop button. The key is
in the vehicle. The vehicle is locked.
X Unlock the vehicle and try to start the vehicle again. The key battery is discharged or nearly discharged.
X Check the key battery (Y page 90) and replace it if necessary
(Y page 90).
If this does not work: X Start your vehicle with the key in the ignition lock. There is interference from a powerful source of radio waves.
X Start your vehicle with the key in the ignition lock. 92
KeyOpening and closing
Page 96 of 421

Problem
Possible causes/consequences and
M
MSolutions You have lost a key. X
Have the key deactivated at a qualified specialist workshop.
X Report the loss immediately to the vehicle insurers.
X If necessary, have the locks changed as well. You have lost the emer-
gency key element. X
Report the loss immediately to the vehicle insurers.
X If necessary, have the locks changed as well. Doors
Important safety notes
G
WARNING
If children are left unsupervised in the vehicle, they could:
R open doors, thereby endangering other per-
sons or road users
R get out and be struck by oncoming traffic
R operate vehicle equipment and become
trapped, for example
In addition, the children could also set the
vehicle in motion, for example, if they:
R release the parking brake
R shift the automatic transmission out of park
position P or shift manual transmission into
neutral
R start the engine
There is a risk of an accident and injury.
When leaving the vehicle, always take the key with you and lock the vehicle. Never leave
children and animals unattended in the vehi-
cle. Keep the keys out of the reach of children.
Stow luggage or loads preferably in the lug-
gage compartment. Observe the loading
guidelines (Y page 316).
United Kingdom only: G
WARNING
When the double locks are activated, the
doors can no longer be opened from the
inside. People in the vehicle can no longer get out, e.g. in hazardous situations. There is a
risk of injury. Therefore, do not leave any people unsuper-
vised in the vehicle, particularly children, eld-
erly people or people in need of special assis-
tance. Do not activate the double lock when
people are in the vehicle.
If the vehicle has been locked with the key,
the double lock function is activated as stand-
ard. It is then not possible to open the doors
from inside the vehicle. You can deactivate
the double lock function by deactivating the
interior motion sensor (Y page 83). The doors
can then be opened from the inside after the vehicle has been locked from the outside. You
can open the rear doors from inside the vehi- cle if they are not secured by the child-proof
locks (Y page 71). The anti-theft alarm system
is triggered if the door is opened from the
inside. Switch off the alarm (Y page 81). Unlocking and opening the doors
from the inside
! The side windows will not open/close if
the battery is discharged or if the side win- dows have iced up. It will then not be pos-
sible to close the door. Do not attempt to
force the door to close. You could other-
wise damage the door or the side window.
When a door is opened, the side window on
that side opens slightly. When the door is
closed, the side window is raised again. Doors
93Opening and closing Z
Page 120 of 421

AMG Performance Seat
Vehicles with electrically adjustable seats: to adjust the contour of the seat and for
improved lateral support, you can individually adjust the front seats. Adjusting the side bolsters of the seat
cushion
X To set the side bolsters of the seat
cushion narrower: press button:.
X To set the side bolsters of the seat
cushion wider: press button;.
Adjusting the seat backrest side bolsters
X To set the side bolsters of the seat
backrest narrower: press button=.
X To set the side bolsters of the seat
backrest wider: press button?. Switching the seat heating on/off
Switching on/off G
WARNING
If you repeatedly switch on seat heating, the
seat cushion and backrest padding may
become very hot. The health of vehicle occu-
pants with limited temperature sensitivity or a limited ability to react to excessively high
temperatures may be affected or they may
even suffer burn-like injuries. There is a risk of
injury.
Therefore, do not switch on the seat heating
repeatedly. The three red indicator lamps in the button
indicate the heating level you have selected.
The system automatically switches down
from level 3to level 2after approximately
eight minutes.
The system automatically switches from level
2 to level 1after approximately ten minutes.
The system automatically switches off
approximately 20 minutes after it is set to
level 1.
X Turn the key to position 1or 2in the ignition
lock (Y page 165).
X To switch on: press button:repeatedly
until the desired heating level is set.
X To switch off: press button:repeatedly
until all the indicator lamps go out.
i If the battery voltage is too low, the seat
heating may switch off. Seats
117Seats, steering wheel and mirrors Z
Page 121 of 421
Problems with the seat heating
Problem
Possible causes/consequences and
M
MSolutions The seat heating has
switched off prema-
turely or cannot be
switched on. The on-board voltage is too low because too many electrical con-
sumers are switched on.
X Switch off electrical consumers that you do not need, such as
the rear window heating or interior lighting.
Once the battery is sufficiently charged, the seat heating will
switch back on automatically. Steering wheel
Important safety notes
G
WARNING
You could lose control of the vehicle while
driving if you:
R adjust the driver's seat, steering wheel or
mirrors
R fasten the seat belt
There is a risk of an accident.
Adjust the driver's seat, head restraint, steer-
ing wheel and mirrors and fasten your seat
belt before starting the engine. G
WARNING
Children could become trapped by the steer-
ing wheel if they adjust it. There is a risk of
injury.
When leaving the vehicle, always take the key with you and lock the vehicle. Never leave
children unattended in the vehicle. Adjusting the steering wheel
G
WARNING
The steering wheel may move unexpectedly if you adjust it while driving. This could cause
you to lose control of the vehicle. There is a
risk of an accident.
Make sure that the steering wheel is locked
before driving off. Never unlock the steering
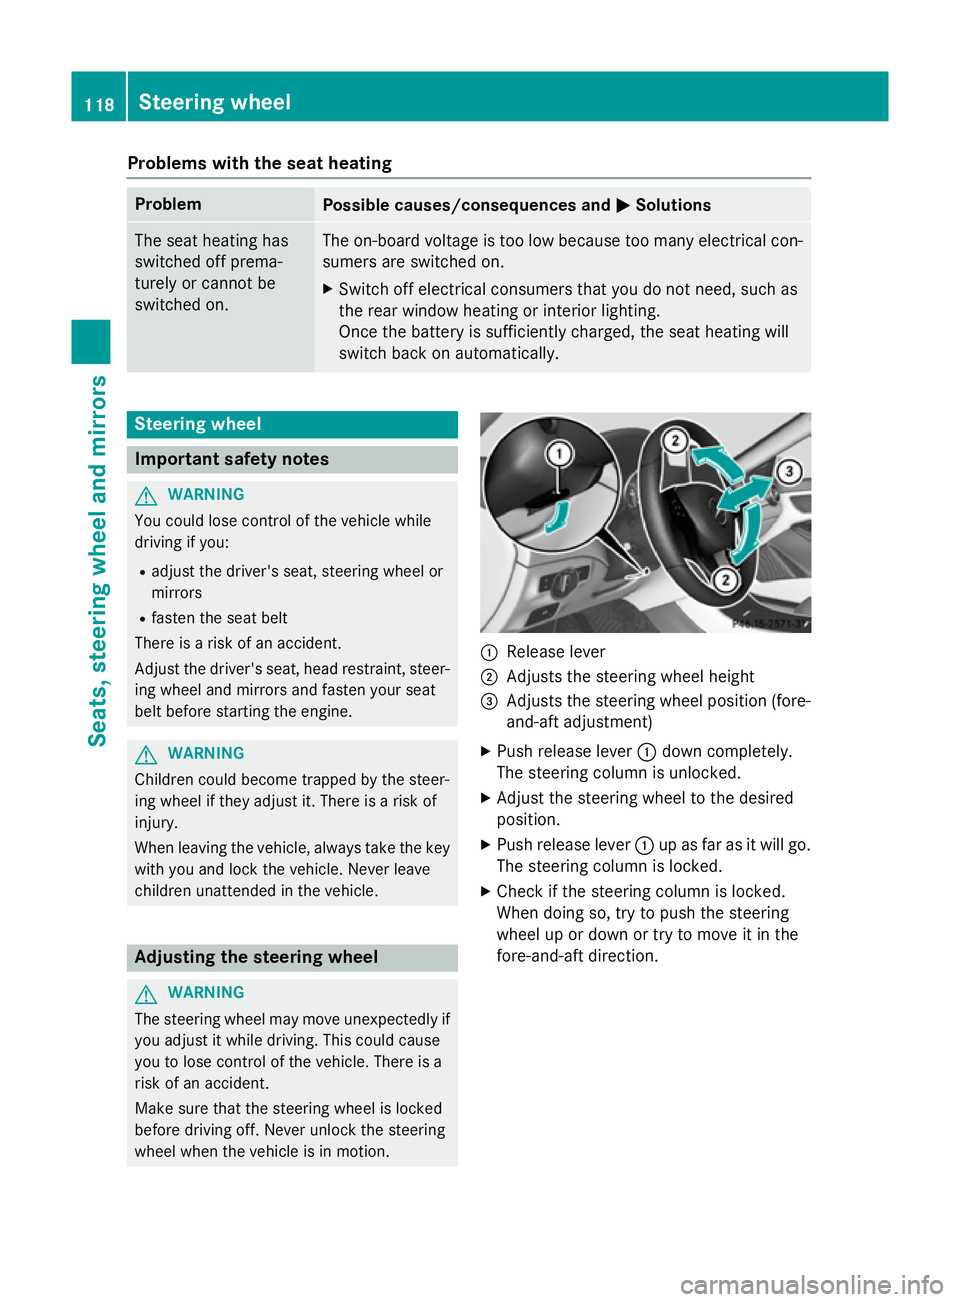
wheel when the vehicle is in motion. :
Release lever
; Adjusts the steering wheel height
= Adjusts the steering wheel position (fore-
and-aft adjustment)
X Push release lever :down completely.
The steering column is unlocked.
X Adjust the steering wheel to the desired
position.
X Push release lever :up as far as it will go.
The steering column is locked.
X Check if the steering column is locked.
When doing so, try to push the steering
wheel up or down or try to move it in the
fore-and-aft direction. 118
Steering wheelSeats, steering wheel and mirrors
Page 123 of 421
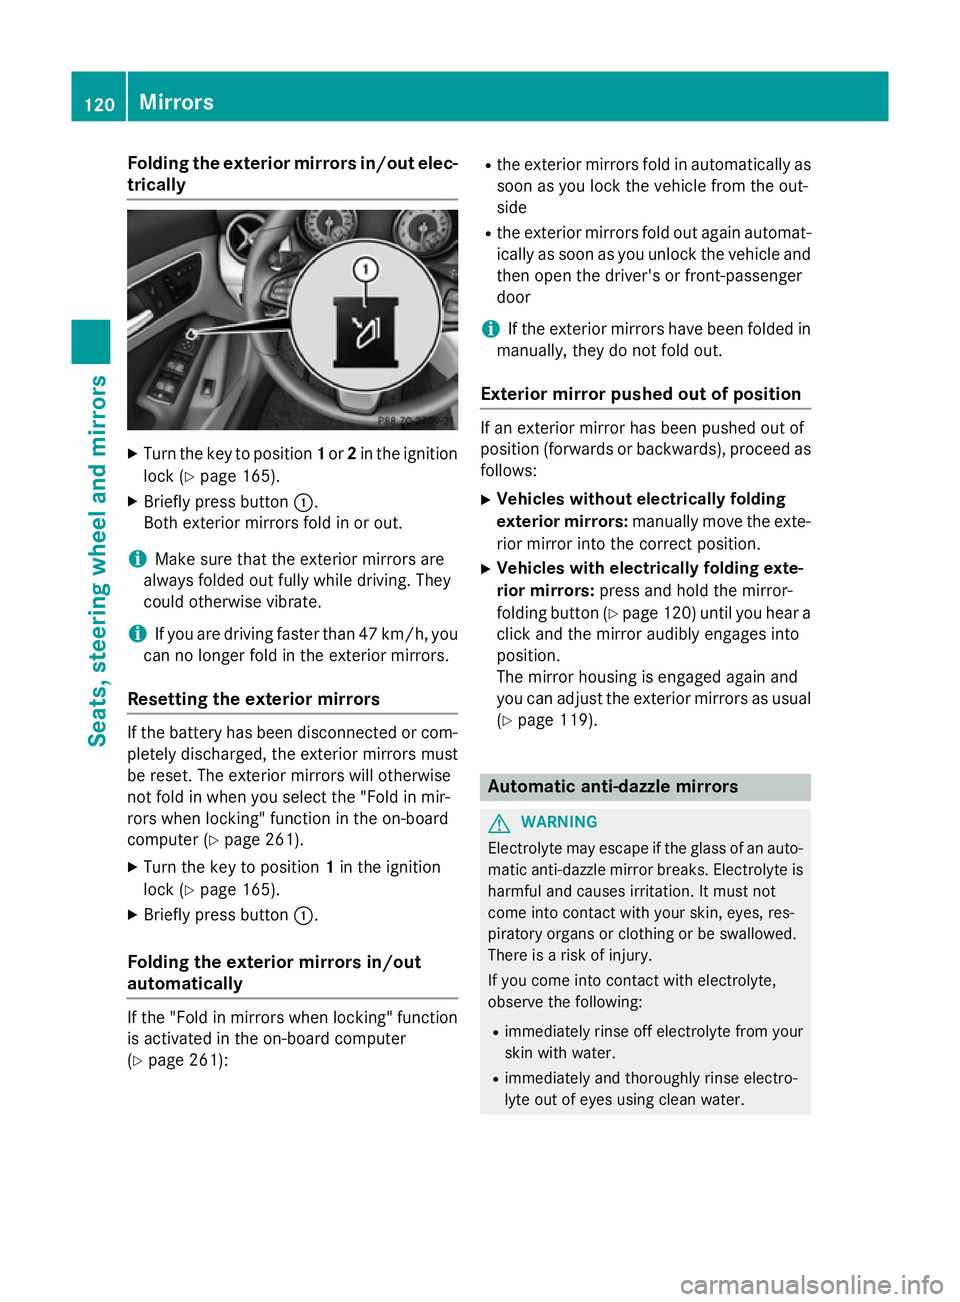
Folding the exterior mirrors in/out elec-
trically X
Turn the key to position 1or 2in the ignition
lock (Y page 165).
X Briefly press button :.
Both exterior mirrors fold in or out.
i Make sure that the exterior mirrors are
always folded out fully while driving. They
could otherwise vibrate.
i If you are driving faster than 47 km/h, you
can no longer fold in the exterior mirrors.
Resetting the exterior mirrors If the battery has been disconnected or com-
pletely discharged, the exterior mirrors must
be reset. The exterior mirrors will otherwise
not fold in when you select the "Fold in mir-
rors when locking" function in the on-board
computer (Y page 261).
X Turn the key to position 1in the ignition
lock (Y page 165).
X Briefly press button :.
Folding the exterior mirrors in/out
automatically If the "Fold in mirrors when locking" function
is activated in the on-board computer
(Y page 261): R
the exterior mirrors fold in automatically as
soon as you lock the vehicle from the out-
side
R the exterior mirrors fold out again automat-
ically as soon as you unlock the vehicle and
then open the driver's or front-passenger
door
i If the exterior mirrors have been folded in
manually, they do not fold out.
Exterior mirror pushed out of position If an exterior mirror has been pushed out of
position (forwards or backwards), proceed as
follows:
X Vehicles without electrically folding
exterior mirrors: manually move the exte-
rior mirror into the correct position.
X Vehicles with electrically folding exte-
rior mirrors: press and hold the mirror-
folding button (Y page 120) until you hear a
click and the mirror audibly engages into
position.
The mirror housing is engaged again and
you can adjust the exterior mirrors as usual
(Y page 119). Automatic anti-dazzle mirrors
G
WARNING
Electrolyte may escape if the glass of an auto- matic anti-dazzle mirror breaks. Electrolyte is
harmful and causes irritation. It must not
come into contact with your skin, eyes, res-
piratory organs or clothing or be swallowed.
There is a risk of injury.
If you come into contact with electrolyte,
observe the following:
R immediately rinse off electrolyte from your
skin with water.
R immediately and thoroughly rinse electro-
lyte out of eyes using clean water. 120
MirrorsSeats, steering wheel and
mirrors
Page 131 of 421
operate the foglamps on vehicles with the
Intelligent Light System (Y page 131).
Rear foglamp
The rear foglamp improves the visibility of
your vehicle in heavy fog for the following
traffic. Please observe the country-specific
laws on the use of rear foglamps.
X To switch on the rear foglamp: turn the
key to position 2in the ignition lock or start
the engine.
X Turn the light switch to LorÃ.
X Press the Rbutton.
The yellow Rindicator lamp in the
instrument cluster lights up.
X To switch off the rear foglamp: press the
R button.
The yellow Rindicator lamp in the
instrument cluster goes out.
i When the rear foglamp is switched on, the
centre brake lamp in the tail lamp switches off due to a legal requirement.
Side lamps ! If the battery has been excessively dis-
charged, the side lamps or parking lamps
are automatically switched off to enable
the next engine start. Always park your
vehicle safely and sufficiently lit according
to legal standards. Avoid the continuous
use of the Tside lamps for several
hours. If possible, switch on the Xright
or the Wleft parking lamp.
X To switch on: turn the light switch to T.
The green Tindicator lamp in the instru-
ment cluster lights up.
Parking lamps
Switching on the parking lamps ensures that
the corresponding side of the vehicle is illu-
minated. X
To switch on the parking lamps: the key
should not be in the ignition lock or it
should be in position 0.
X Turn the light switch to W(left-hand side
of the vehicle) or X(right-hand side of
the vehicle).
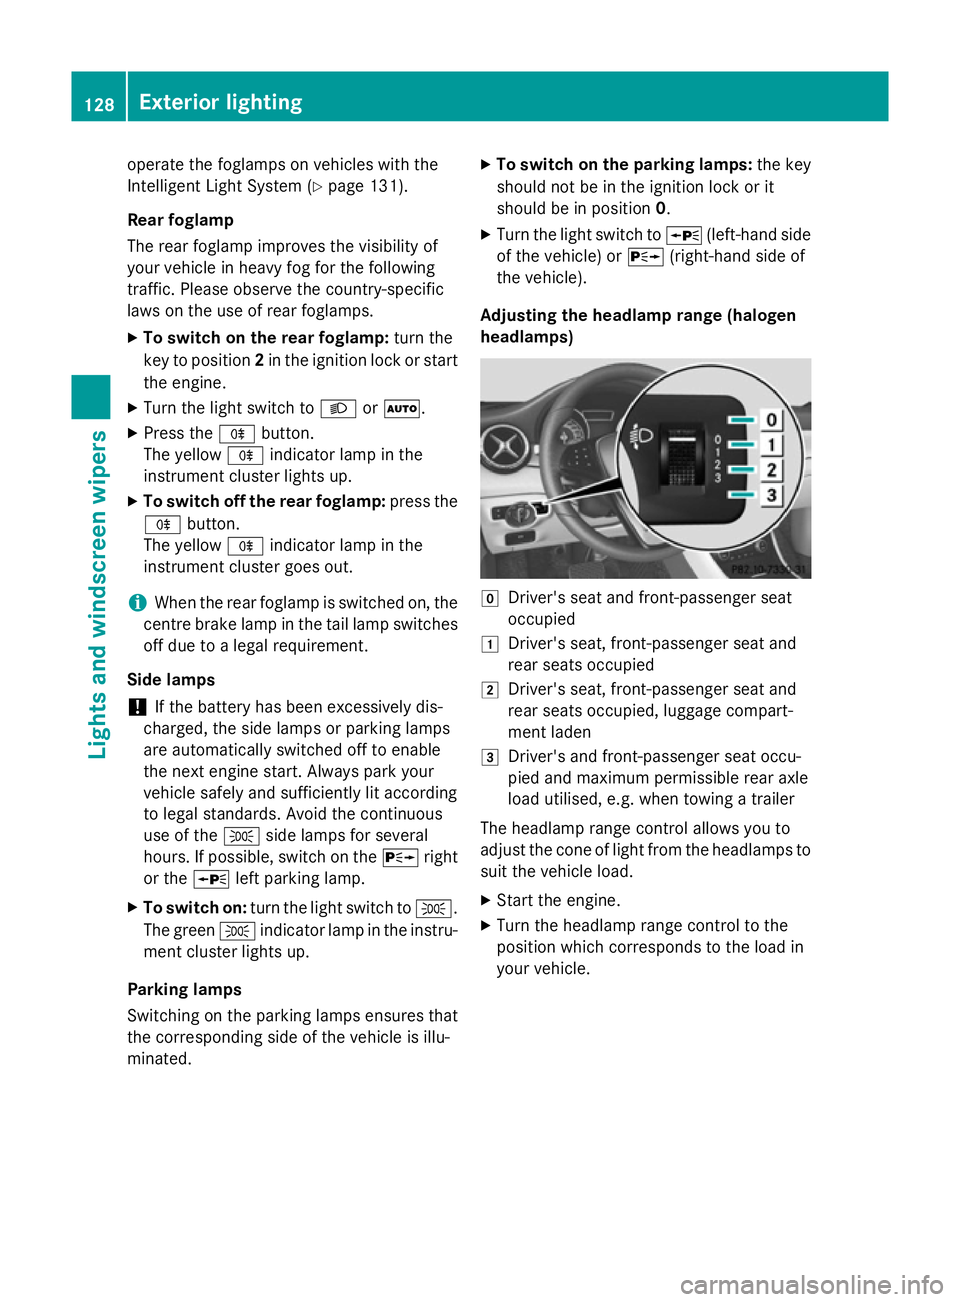
Adjusting the headlamp range (halogen
headlamps) g
Driver's seat and front-passenger seat
occupied
1 Driver's seat, front-passenger seat and
rear seats occupied
2 Driver's seat, front-passenger seat and
rear seats occupied, luggage compart-
ment laden
3 Driver's and front-passenger seat occu-
pied and maximum permissible rear axle
load utilised, e.g. when towing a trailer
The headlamp range control allows you to
adjust the cone of light from the headlamps to suit the vehicle load.
X Start the engine.
X Turn the headlamp range control to the
position which corresponds to the load in
your vehicle. 128
Exterior lightingLights and windscreen wipers
Page 136 of 421
=
v Switches the rear interior lighting
on/off
? | Switches the front interior lighting/
automatic interior lighting control off
A p Switches the right-hand front read-
ing lamp on/off
B Switches the automatic interior lighting
control on
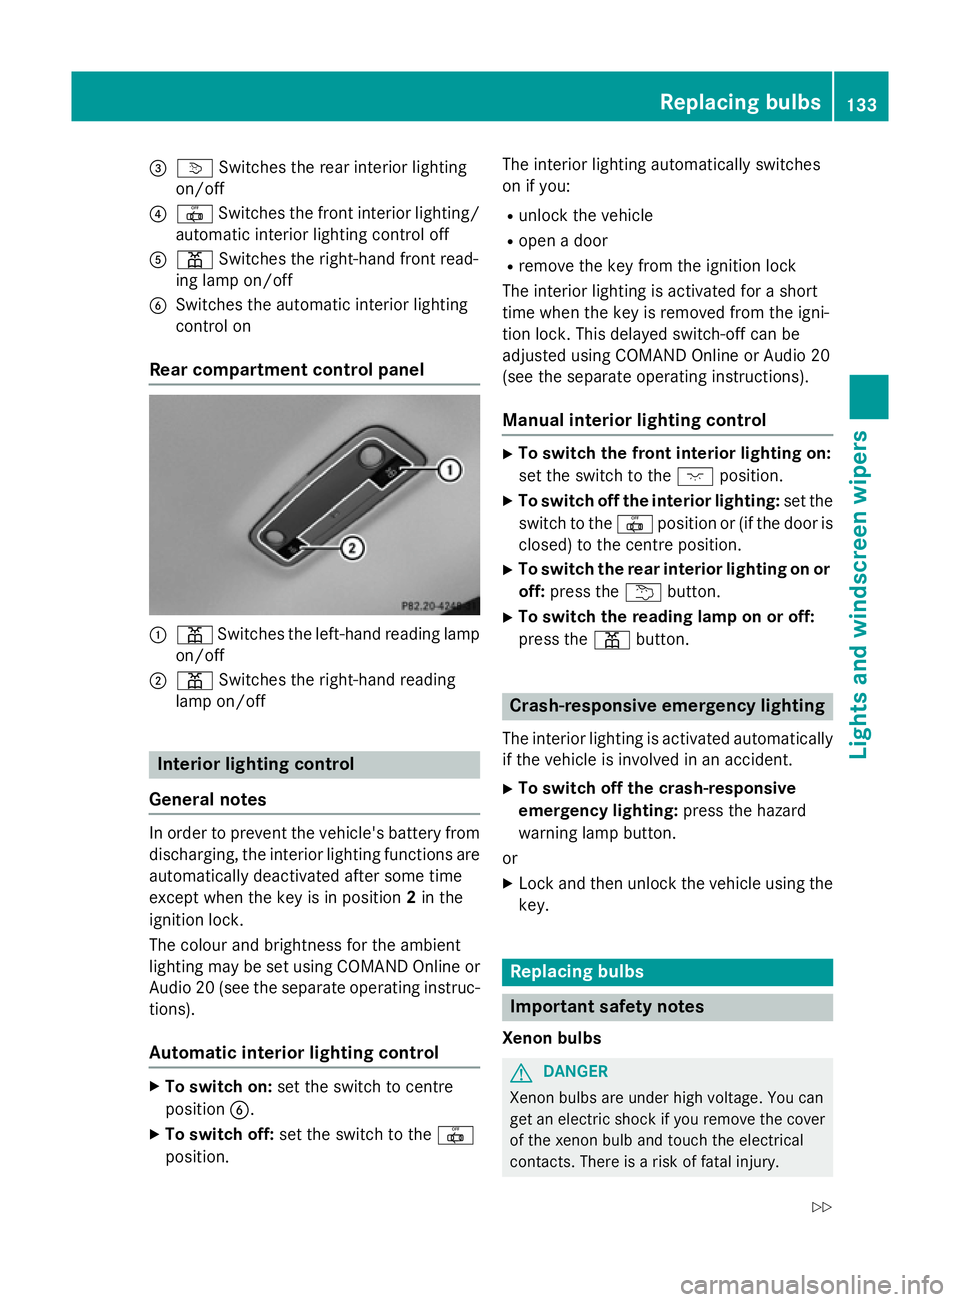
Rear compartment control panel :
p Switches the left-hand reading lamp
on/off
; p Switches the right-hand reading
lamp on/off Interior lighting control
General notes In order to prevent the vehicle's battery from
discharging, the interior lighting functions are
automatically deactivated after some time
except when the key is in position 2in the
ignition lock.
The colour and brightness for the ambient
lighting may be set using COMAND Online or
Audio 20 (see the separate operating instruc-
tions).
Automatic interior lighting control X
To switch on: set the switch to centre
position B.
X To switch off: set the switch to the |
position. The interior lighting automatically switches
on if you:
R unlock the vehicle
R open a door
R remove the key from the ignition lock
The interior lighting is activated for a short
time when the key is removed from the igni-
tion lock. This delayed switch-off can be
adjusted using COMAND Online or Audio 20
(see the separate operating instructions).
Manual interior lighting control X
To switch the front interior lighting on:
set the switch to the cposition.
X To switch off the interior lighting: set the
switch to the |position or (if the door is
closed) to the centre position.
X To switch the rear interior lighting on or
off: press the ubutton.
X To switch the reading lamp on or off:
press the pbutton. Crash-responsive emergency lighting
The interior lighting is activated automatically
if the vehicle is involved in an accident.
X To switch off the crash-responsive
emergency lighting: press the hazard
warning lamp button.
or X Lock and then unlock the vehicle using the
key. Replacing bulbs
Important safety notes
Xenon bulbs G
DANGER
Xenon bulbs are under high voltage. You can
get an electric shock if you remove the cover
of the xenon bulb and touch the electrical
contacts. There is a risk of fatal injury. Replacing bulbs
133Lights and windscreen wipers
Z
Page 156 of 421
THERMOTRONIC automatic climate con-
trol
X Activate the ¿"Cooling with air dehu-
midification" function.
X Activate automatic mode Ã.
X If the windows continue to mist up, activate
the ¬ "Windscreen demisting" function.
i You should only select this setting until
the windscreen is clear again.
Windows misted up on the outside X
Activate the windscreen wipers.
X Set the air distribution to PorO.
i You should only select this setting until
the windscreen is clear again. Rear window heating
General notes The rear window heating has a high current
draw. You should therefore switch it off as
soon as the window is clear. It otherwise
switches off automatically after several
minutes.
If the battery voltage is too low, the rear win-
dow heating may switch off.
Switching on/off X
Turn the key to position 2in the ignition
lock (Y page 165).
X Press the ¤button.
The indicator lamp in the ¤button lights
up or goes out. Operating the climate control system
153Climate control