2015 MERCEDES-BENZ CLA SHOOTING BRAKE reset
[x] Cancel search: resetPage 8 of 421

Ashtray
.............................................. .327
Assistance display (on-board com-
puter) ................................................. .255
Assistance menu (on-board com-
puter) ................................................. .255
ASSYST PLUS
Displaying a service message ....... .340
Driving abroad ............................... 340
Hiding a service message .............. 340
Information about Service ............. 340
Resetting the service interval dis-
play ................................................ 340
Service message ............................ 339
Special service requirements ......... 340
ATA (Anti-Theft Alarm system)
Activating/deactivating ................... 81
Function .......................................... .81
Switching off the alarm .................... 81
ATTENTION ASSIST
Activating/deactivating ................. 257
Display message ............................ 286
Function/note s............................. 230
Audio menu (on-board computer) .... 253
Authorised workshop
see Qualified specialist workshop
AUTO lights
Display message ............................ 282
see Lights
Automatic engine start (ECO start/
stop function) .................................... 171
Automatic engine switch-off (ECO
start/stop function) .......................... 170
Automatic front-passenger front
airbag deactivation
Display message ............................ 278
Automatic front-passenger front
airbag deactivation system
Operation ......................................... 52
Problems ......................................... 56
System self-test ............................... 54
Automatic headlamp mode .............. 127
Automatic transmission
Accelerator pedal position ............. 182
Changing gear ............................... 182
DIRECT SELECT lever ..................... 177
Drive program display .................... 178
Drive programs .............................. 183 Driving tips .................................... 182
DYNAMIC SELECT button (all vehi-
cles except Mercedes-AMG vehi-
cles) ............................................... 174
DYNAMIC SELECT controller
(Mercedes-AMG vehicles) .............. 175
Emergency running mod e.............. 188
Engaging drive position .................. 180
Engaging neutral ............................ 179
Engaging park position
(Mercedes-AMG vehicles) .............. 181
Engaging park position automati-
cally ............................................... 179
Engaging reverse gear ................... 179
Engaging the park position ............ 178
Holding the vehicle stationary on
uphill gradients .............................. 182
Kickdown ....................................... 182
Manual shifting .............................. 185
Oil temperature (on-board com-
puter, Mercedes-AMG vehicles) ..... 262
Overview ........................................ 177
Problem (fault) ............................... 188
Pulling away ................................... 168
Selector lever ................................ 180
Starting the engine ........................ 168
Steering wheel gearshift paddle s... 185
Trailer towing ................................. 183
Transmission position display ........ 180
Transmission position display
(DIRECT SELECT lever) ................... 178
Transmission positions .................. 181
Automatic transmission emer-
gency running mode ......................... 188
Auxiliary heating
Activating/deactivating ................. 157
Activating/deactivating (on the
centre console ).............................. 157
Remote control .............................. 157
Setting ........................................... 260
Auxiliary heating/ventilation
Display message ............................ 298
Important safety notes .................. 156
Problem (display message) ............ 161
Setting the departure time ............. 159
Auxiliary ventilation
Activating/deactivating ................. 157 Index
5
Page 14 of 421
Anti-dazzle mode (automatic) ........ 120
Folding in when locking (on-board
computer) ...................................... 261
Folding in/out (automatically) ....... 120
Folding in/out (electrically )........... 120
Out of position (troubleshooting) ... 120
Parking position ............................. 121
Resetting ....................................... 120
Storing settings (memory func-
tion) ............................................... 122 F
Fault message see Display messages
Filler cap
see Fuel filler flap
Fire extinguisher ............................... 351
First-aid kit ......................................... 350
Fitting a wheel
Fitting a wheel ............................... 383
Lowering the vehicle ...................... 383
Preparing the vehicle ..................... 380
Raising the vehicle ......................... 381
Removing a wheel .......................... 383
Securing the vehicle against roll-
ing away ........................................ 381
Flat tyre
Changing a wheel/fitting the
spare wheel ................................... 379
MOExtended tyre s......................... 352
Preparing the vehicle ..................... 352
TIREFIT kit ...................................... 353
see Emergency spare wheel
Floormat ............................................. 331
Foglamps
Switching on/of f........................... 127
Foglamps (extended range) .............. 131
Frequencies
Mobile phone ................................. 400
Two-way radio ................................ 400
Front foglamps
Display message ............................ 281
Front-passenger front airbag deac-
tivation
Display message ............................ 278 Front-passenger front airbag deac-
tivation system
Operation ......................................... 52
Problems ......................................... 56
System self-test ............................... 54
Fuel
Additives ........................................ 405
Consumption information .............. 406
Consumption statistics .................. 250
Displaying the current consump-
tion ................................................ 250
Displaying the range ...................... 250
Driving tip s.................................... 196
E10 ................................................ 404
Fuel gaug e....................................... 32
Grade (petrol) ................................ 404
Important safety notes .................. 403
Low outside temperatures ............. 406
Notes for CLA 250 ......................... 405
Notes for Mercedes‑ AMG vehi-
cles ................................................ 404
Problem (malfunction) ................... 191
Quality (diesel )............................... 405
Refuelling ....................................... 188
Tank content/reserve fue l............. 403
Fuel filler flap
Opening ......................................... 189
Fuel filter (white display message) .. 286
Fuel level
Calling up the range (on-board
computer) ...................................... 250
Gauge .............................................. 32
Fuel reserve
see Fuel
Fuel tank
Capacity ........................................ 403
Problem (malfunction) ................... 191
Fuses
Allocation chart ............................. 368
Before changing ............................. 367
Fuse box in the engine compart-
ment .............................................. 367
Fuse box in the front-passenger
footwell .......................................... 368
Important safety notes .................. 367 Index
11
Page 20 of 421
Side windows ................................. 101
Tailgate ............................................ 97
Reversing function
Roller sunblind ............................... 108
Reversing lamps
Display message ............................ 281
Roller sunblind
Panorama sliding sunroof .............. 107
Roof carrier ........................................ 324
Roof lining and carpets (cleaning
instructions) ...................................... 347
Roof load (maximum) ........................ 410S
Safety Children in the vehicle ..................... 59
Safety net
Attaching ....................................... 323
Important safety information ......... 323
Safety system
see Driving safety systems
Seat
Adjusting (Performance Seat) ........ 117
Folding the backrest (rear com-
partment) forwards/back .............. 320
Seat belt
Correct usage .................................. 46
Switching belt adjustment on/off
(on-board computer) ...................... 261
Seat belts
Adjusting the driver's and front-
passenger seat belt ......................... 47
Adjusting the height ......................... 46
Cleaning ......................................... 347
Display message ............................ 274
Fastening ......................................... 46
Important safety guidelines ............. 44
Introduction ..................................... 44
Rear seat belt status indicator ......... 48
Releasing ......................................... 47
Warning lamp ................................. 301
Warning lamp (function) ................... 47
Seats
Adjusting (electrically) ................... 115
Adjusting (manually) ...................... 114
Adjusting the 4-way lumbar sup-
port ................................................ 116 Adjusting the head restraint .......... 115
Cleaning the cover ......................... 346
Correct driver's seat position ........ 112
Important safety notes .................. 113
Seat heating problem .................... 118
Storing settings (memory func-
tion) ............................................... 122
Switching seat heating on/of f....... 117
Selector lever
Cleaning ......................................... 346
Sensors (cleaning instructions) ....... 344
Service
see ASSYST PLUS
Service Centre
see Qualified specialist workshop
Service menu (on-board com-
puter) .................................................. 257
Service message
see ASSYST PLUS
Service products
Brake fluid ..................................... 408
Coolant (engine) ............................ 408
Engine oil ....................................... 406
Fuel ................................................ 402
Important safety notes .................. 402
Washer fluid ................................... 409
Setting the air distribution ............... 151
Setting the airflow ............................ 151
Settings
Factory (on-board computer) ......... 262
On-board compute r....................... 258
SETUP (on-board computer) ............. 262
Shifting to neutral (manual trans-
mission) ............................................. 176
Side lamps
Switching on/of f........................... 128
Side windows
Convenience closing ...................... 103
Convenience opening .................... 102
Important safety notes .................. 101
Opening/closing ............................ 102
Problem (malfunction) ................... 105
Resetting ....................................... 104
Reversing feature ........................... 101
Sidebag ................................................ 50
Sliding sunroof
see Panorama sliding sunroof Index
17
Page 23 of 421
see Manual transmission
Transmission position display
(DIRECT SELECT lever) ......................178
Transporting the vehicle .................. 365
Trim pieces (cleaning instruc-
tions) ................................................. .346
Trip computer (on-board com-
puter) ................................................. .250
Trip meter
Calling up ....................................... 250
Resetting (on-board computer) ...... 251
Turn signals
Changing bulbs (front) ................... 136
Changing bulbs (rear) .................... 137
Switching on/off ........................... 129
Two-way radio
Frequencies ................................... 400
Installation ..................................... 400
Transmission output (maximum) .... 400
Type identification plate
see Vehicle identification plate
Tyre pressure
Calling up (on-board computer) ..... 376
Display message ............................ 292
Not reached (TIREFIT) .................... 355
Reached (TIREFIT) .......................... 355
Recommended ............................... 374
Tyre pressure loss warning
General notes ................................ 375
Important safety notes .................. 375
Restarting ...................................... 376
Tyre pressure monitor
Checking the tyre pressure elec-
tronically ........................................ 377
Function/notes ............................ .376
General notes ................................ 376
Important safety notes .................. 376
Radio type approval for the tyre
pressure monitor ........................... 379
Restarting ...................................... 378
Warning lamp ................................. 313
Warning message .......................... 378
Tyres
Changing a wheel .......................... 379
Checking ........................................ 371
Direction of rotatio n...................... 380
Display message ............................ 292
General notes ................................ 384 Important safety notes .................. 370
Information on driving .................... 370
M+S tyres ...................................... 372
MOExtended tyre
s......................... 372
Replacing ....................................... 379
Service life ..................................... 371
Storing ........................................... 380
Summer tyres ................................ 372
Tyre size (data ).............................. 384
Tyre tread ...................................... 371
Wheel and tyre combinations ........ 386
see Flat tyre U
Unlocking Emergency unlocking ....................... 95
From inside the vehicle (central
unlocking button) ............................. 94
Upshift indicator (on-board com-
puter, Mercedes-AMG vehicles) ....... 262 V
Vanity mirror (in sun visor) .............. 327
Variable SPEEDTRONIC
see SPEEDTRONIC
Vehicle
Correct use ...................................... 25
Data acquisition ............................... 26
Display message ............................ 294
Electronics ..................................... 400
Equipment ....................................... 23
Implied warranty .............................. 25
Individual settings .......................... 258
Leaving parked up ......................... 195
Locking (in an emergency) ............... 96
Locking (key) ................................... 87
Lowering ........................................ 383
Pulling away ................................... 168
Raising ........................................... 381
Registration ..................................... 25
Securing from rolling away ............ 381
Transporting .................................. 365
Unlocking (in an emergency) ........... 95
Unlocking (key) ................................ 87
Vehicle data ................................... 410
Vehicle data
Boot load (maximum) ..................... 410 20
Index
Page 28 of 421
depressed pedal. This jeopardises the oper-
ating and road safety of the vehicle. There is a risk of an accident.
Stow all objects securely in the vehicle so that
they do not get into the driver's footwell.
Always fit the floormats securely and as pre-
scribed in order to ensure that there is always sufficient room for the pedals. Do not use
loose floormats and do not place several floor-mats on top of one another.
! If the engine is switched off and equip-
ment on the diagnostics connection is
used, the starter battery may discharge.
Connecting equipment to the diagnostics
connection can lead to emissions monitoring information being reset, for example. This
may lead to the vehicle failing to meet the
requirements of the next emissions test dur-
ing the main inspection. Qualified specialist workshop
A qualified specialist workshop has the nec-
essary special skills, tools and qualifications
to correctly carry out any necessary work on
your vehicle. This particularly applies to work
relevant to safety.
Observe the notes in the Service Booklet.
Always have the following work carried out at a qualified specialist workshop:
R work relevant to safety
R service and maintenance work
R repair work
R modifications, installations and conver-
sions
R work on electronic components
Mercedes-Benz recommends that you use a
Mercedes-Benz Service Centre. Vehicle registration
Mercedes-Benz may ask its Service Centres
to carry out technical inspections on certain vehicles. The quality or safety of the vehicle is
improved as a result of the inspection.
Mercedes-Benz can only inform you about
vehicle checks if it has your registration data.
It is possible that your vehicle has not yet
been registered in your name in the following
cases:
R if your vehicle was not purchased at an
authorised specialist dealer.
R if your vehicle has not yet been examined at
a Mercedes-Benz Service Centre.
It is advisable to register your vehicle with a
Mercedes-Benz Service Centre.
Inform Mercedes-Benz as soon as possible
about any change in address or vehicle own-
ership. You can do this at a Mercedes-Benz
Service Centre, for example. Correct use
If you remove any warning stickers, you or
others could fail to recognise certain dangers.
Leave warning stickers in position.
Observe the following information when driv- ing your vehicle:
R the safety notes in this manual
R the vehicle technical data
R traffic rules and regulations
R laws and safety standards pertaining to
motor vehicles Implied warranty
! Follow the instructions in this manual
about the proper operation of your vehicle
as well as about possible vehicle damage.
Damage to your vehicle that arises from
culpable contraventions against these
instructions are not covered either by
Mercedes-Benz implied warranty or by the
New or Used-Vehicle Warranty. Introduction
25 Z
Page 104 of 421
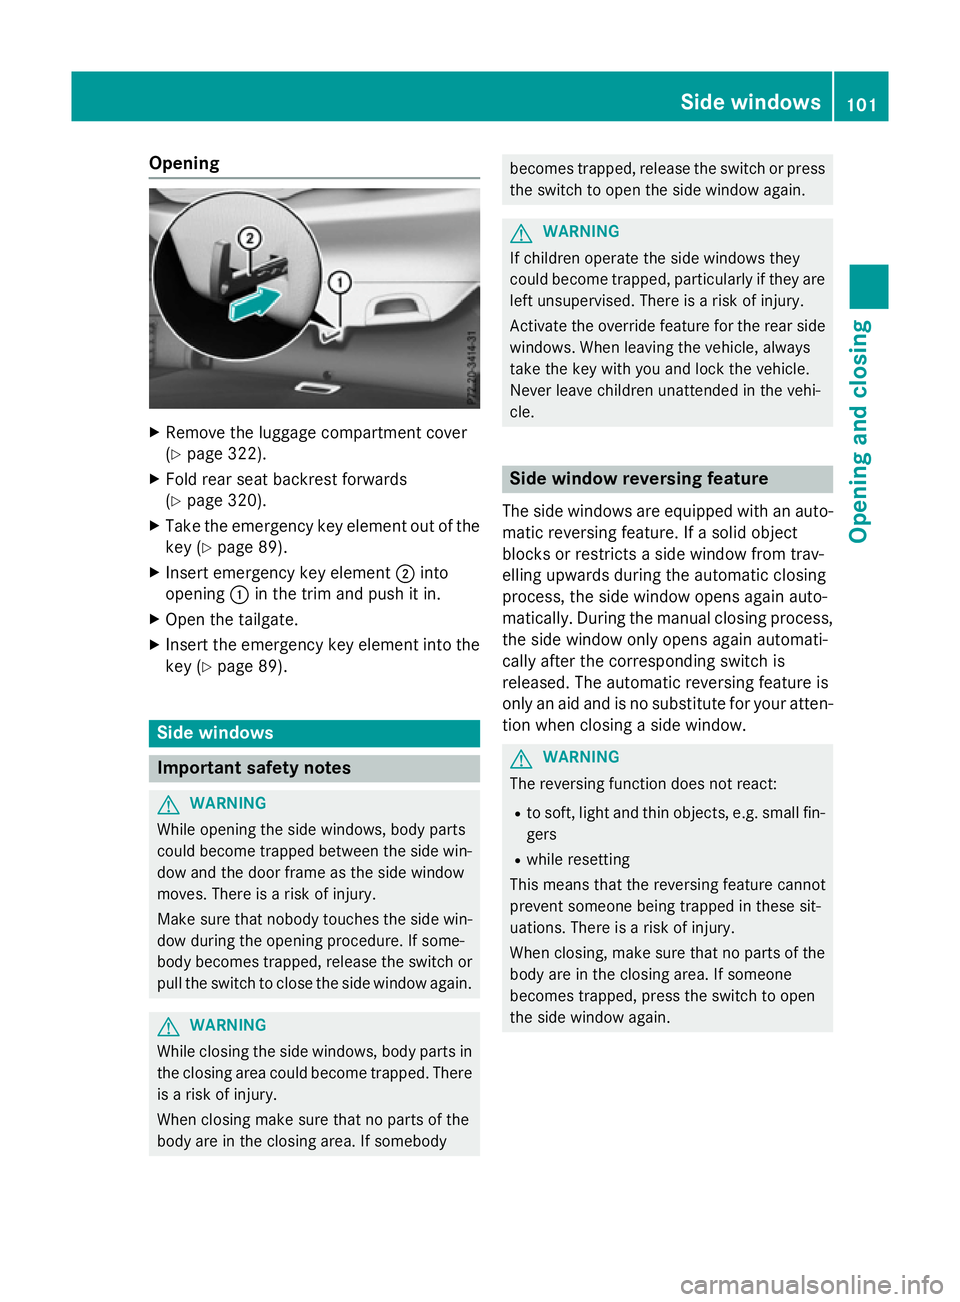
Opening
X
Remove the luggage compartment cover
(Y page 322).
X Fold rear seat backrest forwards
(Y page 320).
X Take the emergency key element out of the
key (Y page 89).
X Insert emergency key element ;into
opening :in the trim and push it in.
X Open the tailgate.
X Insert the emergency key element into the
key (Y page 89). Side windows
Important safety notes
G
WARNING
While opening the side windows, body parts
could become trapped between the side win- dow and the door frame as the side window
moves. There is a risk of injury.
Make sure that nobody touches the side win-
dow during the opening procedure. If some-
body becomes trapped, release the switch or pull the switch to close the side window again. G
WARNING
While closing the side windows, body parts in the closing area could become trapped. There is a risk of injury.
When closing make sure that no parts of the
body are in the closing area. If somebody becomes trapped, release the switch or press
the switch to open the side window again. G
WARNING
If children operate the side windows they
could become trapped, particularly if they are left unsupervised. There is a risk of injury.
Activate the override feature for the rear side
windows. When leaving the vehicle, always
take the key with you and lock the vehicle.
Never leave children unattended in the vehi-
cle. Side window reversing feature
The side windows are equipped with an auto-
matic reversing feature. If a solid object
blocks or restricts a side window from trav-
elling upwards during the automatic closing
process, the side window opens again auto-
matically. During the manual closing process, the side window only opens again automati-
cally after the corresponding switch is
released. The automatic reversing feature is
only an aid and is no substitute for your atten-
tion when closing a side window. G
WARNING
The reversing function does not react:
R to soft, light and thin objects, e.g. small fin-
gers
R while resetting
This means that the reversing feature cannot
prevent someone being trapped in these sit-
uations. There is a risk of injury.
When closing, make sure that no parts of the
body are in the closing area. If someone
becomes trapped, press the switch to open
the side window again. Side windows
101Opening and closing Z
Page 107 of 421
X
To interrupt convenience closing:
release recessed sensor surface :on the
door handle. Resetting the side windows
If a side window can no longer be closed fully, you must reset it.
X Close all doors.
X Turn the key to position 1or 2in the ignition
lock (Y page 165).
X Pull the corresponding switch on the door
control panel until the side window is com- pletely closed (Y page 102).
X Hold the switch for an additional second.
If the side window opens again slightly: X Immediately pull the corresponding switch
on the door control panel until the side win-
dow is completely closed (Y page 102).
X Hold the switch for an additional second.
X If the corresponding side window remains
closed after the button has been released,
the side window has been reset correctly. If this is not the case, repeat the steps aboveagain. 104
Side windowsOpening and closing
Page 108 of 421
Problems with the side windows
G
WARNING
If you close a side window again immediately after it has been blocked or reset, the side window
closes with increased or maximum force. The reversing function is then not active. Parts of the
body could be trapped in the closing area in the process. This poses an increased risk of injury or even fatal injury.
Make sure that no parts of the body are in the closing area. To stop the closing process, releasethe switch or push the switch again to reopen the side window. Problem
Possible causes/consequences and
M MSolutions A side window cannot
be closed because it is
blocked by objects, e.g.
leaves in the window
guide. X
Remove the objects.
X Close the side window. A side window cannot
be closed and you can-
not see the cause. If a side window is obstructed during closing and reopens again
slightly:
X Immediately after the window blocks, pull the corresponding
switch again until the side window has closed.
The side window is closed with increased force.
If a side window is obstructed again during closing and reopens
again slightly: X Immediately after the window blocks, pull the corresponding
switch again until the side window has closed.
The side window is closed without the anti-entrapment feature. Panorama sliding sunroof
Important safety notes
In the following section, the term "sliding sun-
roof" refers to the panorama sliding sunroof. G
WARNING
While opening and closing the sliding sunroof, body parts in close proximity could become
trapped. There is a risk of injury.
Make sure that no body parts are in close
proximity during the opening and closing pro- cedures. If somebody becomes trapped:
R release the switch immediately, or
R during automatic operation, press the
switch briefly in any direction
The opening or closing procedure will be stop-
ped. G
WARNING
If children operate the sliding sunroof they
could become trapped, particularly if they are left unsupervised. There is a risk of injury.
When leaving the vehicle, always take the key
with you and lock the vehicle. Never leave
children unattended in the vehicle. Panorama sliding sunroof
105Opening and closing Z