2015 FORD SUPER DUTY lock
[x] Cancel search: lockPage 163 of 470
LIMITED SLIP DIFFERENTIAL
This axle provides added traction onslippery surfaces, particularly when onewheel is on a poor traction surface. Undernormal conditions, the limited-slip axlefunctions like a standard rear axle. The axlemay exhibit a slight noise or vibrationduring tight turns with low vehicle speed.This is normal behavior and indicates theaxle is working.
ELECTRONIC LOCKING
DIFFERENTIAL
Note:The electronic locking differential isfor off-road use only and is not for use ondry pavement. Using the electronic lockingdifferential on dry pavement will result inincreased tire wear, noise and vibration.
The electronic locking differential is adevice housed in the rear axle that allowsboth rear wheels to turn at the samespeed. The electronic locking differentialcan provide additional traction should yourvehicle become stuck. You can activatethe differential electronically and shift iton the fly within the differential operatingspeed range. The differential is for use inmud, rocks, sand, or any off-road conditionwhere you need maximum traction. It isnot for use on dry pavement.
The following conditions will affect theelectronic locking differential:
•On 2WD vehicles and 4WD vehicles in2H (4X2) or 4H (4X4 High), the ELDwill not engage if the vehicle speed isabove 20 mph (32 km/h).
•On 2WD vehicles and 4WD vehicles in2H (4X2) or 4H (4X4 High), the ELDwill automatically disengage at speedsabove 25 mph (40 km/h) and willautomatically reengage at speedsbelow 20 mph (32 km/h).
•On 4WD vehicles in 4L (4X4 Low), theELD can be engaged at any speed andwill not automatically disengage.
Activating the Electronic LockingDifferential (If Equipped)
Note:Do not use electronic lockingdifferential on dry, hard surfaced roads.Doing so will produce excessive noise,vibration and increase tire wear.
Note:If the electronic locking differentialhas difficulty disengaging, release theaccelerator pedal and turn the steeringwheel in the opposite direction while rolling.
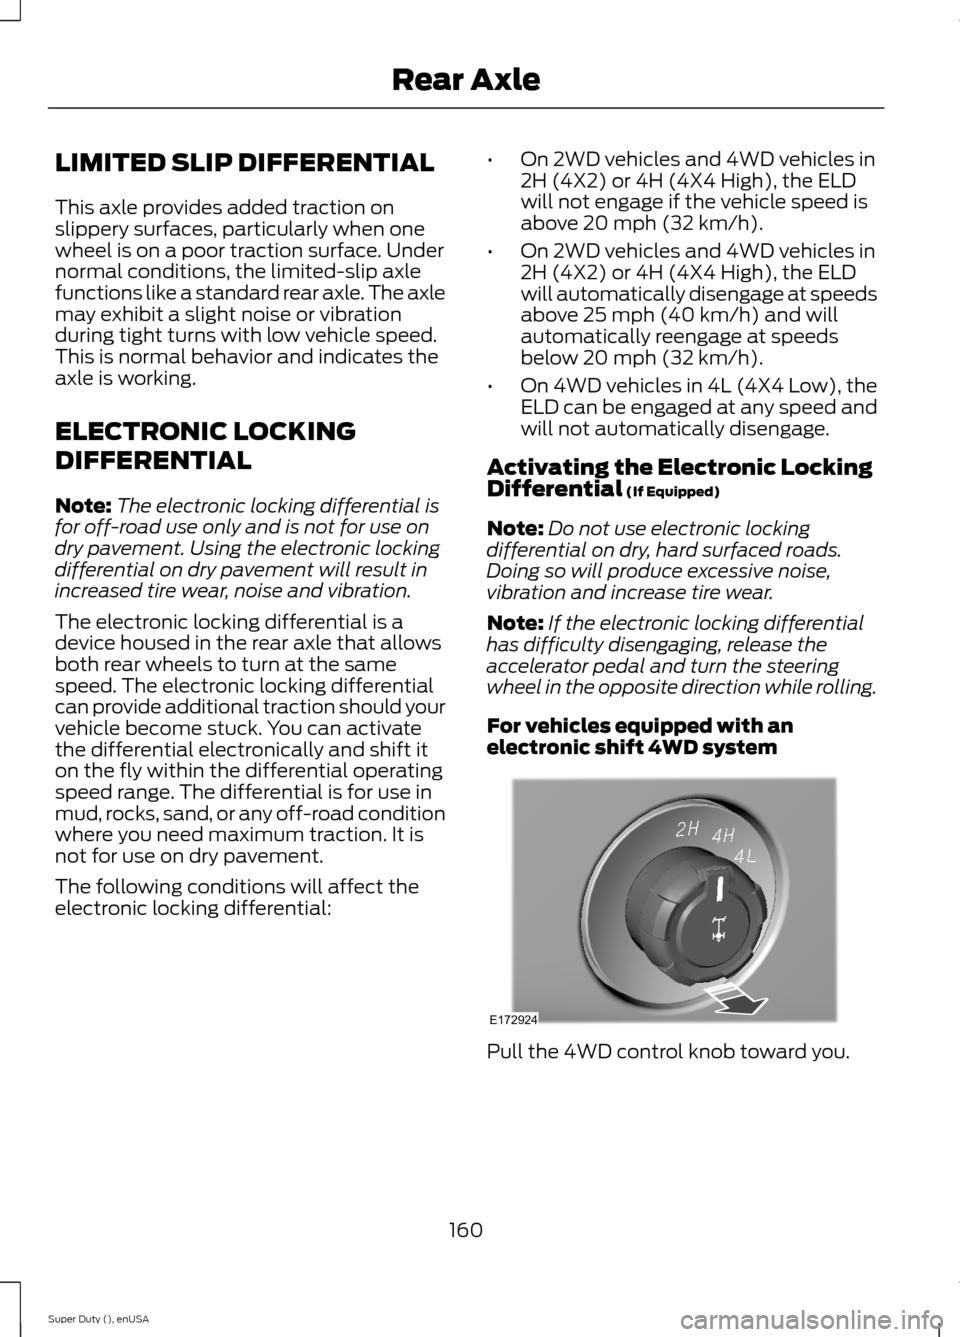
For vehicles equipped with anelectronic shift 4WD system
Pull the 4WD control knob toward you.
160Super Duty (), enUSARear AxleE172924
Page 164 of 470
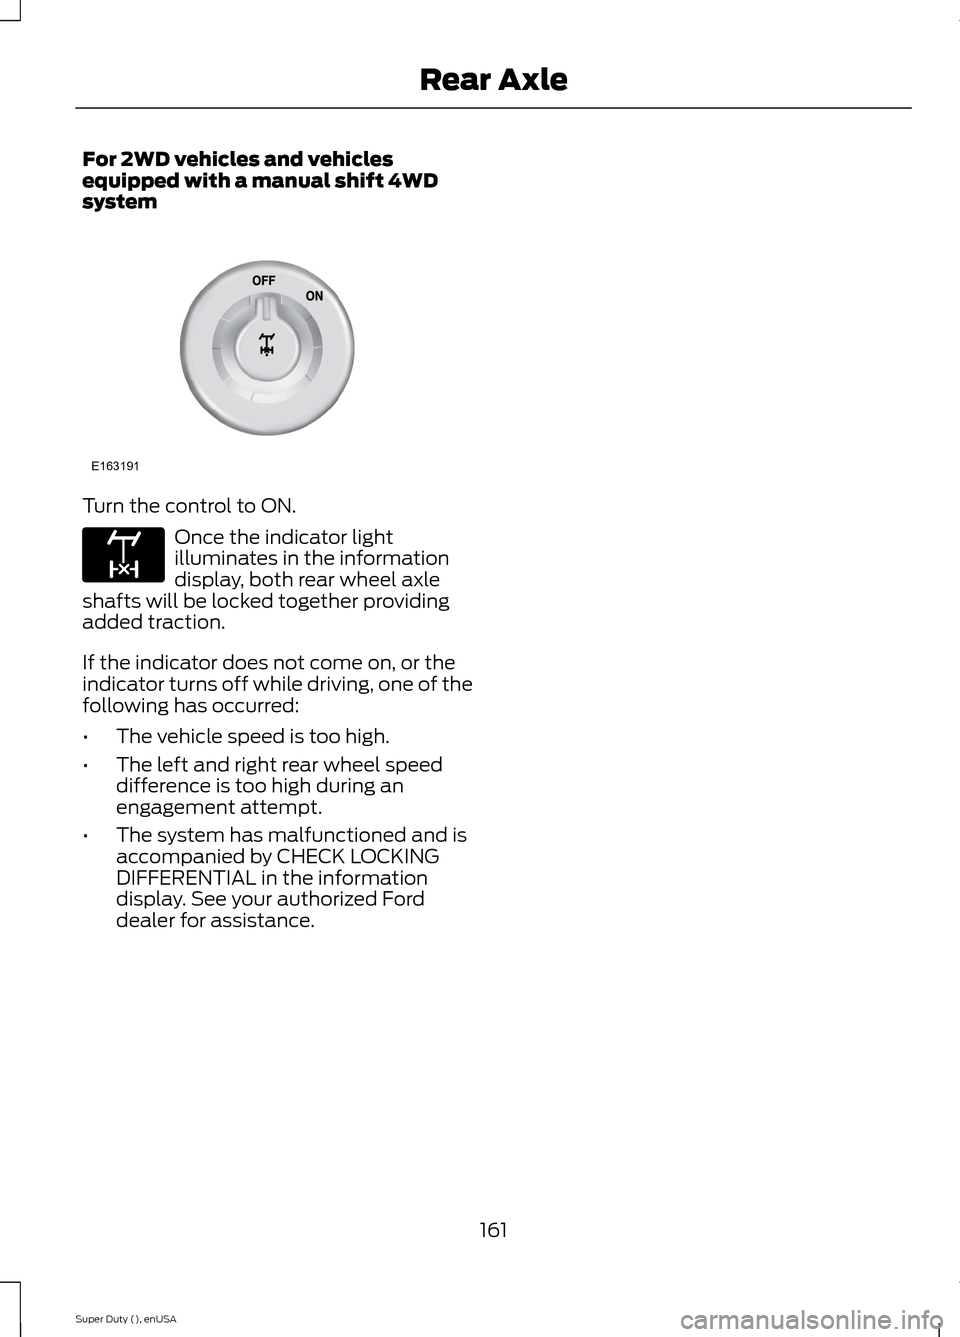
For 2WD vehicles and vehiclesequipped with a manual shift 4WDsystem
Turn the control to ON.
Once the indicator lightilluminates in the informationdisplay, both rear wheel axleshafts will be locked together providingadded traction.
If the indicator does not come on, or theindicator turns off while driving, one of thefollowing has occurred:
•The vehicle speed is too high.
•The left and right rear wheel speeddifference is too high during anengagement attempt.
•The system has malfunctioned and isaccompanied by CHECK LOCKINGDIFFERENTIAL in the informationdisplay. See your authorized Forddealer for assistance.
161Super Duty (), enUSARear AxleE163191 E163170
Page 165 of 470
GENERAL INFORMATION
Note:Occasional brake noise is normal. Ifa metal-to-metal, continuous grinding orcontinuous squeal sound is present, thebrake linings may be worn-out. Have thesystem checked by an authorized dealer. Ifyour vehicle has continuous vibration orshudder in the steering wheel while braking,have it checked by an authorized dealer.
Note:Brake dust may accumulate on thewheels, even under normal drivingconditions. Some dust is inevitable as thebrakes wear and does not contribute tobrake noise. See Cleaning the AlloyWheels (page 261).
See Warning Lamps andIndicators (page 77).
Wet brakes result in reduced brakingefficiency. Gently press the brake pedal afew times when driving from a car wash orstanding water to dry the brakes.
Brake Over Accelerator
In the event the accelerator pedalbecomes stuck or entrapped, apply steadyand firm pressure to the brake pedal toslow the vehicle and reduce engine power.If you experience this condition, apply thebrakes and bring your vehicle to a safestop. Move the transmission selector leverto position P, switch the engine off andapply the parking brake. Inspect theaccelerator pedal for any interference. Ifnone are found and the condition persists,have your vehicle towed to the nearestauthorized dealer.
Brake Assist
Brake assist detects when you brakerapidly by measuring the rate at which youpress the brake pedal. It providesmaximum braking efficiency as long as youpress the pedal, and can reduce stoppingdistances in critical situations.
Anti-lock Brake System
This system helps you maintain steeringcontrol during emergency stops by keepingthe brakes from locking.
This lamp momentarilyilluminates when you turn theignition on. If the light does notilluminate during start up, remains on orflashes, the system may be disabled. Havethe system checked by an authorizeddealer.
If the system is disabled, normalbraking is still effective. If thebrake warning lamp illuminateswhen you release the parking brake, havethe system checked by an authorizeddealer.
HINTS ON DRIVING WITH
ANTI-LOCK BRAKES
Note:When the system is operating, thebrake pedal will pulse and may travelfurther. Maintain pressure on the brakepedal. You may also hear a noise from thesystem. This is normal.
The anti-lock braking system will noteliminate the risks when:
•you drive too closely to the vehicle infront of you
•your vehicle is hydroplaning
•you take corners too fast
•the road surface is poor.
162Super Duty (), enUSABrakesE144522 E144522
Page 166 of 470
PARKING BRAKE
WARNING
Always set the parking brake fullyand make sure the transmissionselector lever is placed in position P.Failure to set the parking brake and engagepark could result in vehicle roll-away,property damage or bodily injury. Turn theignition to the lock position and removethe key whenever you leave your vehicle.
Apply the parking brake whenever yourvehicle is parked. Press the pedaldownward to set the parking brake. Thebrake warning lamp in the instrumentcluster will illuminate and remainsilluminated until the parking brake isreleased.
To release, pull the brake release leverlocated at the lower left side of theinstrument panel.
If you are parking your vehicle on a gradeor with a trailer, press and hold the brakepedal down, then set the parking brake.There may be a little vehicle movement asthe parking brake sets to hold the vehicle'sweight. This is normal and should be noreason for concern. If needed, press andhold the service brake pedal down, thentry reapplying the parking brake. Chock thewheels if required. If the parking brakecannot hold the weight of the vehicle, theparking brake may need to be serviced orthe vehicle may be overloaded.
HILL START ASSIST
WARNINGS
The system does not replace theparking brake. When you leave yourvehicle, always apply the parkingbrake and put the transmission in park (P).
WARNINGS
You must remain in your vehicle onceyou have activated the system.
During all times, you are responsiblefor controlling your vehicle,supervising the system andintervening, if required.
If the engine is revved excessively, orif a malfunction is detected, thesystem will be deactivated.
The system makes it easier to pull awaywhen your vehicle is on a slope without theneed to use the parking brake.
When the system is active, your vehicle willremain stationary on the slope for two tothree seconds after you release the brakepedal. This allows you time to move yourfoot from the brake to the acceleratorpedal. The brakes are releasedautomatically once the engine hasdeveloped sufficient drive to prevent yourvehicle from rolling down the slope. Thisis an advantage when pulling away on aslope, (for example from a car park ramp,traffic lights or when reversing uphill intoa parking space).
The system will activate automatically onany slope that will cause significant vehiclerollback.
Using Hill Start Assist
1.Press the brake pedal to bring yourvehicle to a complete standstill. Keepthe brake pedal pressed.
2.If the sensors detect that your vehicleis on a slope, the system will activateautomatically.
3.When you remove your foot from thebrake pedal, your vehicle will remainon the slope without rolling away forabout two or three seconds. This holdtime will automatically be extended ifyou are in the process of driving off.
163Super Duty (), enUSABrakes
Page 172 of 470
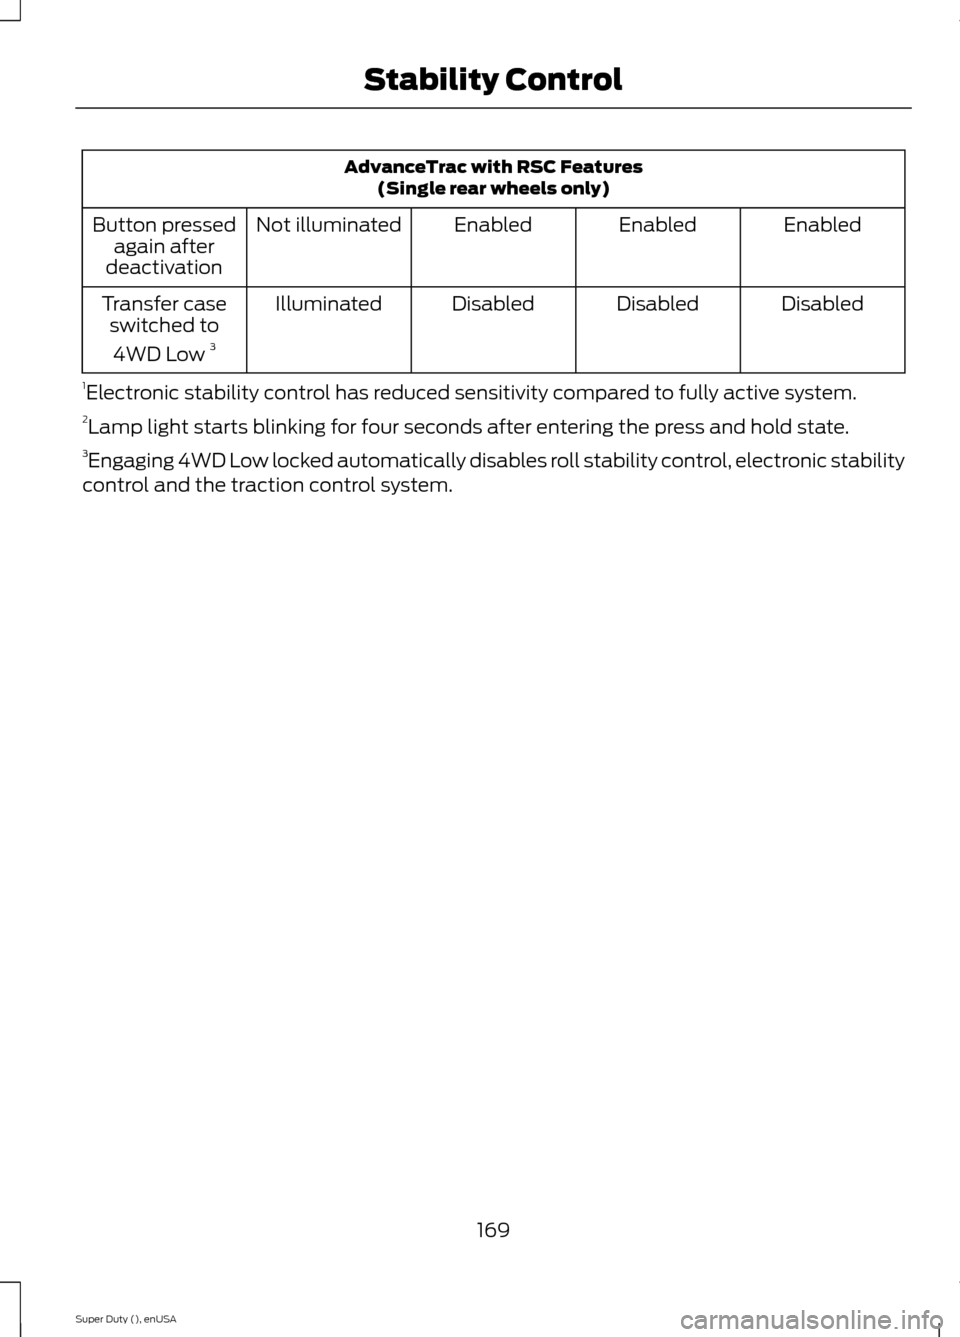
AdvanceTrac with RSC Features(Single rear wheels only)
EnabledEnabledEnabledNot illuminatedButton pressedagain afterdeactivation
DisabledDisabledDisabledIlluminatedTransfer caseswitched to
4WD Low 3
1Electronic stability control has reduced sensitivity compared to fully active system.2Lamp light starts blinking for four seconds after entering the press and hold state.3Engaging 4WD Low locked automatically disables roll stability control, electronic stabilitycontrol and the traction control system.
169Super Duty (), enUSAStability Control
Page 175 of 470
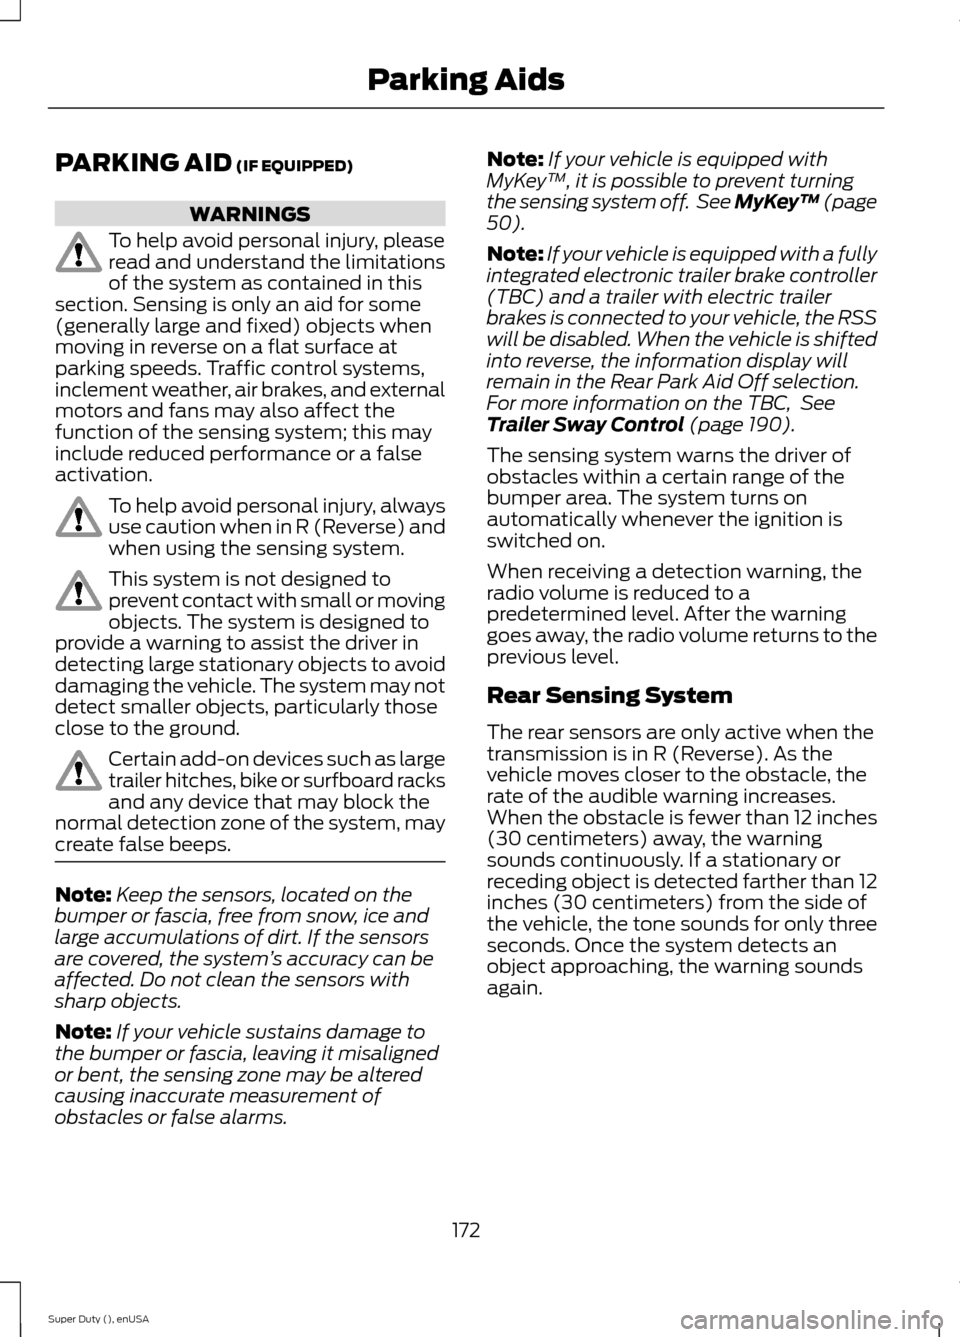
PARKING AID (IF EQUIPPED)
WARNINGS
To help avoid personal injury, pleaseread and understand the limitationsof the system as contained in thissection. Sensing is only an aid for some(generally large and fixed) objects whenmoving in reverse on a flat surface atparking speeds. Traffic control systems,inclement weather, air brakes, and externalmotors and fans may also affect thefunction of the sensing system; this mayinclude reduced performance or a falseactivation.
To help avoid personal injury, alwaysuse caution when in R (Reverse) andwhen using the sensing system.
This system is not designed toprevent contact with small or movingobjects. The system is designed toprovide a warning to assist the driver indetecting large stationary objects to avoiddamaging the vehicle. The system may notdetect smaller objects, particularly thoseclose to the ground.
Certain add-on devices such as largetrailer hitches, bike or surfboard racksand any device that may block thenormal detection zone of the system, maycreate false beeps.
Note:Keep the sensors, located on thebumper or fascia, free from snow, ice andlarge accumulations of dirt. If the sensorsare covered, the system’s accuracy can beaffected. Do not clean the sensors withsharp objects.
Note:If your vehicle sustains damage tothe bumper or fascia, leaving it misalignedor bent, the sensing zone may be alteredcausing inaccurate measurement ofobstacles or false alarms.
Note:If your vehicle is equipped withMyKey™, it is possible to prevent turningthe sensing system off. See MyKey™ (page50).
Note:If your vehicle is equipped with a fullyintegrated electronic trailer brake controller(TBC) and a trailer with electric trailerbrakes is connected to your vehicle, the RSSwill be disabled. When the vehicle is shiftedinto reverse, the information display willremain in the Rear Park Aid Off selection.For more information on the TBC, SeeTrailer Sway Control (page 190).
The sensing system warns the driver ofobstacles within a certain range of thebumper area. The system turns onautomatically whenever the ignition isswitched on.
When receiving a detection warning, theradio volume is reduced to apredetermined level. After the warninggoes away, the radio volume returns to theprevious level.
Rear Sensing System
The rear sensors are only active when thetransmission is in R (Reverse). As thevehicle moves closer to the obstacle, therate of the audible warning increases.When the obstacle is fewer than 12 inches(30 centimeters) away, the warningsounds continuously. If a stationary orreceding object is detected farther than 12inches (30 centimeters) from the side ofthe vehicle, the tone sounds for only threeseconds. Once the system detects anobject approaching, the warning soundsagain.
172Super Duty (), enUSAParking Aids
Page 188 of 470
be: 635 kilograms - (2 x 99kilograms) - (12 x 45 kilograms) =635 - 198 - 540 = -103 kilograms.You will need to reduce the loadweight by at least 240 pounds(104 kilograms). If you removethree 100-pound (45-kilogram)cement bags, then the loadcalculation would be:1400 - (2 x220) - (9 x 100) = 1400 - 440 -900 = 60 pounds. Now you havethe load capacity to transport thecement and your friend home. Inmetric units, the calculation wouldbe: 635 kilograms - (2 x 99kilograms) - (9 x 45 kilograms) =635 - 198 - 405 = 32 kilograms.
The above calculations alsoassume that the loads arepositioned in your vehicle in amanner that does not overloadthe Front or the Rear Gross AxleWeight Rating specified for yourvehicle on the Safety ComplianceCertification Label. The label shallbe affixed to either the door hingepillar, door-latch post, or the dooredge that meets the door-latchpost, next to the driver's seatingposition.
Special Loading Instructionsfor Owners of Pick-up Trucksand Utility-type Vehicles
WARNING
Loaded vehicles may handledifferently than unloadedvehicles. Extra precautions, suchas slower speeds and increasedstopping distance, should betaken when driving a heavilyloaded vehicle.
Your vehicle can haul more cargoand people than most passengercars. Depending upon the typeand placement of the load,hauling cargo and people mayraise the center of gravity of thevehicle.
TAILGATE
Tailgate Lock
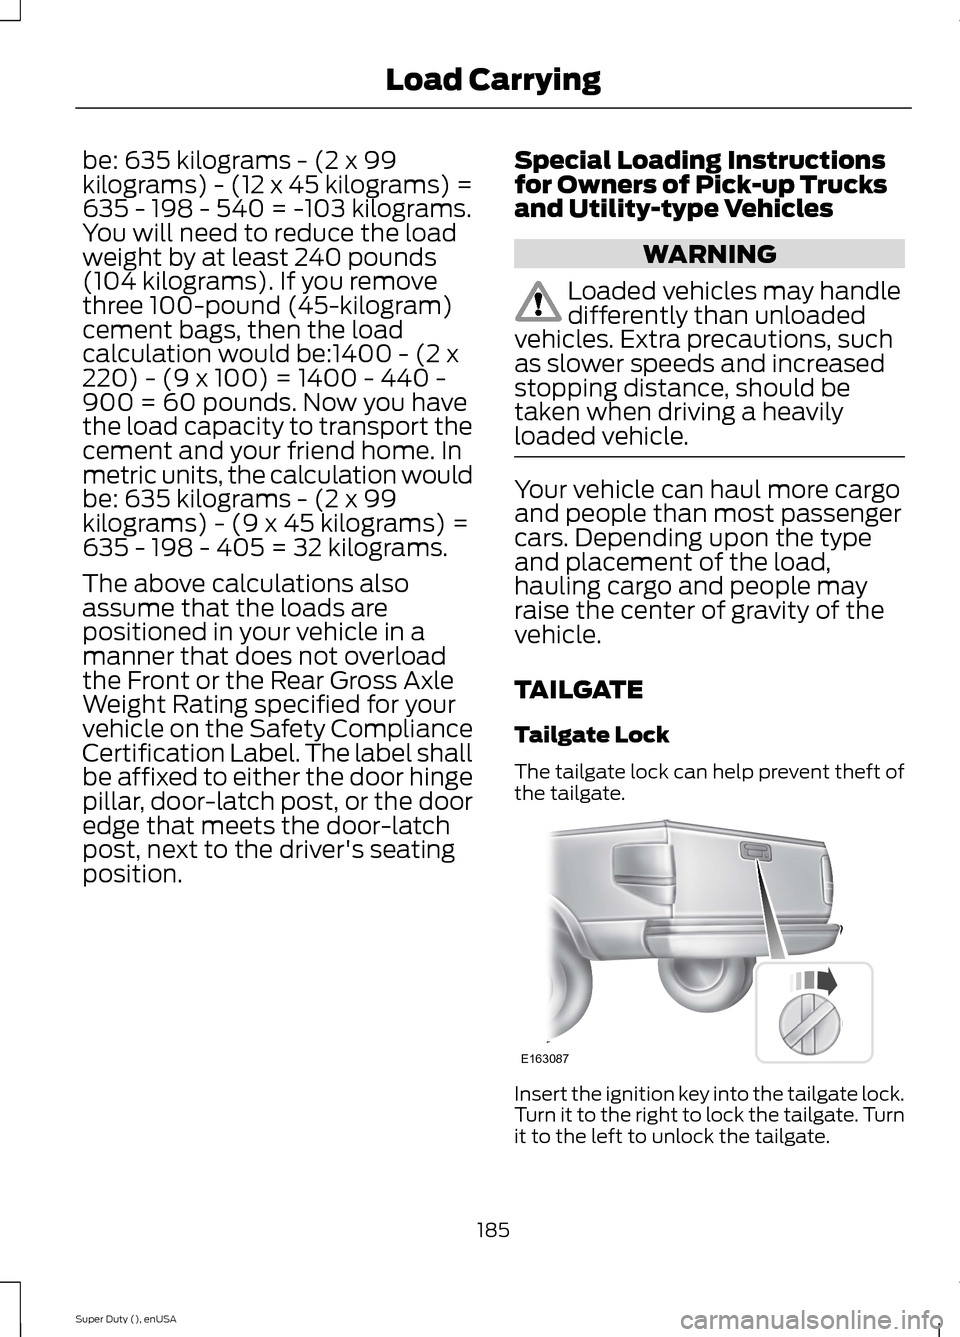
The tailgate lock can help prevent theft ofthe tailgate.
Insert the ignition key into the tailgate lock.Turn it to the right to lock the tailgate. Turnit to the left to unlock the tailgate.
185Super Duty (), enUSALoad CarryingE163087
Page 190 of 470
Opening the Step
Note:Make sure to close and fully latch thestep before moving your vehicle. Never drivewith the step or grab handle open.
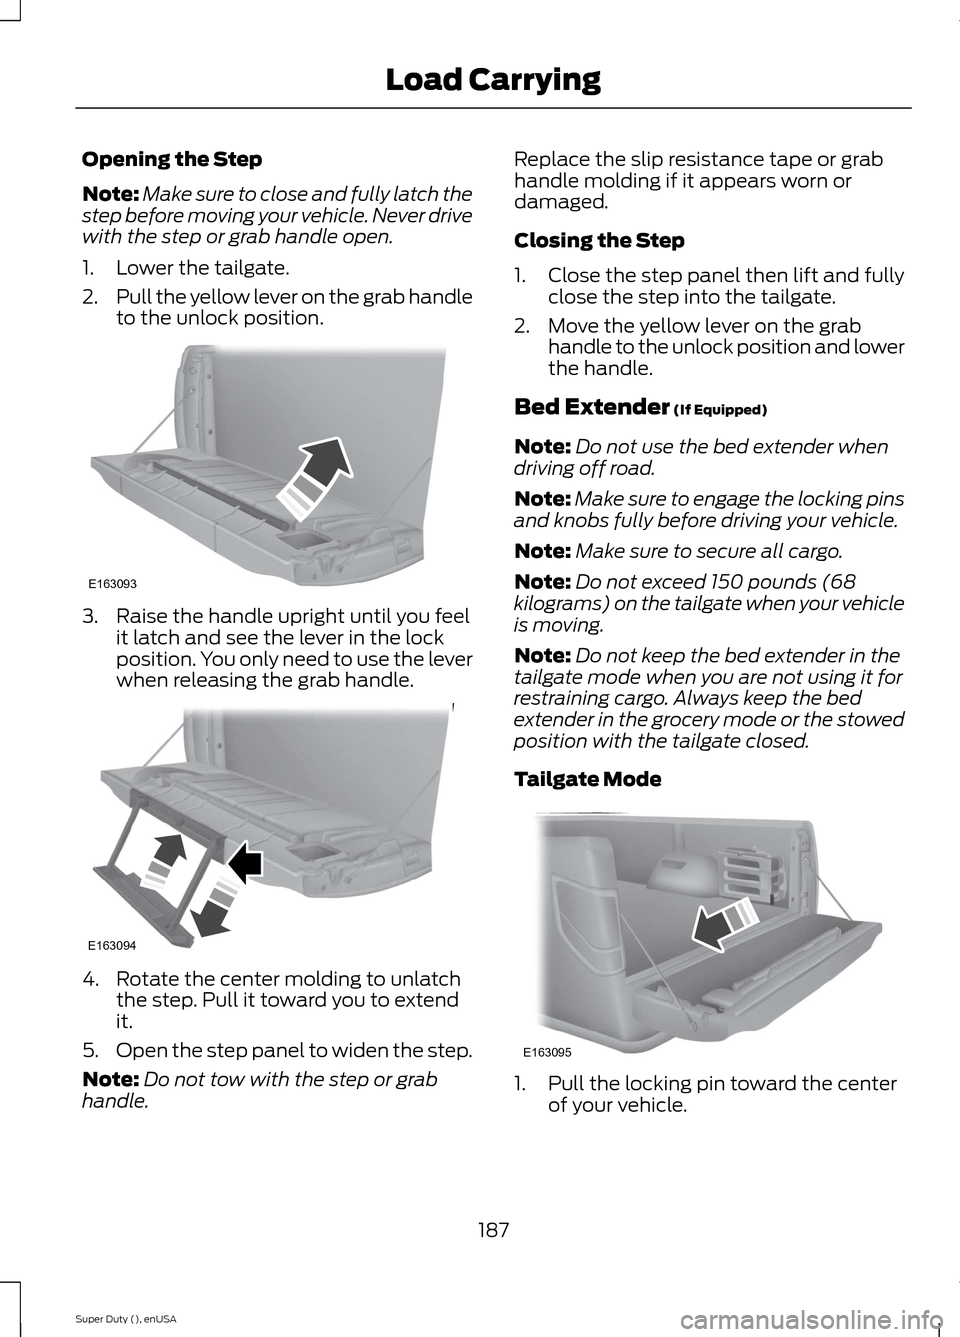
1.Lower the tailgate.
2.Pull the yellow lever on the grab handleto the unlock position.
3.Raise the handle upright until you feelit latch and see the lever in the lockposition. You only need to use the leverwhen releasing the grab handle.
4.Rotate the center molding to unlatchthe step. Pull it toward you to extendit.
5.Open the step panel to widen the step.
Note:Do not tow with the step or grabhandle.
Replace the slip resistance tape or grabhandle molding if it appears worn ordamaged.
Closing the Step
1.Close the step panel then lift and fullyclose the step into the tailgate.
2.Move the yellow lever on the grabhandle to the unlock position and lowerthe handle.
Bed Extender (If Equipped)
Note:Do not use the bed extender whendriving off road.
Note:Make sure to engage the locking pinsand knobs fully before driving your vehicle.
Note:Make sure to secure all cargo.
Note:Do not exceed 150 pounds (68kilograms) on the tailgate when your vehicleis moving.
Note:Do not keep the bed extender in thetailgate mode when you are not using it forrestraining cargo. Always keep the bedextender in the grocery mode or the stowedposition with the tailgate closed.
Tailgate Mode
1.Pull the locking pin toward the centerof your vehicle.
187Super Duty (), enUSALoad CarryingE163093 E163094 E163095