2015 FORD SUPER DUTY lock
[x] Cancel search: lockPage 248 of 470
Note:Electrical or electronic accessoriesor components added to the vehicle by thedealer or the owner may adversely affectbattery performance and durability.
Your vehicle is equipped with a Motorcraftmaintenance-free battery which normallydoes not require additional water duringits life of service.
For longer, trouble-free operation, keep thetop of the battery clean and dry. Also,make certain the battery cables are alwaystightly fastened to the battery terminals.
If you see any corrosion on the battery orterminals, remove the cables from theterminals and clean with a wire brush. Youcan neutralize the acid with a solution ofbaking soda and water.
It is recommended that the negativebattery cable terminal be disconnectedfrom the battery if you plan to store yourvehicle for an extended period of time.
Because your vehicle’s engine iselectronically controlled by a computer,some control conditions are maintainedby power from the battery. When thebattery is disconnected or a new batteryis installed, the engine must relearn its idleand fuel trim strategy for optimumdriveability and performance. Flexible fuelvehicles (FFV) must also relearn theethanol content of the fuel for optimumdriveability and performance. To begin thisprocess
1.With the vehicle at a complete stop,set the parking brake.
2.Put the gearshift in P, turn off allaccessories.
3.Start the engine. Run the engine untilit reaches normal operatingtemperature.
4.Allow the engine to idle for at least oneminute.
5.Turn the A/C on and allow the engineto idle for at least one minute.
6.Release the parking brake. With yourfoot on the brake pedal and with theA/C on, put the vehicle in D and allowthe engine to idle for at least oneminute.
•If you do not allow the engine torelearn its idle trim, the idle qualityof your vehicle may be adverselyaffected until the idle trim iseventually relearned.
7.Drive the vehicle to complete therelearning process
•The vehicle may need to be driven10 mi (16 km) or more to relearn theidle and fuel trim strategy alongwith the ethanol content for flexiblefuel vehicles.
•For flexible fuel vehicles, if you areoperating on E85, you mayexperience poor starts or aninability to start the engine anddriveability problems until the fueltrim and ethanol content have beenrelearned.
If the battery has been disconnected or anew battery has been installed, the clockand radio settings must be reset once thebattery is reconnected.
Always dispose of automotivebatteries in a responsible manner.Follow your local authorized standardsfor disposal. Call your local authorizedrecycling center to find out more aboutrecycling automotive batteries.
Battery Management System (IfEquipped)
The battery management system (BMS)monitors battery conditions and takesactions to extend battery life. If excessivebattery drain is detected, the system maytemporarily disable certain electricalfeatures to protect the battery. Thoseelectrical accessories affected include therear defrost, heated/cooled seats, climate
245Super Duty (), enUSAMaintenance
Page 250 of 470
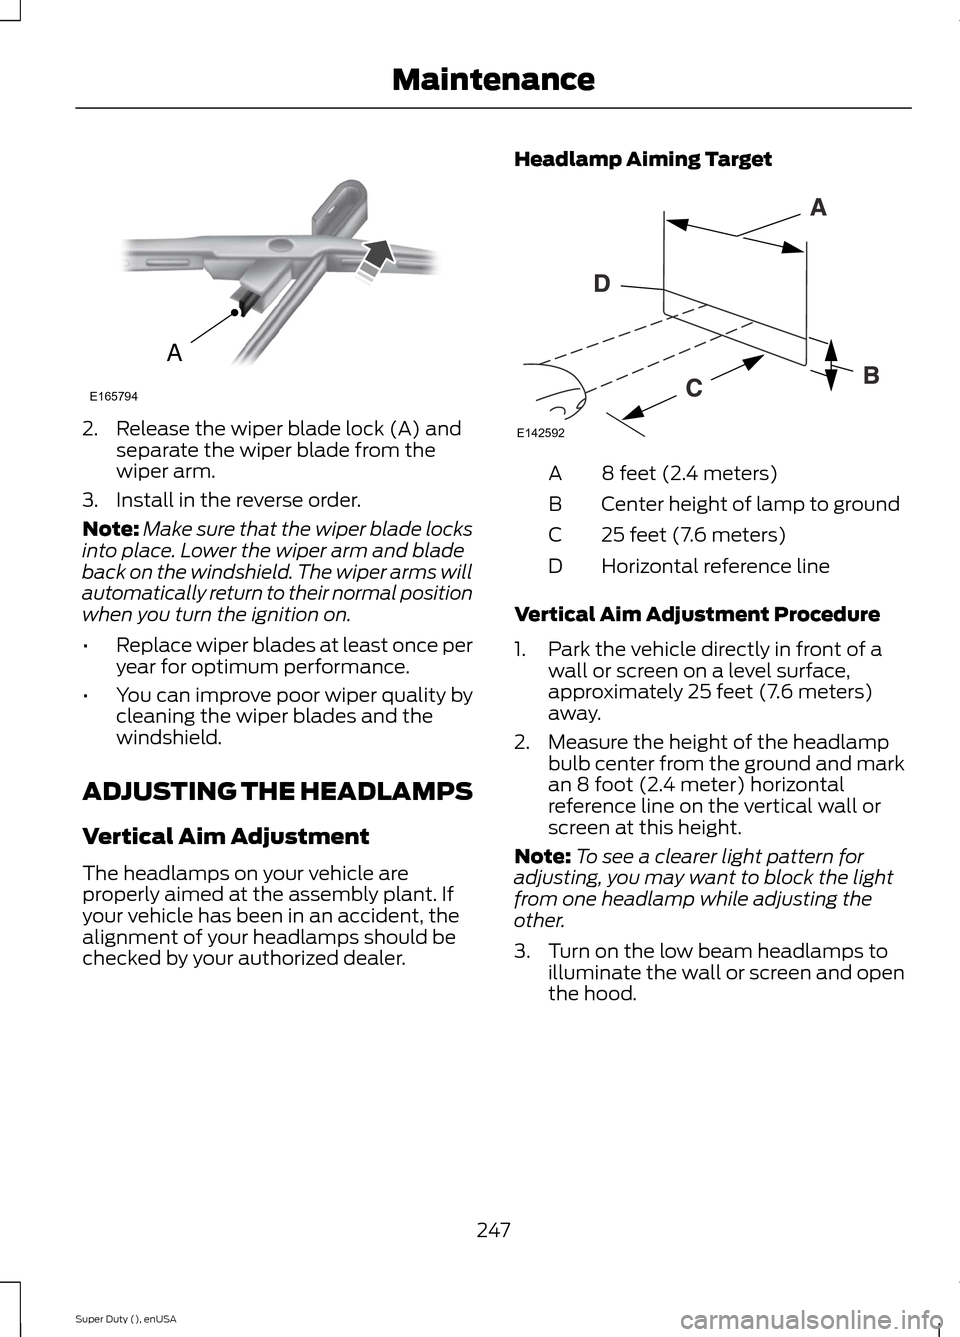
2.Release the wiper blade lock (A) andseparate the wiper blade from thewiper arm.
3.Install in the reverse order.
Note:Make sure that the wiper blade locksinto place. Lower the wiper arm and bladeback on the windshield. The wiper arms willautomatically return to their normal positionwhen you turn the ignition on.
•Replace wiper blades at least once peryear for optimum performance.
•You can improve poor wiper quality bycleaning the wiper blades and thewindshield.
ADJUSTING THE HEADLAMPS
Vertical Aim Adjustment
The headlamps on your vehicle areproperly aimed at the assembly plant. Ifyour vehicle has been in an accident, thealignment of your headlamps should bechecked by your authorized dealer.
Headlamp Aiming Target
8 feet (2.4 meters)A
Center height of lamp to groundB
25 feet (7.6 meters)C
Horizontal reference lineD
Vertical Aim Adjustment Procedure
1.Park the vehicle directly in front of awall or screen on a level surface,approximately 25 feet (7.6 meters)away.
2.Measure the height of the headlampbulb center from the ground and markan 8 foot (2.4 meter) horizontalreference line on the vertical wall orscreen at this height.
Note:To see a clearer light pattern foradjusting, you may want to block the lightfrom one headlamp while adjusting theother.
3.Turn on the low beam headlamps toilluminate the wall or screen and openthe hood.
247Super Duty (), enUSAMaintenanceAE165794 E142592
Page 251 of 470
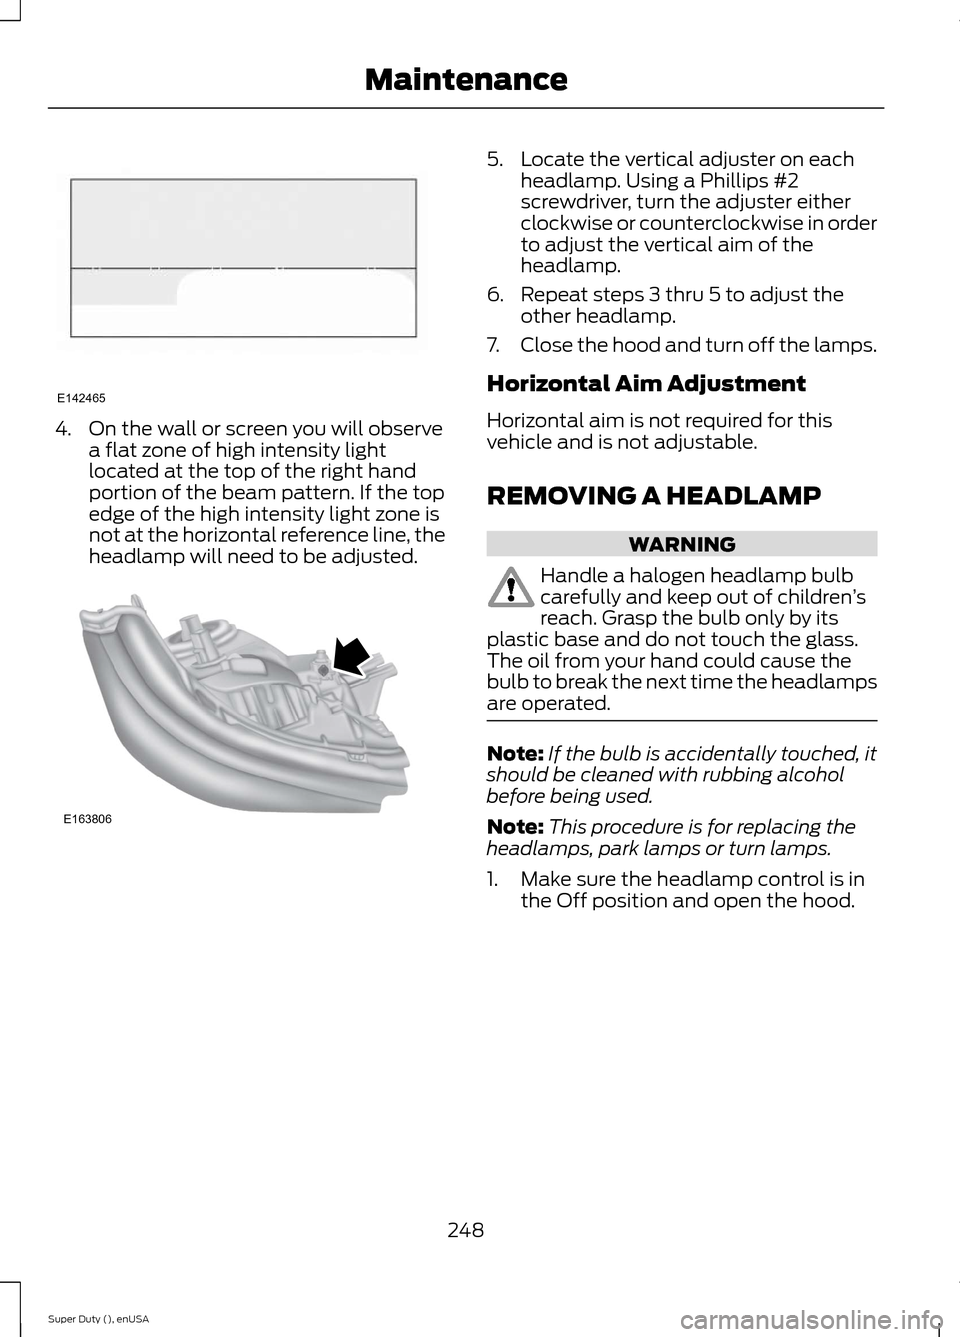
4.On the wall or screen you will observea flat zone of high intensity lightlocated at the top of the right handportion of the beam pattern. If the topedge of the high intensity light zone isnot at the horizontal reference line, theheadlamp will need to be adjusted.
5.Locate the vertical adjuster on eachheadlamp. Using a Phillips #2screwdriver, turn the adjuster eitherclockwise or counterclockwise in orderto adjust the vertical aim of theheadlamp.
6.Repeat steps 3 thru 5 to adjust theother headlamp.
7.Close the hood and turn off the lamps.
Horizontal Aim Adjustment
Horizontal aim is not required for thisvehicle and is not adjustable.
REMOVING A HEADLAMP
WARNING
Handle a halogen headlamp bulbcarefully and keep out of children’sreach. Grasp the bulb only by itsplastic base and do not touch the glass.The oil from your hand could cause thebulb to break the next time the headlampsare operated.
Note:If the bulb is accidentally touched, itshould be cleaned with rubbing alcoholbefore being used.
Note:This procedure is for replacing theheadlamps, park lamps or turn lamps.
1.Make sure the headlamp control is inthe Off position and open the hood.
248Super Duty (), enUSAMaintenanceE142465 E163806
Page 252 of 470
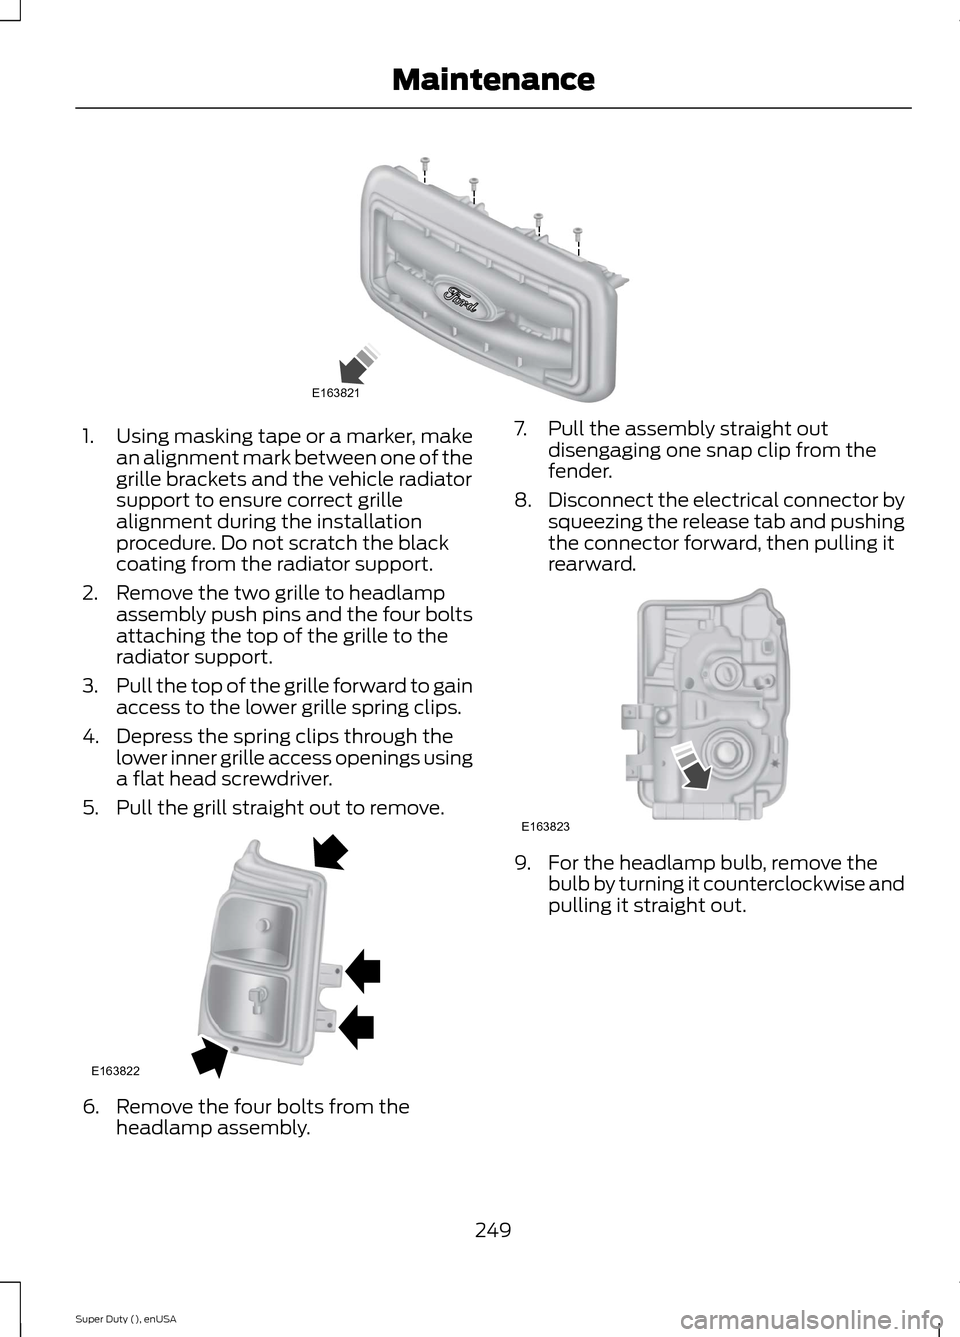
1.Using masking tape or a marker, makean alignment mark between one of thegrille brackets and the vehicle radiatorsupport to ensure correct grillealignment during the installationprocedure. Do not scratch the blackcoating from the radiator support.
2.Remove the two grille to headlampassembly push pins and the four boltsattaching the top of the grille to theradiator support.
3.Pull the top of the grille forward to gainaccess to the lower grille spring clips.
4.Depress the spring clips through thelower inner grille access openings usinga flat head screwdriver.
5.Pull the grill straight out to remove.
6.Remove the four bolts from theheadlamp assembly.
7.Pull the assembly straight outdisengaging one snap clip from thefender.
8.Disconnect the electrical connector bysqueezing the release tab and pushingthe connector forward, then pulling itrearward.
9.For the headlamp bulb, remove thebulb by turning it counterclockwise andpulling it straight out.
249Super Duty (), enUSAMaintenanceE163821 E163822 E163823
Page 253 of 470
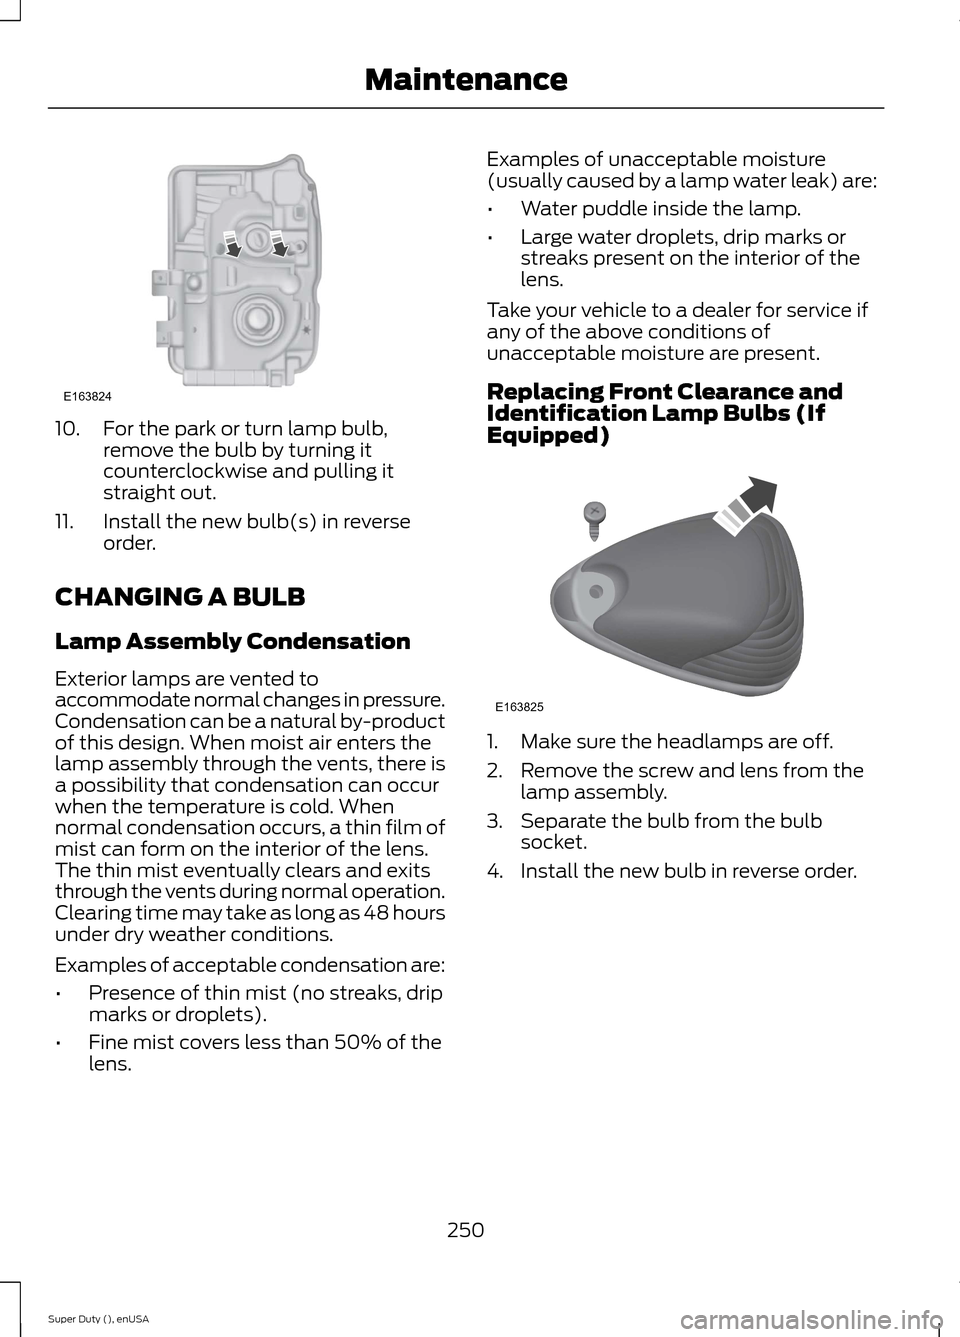
10.For the park or turn lamp bulb,remove the bulb by turning itcounterclockwise and pulling itstraight out.
11.Install the new bulb(s) in reverseorder.
CHANGING A BULB
Lamp Assembly Condensation
Exterior lamps are vented toaccommodate normal changes in pressure.Condensation can be a natural by-productof this design. When moist air enters thelamp assembly through the vents, there isa possibility that condensation can occurwhen the temperature is cold. Whennormal condensation occurs, a thin film ofmist can form on the interior of the lens.The thin mist eventually clears and exitsthrough the vents during normal operation.Clearing time may take as long as 48 hoursunder dry weather conditions.
Examples of acceptable condensation are:
•Presence of thin mist (no streaks, dripmarks or droplets).
•Fine mist covers less than 50% of thelens.
Examples of unacceptable moisture(usually caused by a lamp water leak) are:
•Water puddle inside the lamp.
•Large water droplets, drip marks orstreaks present on the interior of thelens.
Take your vehicle to a dealer for service ifany of the above conditions ofunacceptable moisture are present.
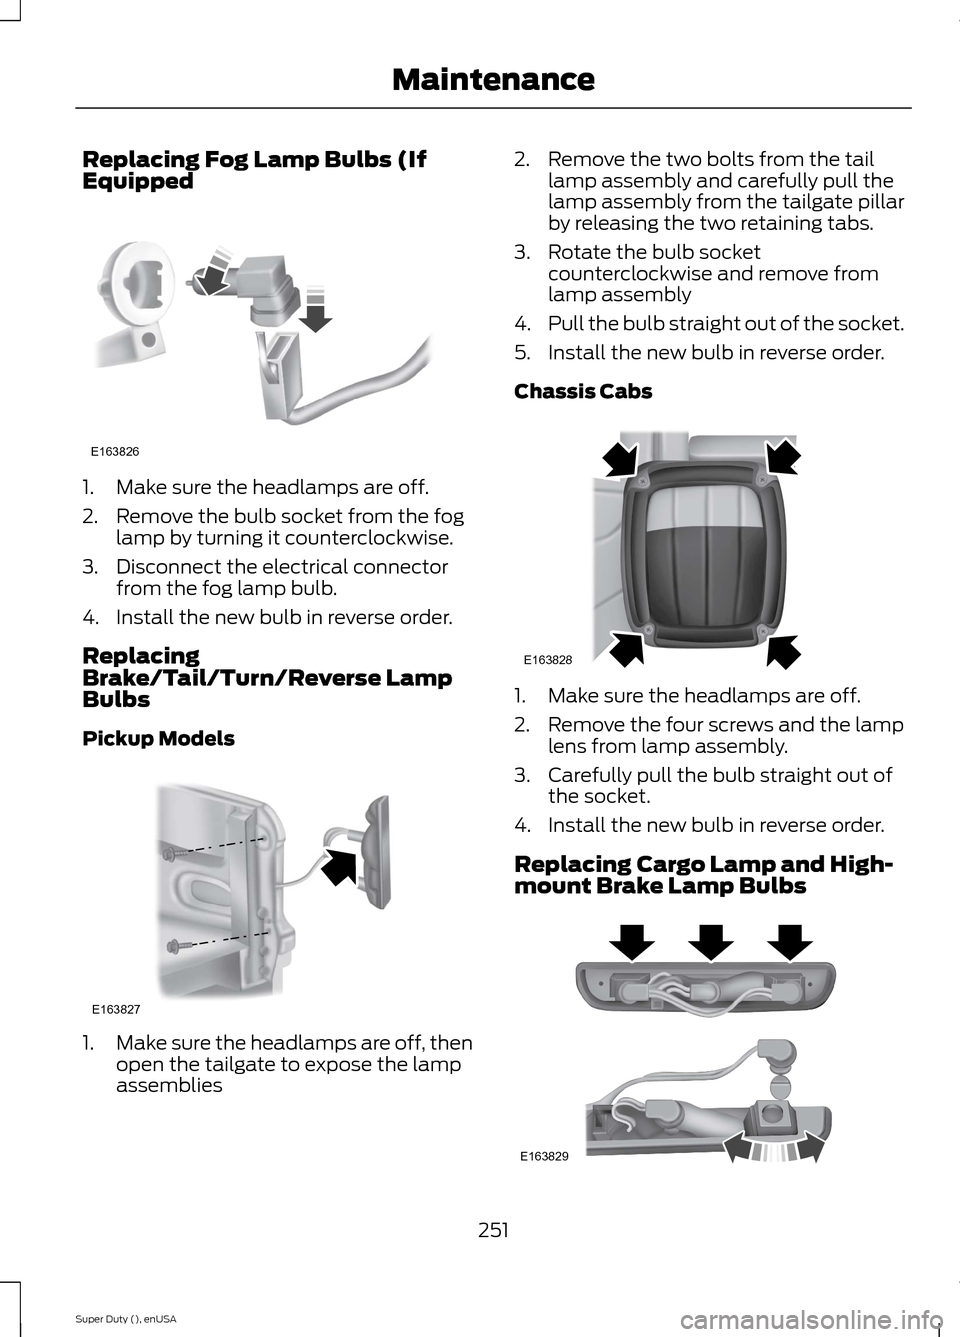
Replacing Front Clearance andIdentification Lamp Bulbs (IfEquipped)
1.Make sure the headlamps are off.
2.Remove the screw and lens from thelamp assembly.
3.Separate the bulb from the bulbsocket.
4.Install the new bulb in reverse order.
250Super Duty (), enUSAMaintenanceE163824 E163825
Page 254 of 470
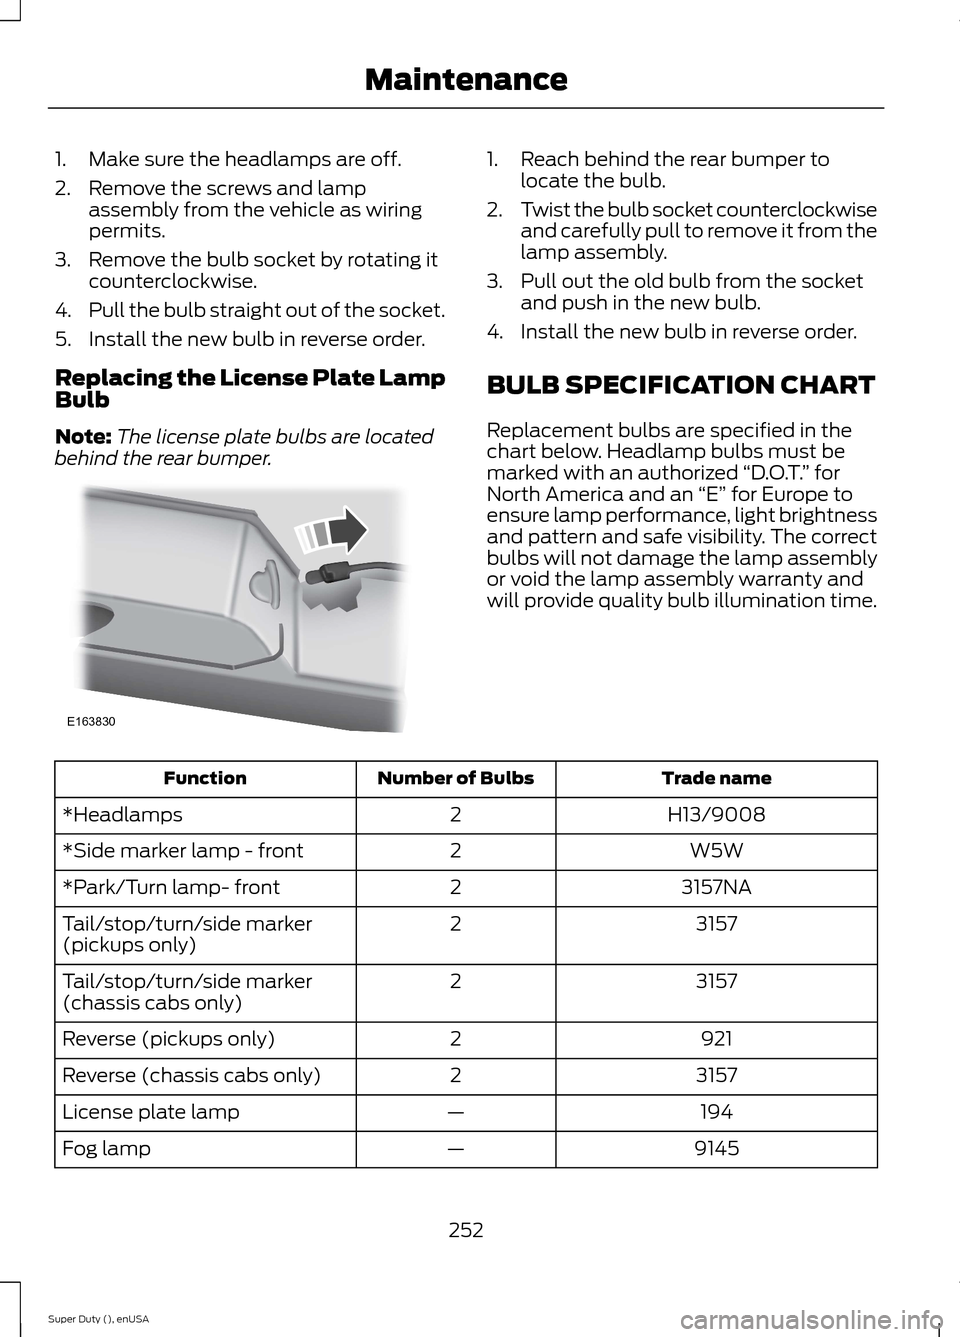
Replacing Fog Lamp Bulbs (IfEquipped
1.Make sure the headlamps are off.
2.Remove the bulb socket from the foglamp by turning it counterclockwise.
3.Disconnect the electrical connectorfrom the fog lamp bulb.
4.Install the new bulb in reverse order.
ReplacingBrake/Tail/Turn/Reverse LampBulbs
Pickup Models
1.Make sure the headlamps are off, thenopen the tailgate to expose the lampassemblies
2.Remove the two bolts from the taillamp assembly and carefully pull thelamp assembly from the tailgate pillarby releasing the two retaining tabs.
3.Rotate the bulb socketcounterclockwise and remove fromlamp assembly
4.Pull the bulb straight out of the socket.
5.Install the new bulb in reverse order.
Chassis Cabs
1.Make sure the headlamps are off.
2.Remove the four screws and the lamplens from lamp assembly.
3.Carefully pull the bulb straight out ofthe socket.
4.Install the new bulb in reverse order.
Replacing Cargo Lamp and High-mount Brake Lamp Bulbs
251Super Duty (), enUSAMaintenanceE163826 E163827 E163828 E163829
Page 255 of 470
1.Make sure the headlamps are off.
2.Remove the screws and lampassembly from the vehicle as wiringpermits.
3.Remove the bulb socket by rotating itcounterclockwise.
4.Pull the bulb straight out of the socket.
5.Install the new bulb in reverse order.
Replacing the License Plate LampBulb
Note:The license plate bulbs are locatedbehind the rear bumper.
1.Reach behind the rear bumper tolocate the bulb.
2.Twist the bulb socket counterclockwiseand carefully pull to remove it from thelamp assembly.
3.Pull out the old bulb from the socketand push in the new bulb.
4.Install the new bulb in reverse order.
BULB SPECIFICATION CHART
Replacement bulbs are specified in thechart below. Headlamp bulbs must bemarked with an authorized “D.O.T.” forNorth America and an “E” for Europe toensure lamp performance, light brightnessand pattern and safe visibility. The correctbulbs will not damage the lamp assemblyor void the lamp assembly warranty andwill provide quality bulb illumination time.
Trade nameNumber of BulbsFunction
H13/90082*Headlamps
W5W2*Side marker lamp - front
3157NA2*Park/Turn lamp- front
31572Tail/stop/turn/side marker(pickups only)
31572Tail/stop/turn/side marker(chassis cabs only)
9212Reverse (pickups only)
31572Reverse (chassis cabs only)
194—License plate lamp
9145—Fog lamp
252Super Duty (), enUSAMaintenanceE163830
Page 257 of 470
CHANGING THE ENGINE AIR
FILTER
WARNINGS
To reduce the risk of vehicle damageand personal burn injuries, do notstart your engine with the air cleanerremoved and do not remove it while theengine is running.
To reduce the risk of vehicle damageand personal burn injuries, do notstart your engine with the air cleanerremoved and do not remove it while theengine is running.
Note:Failure to use the correct air filterelement may result in severe enginedamage. The customer warranty may bevoid for any damage to the engine if thecorrect air filter element is not used.
When changing the air filter element, useonly the air filter element listed. SeeCapacities and Specifications (page301).
Change the air filter element at the properinterval. See Scheduled Maintenance(page 440).
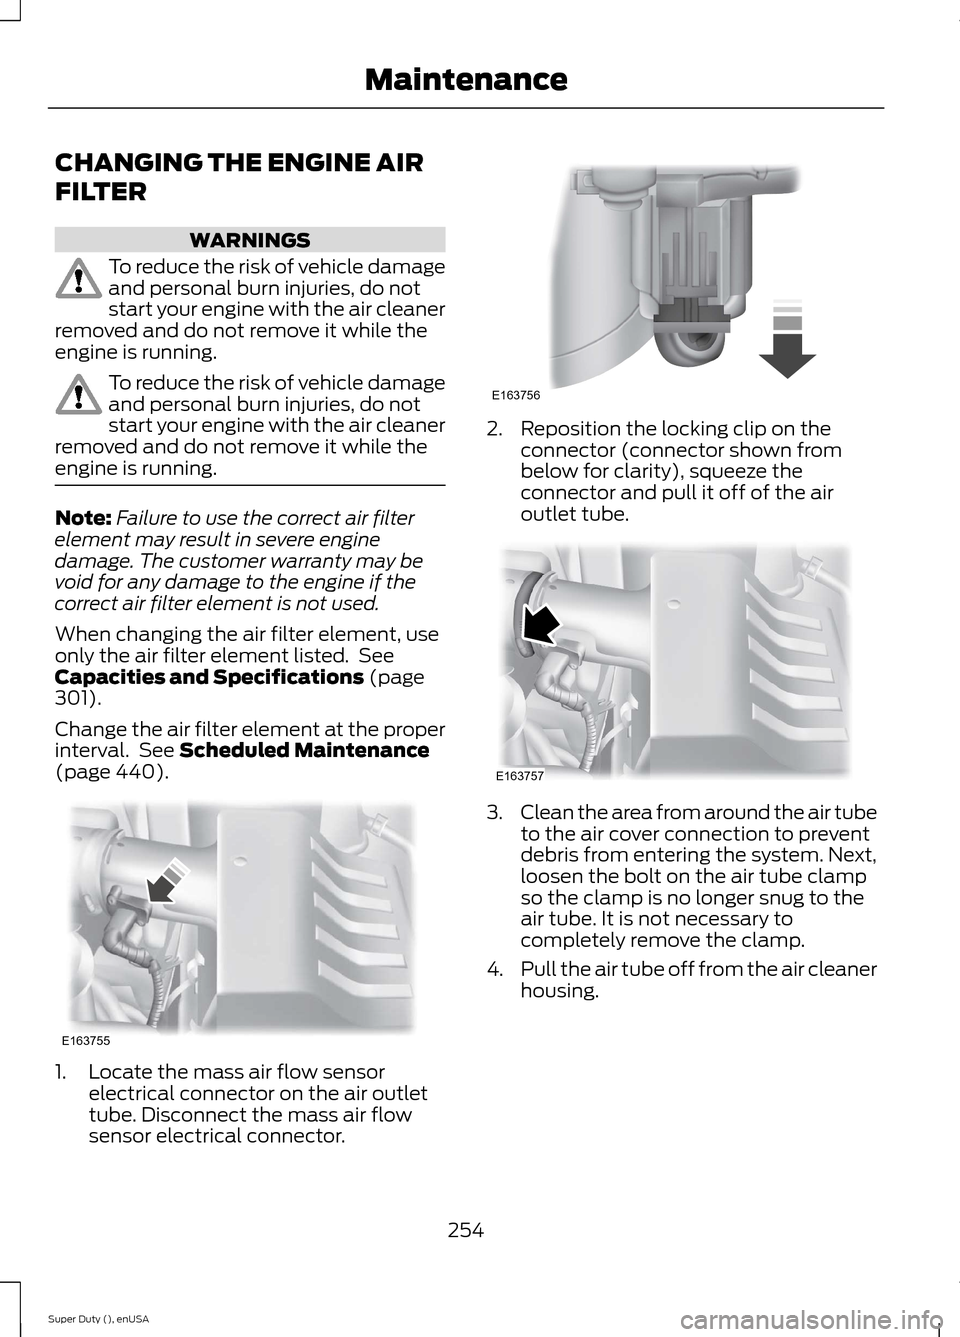
1.Locate the mass air flow sensorelectrical connector on the air outlettube. Disconnect the mass air flowsensor electrical connector.
2.Reposition the locking clip on theconnector (connector shown frombelow for clarity), squeeze theconnector and pull it off of the airoutlet tube.
3.Clean the area from around the air tubeto the air cover connection to preventdebris from entering the system. Next,loosen the bolt on the air tube clampso the clamp is no longer snug to theair tube. It is not necessary tocompletely remove the clamp.
4.Pull the air tube off from the air cleanerhousing.
254Super Duty (), enUSAMaintenanceE163755 E163756 E163757