2015 FORD SUPER DUTY lock
[x] Cancel search: lockPage 191 of 470
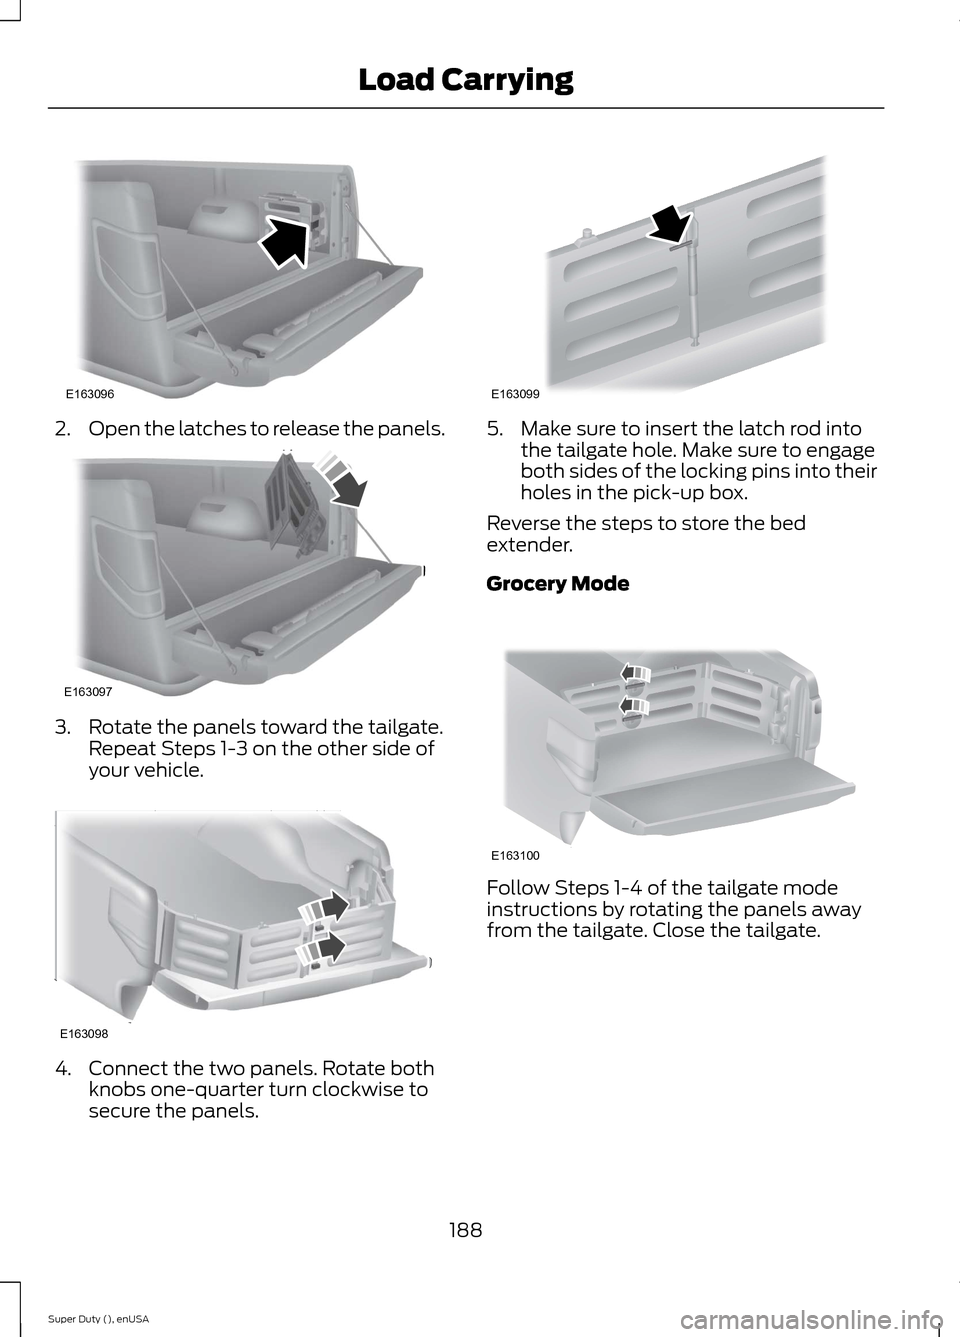
2.Open the latches to release the panels.
3.Rotate the panels toward the tailgate.Repeat Steps 1-3 on the other side ofyour vehicle.
4.Connect the two panels. Rotate bothknobs one-quarter turn clockwise tosecure the panels.
5.Make sure to insert the latch rod intothe tailgate hole. Make sure to engageboth sides of the locking pins into theirholes in the pick-up box.
Reverse the steps to store the bedextender.
Grocery Mode
Follow Steps 1-4 of the tailgate modeinstructions by rotating the panels awayfrom the tailgate. Close the tailgate.
188Super Duty (), enUSALoad CarryingE163096 E163097 E163098 E163099 E163100
Page 196 of 470
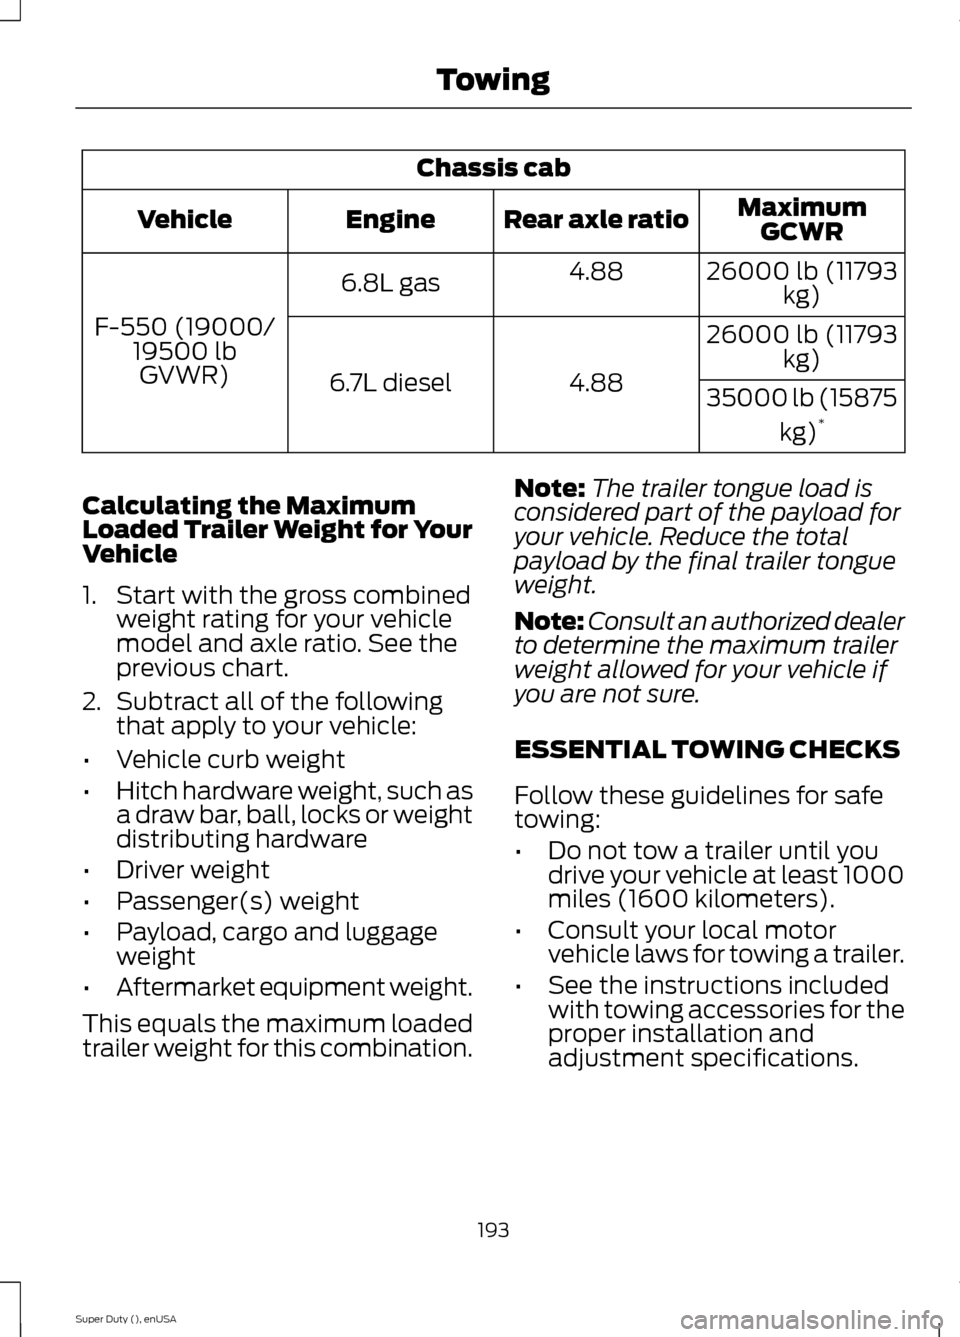
Chassis cab
MaximumGCWRRear axle ratioEngineVehicle
26000 lb (11793kg)4.886.8L gas
F-550 (19000/19500 lbGVWR)
26000 lb (11793kg)
4.886.7L diesel35000 lb (15875
kg)*
Calculating the MaximumLoaded Trailer Weight for YourVehicle
1.Start with the gross combinedweight rating for your vehiclemodel and axle ratio. See theprevious chart.
2.Subtract all of the followingthat apply to your vehicle:
•Vehicle curb weight
•Hitch hardware weight, such asa draw bar, ball, locks or weightdistributing hardware
•Driver weight
•Passenger(s) weight
•Payload, cargo and luggageweight
•Aftermarket equipment weight.
This equals the maximum loadedtrailer weight for this combination.
Note:The trailer tongue load isconsidered part of the payload foryour vehicle. Reduce the totalpayload by the final trailer tongueweight.
Note:Consult an authorized dealerto determine the maximum trailer
weight allowed for your vehicle ifyou are not sure.
ESSENTIAL TOWING CHECKS
Follow these guidelines for safetowing:
•Do not tow a trailer until youdrive your vehicle at least 1000miles (1600 kilometers).
•Consult your local motorvehicle laws for towing a trailer.
•See the instructions includedwith towing accessories for theproper installation andadjustment specifications.
193Super Duty (), enUSATowing
Page 199 of 470
Do not use a hitch that eitherclamps onto the bumper orattaches to the axle. You mustdistribute the load in your trailerso that 10-15% for conventionaltowing or 15-25% for fifth wheeltowing of the total weight of thetrailer is on the tongue.
Weight-distributing Hitches
WARNING
Do not adjust aweight-distributing hitch toany position where the rearbumper of the vehicle is higherthan it was before attaching thetrailer. Doing so will defeat thefunction of the weight-distributinghitch, which may causeunpredictable handling, and could
result in serious personal injury.
When hooking-up a trailer using aweight-distributing hitch, alwaysuse the following procedure:
1.Park the loaded vehicle,without the trailer, on a levelsurface.
2.Measure the height to the topof your vehicle's front wheelopening on the fender. This isH1.
3.Attach the loaded trailer toyour vehicle without theweight-distributing barsconnected.
4.Measure the height to the topof your vehicle's front wheelopening on the fender a secondtime. This is H2.
5.Install and adjust the tensionin the weight-distributing barsso that the height of yourvehicle's front wheel openingon the fender is approximatelyhalfway between H1 and H2.
6.Check that the trailer is level orslightly nose down toward yourvehicle. If not, adjust the ballheight accordingly and repeatSteps 2-6.
Once the trailer is level or slightlynose down toward the vehicle:
•Lock the bar tension adjusterin place.
•Check that the trailer tonguesecurely attaches and locksonto the hitch.
•Install safety chains, lighting,and trailer brake controls asrequired by law or the trailermanufacturer.
Fifth-wheel Trailer Hitch (IfEquipped)
WARNINGS
The mounting pads in the bedare specifically designed forcertain fifth-wheel trailer hitchesand gooseneck ball hitches. Donot use these mounting pads forother purposes. Doing so couldresult in vehicle structural
196Super Duty (), enUSATowing
Page 203 of 470
•TRAILER CONNECTED:Displays when the systemsenses a correct trailer wiringconnection during a givenignition cycle.
•TRAILER DISCONNECTED:Displays, accompanied by asingle audible time, when thesystem senses a trailerconnection and then adisconnection, eitherintentional or unintentional,during a given ignition cycle. Italso displays if a truck ortrailer-wiring fault occurscausing the trailer to appeardisconnected. This messagecan also display if you use themanual control lever without atrailer connected.
Procedure for Adjusting Gain
Note:Only perform this procedurein a traffic-free environment atspeeds of approximately 20-25mph (30-40 km/h).
The gain setting sets the trailerbrake controller for the specifictowing condition. You shouldchange the setting as towingconditions change. Changes totowing conditions include trailerload, vehicle load, road conditionsand weather.
The gain should be set to providethe maximum trailer brakingassistance while making sure thetrailer wheels do not lock whenusing the brakes. Locked trailerwheels may lead to trailerinstability.
1.Make sure the trailer brakes arein good working condition,functioning normally andproperly adjusted. See yourtrailer dealer if necessary.
2.Hook up the trailer and makethe electrical connectionsaccording to the trailermanufacturer's instructions.
3.When you plug in a trailer withelectric orelectric-over-hydraulic brakes,TRAILER CONNECTEDappears in the informationdisplay.
4.Use the gain adjustment (+ and-) buttons to increase ordecrease the gain setting to thedesired starting point. A gainsetting of 6.0 is a good startingpoint for heavier loads.
5.In a traffic-free environment,tow the trailer on a dry, levelsurface at a speed of 20-25mph (30-40 km/h) andsqueeze the manual controllever completely.
6.If the trailer wheels lock up,indicated by squealing tires,reduce the gain setting. If thetrailer wheels turn freely,
increase the gain setting.Repeat Steps 5 and 6 until the
200Super Duty (), enUSATowing
Page 204 of 470
gain setting is at a point justbelow trailer wheel lock-up. Iftowing a heavier trailer, trailerwheel lock-up may not beattainable even with themaximum gain setting of 10.
Initial Output Setting
The trailer brake controller letsyou customize how aggressivelythe trailer brakes engage. Thedefault value is set to “Light”. Werecommend this setting for themajority of trailers. If you are usingan EOH trailer with a high settingvoltage, or if you prefer to feelmore brake feedback from thetrailer, then select “Medium” or“Heavy”.
Trailer Brake Effort Setting
The trailer brake controller allowsthe user to customize howaggressively the trailer brakesengage. The default value is "Low"and is the recommended settingfor most trailers. If your trailer'sbrakes require more initial voltage,or if you prefer more aggressivetrailer braking, then select eitherthe "Medium" or the "High"setting.
Information Display WarningMessages
Note:An authorized dealer candiagnose the trailer brake controllerto determine exactly which trailerfault has occurred. However, yourFord warranty does not cover thisdiagnosis if the fault is with thetrailer.
TRAILER BRAKE MODULEFAULT
Displays in response to faultssensed by the trailer brakecontroller, accompanied by asingle tone. If this messageappears, contact an authorizeddealer as soon as possible fordiagnosis and repair. Thecontroller may still function, but
with degraded performance.
WIRING FAULT ON TRAILER
Displays when there is a shortcircuit on the electric brake outputwire.
If this message displays,accompanied by a single tone,with no trailer connected, theproblem is with your vehicle wiringbetween the trailer brakecontroller and the 7-pin connectorat the bumper.
201Super Duty (), enUSATowing
Page 205 of 470
If the message only displays witha trailer connected, the problemis with the trailer wiring. Consultyour trailer dealer for assistance.This can be a short to ground(such as a chaffed wire), short tovoltage (such as a pulled pin ontrailer emergency breakawaybattery) or the trailer brakes maybe drawing too much current.
Points to Remember
Note:Do not attempt removal ofthe trailer brake controller withoutconsulting the Workshop Manual.Damage to the unit may result.
•Adjust gain setting before usingthe trailer brake controller forthe first time.
•Adjust gain setting, using theprocedure above, wheneverroad, weather and trailer orvehicle loading conditionschange from when the gainwas initially set.
•Only use the manual controllever for proper adjustment ofthe gain during trailer setup.Misuse, such as applicationduring trailer sway, could causeinstability of trailer or towvehicle.
•Avoid towing in adverseweather conditions. The trailerbrake controller does notprovide anti-lock control of thetrailer wheels. Trailer wheelscan lock up on slipperysurfaces, resulting in reducedstability of trailer and towvehicle.
•The trailer brake controller isequipped with a feature thatreduces output at vehiclespeeds below 11 mph (18 km/h)so trailer and vehicle braking isnot jerky or harsh. This featureis only available when applyingthe brakes using your vehicle'sbrake pedal, not the controller.
•The controller interacts withthe brake control system andpowertrain control system ofyour vehicle to provide the bestperformance on different roadconditions.
•Your vehicle's brake systemand the trailer brake systemwork independently of eachother. Changing the gainsetting on the controller doesnot affect the operation of yourvehicle's brakes whether youattach a trailer or not.
202Super Duty (), enUSATowing
Page 209 of 470
•Use a damper device such as a tarp,heavy blanket or piece of carpetdraped over the recovery strap to helpabsorb the energy in the event thestrap breaks.
•Make sure the stuck vehicle is notloaded heavier than its gross vehicleweight rating specified on thecertification label.
•Always align the tow vehicle and stuckvehicle in a straight line (within 10degrees).
•Keep bystanders to the sides of thevehicle, at a distance of at least twicethe length of the recovery strap. Thishelps avoid injury from the hazard of arecovery hook or strap breaking, or avehicle lurching into their path.
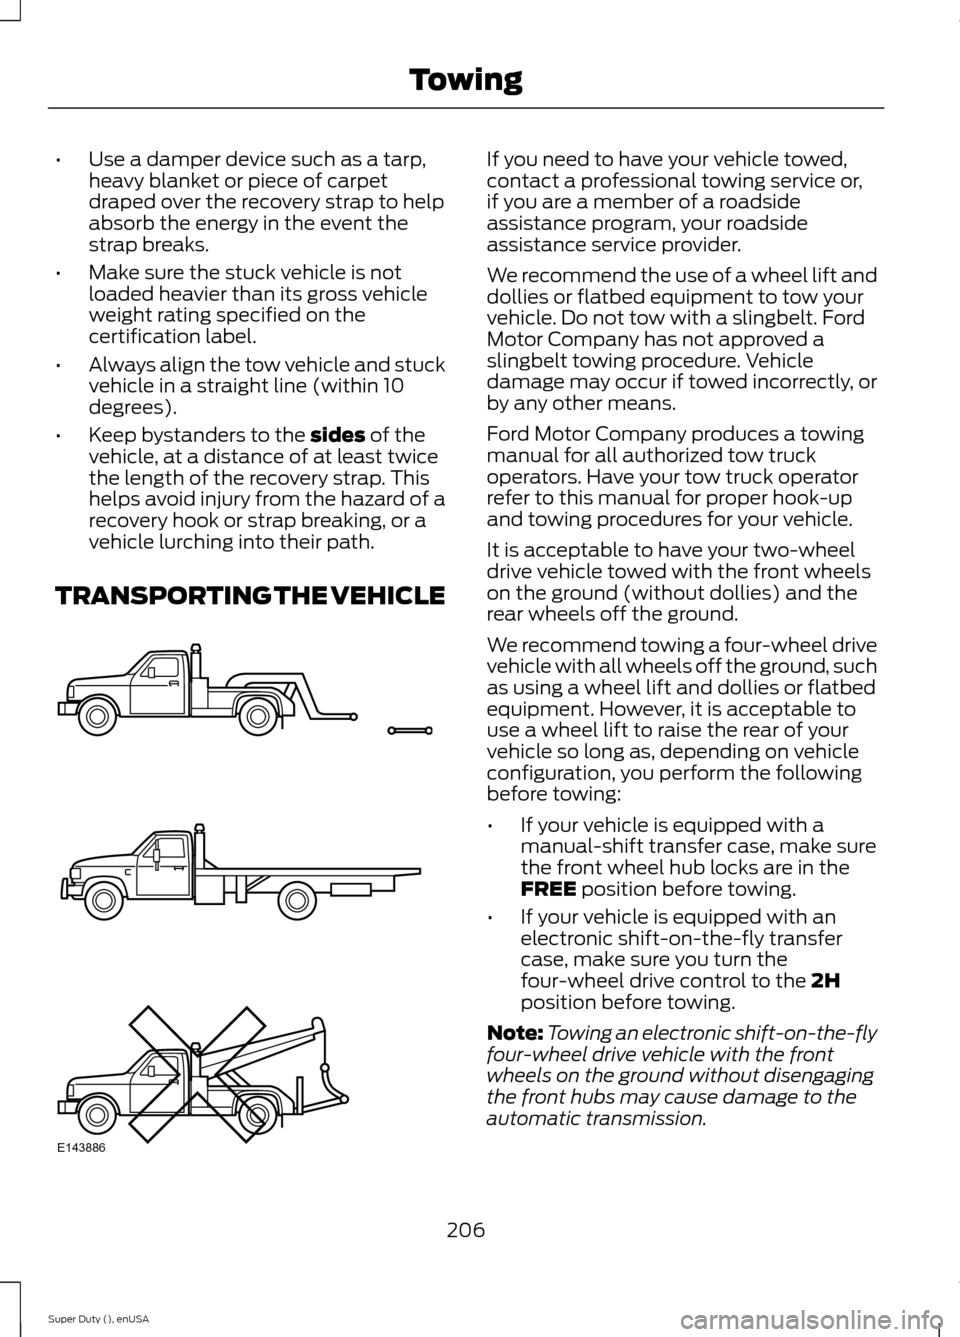
TRANSPORTING THE VEHICLE
If you need to have your vehicle towed,contact a professional towing service or,if you are a member of a roadsideassistance program, your roadsideassistance service provider.
We recommend the use of a wheel lift anddollies or flatbed equipment to tow yourvehicle. Do not tow with a slingbelt. FordMotor Company has not approved aslingbelt towing procedure. Vehicledamage may occur if towed incorrectly, orby any other means.
Ford Motor Company produces a towingmanual for all authorized tow truckoperators. Have your tow truck operatorrefer to this manual for proper hook-upand towing procedures for your vehicle.
It is acceptable to have your two-wheeldrive vehicle towed with the front wheelson the ground (without dollies) and therear wheels off the ground.
We recommend towing a four-wheel drivevehicle with all wheels off the ground, suchas using a wheel lift and dollies or flatbedequipment. However, it is acceptable touse a wheel lift to raise the rear of yourvehicle so long as, depending on vehicleconfiguration, you perform the followingbefore towing:
•If your vehicle is equipped with amanual-shift transfer case, make surethe front wheel hub locks are in theFREE position before towing.
•If your vehicle is equipped with anelectronic shift-on-the-fly transfercase, make sure you turn thefour-wheel drive control to the 2Hposition before towing.
Note:Towing an electronic shift-on-the-flyfour-wheel drive vehicle with the frontwheels on the ground without disengagingthe front hubs may cause damage to theautomatic transmission.
206Super Duty (), enUSATowingE143886
Page 210 of 470
Note:Towing a two-wheel drive vehicle oran electronic shift-on-the-fly four-wheeldrive vehicle with the rear wheels on theground for more than 50 miles (80 km) orfaster than 35 mph (56 km/h) may causedamage to the automatic transmission.
Note:Using wheel lift equipment to tow adual rear wheel vehicle requires removingan outer rear wheel before towing.
TOWING THE VEHICLE ON
FOUR WHEELS
Emergency Towing
If your vehicle becomes inoperable(without access to wheel dollies,car-hauling trailer, or flatbed transportvehicle), it can be flat-towed (all wheelson the ground, regardless of the powertrainand transmission configuration) under thefollowing conditions:
•Your vehicle is facing forward fortowing in a forward direction.
•Place the transmission in position N. Ifyou cannot move the transmission intoN, you may need to override it. SeeTransmission (page 144).
•Maximum speed is 35 mph (56 km/h).
•Maximum distance is 50 miles (80kilometers).
Recreational Towing
Note:Put your climate control system inrecirculated air mode to prevent exhaustfumes from entering your vehicle. SeeClimate Control (page 103).
Follow these guidelines if you have a needfor recreational towing, such as towingyour vehicle behind a motorhome. Wedesigned these guidelines to preventdamage to your transmission.
Two-wheel Drive Vehicles andFour-wheel Drive Vehicles Equippedwith an Electronic-shift Transfer Case
Do not tow your vehicle with any wheelson the ground, as vehicle or transmissiondamage may occur. It is recommended totow your vehicle with all four (4) wheelsoff the ground, such as when using acar-hauling trailer. Otherwise, you cannottow your vehicle.
Four-wheel Drive Vehicles Equippedwith a Manual-shift Transfer Case
1.Put the transmission in position N.
2.Put the transfer case in position N.
3.Put the hub locks in the FREE position.Always make sure that both hub locksare set to the same position.
207Super Duty (), enUSATowing