Page 89 of 282

Applies to vehicles: with 5 tronic transmiss ion/ shi ft padd les
The tiptronic allow the driver to shift t")
....,
N
0 > co
rl I.O
"'
"'
"'
rl
Shifting manually (tiptronic mode)
Applies to vehicles: with 5 tronic transmiss ion/ shi ft padd les
The tiptronic allow the driver to shift the gears
manually.
Fig. 75 Center c_onso le: manual shi fting wi th the selec tor
lever
Fig. 76 Steering wheel: manual shi fting with t he shift pad
d les*
Shifting with the selector lever
You can shift into tiptronic mode while stationary
and while driv ing.
• To shift into tip tron ic mode, push the selector
lever from the D/S setting to the right in the
tiptron ic shift gate. Once the transmission has
switched modes, the selecto r lever position
M
is shown in the instrument cluster display
r:::> page 82, fig. 72 . For example M4, means the
fourth gear is engaged.
• To shift up a gear, tap the selector lever for
ward
0 r:::> fig . 75.
• To shift down a gear, tap the selector lever to
back
0 -
Shifting with the shift paddles*
You can operate the shift paddles in the D/S or M
(tiptronic shift gate) selector lever positions.
Automatic transmission
• To shift up one gear, tap the shift padd le 0
r:::> fig. 76.
• To shift down one gear, tap the shift paddle 0 -
If the shift paddles are tapped while in the D/S
selector lever position, automatic mode switches
off briefly. To switch from manually shifting back
to automatic shifting immediately, tap the shift paddle
0 ¢ fig. 76 for 1 second.
To keep shifting using the shift paddles, move the
selector lever to the right out of the D/S position
into the t iptron ic shift gate.
T he transmission automatically shifts up or down
before critical engine speed is reached.
The transmission only allows manual shifting
whe n the engine speed is within the permitted
range.
(0 Tips
- If you shift to the next lowest gear, the
transmission will only shift if the engine will
not be over-revved.
- With kick-down, the transmission shifts to a
lower gear, depending on vehicle speed and
engine speed.
- tiptronic does not work if the transmission
is running in emergency mode .
Kick-down
Applies to vehicles: wit h S tronic transm issio n
Kick-down enables maximum acceleration.
When you press the accelerator pedal down be
yond the resistance point , the automatic trans
mission downsh ifts into a lower gear, depending
on veh icle speed and engine RPM.
It shifts up in
to the next higher gear once the maxim um speci
fied eng ine RPM is reached.
A WARNING ~
Please note that the whee ls cou ld spin on
slick or slippery roads when kick-down is ac
tive .
-
87
Page 90 of 282

Automatic transmission
Launch Control-Program
Applie s to v ehi cles: w ith launch control
The Launch Control Program enables maximum
acceleration .
Requirement: The engine must be at operating
temperature and t he steering wheel must not be
turned.
.,. With the engine running, press the
!~OFFI but
ton briefly one time
l) .
.,. Pull the selector lever back out of the O/S posi
tion briefly to select the S position, or press it
toward the right into the tiptronic position or
select the
Dynamic driving mode in drive se
lect*
~page 112.
.,. Press the brake pedal firmly with your left foot
and hold it all the way down for at least 1 sec
ond.
.,. At the same time, press the gas pedal all the
way down with your right foot until the engine
reaches and stays at a high RPM level.
.,. Remove your left foot from the brake.
_.&. WARNING
- Always adapt your driving to the traffic flow.
- Only use Launch Control when road and traf-
fic conditions allow it and other drivers will
not be endangered or impacted by your driv
ing and the vehicle's acceleration.
- Please note that the drive wheels can spin
and the vehicle can break away when sport
mode is switched on, especially when the
road is slippery.
- Once the vehicle has started moving, press
the
l .1'3 OFF ! button briefly to turn the sport
mode off.
(D Tips
- The transmission temperature may increase
significantly after using the launch control program. If that happens, the program may
1l In vehicles w ith a d rive r infor matio n syste m, a n ESC light
in t he instrument clus ter s tays o n co ntinuo usly and t he
message
Stabilization control (ESC): sport. Warning! Re·
stricted stability
appears temporarily.
88
not be available for a few minutes. It will be
available again after a cool-down period.
- When accelerating using the launch control
program, all vehicle parts are subject to
heavy loads. This can lead to increased wear.
Emergency mode
App lies to vehicles : wi th S t ro ni c t ra nsmi ssio n
In the event of a system malfunction, there is an
emergency program .
If all of the selector lever positions are highlight
ed with a light background in the instrument
cluster display, there is a system malfunction and
the S tronic transmission is running in the emer
gency program. The vehicle can still be driven in
emergency mode, but only with reduced speed
and not in all gears. In some cases, the vehicle
cannot drive in reverse .
(D Note
If the transmission runs in emergency mode,
drive to an authorized Audi dealer or author
ized Audi Service Facility immediately to have
the malfunction corrected.
Transmission malfunction
• Transmission malfunction! Please stop the
vehicle and select P
There is a malfunction in the transmission. Park
the vehicle securely and do not continue driving.
See an authorized Audi dealer or authorized Audi
Service Facility for assistance.
• Transmission overheating! Please stop the
vehicle!
The transmission is too hot and can become dam
aged. Stop and let the transmission cool with the
engine running (at idle) in the P selector lever po
sition. Then the indicator light and the message
turn off, drive to an authorized Audi dealer or au
thorized Audi Service Facility immediately to have.,.
Page 91 of 282

....,
N
0 > co
rl I.O
the malfunction corrected. If the indicator light
and the driver message do not turn off, do not
continue dr iv ing. See an authorized Audi dealer
or authorized Audi Service Facility for assistance .
rm Transmission malfunction: you can continue
driving
Drive to an authorized Aud i dealer or authorized
Aud i Service Facility immediately to have the
malfunction corrected.
rm Transmission malfunction: no reverse gear
(you can continue driving)
Drive to an authorized Aud i dealer or authorized
Audi Service Fac ility immediately to have the
malfunction corrected.
rm Transmission malfunction: You can continue
driving in D until engine off
Drive the vehicle away from moving traffic and
park. See an authorized Audi dealer or authorized
Audi Service Fac ility for assistance.
rm Transmission overheating! Please adapt
driving style
Continue driving moderate ly. When the indicator
light turns off, you can continue driving normally.
rm Transmission: Please press brake pedal and
select gear again
If the transmission malfunctions because the
temperature is too high, a message appears
when the transmission is coo led.
Selector lever emergency re lease
Appl ies to vehicles: with S tronic transm ission
If the vehicle's power supply foils, the selector
lever can be released in an emergency.
"'
"'
"' Fig. 77 Selector lever: removing the cove r rl
Automatic transmission
Fig. 78 Selector lever: u sing the emergency release to
move out of the Park position
The emergency release mechanism is located in
the right area under the selector lever shift gate.
Using the emergency release can be complicated.
We recommend contacting your authorized Audi dealer for assistance, if necessary.
The screwdriver from the vehicle too l kit located
in the luggage compartment is needed to for the
emergency release
c> page 241. Use the flat side
of the reversible screwdriver blade .
Removing the selector lever cover
.. Set the parking brake «Ell c> A to secure your
vehicle from rolling.
.. Insert the flat side of the screwdriver s ideways
in the slot near the shift cover and pry the shift
cover up ¢
fig. 77 .
.. Pull up the co rners of the sh ift cover carefully
with your hands and fo ld it over the shifter
knob ¢
fig. 78.
Selector lever emergency release
.. Press and hold the yellow release button with
the screwdriver ¢
fig. 78.
.. Press the release button in the selector lever ®
and
move the lever into the N position.
.. Clip the shift cover back into the shift gate after
using the emergency release.
If the vehicle must be pushed or towed due to a
power failure (for example, the battery is dead),
the selector lever must first be
moved to the N
position using the emergency release mecha
nism .
89
Page 92 of 282
Automatic transmi ssion
A WARNING
Only move the se lector lever out of the P posi
tion when the parking brake is set . If that
does not work, secure the vehicle w ith the
brake pedal. Otherw ise, the vehicle could
start to move uni ntentionally when the sele c
t o r l ever is moved out of the P pos ition.
90
Page 93 of 282
 ..,.,
..,.,
..,., ,....,
Trailer mode Driving with a trailer
General information
Your Audi was designed primarily for passenger
transportation .
If you plan to")
M N
0 > co ,...., \!) ..,.,
..,.,
..,., ,....,
Trailer mode Driving with a trailer
General information
Your Audi was designed primarily for passenger
transportation .
If you plan to tow a tra iler, p lease remember that
the additiona l load will affect d urability, econo
my and performance .
T railer towing not on ly places more stress on the
vehicle, it a lso calls for more concentrat ion from
the dr iver .
F or this reason, a lways fo llow the operating and
d riving instructions provided and use common
sense.
Technical requirements
Traile r hitch
Use a weight-carrying hitch conforming to the
gross trailer we ight. The hitch must be suitable
for your vehicle and trai ler and must be mounted
securely on the veh icle 's chassis at a technically
sound
location . Use on ly a tra iler hitc h with a re
movable ba ll mou nt. Always chec k w ith the t ra il
e r hitch m anu fac tur er to make sure that you a re
using the co rrec t hitch.
Do not use a bumper hitch .
The hitch must be installed in such a way that it
does not i nterfere wit h the impact -absorbi ng
bumper system. No mod ificat ions should b e
mad e to the vehicle exhaust and brake systems .
Fr om time to t ime, c hec k t hat a ll h itch mou nti ng
bo lts remain sec urely fastened .
When you are no t tow ing a trailer,
remove the
trai ler hitch ball mount . Th is prevents the hitc h
fr om caus ing damage should you r vehicle be
s truck from behind~,&. .
Trailer brakes
If yo ur tra iler is equipped w it h a braking system,
check to be s ure that it conforms to all regu la
tions.
Trailer mode
T he trailer hyd raulic brake system must not be di
rect ly connected to the ve hicle's hydraulic b rake
system .
Safety chains
Always use s afe ty chains be tween your ve hicle
and the tra ile r.
Trailer lights
Tra ile r li ghts must meet all regulations. Be sure
to check w it h your Aud i dea le r fo r corr ect w irin g,
swi tches and relays.
Mirrors
If you a re unable to see the traffic behind you us
i ng the regular o uts ide mirrors, then you
must in
sta ll extended mirrors .
It is importa nt that you
always have clea r vision to the rea r.
_&. WARNING
Afte r removing the trailer hit ch, d o no t store
i t in yo ur vehicle. In ca se of sudden br akin g,
the hitch could fly fo rward and inju re you or
your passengers.
Operating instructions
Maximum traile r weight
A trai le r fo r you r vehicle is limited to a typi cal
class 1 or class 2 trai le r.
Trailer load distribution
B e sure the load in the t raile r is held secure ly in
pla ce to p revent it from shift ing forward, back
ward or sideways .
Never allow a pas senger to ride in a trailer~.&.
in Driving instructions on page 92.
Engine cooling system
Towing a trailer makes the engine work harder . It
is important tha t the cooling system 's pe rform
ance is up to the additional load. Make s ure that
the coo ling system has enoug h flu id.
Tire pressure
When towing a trailer, inflate the tires of your ve-
hicle to the cold tire pressure listed under "Full
lilJJ..
91
Page 94 of 282
. Inflate
trailer tires to trailer and tire manufacturers
specifications.")
Trailer mode
load" on the label located on the driver's side B
pillar (visible when the door is open). Inflate
trailer tires to trailer and tire manufacturers'
specifications.
Lights
Check to make sure both vehicle and trailer lights
are working properly.
Safety chains
Be sure tra iler safety cha ins are properly connect
ed from the trailer to the hitch on the vehicle.
L eave enough slack in the chains to permit turn
ing corners. When you install safety chains, make
sure they will not drag on the road when you are
driving .
The chains should cross under the trai ler tongue
to prevent it from dropping in case of separation
from the hitch .
Driving instructions
Driving with a trailer always requires extra care
and consideration .
To obta in the best poss ible handling of vehicle
and trailer, please note the following:
.,. Do not tow a loaded tra iler when your car itself
is not loaded.
.. Be especia lly careful when passing other
vehicles.
.. Observe speed limits .
.. Do not drive at the maximum permissible
speed.
.. Always apply brakes early.
.. Monitor the temperature gauge.
Weight distribution
Towing a loaded trai ler with an empty car results
in a high ly unstable distribution of weight. If this
cannot be avoided, drive at very low speeds only
to avoid the risk of losing steering control.
A "balanced" rig is easie r to operate and control.
This means that the tow vehicle should be loaded
to the extent possible and permissible, while
keeping the trailer as light as poss ible under the
circumstances. Whenever possible, transfer
some cargo to the luggage compartment of the
92
tow vehicle while observing tongue load require
ments and vehicle loading considerations.
Speed
The higher the speed, the more diff icult it be
comes for the driver to control the rig. Do not
drive at the maximum permissible speed. Reduce
your speed even more if load, weather or wind
conditions are unfavorab le -particularly when
going downh ill.
Reduce veh icle speed
immediately if the trailer
shows the slightest sign of swaying .
Do not try
to stop the swaying by accelerating.
Observe speed limits. In some areas, speeds for
vehicles towing tra ile rs are lower than fo r regular
vehicles .
Always apply brakes early. When driving down
hill, shift int o a lo wer gear to use the eng ine
braking effect to slow the vehicle . Use of the
brakes alone can cause them to overheat and fail.
Coolant temperature
The coolant temperature gauge¢ page 12 must
be obse rved carefully. The coolant temperature
can increase if you dr ive on long inclines in a low
gear at high engine speeds . Reduce your speed
immediately if the LEDs in the top part of the dis
play turn on .
For more information abo ut ind icator lights, re
fer to. ¢
page 19 .
A WARNING
-
Anyone not properly restrained in a moving
vehicle is at a much greater risk in an acci
dent. Never let anyone ride in your car who is
not proper ly wearing the restraints provided
by Aud i.
Trailer mode notes
Important to know
Your vehicle handles differently when towing a
trai ler because of the additiona l weight and dif
ferent weight distribution . Safety, performance
and economy will greatly depend on how careful-
ly you load your trailer and operate your r ig. ..,.
Page 95 of 282
 1.11
1.11
1.11
,....,
Before you actually tow your trailer, practice
turning, stopping and backing up in an area away
from traffic. Keep practicing until yo")
M N
0 > co ,...., \!) 1.1'1
1.1'1
1.1'1
,....,
Before you actually tow your trailer, practice
turning, stopping and backing up in an area away
from traffic. Keep practicing until you have be
come completely fami liar with the way your ve hi
cle-trailer combination behaves and responds.
Backing up is d iff icu lt and requires practice . Back
i ng up w ith a trailer generally req uires steering
action oppos ite to that when backing up yo ur ve
hi cle without a trailer.
M aintain a g reater distance betwee n your vehicle
and the one in front of yo u. You w ill need more
room to stop. To compensate for the tra iler, you
will need a larger than norma l turning radius.
When passing, remember that yo u cannot acce l
erate as fast as yo u normally would because of
the added load. Make sure you have enough room
to pass. After passing, allow plenty of room for
your trailer before changing lanes again.
Avoid jerky sta rts, sharp turns or rapid lane
changes.
@ Tips
- Do not tow a tra ile r during the break-in peri
od of yo ur vehicle.
- If yo u tow a t railer, you r A udi may require
more frequent ma intenance due to the ex
tra load
~ page 262.
Parking on a slope
Do not park on a slope with a trailer . If it cannot
be avoided, do so only after doing the following:
When parking:
.. Apply the foo t brake .
.. Have someone pla ce chocks under bo th t he ve
hicle and the trailer wheels .
.. With c hocks i n place, s lowly re lease the brakes
u nti l the whee l chocks absorb the load .
.. Turn the wheels towards the c urb .
.. Apply the parking brake .
.. Se lect the P selector lever pos ition.
When restarting after parking :
.. Apply the foot brake .
.. Start the eng ine.
.. Se lect the D/S selector lever posit ion.
Trailer mode
.. Release the pa rking brake and s lowly pull out
an d away from the wheel chocks .
.. Stop and have someone retr ieve the wheel
chocks.
(D Tips
If you move the selector leve r of the automat
i c transm iss ion to P before app ly ing the park
i ng brake and before blocking the wheels, you
may have to use mo re force later to move the
l ever out of the P posit ion.
93
Page 96 of 282

Assist
Assist Electronic speed limiter*
Applies to veh icles: with electronic speed limiter
Your vehicle may be factory equipped with ti res
that are rated for a maximum speed of 130 mph
(210 km/h) . T his is less than the maximum speed
of your vehicle . To reduce the risk of sudden tire
failure and loss of control if the vehicle is operat
ed at excessive speeds, your vehicle also has an
electronic speed limiter. The electronic speed
limiter prevents your vehicle from going faster
than the tir e speed rat ing . For more information
~page 221.
If the engine control unit receives faulty vehicle
road speed signals, the Malfunction Indicator
Lamp (MIL)
¢4 will illuminate . If this occurs,
contact the nearest a utho rized Audi dealer for as
sistance .
A WARNING
Always observe the posted speed limits and
adjust your speed to suit prevailing road, traf
fic and weather conditions . Never drive your
vehicle faster than the maximum speed rating of the tires installed.
Speed warning system
Introduction
The speed warning system helps you to stay un
der a specified maximum speed.
-
The speed warning system warns you if you are
exceeding the maximum speed that you have set .
You will hear a warning tone when your speed ex
ceeds the stored value by approximately 3 mph
(3 km/h) . Th e. (USA models)/. (Canada
models) indicator light and the message
Speed
limit exceeded!
appear in the instrument cluster
disp lay at the same time . The ./. indicator
light turns off when the speed decreases below
the stored maximum speed.
Setting a thresho ld is recommended if you would
like to be reminded when you re ach a certain
maximum speed. Situations where you may want
to do so include driving in a country with a gener-
94
al speed limit or if there is a specified maximum
speed for winter tires.
(D Tips
Regardless of the speed warning system, you
should always monitor your speed using the
speedometer and make sure you are following
the legal speed limit .
Setting the threshold
You can set, change and delete the threshold in
the MMI.
.. Select: the I MENU I button >Car> Systems*
contro l button > Driver assistance > Speed
warning.
You can set any threshold between 20 mph
(30 km/h) and 150 mph (240 km/h) . Settings
can each be adjusted in increments of 6 mph
(10 km/h).
Cruise control system
· Description
Applies to vehicles: with cruise control system
The cruise control system makes it poss ible to
drive at a constant speed starting at 15 mph
(20 km/h).
The speed is kept constant by modify ing engine
power or through an act ive brake intervention.
A WARNING
- Always pay attention to the traffic around
you when the cruise control is in operation.
You are a lways responsible for your speed
and the distance between your vehicle and
other vehicles.
- For reasons of safety, cruise contro l should
not be used in the city, in stop-and-go traf
fic, on winding roads and when road condi tions are poor (such as ice, fog, gravel,
heavy rain and hydroplaning) -you could
have an accident .
- Switch the cruise control off temporarily
when driv ing in turning lanes, highway exits
or in construction zones .
-
 1
1 2
2 3
3 4
4 5
5 6
6 7
7 8
8 9
9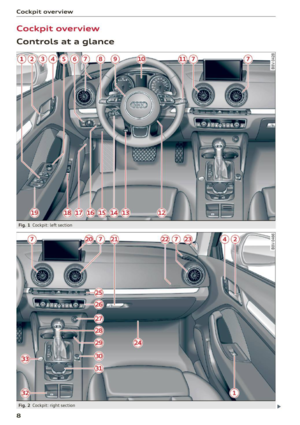 10
10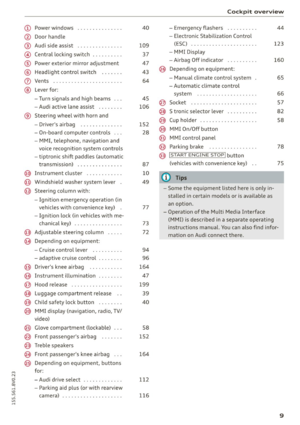 11
11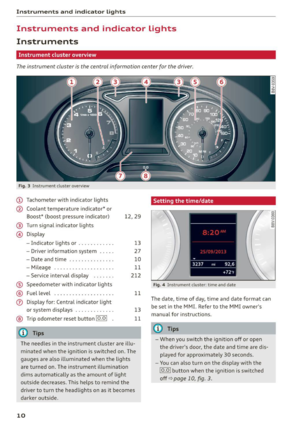 12
12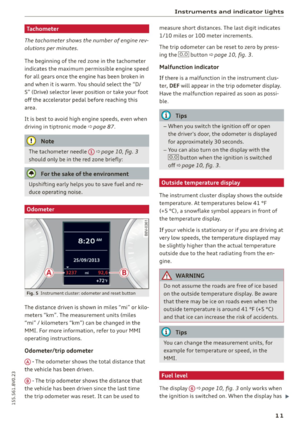 13
13 14
14 15
15 16
16 17
17 18
18 19
19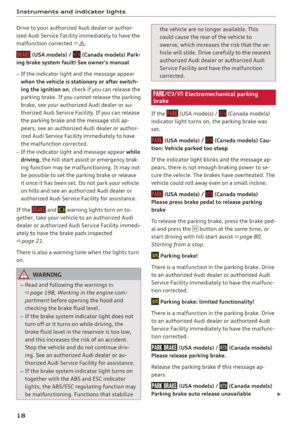 20
20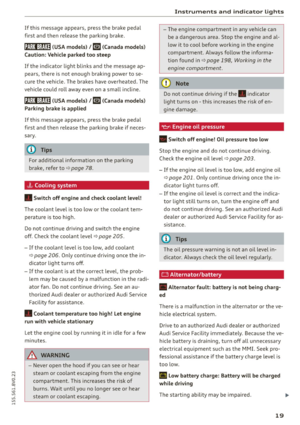 21
21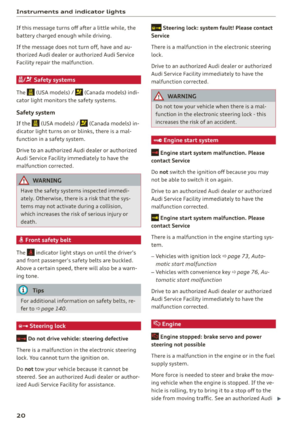 22
22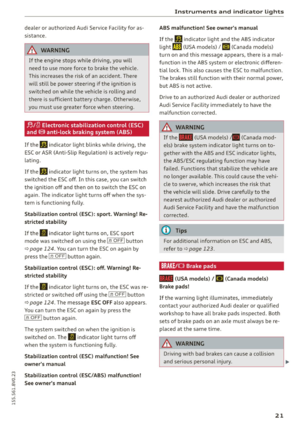 23
23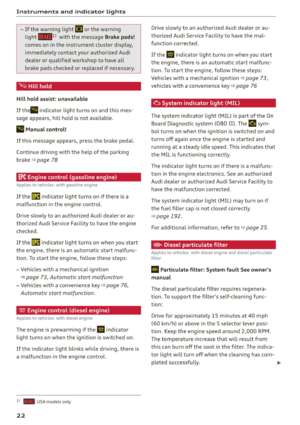 24
24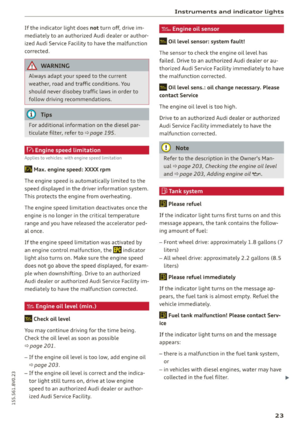 25
25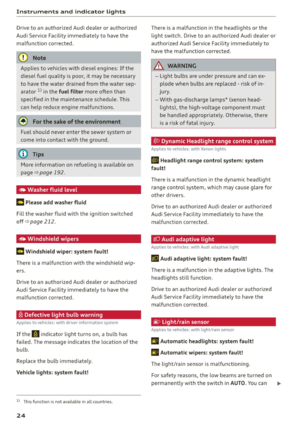 26
26 27
27 28
28 29
29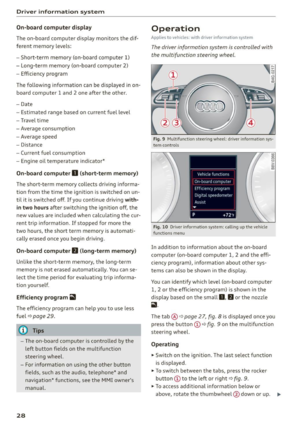 30
30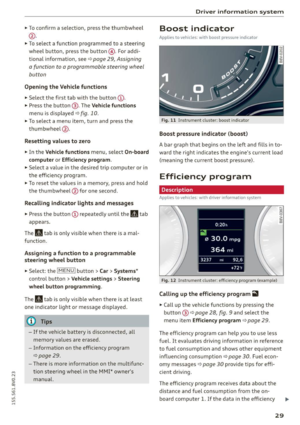 31
31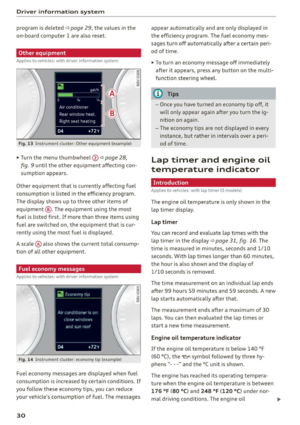 32
32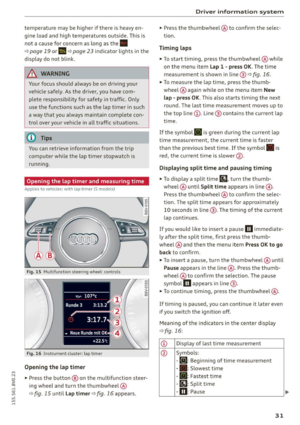 33
33 34
34 35
35 36
36 37
37 38
38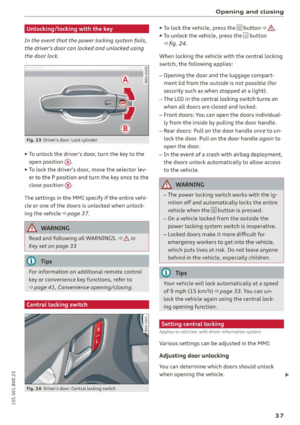 39
39 40
40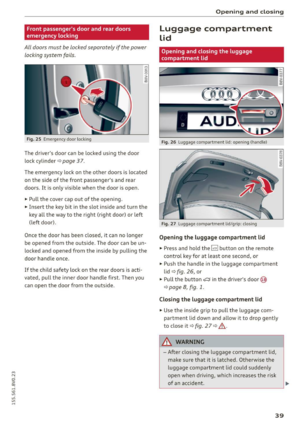 41
41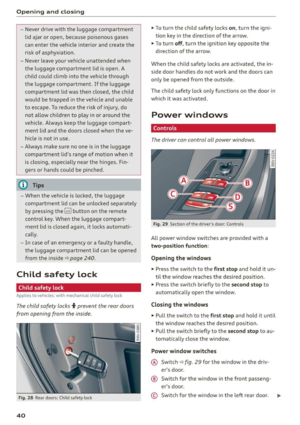 42
42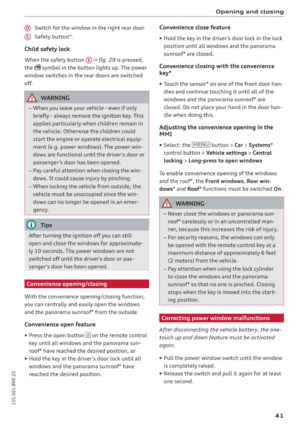 43
43 44
44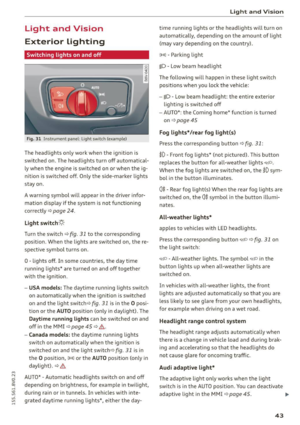 45
45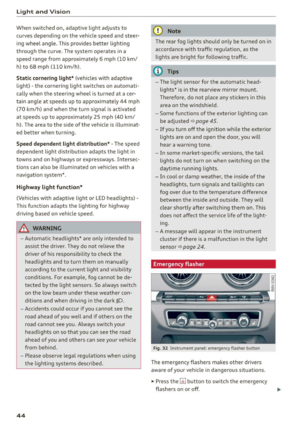 46
46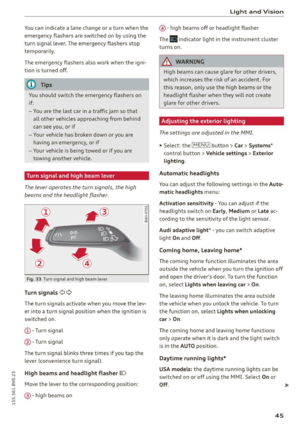 47
47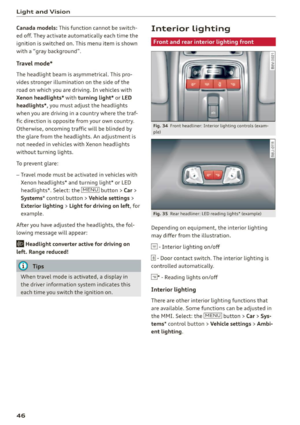 48
48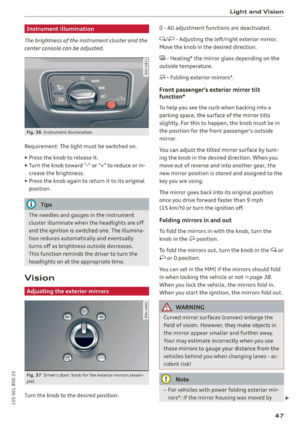 49
49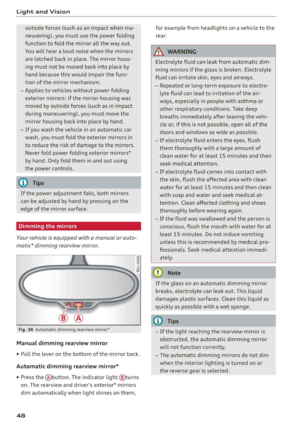 50
50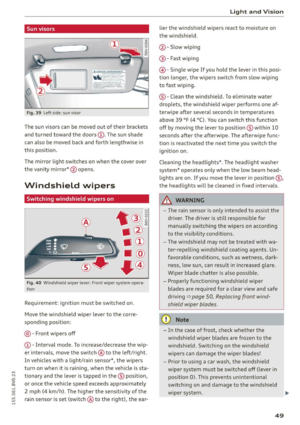 51
51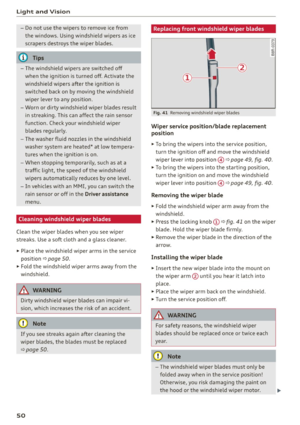 52
52 53
53 54
54 55
55 56
56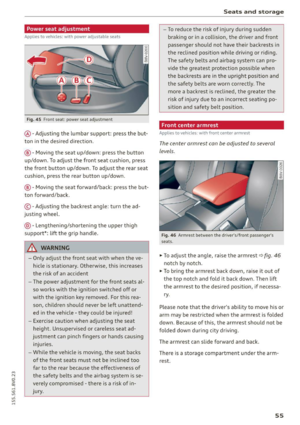 57
57 58
58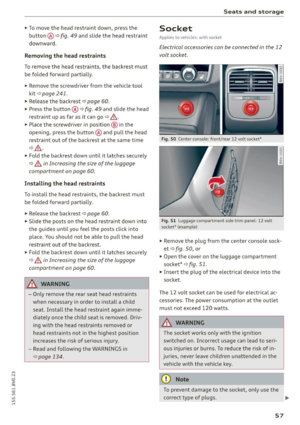 59
59 60
60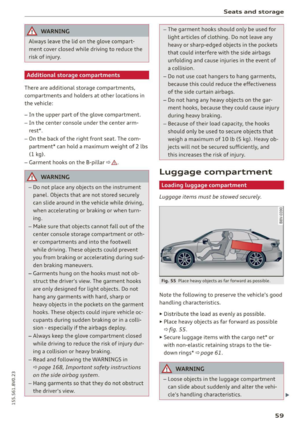 61
61 62
62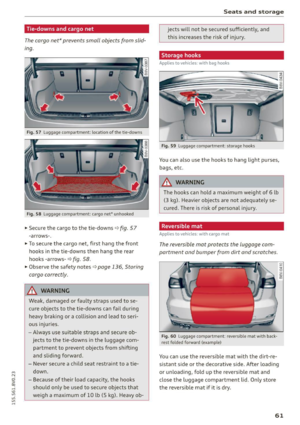 63
63 64
64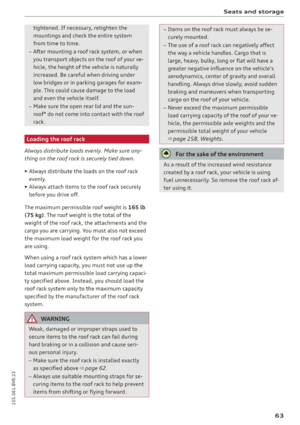 65
65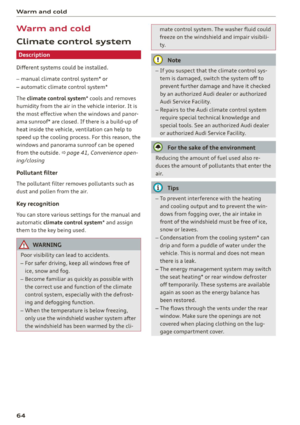 66
66 67
67 68
68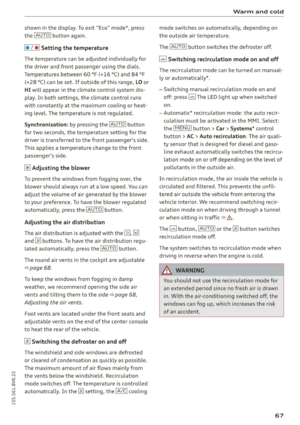 69
69 70
70 71
71 72
72 73
73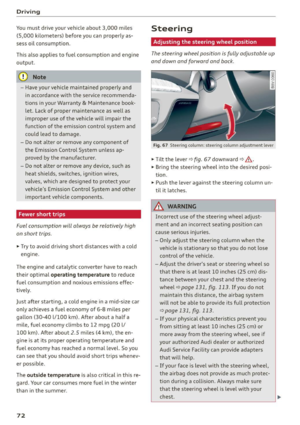 74
74 75
75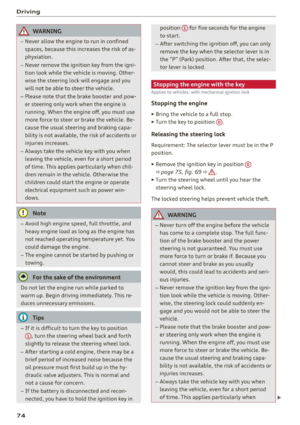 76
76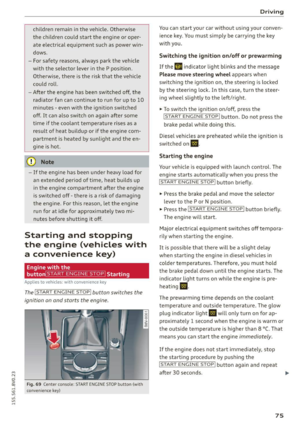 77
77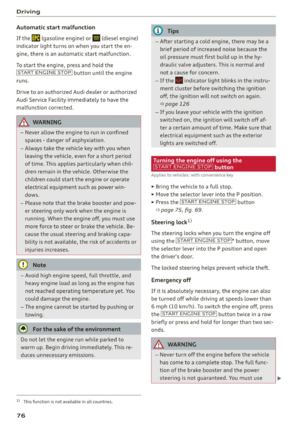 78
78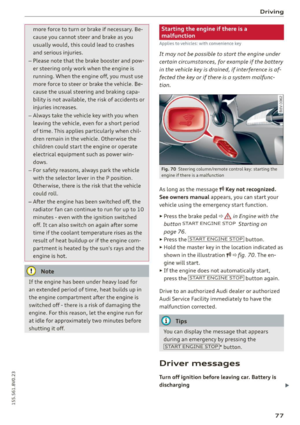 79
79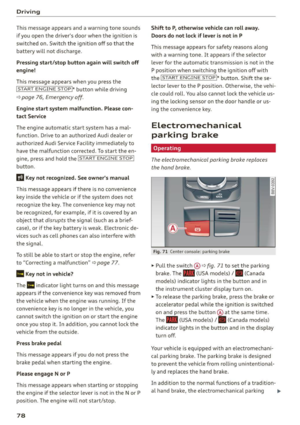 80
80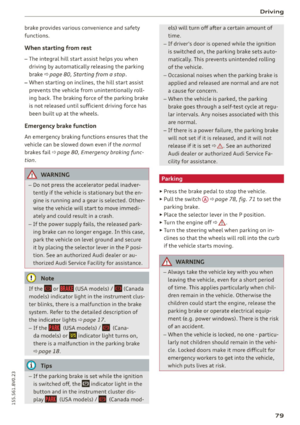 81
81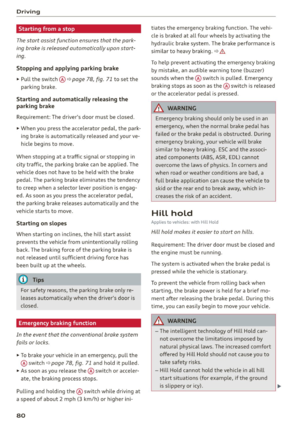 82
82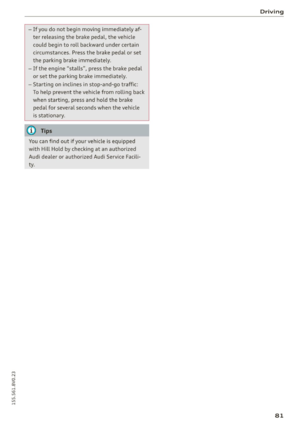 83
83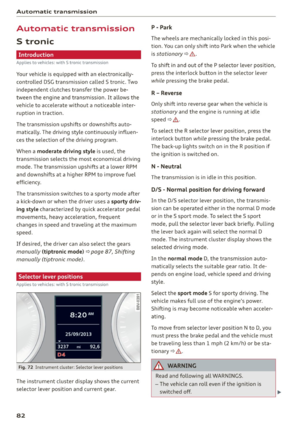 84
84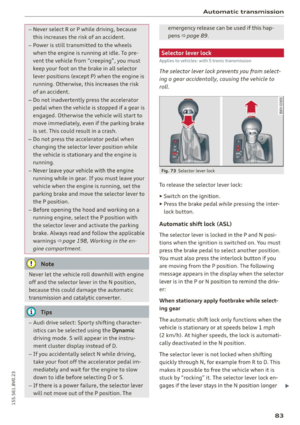 85
85 86
86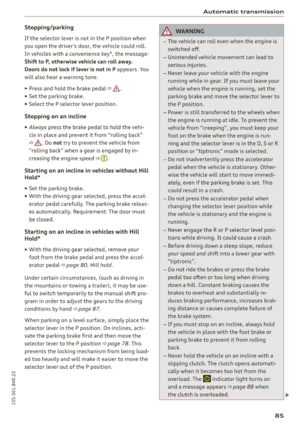 87
87 88
88 89
89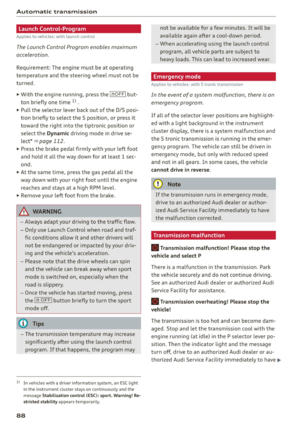 90
90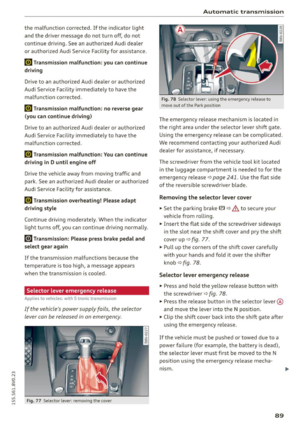 91
91 92
92 93
93 94
94 95
95 96
96 97
97 98
98 99
99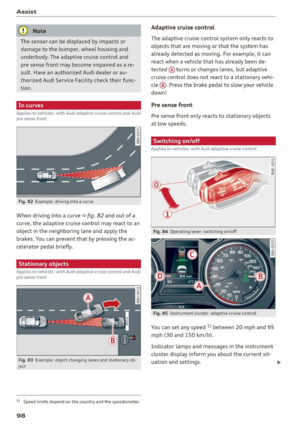 100
100 101
101 102
102 103
103 104
104 105
105 106
106 107
107 108
108 109
109 110
110 111
111 112
112 113
113 114
114 115
115 116
116 117
117 118
118 119
119 120
120 121
121 122
122 123
123 124
124 125
125 126
126 127
127 128
128 129
129 130
130 131
131 132
132 133
133 134
134 135
135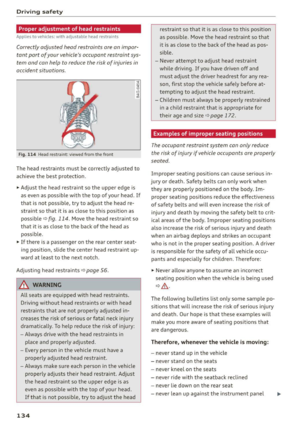 136
136 137
137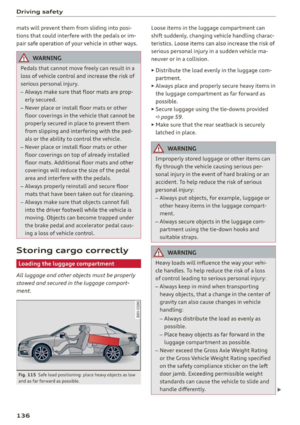 138
138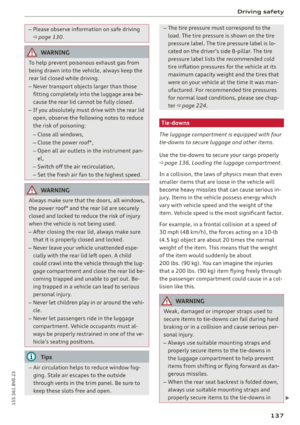 139
139 140
140 141
141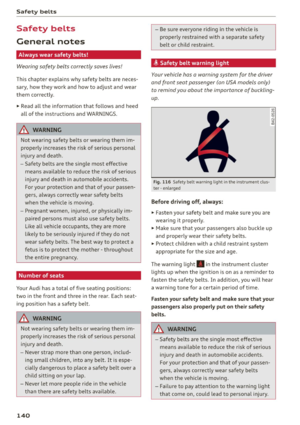 142
142 143
143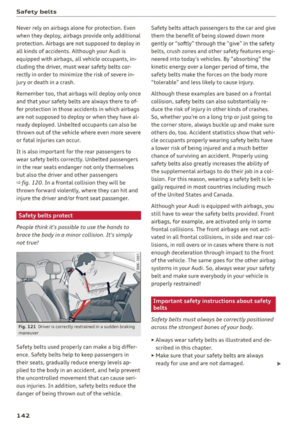 144
144 145
145 146
146 147
147 148
148 149
149 150
150 151
151 152
152 153
153 154
154 155
155 156
156 157
157 158
158 159
159 160
160 161
161 162
162 163
163 164
164 165
165 166
166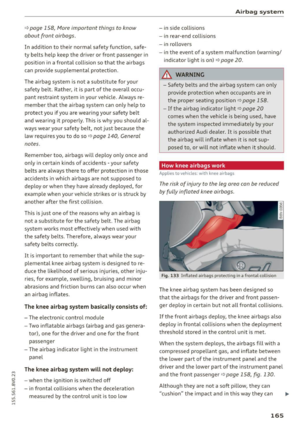 167
167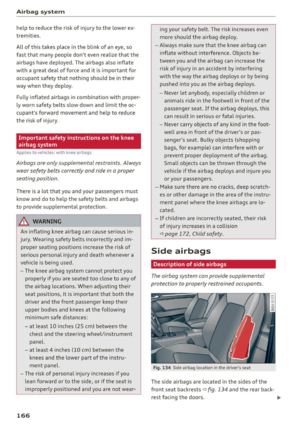 168
168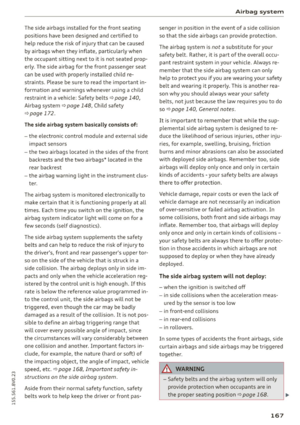 169
169 170
170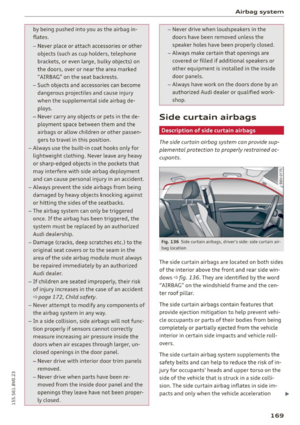 171
171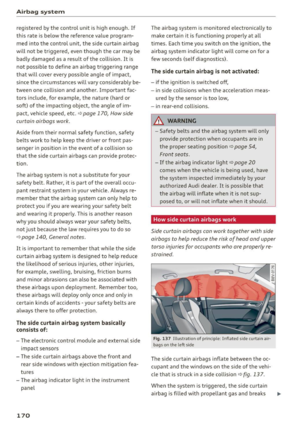 172
172 173
173 174
174 175
175 176
176 177
177 178
178 179
179 180
180 181
181 182
182 183
183 184
184 185
185 186
186 187
187 188
188 189
189 190
190 191
191 192
192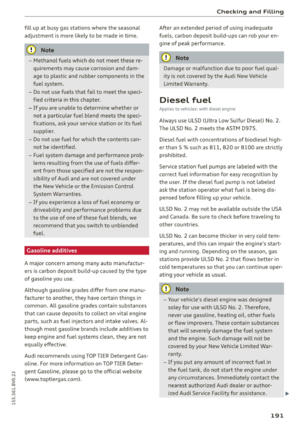 193
193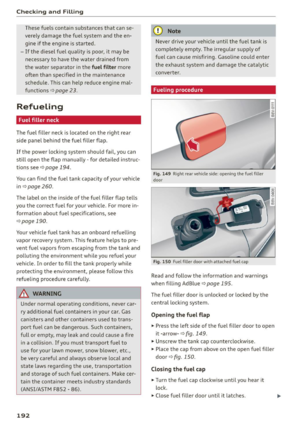 194
194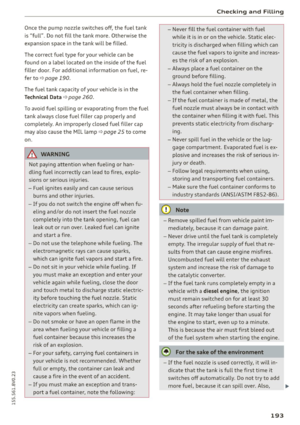 195
195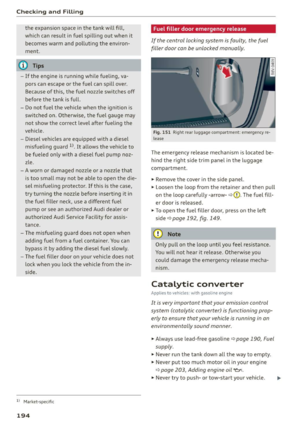 196
196 197
197 198
198 199
199 200
200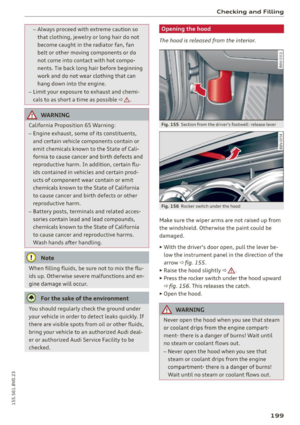 201
201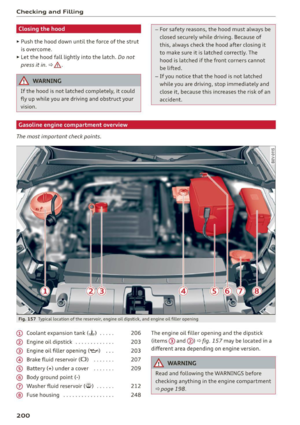 202
202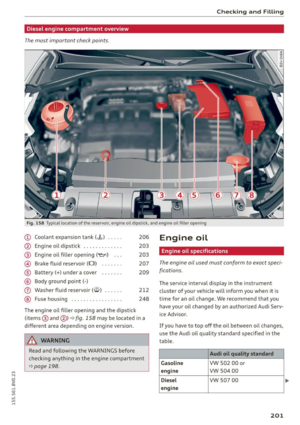 203
203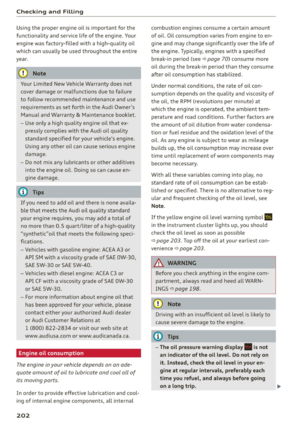 204
204 205
205 206
206 207
207 208
208 209
209 210
210 211
211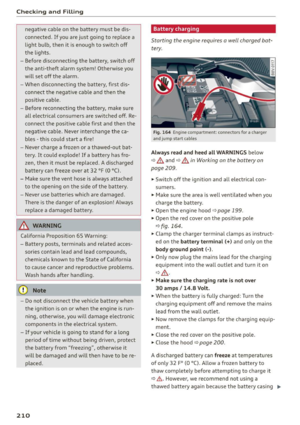 212
212 213
213 214
214 215
215 216
216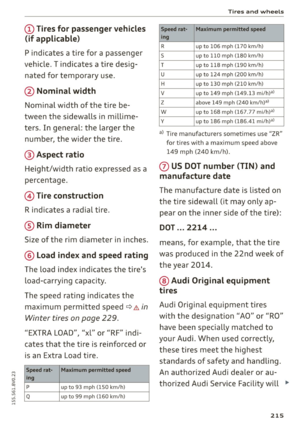 217
217 218
218 219
219 220
220 221
221 222
222 223
223 224
224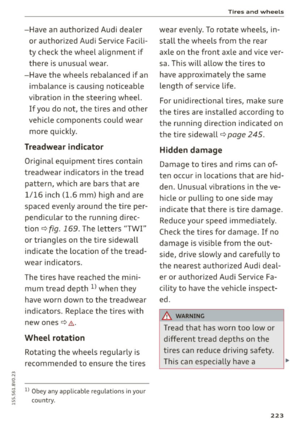 225
225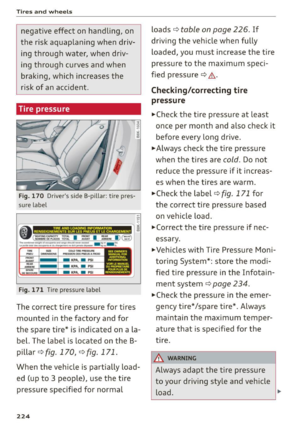 226
226 227
227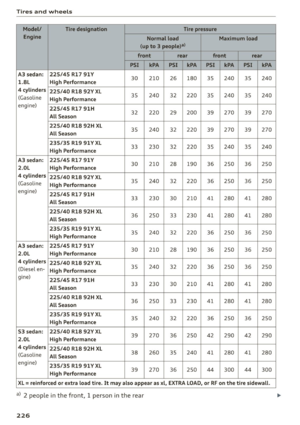 228
228 229
229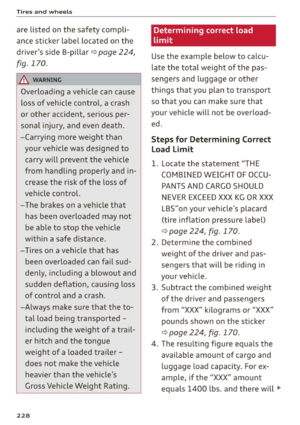 230
230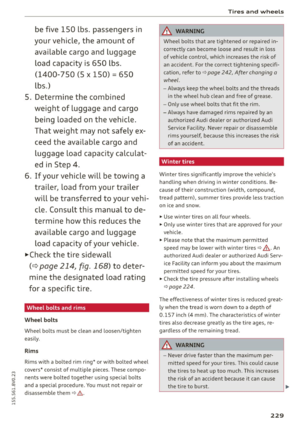 231
231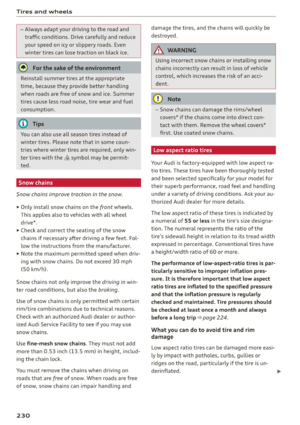 232
232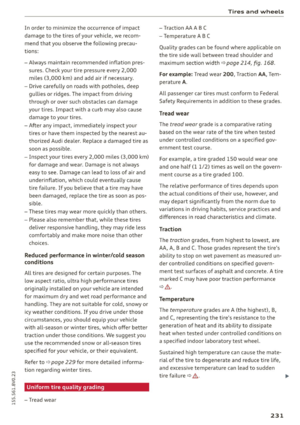 233
233 234
234 235
235 236
236 237
237 238
238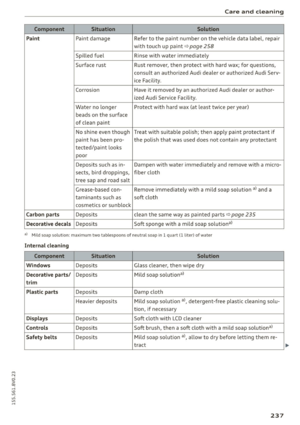 239
239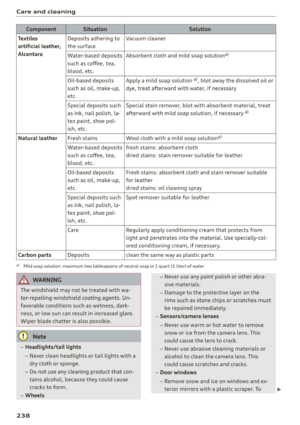 240
240 241
241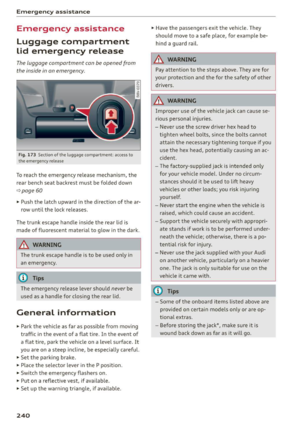 242
242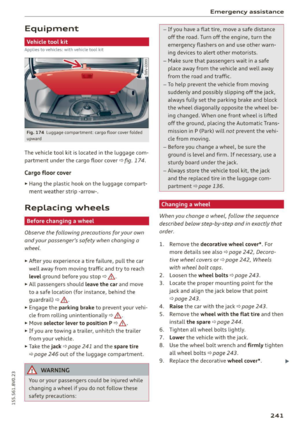 243
243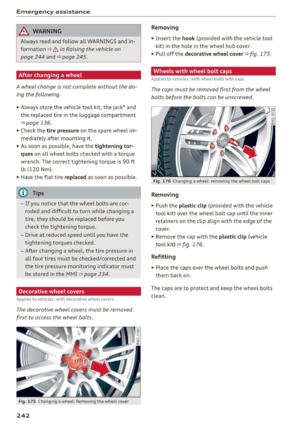 244
244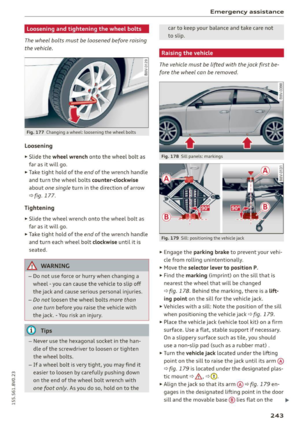 245
245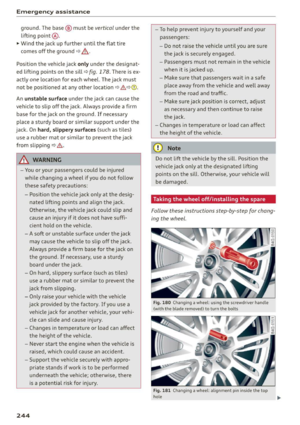 246
246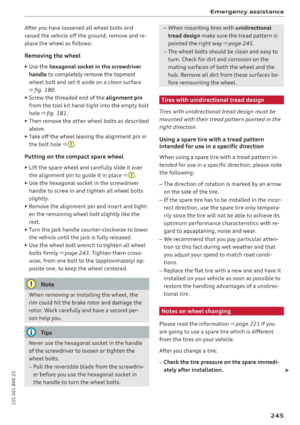 247
247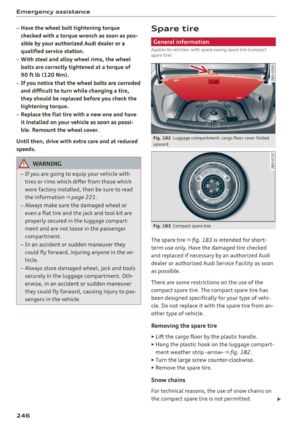 248
248 249
249 250
250 251
251 252
252 253
253 254
254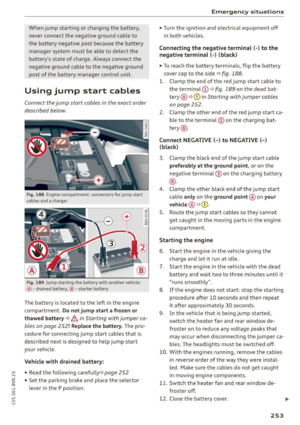 255
255 256
256 257
257 258
258 259
259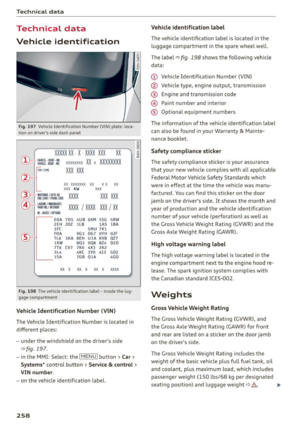 260
260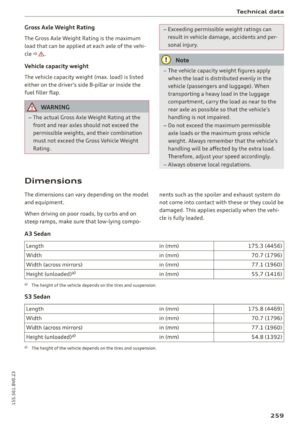 261
261 262
262 263
263 264
264 265
265 266
266 267
267 268
268 269
269 270
270 271
271 272
272 273
273 274
274 275
275 276
276 277
277 278
278 279
279 280
280 281
281