2015 AUDI S3 SEDAN wiper blades
[x] Cancel search: wiper bladesPage 51 of 282
....,
N
0 > co
rl I.O
"'
"'
"'
rl
Sun visors
C1o... ___ J
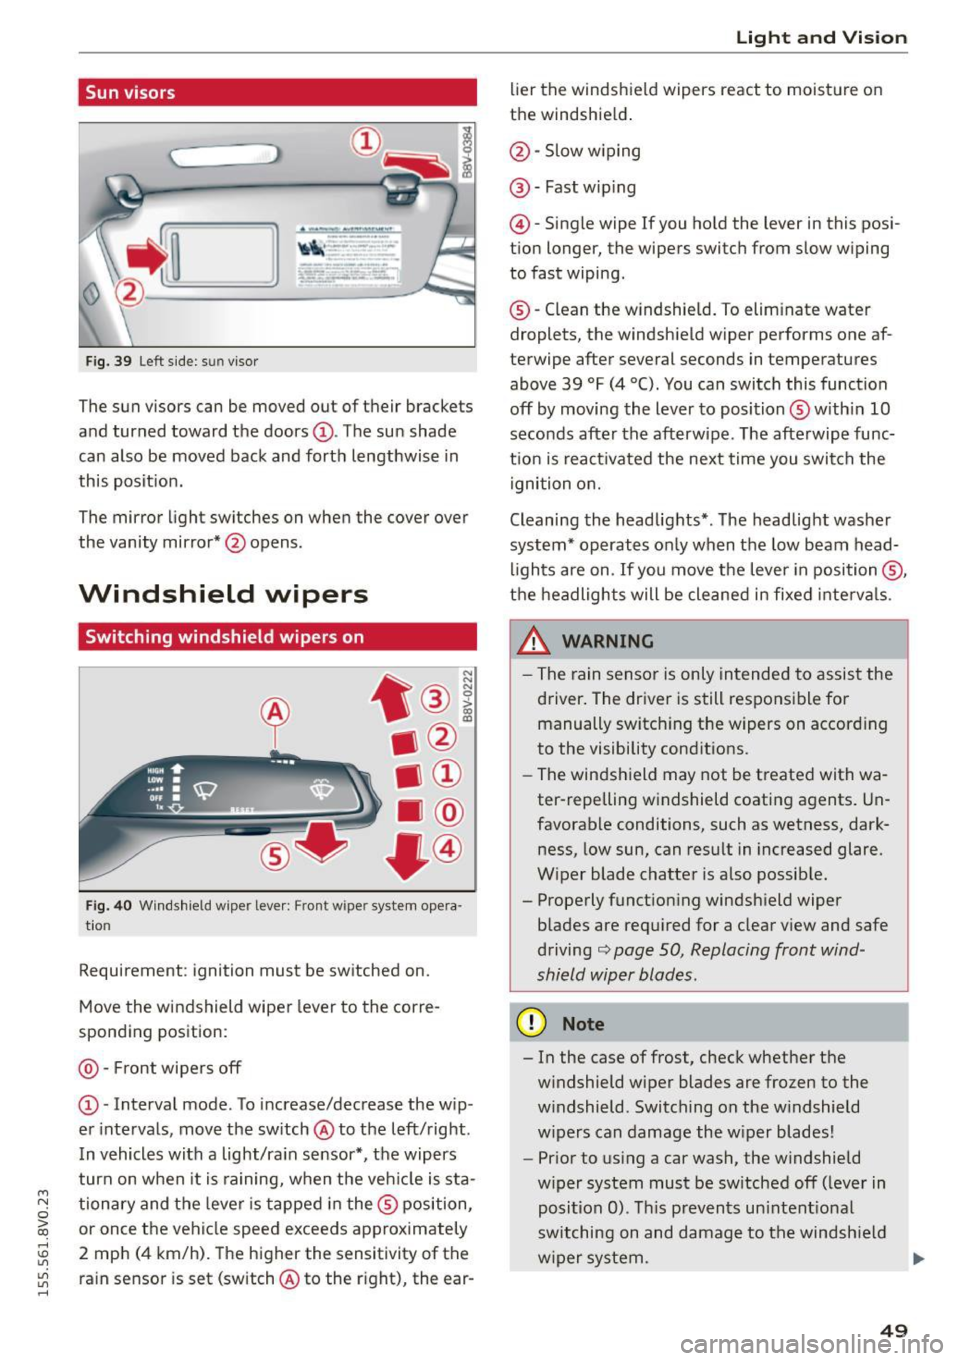
Fig. 39 Left side: su n viso r
The sun visors can be moved out of their brackets
and turned toward the doors@. The sun shade
can also be moved back and forth lengthwise in
this posit ion.
The mirror light switches on when the cover over
the vanity mirror* @opens .
Windshield wipers
Switching windshield wipers on
Fig. 40 Windshield wiper leve r: Front wiper system opera
tion
Requirement : ignition must be switched on.
Move the windshield wiper lever to the corre
sponding position:
@ -Front wipers off
@ -Interval mode. To increase/decrease the w ip
er intervals, move the switch @to the left/right .
I n vehicles with a light/ra in sensor*, the wipers
turn on when it is ra ining, when the veh icle is sta
tionary and the lever is tapped in the ® position,
or once the vehicle speed exceeds approximately
2 mph (4 km/h). The higher the sensitivity of the ra in sensor is set (switch @to the r ight), the ear-
Light and Visio n
lier the windshield wipers react to moisture on
the windshield .
@-Slow w iping
@ -Fast wip ing
@ -Single wipe If you ho ld the lever in this posi
tion longer, the wipers switch from slow wiping
to fast wiping.
® -C lean the w indshield. To elim inate water
droplets, the windsh ield wiper performs one af
terwipe after several seconds in temperatures
above 39 °F (4 °(). You can switch this function
off by moving the lever to position ® with in 10
seconds after the afterwipe. The afterwipe func
t ion is react ivated the nex t time you switch the
ignition on.
Cleaning the headlights*. The headlight washer
system* operates only when the low beam head
li ghts are on . If you move the lever in position @,
t h e headlights will be cleaned in fixed interva ls .
_& WARNING
- The rain sensor is only intended to assist the
driver. The driver is still responsible for manually switch ing the w ipers on according
to the visibility cond itions.
- The windshield may not be treated with wa
ter-repelling w indshield coat ing agents. Un
favorable conditions, such as wetness, dark
ness, low sun, can result in increased glare.
W iper blade chatter is also possib le.
- Properly function ing windsh ield wiper
b lades are req uired for a clear v iew and safe
driving
c::> page 50, Replacing front wind
shield wiper blades .
(D Note
- In the case of frost, check whether the
windshield wiper blades are fr ozen to the
w indshield. Switching on the w indshield
w ipers can damage the w iper blades!
- Prior to using a car wash, the windshield
w iper system must be sw itched off (leve r in
posit ion 0). T his prevents un intent ional
switching on and damage to the windsh ield
w iper system. .,.
49
Page 52 of 282
Light and Vi sion
- Do not use the wipers to remove ice from
the windows. Using windshie ld wipers as ice
scrapers destroys the wiper blades.
(D Tips
- The windshield wipers are switched off
when the ignition is turned off. Activate the
windsh ield wipers after the ignition is
switched back on by moving the windsh ield
wiper lever to any pos it ion.
- Worn or dirty windshie ld wiper b lades result
i n streaking. This can affect the rain sensor
funct ion. Check your windshield wiper
blades regularly .
- The washer fluid nozzles in the w indshield
washer system are heated* at low tempera
tures when the ignit io n is on.
- When stopp ing temporarily, such as at a
traffic light, the speed of the windsh ield
wipers automatically reduces by one level.
- In vehicles with an MMI, you can switch the
rain sensor or off in the
Dri ver ass istanc e
menu.
Cleaning windshield wiper blades
Clea n the wiper blades when you see wipe r
s treaks. Use a soft cloth and a glass cleaner.
.., Place the w indshield wiper arms in the serv ice
pos ition ¢
page 50 .
.., Fo ld the windshield wipe r arms away from the
winds hield .
A WARNING
Dirty windshie ld wiper blades can impai r vi
sion , which increases the risk of an accident.
(D Note
If you see streaks aga in after cleaning the
w iper blades, the b lades must be replaced
¢page SO.
so
-
Replacing front windshield wiper blades
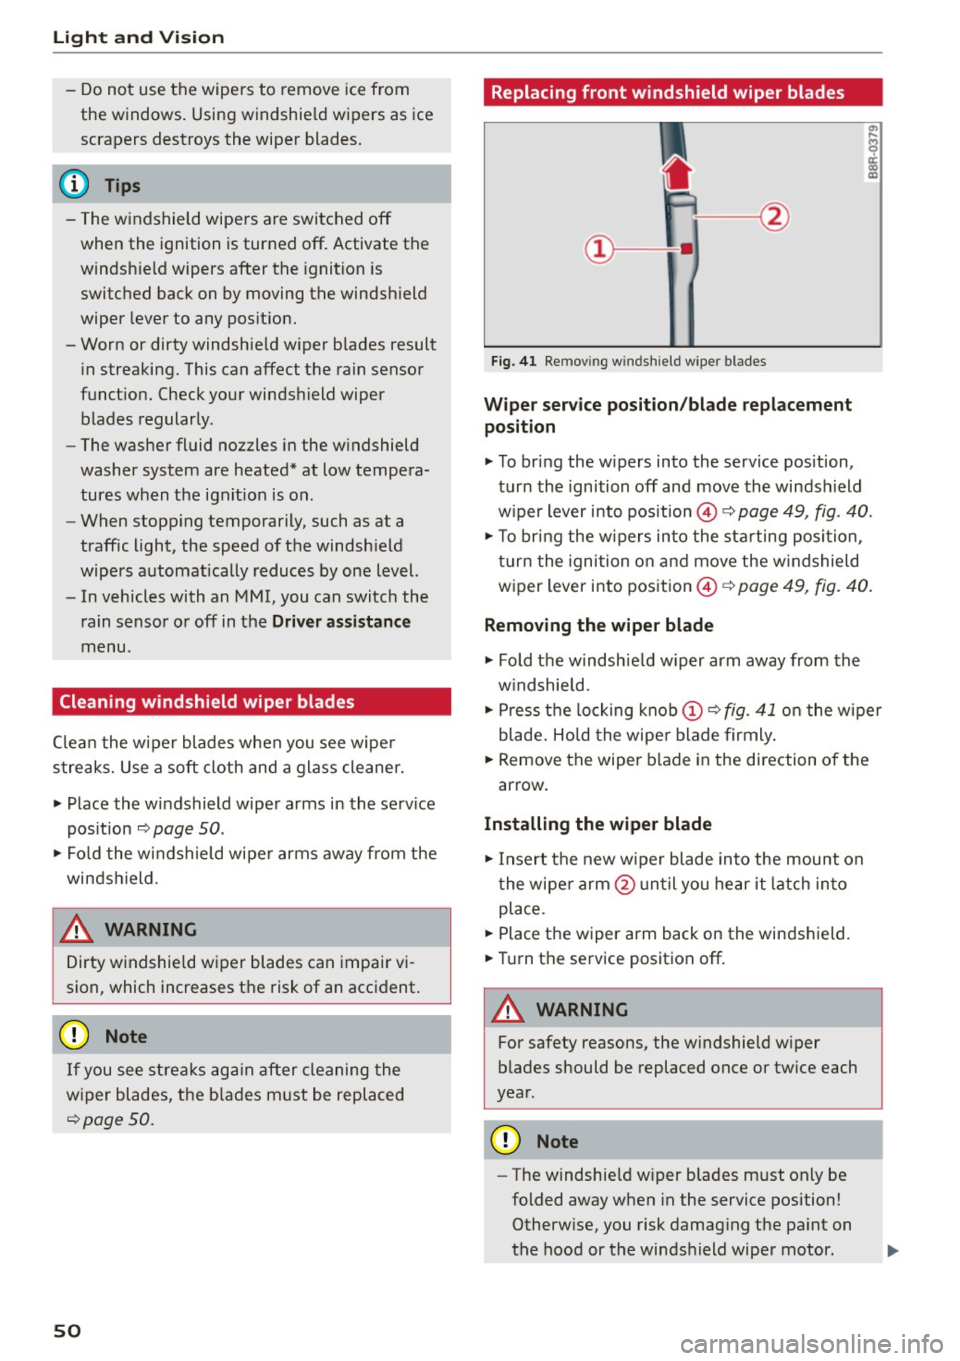
F ig. 41 Re mov ing wind shi eld w iper blades
Wiper service po sit ion /blade repl acement
position
.., To br ing the w ipers into the service pos ition,
turn the ignition off and move the windsh ield
w iper lever into position @¢
page 49, fig. 40.
.., To br ing the w ipers into the sta rting position ,
turn the ignition on and move the w indshield
wiper lever into position ©¢
page 49, fig. 40.
Removing the wiper blade
... Fold the windshie ld w iper arm away from the
w indshield.
.., Press the locking knob
(D C? fig . 41 o n the wiper
blade . Hold the wipe r blade firmly.
... Remove the wiper blade in the direction of the
arrow .
Installing the wipe r blade
.., Insert the new wiper blade into the mount on
the wiper arm @unt il you hear it latch in to
place.
... Place the wiper arm back on the windshield.
... Turn th e service position off .
A WARNING
-
For safety reasons, the w indshie ld w iper
b lades should be replaced once or tw ice each
year .
Q) Note
-The windshie ld w iper blades must only be
folded away when in the service position!
Otherw ise, you risk damag ing the pa int on
the hood or the windshield wiper motor .
Page 53 of 282
....,
N
0 > co
rl I.O
"'
"'
"'
rl
-You should not drive your vehicle or press
the windshie ld wiper lever when the wiper
arms are folded away from the w indshield.
The windshield wipers would move back in
to their original position and could damage
the hood and windshield .
- To prevent damage to the windshield wash
er system, a lways loosen wiper blades that
have frozen to the windsh ield before turn
i ng the wipers on .
- To prevent damage to the wiper blades, do
not apply gasoline, petro leum, th inning
agents or other solvents on the wiper b lades or near them.
- To prevent damage to the wiper arms or
othe r components, do not try to move the
windsh ield wipers by hand.
@ Tips
- Commerc ial hot wax such as the types used
by car washe s make it more difficult t o clean
the w indshie ld.
- You can also use the service pos ition, for ex
ample, if you want to p rotect the w indshie ld
from i cing by us ing a cover.
- You cannot activate the service pos it ion
whe n the hood is open.
Digital compass
Switching the compass on and off
Ap plies to vehicles: w ith digi tal compass
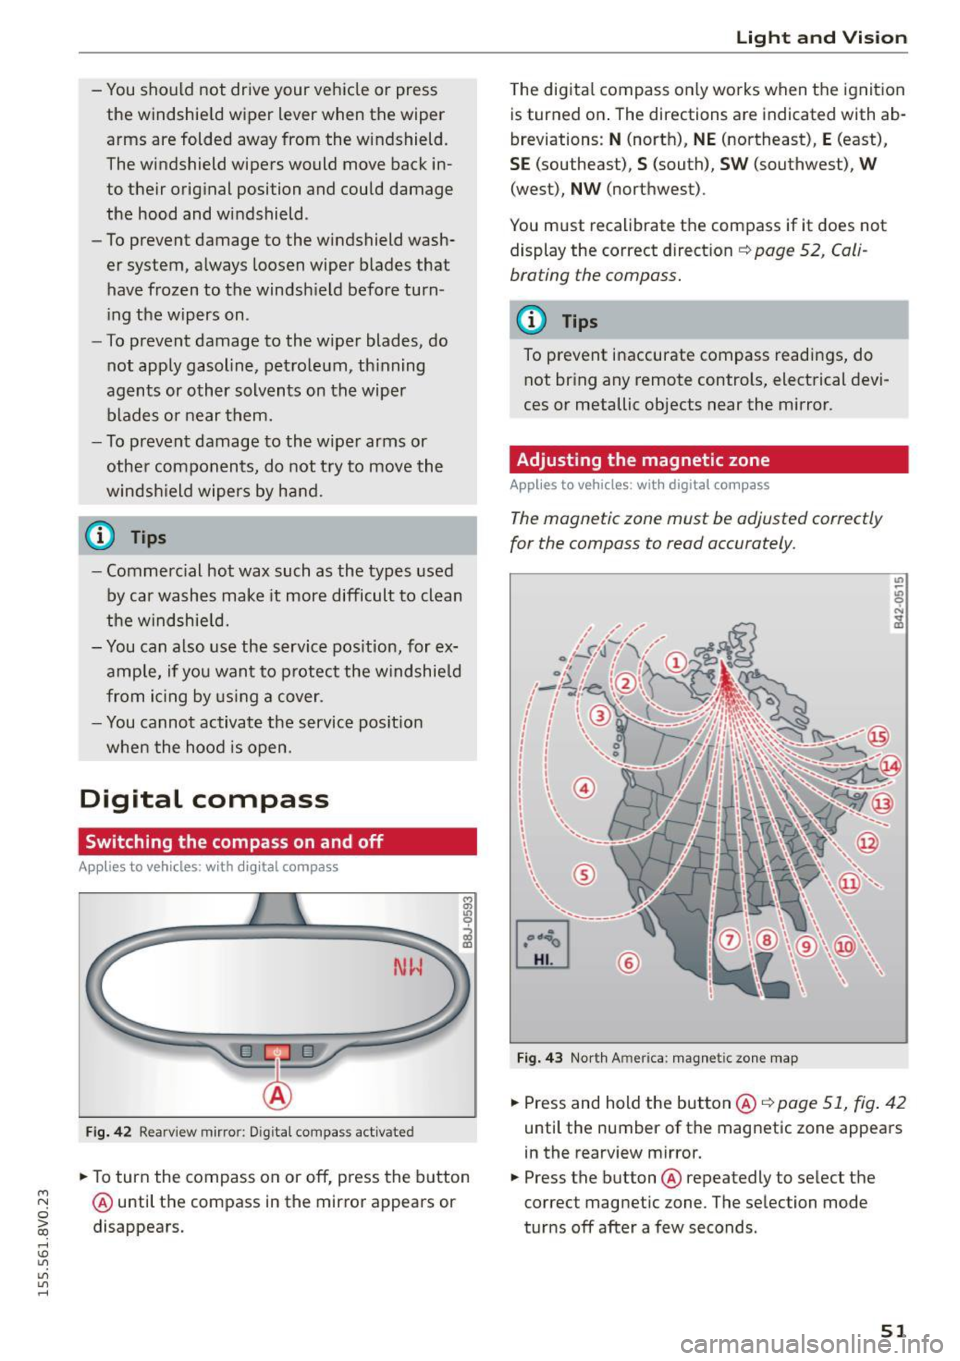
Fig. 4 2 Rearview mirro r: Dig ital compass act ivated
... To turn the compass on or off, press the button
@ until the compass in the mirror appears or
disappears.
Light and Visio n
The dig ita l compass on ly works when the ignit ion
is turned on . The directions a re indicated with ab
breviations:
N (nort h), NE (northeast), E (east),
SE (southeast), S (south), SW (southwest), W
(west), NW (northwest).
You must recalibrate t he compass if it does not
display the correct direct ion
¢ page 52, Cali
brating the compass.
(D Tips
To prevent inaccurate compass readings, do not br ing any remote controls, electrical devi
ces or metallic objects near the mirror.
Adjusting the magnetic zone
Appl ies to vehicles: wit h digita l co mp ass
The magnetic zone must be adjusted correctly
for the compass to read accurately.
®
Fig. 4 3 Nor th Ameri ca: magnet ic zone map
... Press and hold the button @ ¢page 51, fig . 42
until the number of the mag netic zone appears
in the rearview mirror .
... Press the butt on @ repeatedly to select the
correct magnetic zone. The se lection mode
tur ns off after a few seconds .
51
Page 238 of 282
Care and cleaning
& WARNING
- Only wash the vehicle when the ignition is
off an d follow the i nstructions fr om the car
wash operator to r educe the r isk of acci
dents.
- To reduce the r isk of cuts, protect yourself
from sharp metal components when wash ing the underbody or the inside of the wheel
hous ings.
- After washing the vehicle, the braking effect
may be delayed due to moisture o n the
brake rotors or i ce in the winte r. T he bra kes
mus t be d ried first w ith a few caref ul bra ke
applications .
@ Note
-If you wash the ve hicle in an au tomatic car
wash, you m ust fold the e xterior m irrors in
to reduce the ris k of damage to the mirrors .
Power folding exterior mirrors* must only
be fo lded i n and out using the power folding
funct ion. -
To prevent paint damage, do not wash the
vehicle in direct sunlight.
- T o reduce the r is k of damage to the sur face,
do not use insect remov ing sponges, kitchen
sponges or similar items.
- Mat te finish painted vehicle components:
- To reduce the risk of damage to the sur-
face, do not use po lishi ng agents or hard
wax.
- Never use protective wax.
It can destroy
the matte finish effect.
- Do not place any stickers or magnet ic
signs on vehicle parts painted w ith matte
finish paint. The pa int co uld be damaged
when the sticke rs o r mag nets are re
moved.
@ For the sake of the environment
Only wash the ve hicle in facilities spec ially de
s igned fo r that purpose. This w ill reduce the
r isk of dir ty wa ter co ntaminated w ith oil from
entering the sewe r system.
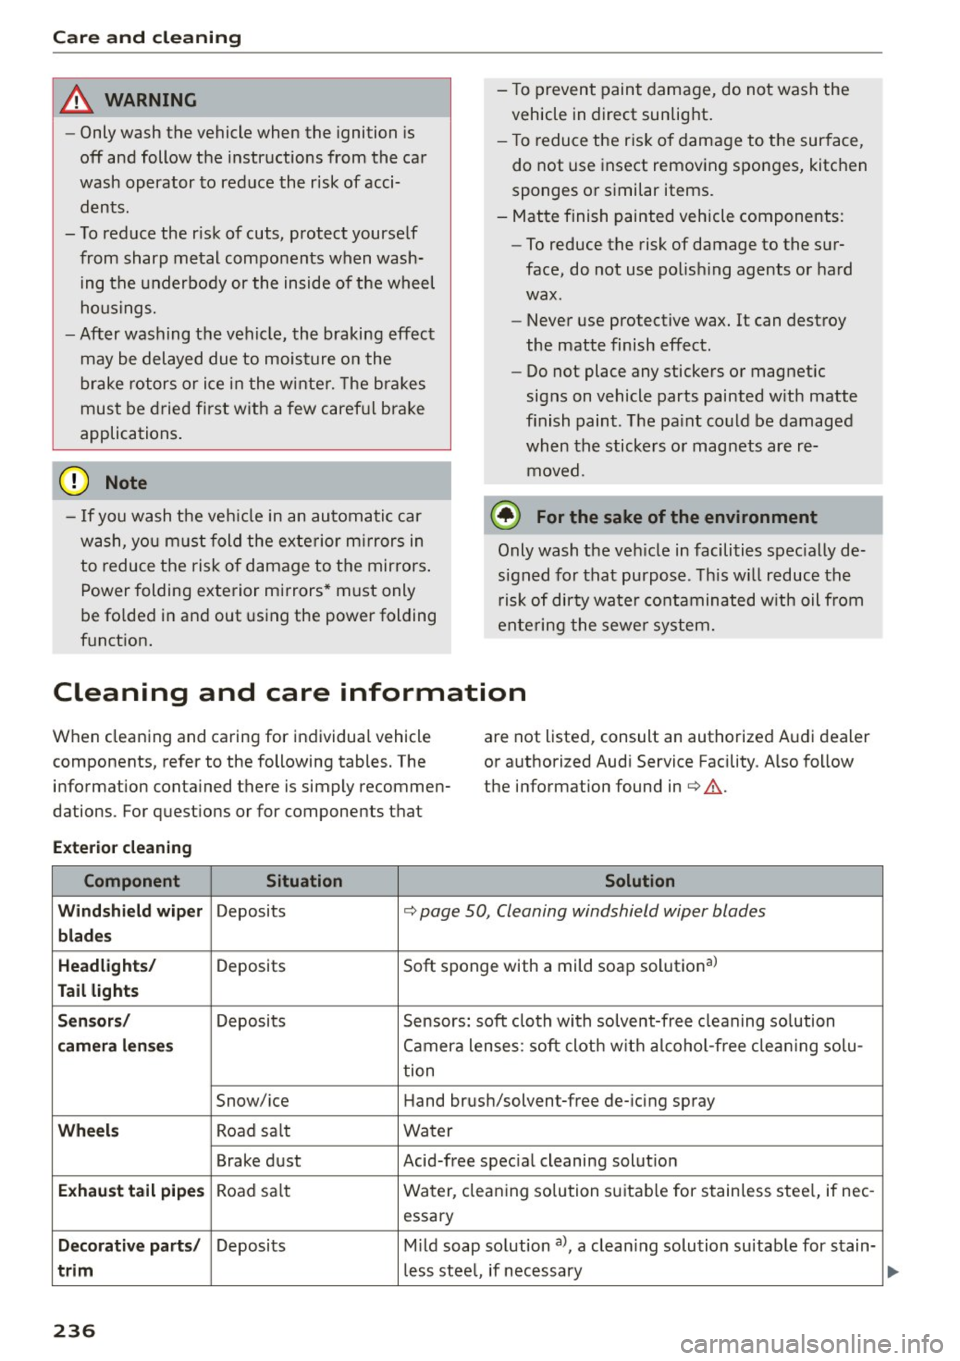
Cleaning and care information
When cleaning and caring for individua l vehicle
components, refer to the following tables. The
information contained there is simply recommen
dations. For quest ions or for components that are not listed,
consult an authorized A udi dealer
or authorized Audi Service Facility . Also follow
the information found in
¢ _6.
Exterio r cleaning
Component Situation Solution
Windshield wiper
Deposits ¢ page 50, Cleaning windshield wiper blades
blades
Headlights /
Deposits Soft sponge with a mild soap
solutiona)
Tail lights
Sensors /
Deposits Sensors: soft cloth with solvent-free cleaning so lution
camera len se s Camera le ·nses : soft clot h w ith a lcohol-free clea ning so lu-
tion
Snow/ ice Hand brush/solvent-free de- icing spray
Wheel s Road sa lt Water
Brake dust Acid-free specia l cleaning solution
E xhau st tail pipe s Road salt Water, clean
ing solution su itab le for stain less stee l, if nee -
essary
D ecorative parts / Deposits Mild soap solution al, a clean ing solution suitable for stain-
trim l ess stee l, if necessary
236
Page 277 of 282
M N
0 > co ,...., \!) 1.1'1
1.1'1
1.1'1
,....,
R
Radiator fan
Radio clock 206
refer to Clock
. . . . . . . . . . . . . . . . . . . . . . . . 10
Rain/light sensor
Headlights . . . . . . . . . . . . . . . . . . . . . . . . . . 43
Indicator light . . . . . . . . . . . . . . . . . . . . . . . 24
Intermittent (windshield wipers) . . . . . . . . 49
Sw itching on/off . . . . . . . . . . . . . . . . . . . . . 49
Raising the vehicle . . . . . . . . . . . . . . . . . . . . 256
Range (tank contents) . . . . . . . . . . . . . . . . . . 28
Rear armrest . . . . . . . . . . . . . . . . . . . . . . . . . . 56
Rear lid
refer to luggage compartment lid . . . . . . . 39
Rear light
Indicator light . . . . . . . . . . . . . . . . . . . . . . . 24
Rearview camera
refer to Parking systems 116,117
Rearview mirror
refer to Mirror . . . . . . . . . . . . . . . . . . . . . . . 48
Rearview mirror dimming . . . . . . . . . . . . . . . 48
Rear window defogger . . . . . . . . . . . . . . . . . . 68
Recirculation mode
automatic control system . . . . . . . . . . . . . . 67
manual climate control system . . . . . . . . . . 65
Reducing fue l consumption
Efficiency program . . . . . . . . . . . . . . . . . . . . 29
Remote control
refer to Remote control key . . . . . . . . . . . . 33
Remote control key . . . . . . . . . . . . . . . . . . . . . 33
LED . . . . . . . . . . . . . . . . . . . . . . . . . . . . . 33, 34
Replacing the battery . . . . . . . . . . . . . . . . . 34
Synch ron izat ion . . . . . . . . . . . . . . . . . . . . . . 35
u nl ocking/locking . . . . . . . . . . . . . . . . . . . . 35
Repair manuals . . . . . . . . . . . . . . . . . . . . . . . 262
Repairs Airbag system . . . . . . . . . . . . . . . . . . . . . . 163
Replacement key . . . . . . . . . . . . . . . . . . . . . . 33
Replacing Light bulbs . . . . . . . . . . . . . . . . . . . . . . . . . 250
Replacing windshield wiper blades . . . . . . . . 50
Report ing Safety Defects . . . . . . . . . . . . . . . 138
Reset button (tr ip odometer) . . . . . . . . . . . . 11
Resetting the tr ip odometer . . . . . . . . . . . . . 11
Retract New brake pads . . . . . . . . . . . . . . . . . . . . . 125
Ind ex
Retractor . . . . . . . . . . . . . . . . . . . . . . . . . . . . 143
Reve rse (automatic transmission) . . . . . . . . . 82
Reversible mat . . . . . . . . . . . . . . . . . . . . . . . . 61
Right hand dr ive . . . . . . . . . . . . . . . . . . . . . . . 46
Rims ......... ... .. ................. 229
Roof rack . . . . . . . . . . . . . . . . . . . . . . . . . . . . . 62
Load ing . . . . . . . . . . . . . . . . . . . . . . . . . . . . . 63
Roof weight . . . . . . . . . . . . . . . . . . . . . . . . . 63
s
Saddlebag . . . . . . . . . . . . . . . . . . . . . . . . . . . . 61
Safe drivi ng habits . . . . . . . . . . . . . . . . . . . . 130
Safety Airbag system . . . . . . . . . . . . . . . . . . . . . . 148
Belts . . . . . . . . . . . . . . . . . . . . . . . . . . . . . . 140
Cargo . . . . . . . . . . . . . . . . . . . . . . . . . . . . . 136
Co rrect seating position . . . . . . . . . . . . . . 131
Pedal a rea . . . . . . . . . . . . . . . . . . . . . . . . . . 135
Safety be lt pos ition . . . . . . . . . . . . . . . . . . . 144
Safety belt height adjustment . . . . . . . . . 146
Safety be lts worn by pregnant women 145
Safety be lt pretensioner
Serv ice and disposal . . . . . . . . . . . . . . . . . 147
Safety be lts . . . . . . . . . . . . . . . . . . . . . . 1 40, 143
Adjusting . . . . . . . . . . . . . . . . . . . . . . . . . . 145
Cleaning . . . . . . . . . . . . . . . . . . . . . . . . . . . 23
7
Danger to passengers who do not wear a
safety belt . . . . . . . . . . . . . . . . . . . . . . . . . 141
Fastening . . . . . . . . . . . . . . . . . . . . . . . . . . 143
Height ad justment . . . . . . . . . . . . . . . . . . . 146
Improperly wo rn . . . . . . . . . . . . . . . . . . . . 146
Indicator lig ht . . . . . . . . . . . . . . . . . . . . . . . 20
Not worn . . . . . . . . . . . . . . . . . . . . . . . . . . 141
Sa fe ty be lt pos ition . . . . . . . . . . . . . . . . . . 144
Safety instr uctions . . . . . . . . . . . . . . . . . . . 142
Securing child safety seats . . . . . . . . . . . . 182
Special considerations for pregnant wom-
en . . . . . . . . . . . . . . . . . . . . . . . . . . . . . . . . 145
Unfastening . . . . . . . . . . . . . . . . . . . . . . . . 145
Warning/ind icator light . . . . . . . . . . . . . . . 140
Worn properly . . . . . . . . . . . . . . . . . . . . . . 142
Safety be lt warning light . . . . . . . . . . . . . . . 140
Safety centra l locking . . . . . . . . . . . . . . . . . . . 38
Safety compliance sticker . . . . . . . . . . . . . . 258
Safety eq uipment . . . . . . . . . . . . . . . . . . . . . 130
275
Page 280 of 282
Index
w
Warning/ indicator lights
System indicator light (MIL) . . . . . . . . . . . . 22
Warn ing/Ind icator lights
A irbag system . . . . . . . . . . . . . . . . . . . . . . 160
PASSENG ER AIR BAG OFF . . . . . . . . . . . . . 160
Warn ing lights
refer to Indicator lights . . . . . . . . . . . . . . . . 1 3
Warranty coverages . . . . . . . . . . . . . . . . . . . 262
Washer fluid level (indicator l igh t) . . . . . . . . 24
Washing matte finish paint . . . . . . . . . . . . . 235
Weights . . . . . . . . . . . . . . . . . . . . . . . . . . . . . 258
What happens if you wear your safety belt too
loose? . . . . . . . . . . . . . . . . . . . . . . . . . . . . . . 144
What happens to unbelted occupants? . . . . 141
What impairs driving sa fety? . . . . . . . . . . . . 13 1
Wheel bolts . . . . . . . . . . . . . . . . . . . . . . . . . 229
Wheels . .. .. .. ................. .. ... 214
All wheel dr ive . . . . . . . . . . . . . . . . . . . . . . 127
Clea ning . . . . . . . . . . . . . . . . . . . . . . . . . . . 236
Glossa ry of t ire and load ing terminology . 216
Replacing . . . . . . . . . . . . . . . . . . . . . . . . . . 24 1
Ti res and vehicle load limits . . . . . . . . . . . 227
Wheel wrench . . . . . . . . . . . . . . . . . . . . . . . . 241
When mus t a safety belt be rep laced? . . . . 1 42
When must the airbag system be inspected? 1.60
Where are lower anchorages located? . . . . . 186
W indows
C lea ning/remov ing ice ................ 237
W indshield
cleaning . . . . . . . . . . . . . . . . . . . . . . . . . . . . 49
defrosting (automatic climate cont rol sys-
tem) . . . . . . . . . . . . . . . . . . . . . . . . . . . . . . . 67
defrosting (man ual climate contro l system) .65
also refer to Windshield . . . . . . . . . . . . . . . 4 9
W indshield washe r system .......... 49, 212
Fil ling . . . . . . . . . . . . . . . . . . . . . . . . . . . . . 212
Reservoir capacity . . . . . . . . . . . . . . . . . . . 260
W indshield wipers
Clea ning wipe r blades . . . . . . . . . . . . . . . . . 50
Folding up . . . . . . . . . . . . . . . . . . . . . . . . . . 50
I ndicato r light . . . . . . . . . . . . . . . . . . . . . . . 24
Replacing w indshield wiper blades . . . . . . . 50
Sw itching on and off . . . . . . . . . . . . . . . . . . 49
278
Win ter driving
Snow chains . . . . . . . . . . . . . . . . . . . . . . . . 230
Tires . . . . . . . . . . . . . . . . . . . . . . . . . . . . . . 229
Win ter operation
B att ery . . . . . . . . . . . . . . . . . . . . . . . . . . . . 208
Cooling system . . . . . . . . . . . . . . . . . . . . . . 205
Windshie ld washer system . . . . . . . . . . . . 212
Winter t ires . . . . . . . . . . . . . . . . . . . . . . . . . . 229
Winter use
Car washes . . . . . . . . . . . . . . . . . . . . . . . . . 235
defrost ing the windsh ield (automat ic cli -
mate control system) . . . . . . . . . . . . . . . . . . 67
Remov ing ice from windows . . . . . . . . . . . 237
Seat heating . . . . . . . . . . . . . . . . . . . . . . . . . 68
X
Xenon-L ights . . . . . . . . . . . . . . . . . . . . . . . . . 250
Xenon headlights . . . . . . . . . . . . . . . . . . . 43, 46