2015 AUDI S3 SEDAN mirror
[x] Cancel search: mirrorPage 40 of 282

Opening and closing
"'Select: the IMENU ! button> Car> Systems*
control button > Vehicle settings > Central
locking > Door unlocking.
Selecting All and pressing the~ button on the
remote control key unlocks the entire vehicle.
If you select
Driver and then press the~ button
on the remote control key, only the driver's door
will unlock. In vehicles with a convenience key,
only the front door whose handle you pull will
unlock. If you press the~ button twice, the en
tire vehicle will unlock. If you press the~ button,
the entire vehicle will always lock.
Folding* the exterior mirrors
"'Select: the IMENU ! button> Car> Systems*
control button > Vehicle settings > Central
locking > Fold mirrors when locking.
For more
information, refer to
c:> page 47, Adjusting
the exterior mirrors.
If you select On, the outside mirrors will fold in
automatically when you press the~ button on
the remote control key
i:> page 47.
Tone when locking
"'Select : the IMENU ! button> Car> Systems*
control button > Vehicle settings > Central
locking> Tone when locking.
When checked off./, a tone will sound when you
lock the vehicle.
If you press the~ button twice, the entire vehi
cle will lock. There is a locking tone at the same
time
1l .
Electronic immobilizer
The immobilizer prevents unauthorized use of
your vehicle.
A microchip in the key automatically deactivates
the electronic immobilizer when the key is locat
ed in the vehicle.
If you remove the key from the
vehicle, the electronic immobilizer activates
again automatically.
l) Thi s fu nct io n is not availabl e in all cou ntri es .
38
A WARNING ,_ -
Always take the key with you whenever you
leave your vehicle. The electronic immobilizer
can be deactivated with the key, so this could
make it possible for unauthorized persons to
start the engine and operate vehicle systems
such as the power windows or sunroof. This
can increase the risk of serious injury.
(D Tips
-The vehicle cannot be started if an unau
thorized key is used.
It may not be possible
to start the vehicle under certain circum
stances, for example if there is another ra
dio module like the key from another vehicle
or a transponder on the same keychain.
- For an explanation on conformity with the
FCC regulations in the United States and the
Industry Canada regulations, refer to
i:>page 265.
Safety central locking
App lies to vehicles : wi th safe ty cen tral lock ing
Safety central locking provides the possibility, to
only unlock the driver's door and the fuel filler
door. The rest of the vehicle remains locked.
Unlocking the driver's door and the fuel filler
door
"' Press the remote control key or convenience key
Ifill button once or turn the key once in the open
ing direction.
Unlocking all doors, the luggage
compartment lid and the fuel filler door
"' Press the remote control key or convenience key
Ifill button twice within five seconds or turn the
key
twice within five seconds in the opening di
rection.
When unlocking just the driver's door, the anti
theft alarm system* is also immediately deacti
vated.
In vehicles with an MMI, you can directly adjust
the safety central locking
c:> page 3 7.
Page 46 of 282

Light and Vision
When switched on, adaptive light adjusts to
curves depending on the vehicle speed and steer·
ing wheel angle . This provides better lighting
through the curve. The system operates in a
speed range from approximately 6 mph (10 km/
h) to 68 mph (110 km/h).
Static cornering light* (vehicles with adaptive
light)· the cornering light switches on automati
cally when the steering wheel is turned at acer
tain ang le at speeds up to approximately 44 mph
(70 km/h) and whe n the turn signal is activated
at speeds up to approximately 25 mph (40 km/
h). The area to the side of the vehicle is illuminat
ed better when tu rning.
Speed depend ent light distribution* -The speed
dependent light distribution adapts the light in
towns and on highways or expressways. In tersec
tions can also be illum inated on veh icles with a
navigat ion system*.
Highway light function*
(Vehicles with adaptive light or LED headlights) -
This function adapts the light ing for highway
driving based on vehicle speed .
..&, WARNING
-Automatic headlights* are only int ended to
assist the driver. They do not relieve the
driver of his responsibility to check the
headlights and to turn them on manually
according to the current light and visibi lity
condit ions. For example, fog cannot be de·
tected by the light sensors . So always switch
on the low beam under these weather con
ditions and when driving in the dark
io.
- Accidents could occur if you can not see the
road ahead of you well and if others on the
road cannot see you . Always switch your
head lightsonsothatyoucanseetheroad
ahead of you and others can see your vehicle
from behind.
- Please observe legal regulations when using
the lighting systems described .
44
(D Note
The rear fog lights shou ld only be turned on in
accordance with traffic regulation, as the lights are bright for following traffic.
@ Tips
-The light sensor for the automatic head
lights * is in the rearview mirror mount.
Therefore, do not place any stickers in this
area on the windshield.
- Some functions of the exterior lighting can
be adjusted
c> page 45.
- If you turn off the ignition whi le the exterior
lights are on and open the door, you will
hear a warning tone.
- In some market-specific versions, the tail
lights do not turn on when switching on the
daytime running lights.
- In cool or damp weather, the inside of the headlights, turn signals and taillights can
fog over due to the temperature difference
between the inside and outside . They will
clear shortly after switching them on. This
does not affect the serv ice life of the light
ing .
- A message will appear in the instrument
cluster if there is a malfunction in the light
sensor
c> page 24.
Emergency flasher
Fig. 32 Ins trumen t panel : em ergenc y flasher bu tton
The emergency flashers makes other dr ivers
aware of your vehicle in dangerous s ituations .
.. Press the~ button to switch the emergency
flashers on or off.
Page 49 of 282
....,
N
0 > co
rl I.O
"'
"'
"'
rl
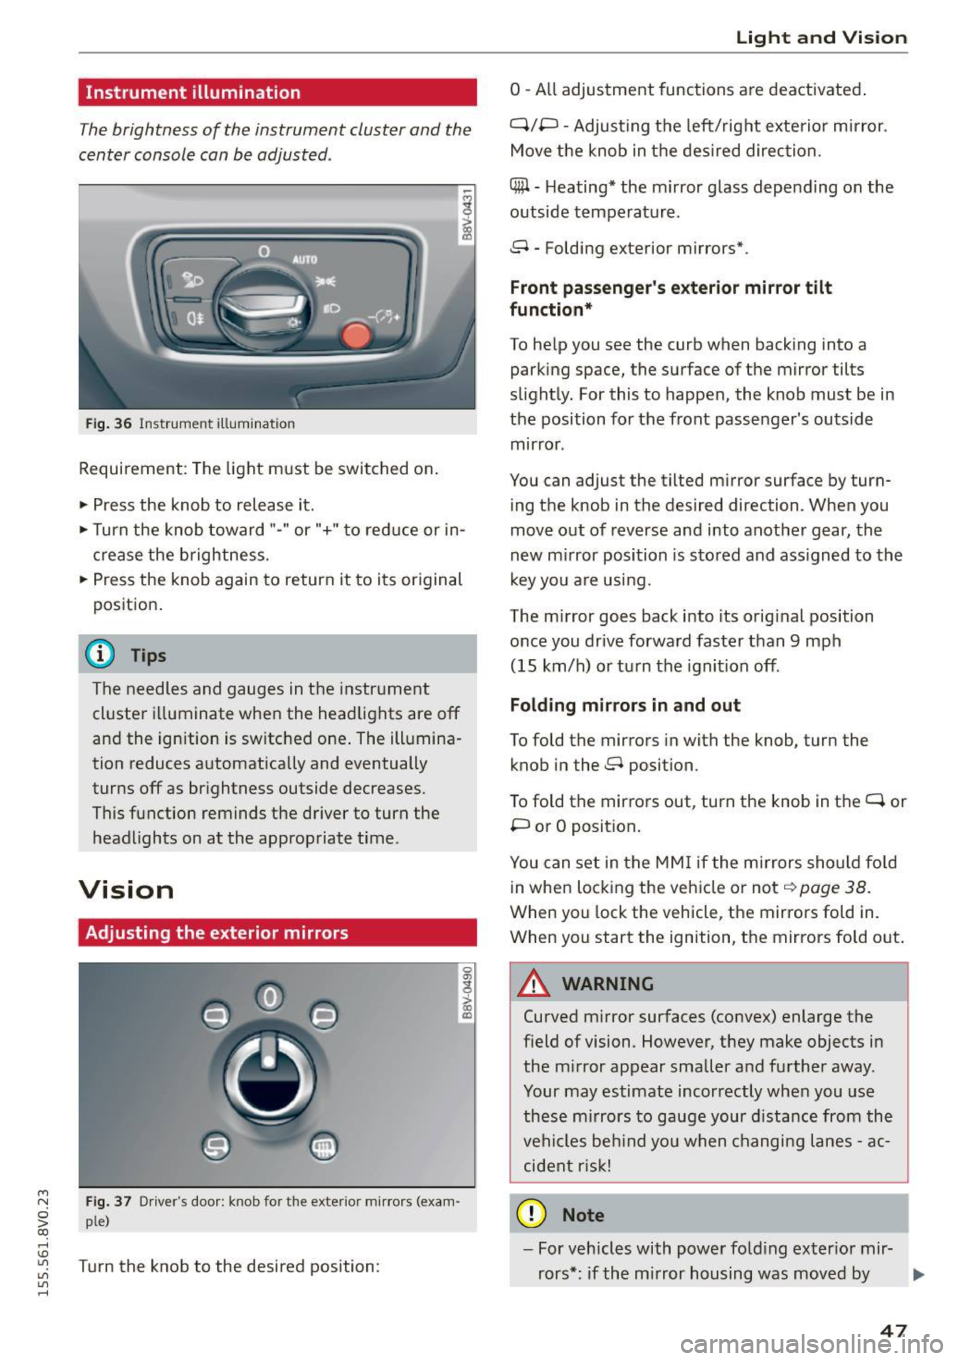
Instrument illumination
The brightness of the instrument cluster and the
center console can be adjusted .
Fig. 36 Instrument illum ination
Requirement: The light must be switched on.
.. Press the knob to release it.
.. Turn the knob toward"-" or"+" to red uce or in
crease the brightness.
.. Press the knob again to return it to its original
posit ion .
@ Tips
The needles and gauges in the instrument
cluster illuminate when the headlights are off
and the ignition is switched one . The illumina·
tion reduces automatically and eventually
turns off as br ightness outside decreases.
This function reminds the driver to turn the
headlights on at the appropriate time .
Vision
Adjusting the exterior mirrors
Fig. 37 Driver's door: knob for the exterior mirrors (exam
ple)
Turn the knob to the desired position:
0
g
> a, (X)
Light and Visio n
0 -A ll adjustment functions are deactivated .
Q/P -Adjusting the left/rig ht exterior mirror.
Move the knob in the des ired direction.
C@ · Heating* the m irror glass depending on the
outside temperature.
8 • Folding exterior mirrors*.
Front pa ss e ng er's ex te rior mirror tilt
functio n*
To help you see the curb when backing into a
parking space, the surface of the mirror tilts
slight ly. For this to happen, the knob must be in
the position for the front passenger's outside
mirror .
You can adjust the tilted mirror surface by turn·
i ng the knob in the desired direction . When you
move out of reverse and into another gear, the
new m irror position is stored and ass igned to the
key yo u are us ing .
The mirror goes back into its orig inal position
once you drive forward faster than 9 mph
(15 km/h) o r turn the ignition off.
Folding m ir rors in and out
To fold the mirrors in with the knob, turn the
knob in the 8 position.
To fold the mirrors out, turn the knob in the
q or
P or O posit ion .
You can set in the MM I if the mirrors sho uld fo ld
in when locking the vehicle or not
q page 38.
When you lock the vehicle, the mirrors fold in.
When you start the ignition, the mirrors fold out.
A WARNING -,.
Curved m irror surfaces (convex) enlarge the
field of vision. However, they make objects in
the m irror appear smaller and further away.
Your may estimate incorrectly when you use
these m irrors to gauge your d istance from the
vehi cles be hind you when changi ng lanes -ac·
cident risk!
@ Note
- For vehicles with power fo ld ing exter ior mir·
rors*: if the mirror housing was moved by
IJI,-
47
Page 50 of 282
Lig ht a nd Vis ion
outside forces (such as an impact when ma
neuvering), you must use the power folding
funct ion to fold the mir ror all the way out.
You will hear a loud noise when the mirrors
are latched back in place. The mirror hous
i ng must not be moved back into place by
hand because th is would impair the func
tion of the mirror mechanism.
-Applies to vehicles without power fold ing
exterior mirrors: if the mirror housing was moved by outside forces (such as in impact
during maneuve ring), you must move the
mirror ho us ing ba ck into p lace by hand.
- If you wash the veh icle in an automatic car
wash, you m ust fold the exterior m irrors in
to reduce the risk of damage to the mirrors .
Never fold power folding exterior mirrors*
by hand. Only fo ld them in and out using
the power controls.
@ Tips
If the power adjustment fails, both mirrors
can be adjusted by hand by pressing on the
edge of the mirror surface.
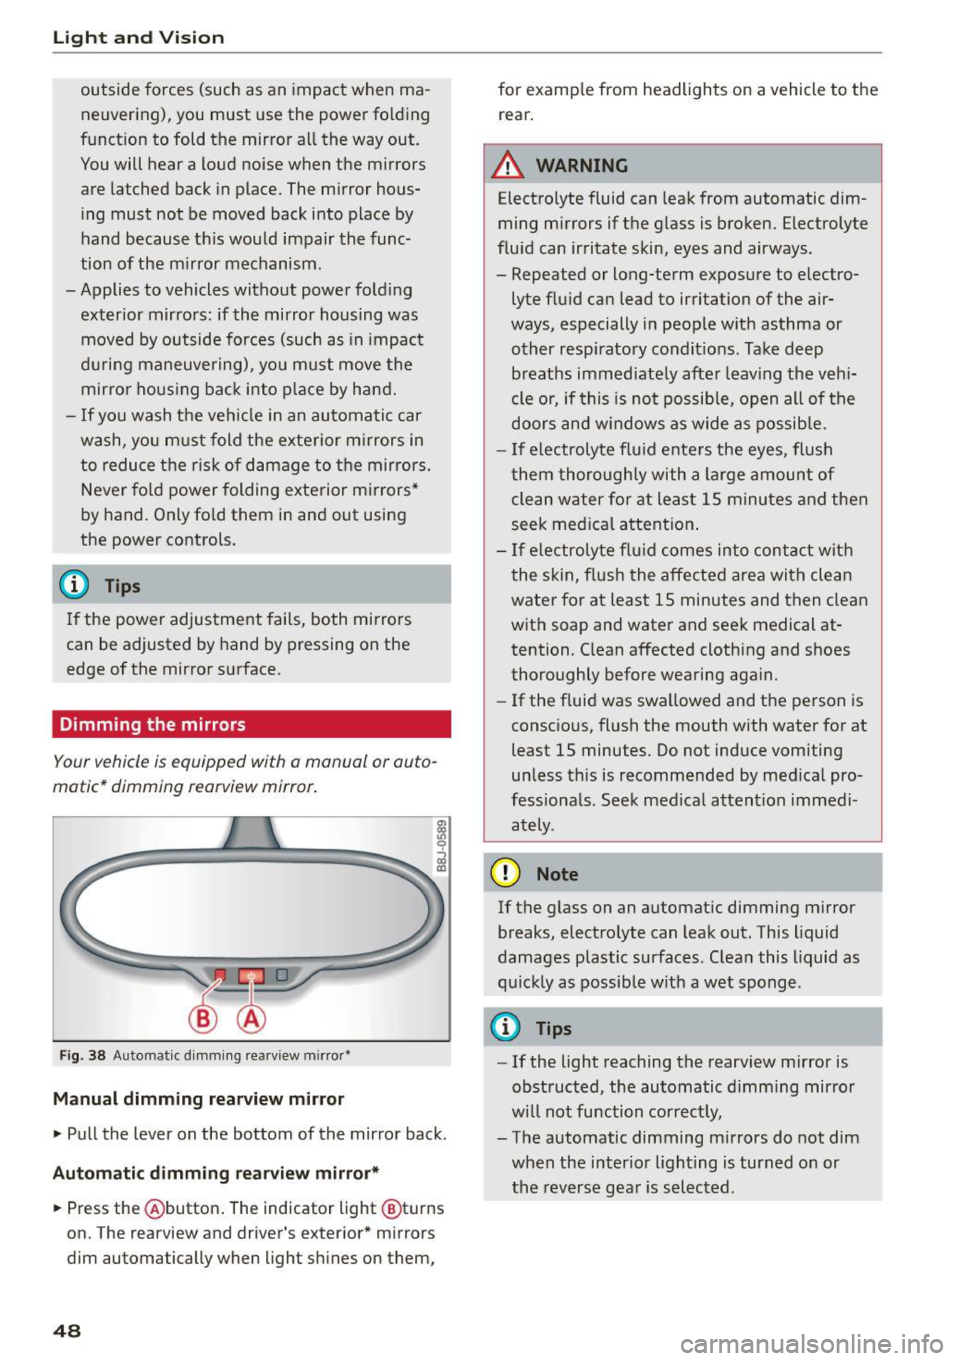
Dimming the mirrors
Your vehicle is equipped with a manual or auto
matic* dimming rearview mirror .
Fig. 38 Automatic d imm ing rearv iew mirro r•
M anual dimming rea rvi ew mirror
• Pull the lever on the bottom of the mirror back.
Autom atic dimm ing r ear view mirr or*
• Press the @button . The indicator light @turns
on. The rearview and driver's exterior * mirrors
dim automatically when light sh ines on them,
48
for examp le from headlights on a vehicle to the
rear.
A WARNING
Electrolyte fluid can leak from automatic dim
ming mirrors if the g lass is broken. Electrolyte
flu id can irritate skin, eyes and airways .
- Repeated or long-term exposure to electro
lyte fluid can lead to irritation of the air
ways, especially in people w ith asthma or
other resp iratory condit ions . Take deep
breaths immed iate ly after leav ing the veh i
cle or, if this is not possib le, open all of the
doors and w indows as wide as possib le.
- If electrolyte flu id ente rs the eyes, flush
them thoroughly with a large amount of
clean water for at least 15 m inutes and then
seek med ica l attention .
- If electroly te f lu id comes into contac t with
the skin, flush the affected area with clean
water for at least 15 minutes and then clean
with soap and water and seek medical at
tention. C lean affected clothing and shoes
thoroughly before wearing aga in.
- If the f luid was swa llowed and the person is
consc io us, fl ush the mouth with water for at
least 15 minutes. Do not induce vomiting
unless th is is recommended by med ica l pro
fessiona ls . Seek med ical attention immedi
ately .
(D Note
If the glass on an automat ic dimming m irror
breaks, electro lyte can leak out. This liquid
damages plastic surfaces. C lean this liquid as
q uick ly as possib le w ith a wet sponge .
{D Tips
- If the light reaching the rearview mirror is
obstructed, the automatic d imm ing mirror
w ill not function correct ly,
- The automatic dimming m irrors do not dim
when the interior lighting is turned on or
the reverse gea r is selected .
Page 51 of 282
....,
N
0 > co
rl I.O
"'
"'
"'
rl
Sun visors
C1o... ___ J
Fig. 39 Left side: su n viso r
The sun visors can be moved out of their brackets
and turned toward the doors@. The sun shade
can also be moved back and forth lengthwise in
this posit ion.
The mirror light switches on when the cover over
the vanity mirror* @opens .
Windshield wipers
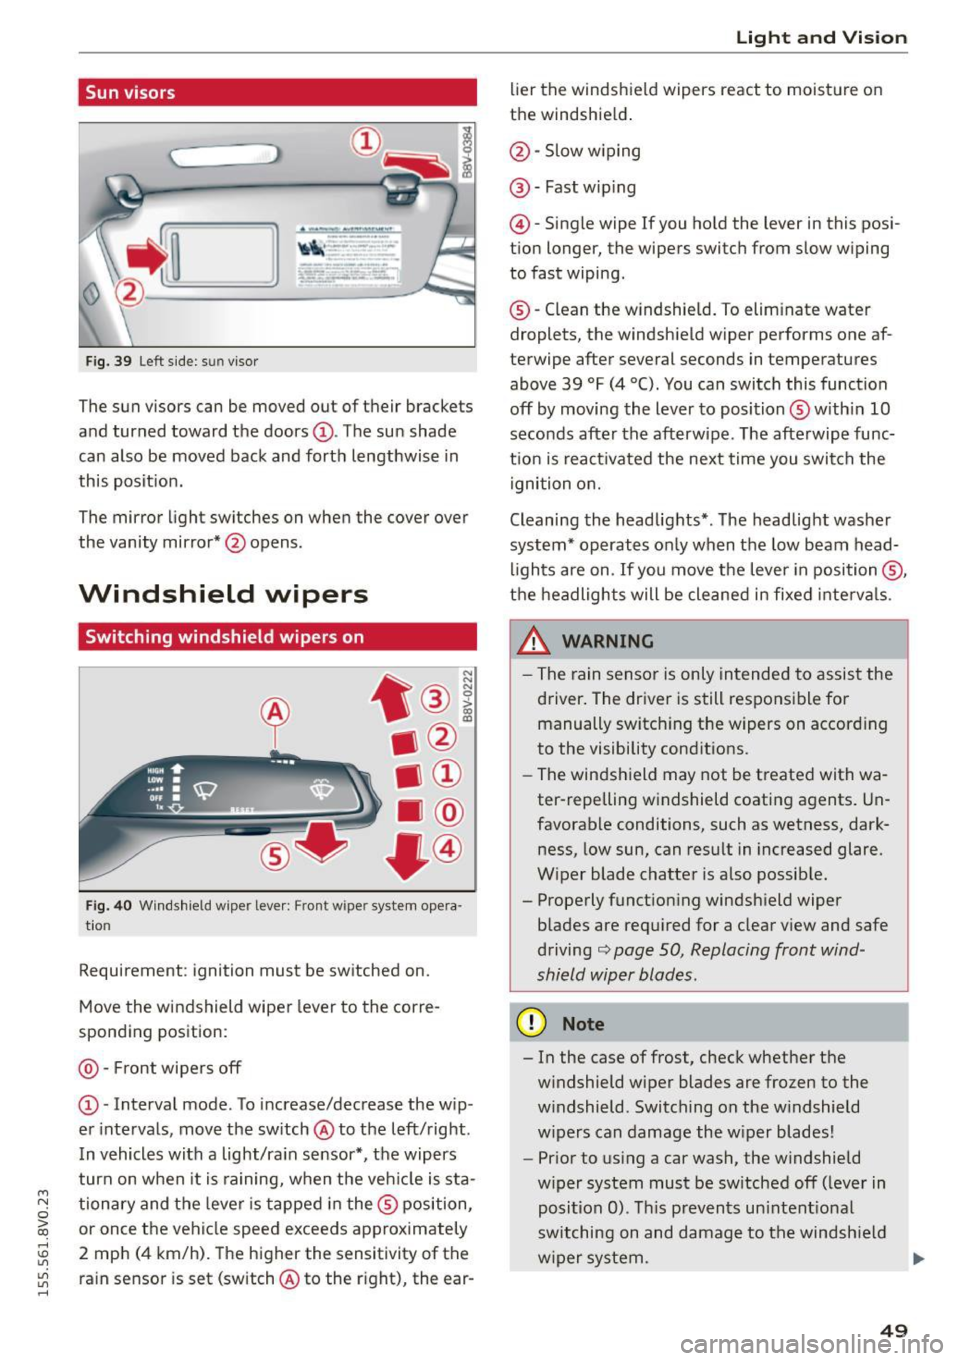
Switching windshield wipers on
Fig. 40 Windshield wiper leve r: Front wiper system opera
tion
Requirement : ignition must be switched on.
Move the windshield wiper lever to the corre
sponding position:
@ -Front wipers off
@ -Interval mode. To increase/decrease the w ip
er intervals, move the switch @to the left/right .
I n vehicles with a light/ra in sensor*, the wipers
turn on when it is ra ining, when the veh icle is sta
tionary and the lever is tapped in the ® position,
or once the vehicle speed exceeds approximately
2 mph (4 km/h). The higher the sensitivity of the ra in sensor is set (switch @to the r ight), the ear-
Light and Visio n
lier the windshield wipers react to moisture on
the windshield .
@-Slow w iping
@ -Fast wip ing
@ -Single wipe If you ho ld the lever in this posi
tion longer, the wipers switch from slow wiping
to fast wiping.
® -C lean the w indshield. To elim inate water
droplets, the windsh ield wiper performs one af
terwipe after several seconds in temperatures
above 39 °F (4 °(). You can switch this function
off by moving the lever to position ® with in 10
seconds after the afterwipe. The afterwipe func
t ion is react ivated the nex t time you switch the
ignition on.
Cleaning the headlights*. The headlight washer
system* operates only when the low beam head
li ghts are on . If you move the lever in position @,
t h e headlights will be cleaned in fixed interva ls .
_& WARNING
- The rain sensor is only intended to assist the
driver. The driver is still responsible for manually switch ing the w ipers on according
to the visibility cond itions.
- The windshield may not be treated with wa
ter-repelling w indshield coat ing agents. Un
favorable conditions, such as wetness, dark
ness, low sun, can result in increased glare.
W iper blade chatter is also possib le.
- Properly function ing windsh ield wiper
b lades are req uired for a clear v iew and safe
driving
c::> page 50, Replacing front wind
shield wiper blades .
(D Note
- In the case of frost, check whether the
windshield wiper blades are fr ozen to the
w indshield. Switching on the w indshield
w ipers can damage the w iper blades!
- Prior to using a car wash, the windshield
w iper system must be sw itched off (leve r in
posit ion 0). T his prevents un intent ional
switching on and damage to the windsh ield
w iper system. .,.
49
Page 53 of 282
....,
N
0 > co
rl I.O
"'
"'
"'
rl
-You should not drive your vehicle or press
the windshie ld wiper lever when the wiper
arms are folded away from the w indshield.
The windshield wipers would move back in
to their original position and could damage
the hood and windshield .
- To prevent damage to the windshield wash
er system, a lways loosen wiper blades that
have frozen to the windsh ield before turn
i ng the wipers on .
- To prevent damage to the wiper blades, do
not apply gasoline, petro leum, th inning
agents or other solvents on the wiper b lades or near them.
- To prevent damage to the wiper arms or
othe r components, do not try to move the
windsh ield wipers by hand.
@ Tips
- Commerc ial hot wax such as the types used
by car washe s make it more difficult t o clean
the w indshie ld.
- You can also use the service pos ition, for ex
ample, if you want to p rotect the w indshie ld
from i cing by us ing a cover.
- You cannot activate the service pos it ion
whe n the hood is open.
Digital compass
Switching the compass on and off
Ap plies to vehicles: w ith digi tal compass
Fig. 4 2 Rearview mirro r: Dig ital compass act ivated
... To turn the compass on or off, press the button
@ until the compass in the mirror appears or
disappears.
Light and Visio n
The dig ita l compass on ly works when the ignit ion
is turned on . The directions a re indicated with ab
breviations:
N (nort h), NE (northeast), E (east),
SE (southeast), S (south), SW (southwest), W
(west), NW (northwest).
You must recalibrate t he compass if it does not
display the correct direct ion
¢ page 52, Cali
brating the compass.
(D Tips
To prevent inaccurate compass readings, do not br ing any remote controls, electrical devi
ces or metallic objects near the mirror.
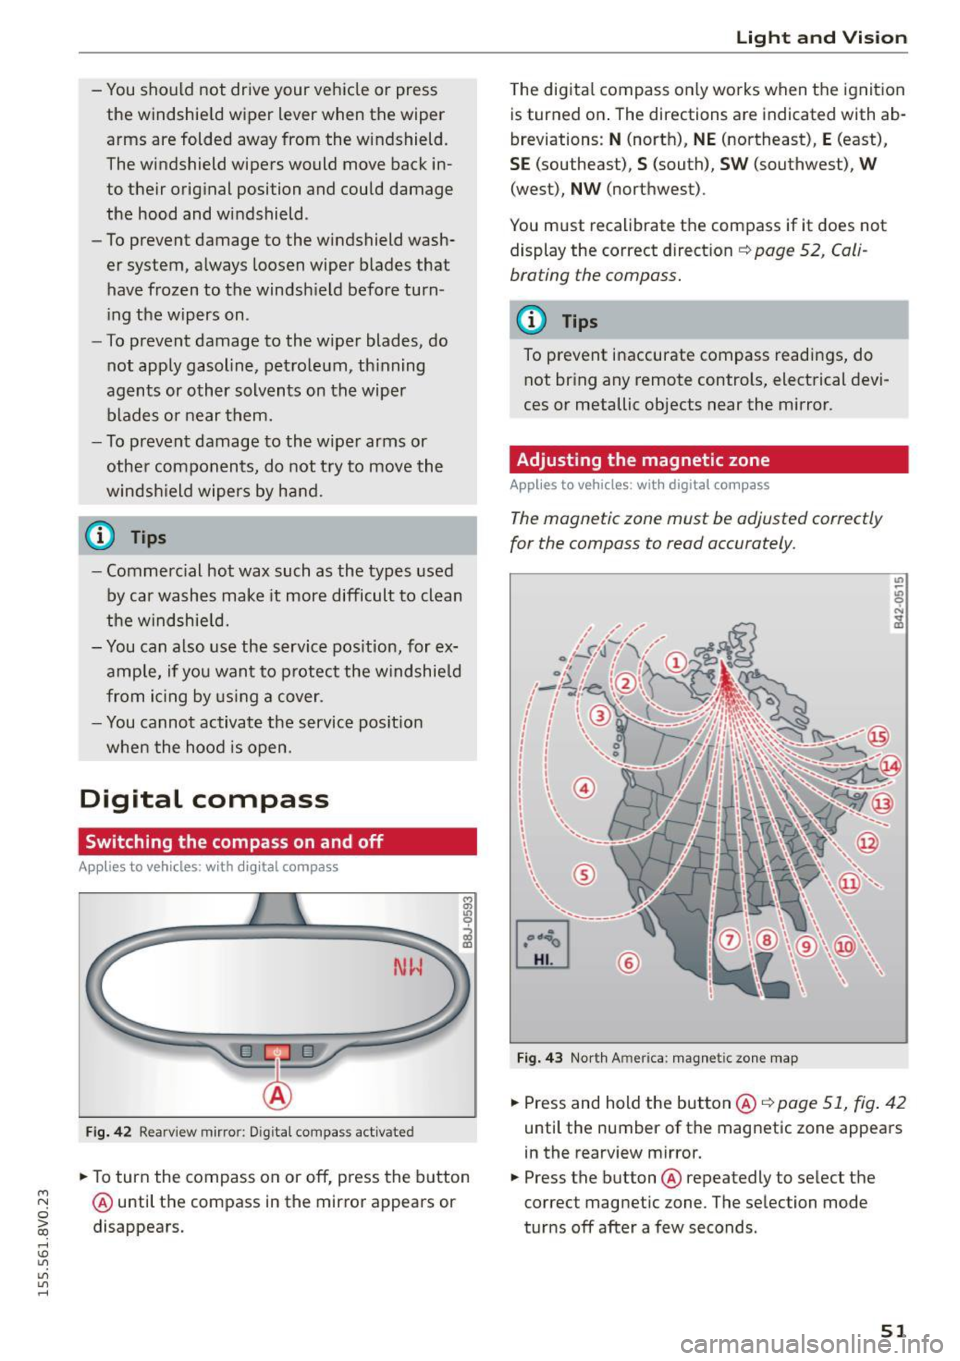
Adjusting the magnetic zone
Appl ies to vehicles: wit h digita l co mp ass
The magnetic zone must be adjusted correctly
for the compass to read accurately.
®
Fig. 4 3 Nor th Ameri ca: magnet ic zone map
... Press and hold the button @ ¢page 51, fig . 42
until the number of the mag netic zone appears
in the rearview mirror .
... Press the butt on @ repeatedly to select the
correct magnetic zone. The se lection mode
tur ns off after a few seconds .
51
Page 54 of 282
Light and Vi sion
Calibrating the compass
Appl ies to veh icles: w ith digital compass
You must recalibrate the compass if it does not
display the correct direction .
.,. Press and hold the button ® c:> page 51, fig. 42
until a C appears in the rearview mirror .
.,. Drive in a circle at about 5 mph (10 km/h) until
a d irect ion is displayed in the rearv iew m irror .
A WARNING
- To avoid endanger ing yourself and othe r
dr ivers, calibrate the compass in an area
where there is no traffic.
-
- T he dig ita l compass shou ld only be used as
an orientation aid .
If you want to check the
compass while driving, you must still pay at
tention to traffic, the road, the weather and any other possible hazards.
52
Page 93 of 282

M N
0 > co ,...., \!) ..,.,
..,.,
..,., ,....,
Trailer mode Driving with a trailer
General information
Your Audi was designed primarily for passenger
transportation .
If you plan to tow a tra iler, p lease remember that
the additiona l load will affect d urability, econo
my and performance .
T railer towing not on ly places more stress on the
vehicle, it a lso calls for more concentrat ion from
the dr iver .
F or this reason, a lways fo llow the operating and
d riving instructions provided and use common
sense.
Technical requirements
Traile r hitch
Use a weight-carrying hitch conforming to the
gross trailer we ight. The hitch must be suitable
for your vehicle and trai ler and must be mounted
securely on the veh icle 's chassis at a technically
sound
location . Use on ly a tra iler hitc h with a re
movable ba ll mou nt. Always chec k w ith the t ra il
e r hitch m anu fac tur er to make sure that you a re
using the co rrec t hitch.
Do not use a bumper hitch .
The hitch must be installed in such a way that it
does not i nterfere wit h the impact -absorbi ng
bumper system. No mod ificat ions should b e
mad e to the vehicle exhaust and brake systems .
Fr om time to t ime, c hec k t hat a ll h itch mou nti ng
bo lts remain sec urely fastened .
When you are no t tow ing a trailer,
remove the
trai ler hitch ball mount . Th is prevents the hitc h
fr om caus ing damage should you r vehicle be
s truck from behind~,&. .
Trailer brakes
If yo ur tra iler is equipped w it h a braking system,
check to be s ure that it conforms to all regu la
tions.
Trailer mode
T he trailer hyd raulic brake system must not be di
rect ly connected to the ve hicle's hydraulic b rake
system .
Safety chains
Always use s afe ty chains be tween your ve hicle
and the tra ile r.
Trailer lights
Tra ile r li ghts must meet all regulations. Be sure
to check w it h your Aud i dea le r fo r corr ect w irin g,
swi tches and relays.
Mirrors
If you a re unable to see the traffic behind you us
i ng the regular o uts ide mirrors, then you
must in
sta ll extended mirrors .
It is importa nt that you
always have clea r vision to the rea r.
_&. WARNING
Afte r removing the trailer hit ch, d o no t store
i t in yo ur vehicle. In ca se of sudden br akin g,
the hitch could fly fo rward and inju re you or
your passengers.
Operating instructions
Maximum traile r weight
A trai le r fo r you r vehicle is limited to a typi cal
class 1 or class 2 trai le r.
Trailer load distribution
B e sure the load in the t raile r is held secure ly in
pla ce to p revent it from shift ing forward, back
ward or sideways .
Never allow a pas senger to ride in a trailer~.&.
in Driving instructions on page 92.
Engine cooling system
Towing a trailer makes the engine work harder . It
is important tha t the cooling system 's pe rform
ance is up to the additional load. Make s ure that
the coo ling system has enoug h flu id.
Tire pressure
When towing a trailer, inflate the tires of your ve-
hicle to the cold tire pressure listed under "Full
lilJJ..
91