Page 65 of 282
M N
0 > co ,...., \!) ..,.,
..,.,
..,., ,....,
tightened. If necessary, retighten the mountings and check the entire system
from t ime to t ime.
- After mounting a roof rack system, or when
you transport objects on the roof of your ve
hicle, the height of the veh icle is naturally
increased. Be careful when driving under
l ow bridges or in parking garages for exam
ple. This could cause damage to the load
and even the vehicle itself.
- Make sure the open rear lid and the sun
roof* do not come into contact with the roof
rac k.
Loading the roof rack
Always distribute loads evenly . Make sure any
thing on the roof rack is securely tied down .
... Always distribute the loads on the roof rack
evenly .
... Always attach items to the roof rack securely
before you d rive off .
The maximum perm iss ible roof weight is
165 lb
( 75 kg ). The roof weight is the total of the
weight of the roof rack, the attachments and the
cargo you a re ca rrying . You must also not exceed
the maximum load weight fo r the roof rack you
a re using.
When using a roof rack system wh ich has a lower
l oad carrying capacity, you must not use up the
tota l maxim um permissible load car ry ing capac i
ty specified above. Inste ad , you shou ld load t he
roof rack system only to the maximum capacity
specified by the manufact urer of the roof rack
system .
A WARNING
Weak, damaged or improper straps used to
secure items to the roof rack can fa il during
hard brak ing or in a collision and cause seri
ous personal injury.
- Make sure the roof rack is insta lled exactly
as spec ified above
¢ page 62.
- Always use suitable mounting straps for se
curing items to the roof rack to help prevent
items from shift ing or f ly ing fo rward.
-
S eat s and stor age
- Items on the roof rac k must always be se
curely mounted.
- The use of a roof rack can negatively affect
the way a vehicle handles. Cargo that is
large, heavy, bulky, long or flat will have a
greater negative inf luence on the vehicle's
ae rodynamics, center of gravity and overall
h a ndling. Always drive slowly, avoid sudden
b rak ing and maneuvers when transpor ting
cargo on the roof of your veh icle.
- Never exceed the maxim um permissible
load carrying capacity of the roof of your ve
h icle, the permiss ible axle weights and the
perm issib le tota l we igh t of your vehicle
¢ page 258, Weights .
@ For the sake of the environment
As a result of the increased wind resistance
created by a roof ra ck , your vehicle is using
fuel unnecessarily. So remove the roof rac k af
ter using it.
63
Page 66 of 282
Warm and cold
Warm and cold Climate control system
Description
Different systems could be installed.
- manual climate control system* or
- automatic climate control system*
The
climate control system* cools and removes
humidity from the air in the vehic le interior. It is
the most effective when the windows and panor
ama sunroof* are closed.
If there is a build-up of
heat inside the vehicle, ventilation can help to
speed up the cooling process . For this reason, the
windows and panorama sunroof can be opened
from the outside .~
page 41, Convenience open
ing/closing
Pollutant filter
The pollutan t filter removes pollutants such as
dust and pollen from the air.
Key recognition
You can store various settings for the manua l and
automatic
climate control system* and assign
them to the key being used .
A WARNING
Poor visibility can lead to acc idents.
- For safer driving, keep all w indows free of
ice, snow and fog.
- Become familiar as quickly as possible with
the correct use and function of the climate
control system, espec ially with the defrost
ing and defogging function .
- When the temperature is below freezing,
only use the windsh ield washer system after
the windsh ield has been warmed by the cli -
64
mate control system. The washer f luid could
freeze on the w indshield and impair visibili
ty.
(D Note
- If you suspect that the climate control sys
tem is damaged, switch the system off to
prevent further damage and have it checked
by an authorized Audi dealer or authorized
Audi Service Facility .
- Repairs to the Audi climate control system
require special technical knowledge and
special tools. See an author ized Audi dealer
or authorized Audi Service Facility .
@ For the sake of the environment
Reducing the amount of fuel used also re
duces the amount of pollutants that enter the
a ir .
@ Tips
- To prevent interference with the heating
and cooling output and to prevent the win
dows from fogg ing over, the air intake in
front of the w indshield must be free of ice,
snow or leaves.
- Condensation from the cooling system* can
dr ip and form a pudd le of water under the
vehicle . This is normal and does not mean
there is a leak .
- Th e energy management system may switch
the seat heating* or rear window defroster
off temporarily. These systems are available
again as soon as the energy balance has
been restored.
- The f lows through the vents under the rear
window. Make sure the openings are not
covered when p lacing clothing on the lug
gage compartment cover.
Page 67 of 282
....,
N
0 > co
rl I.O
"'
"'
"'
rl
Climate control system controls
Applies to vehicles: with manual climate control system
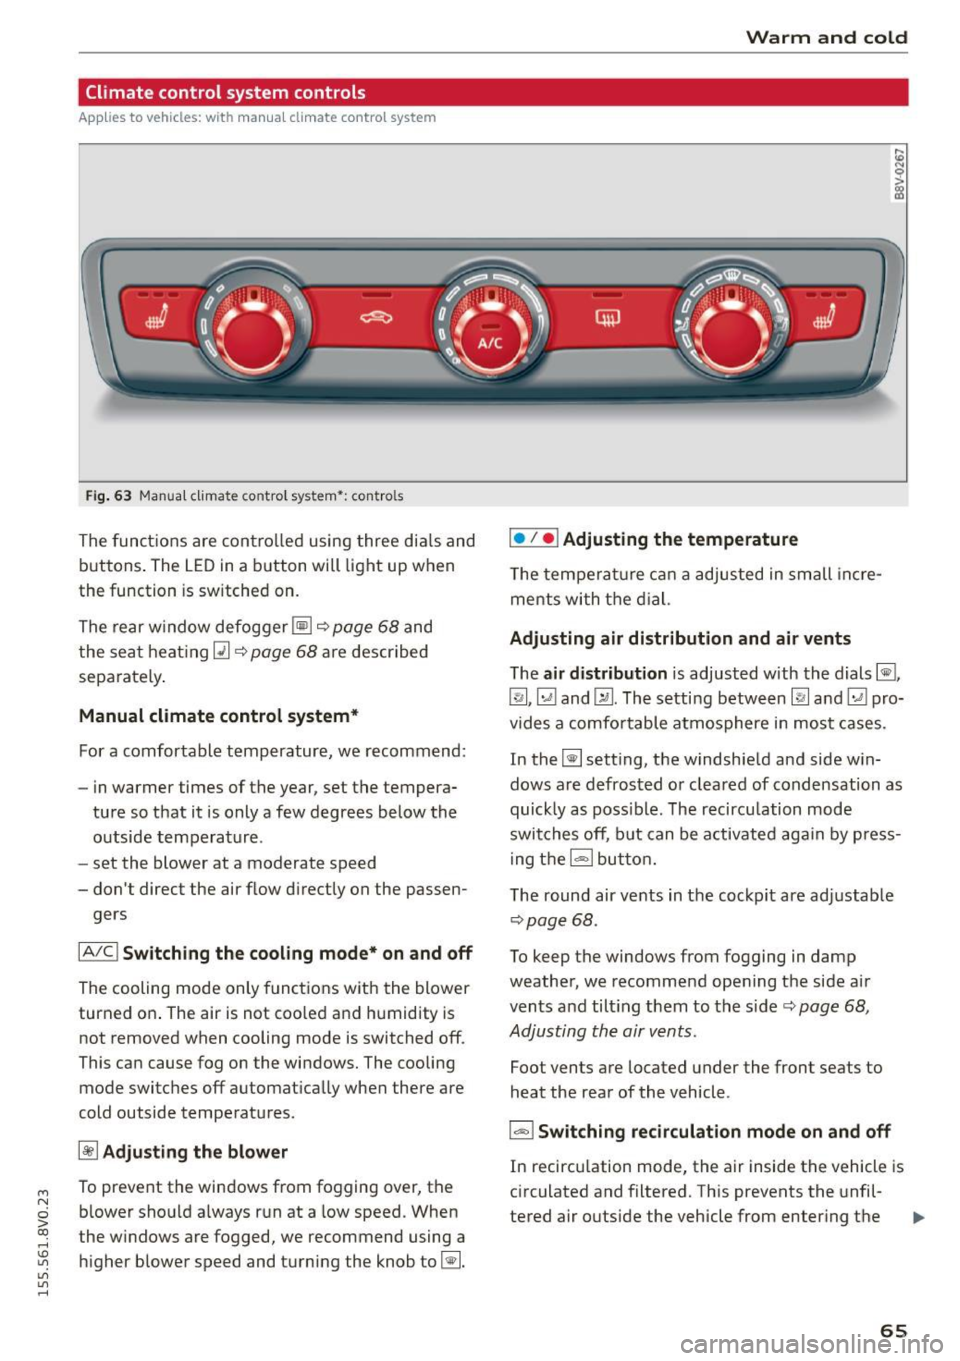
F ig. 63 Manua l clima te co ntro l system *: contro ls
The functions are controlled using three dia ls and
buttons . The LED
in a button will light up when
the function is sw itched on.
The rear window defogger ~~
page 68 and
the seat heating~~
page 68 are described
sepa rately .
Manual climate control system*
For a comfortable temperature, we recommend:
- in warmer time s of the year, set the tempera-
ture so that it is only a few degrees below the outside temperature .
- set the blower at a moderate speed
- don't direct the air flow d irectly on the passen-
gers
IA/C l Switching the cooling mode* on and off
The cooling mode only functions with the blower
turned on . The air is not coo led and humidity is
not removed when cooling mode is switched off .
This can cause fog on the windows. The cooling
mode switches off automat ically when there are
cold outside temperatures.
~ Adjusting the blower
To prevent the windows from fogging over, the b lower should a lways run at a low speed. When
t he w indows are fogged, we recommend using a
higher blower speed and turning the knob to~-
Warm and cold
I• I • I Adjusting the temperature
T he temperature can a adjusted in small incre
me nts with the dial.
Adjusting air distribution and air vents
The air distribution is adjusted with the dials ~.
~.~ and~-The setting between
IR! and ~ pro
vides a comfo rtable atmosphere in most cases.
In the~ setting, the windshield and side win
dows are defrosted or cleared of condensation as
quickly as poss ible. The recircu lation mode
switches off, but can be activated again by press
ing the
l = I button.
The round air vents in the cockpit are adjustab le
¢ page 68 .
To keep the windows from fogging in damp
weather, we recommend opening the side air
vents and tilt ing them to the side ¢
page 68,
Adjusting the air vents .
Foot vents are located under the front seats to
heat the rear of the vehicle .
I-I Switching recirculation mode on and off
In recirculation mode, the air inside the vehicle is
circulated and filtered. This prevents the unfil-
tered air outside the vehicle from enter ing the .,..
65
Page 68 of 282
Warm and col d
vehicle interior . We recommend switching recir
culation mode on when driving through a tunne l
or when s itting in traffic¢.&. .
Recircula tion mode is sw itched off in the defrost
setting ~.
Automatic climate control system controls
Applies to vehicles: with automatic air conditioner
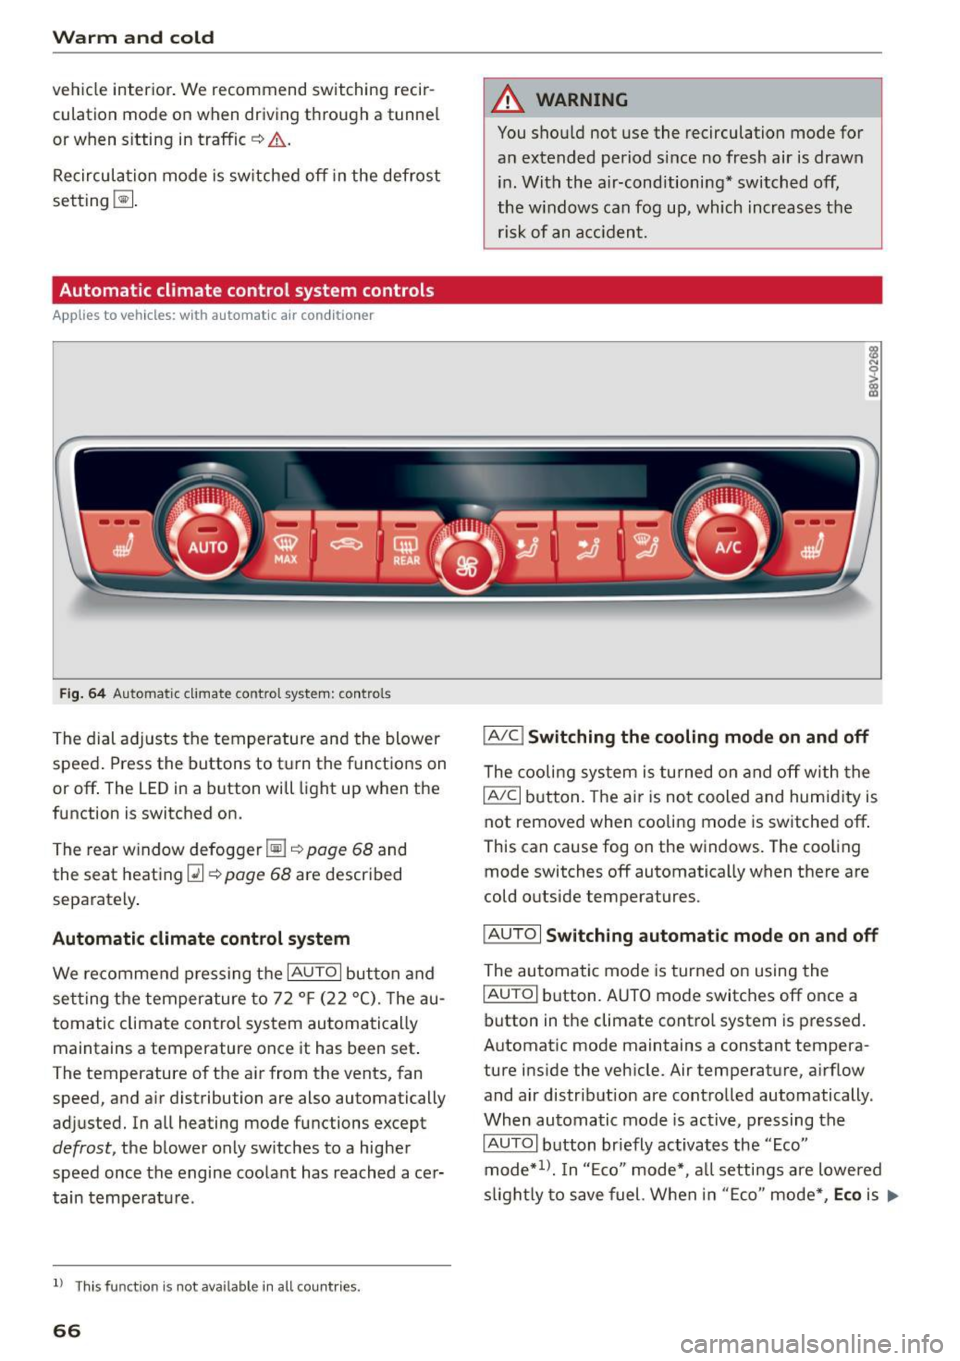
Fig. 6 4 Automa tic climat e co ntro l system : contro ls
The dial ad justs the temperature and the blower
speed . Press the buttons to turn the functions on
or off . The LED in a button will light up when the
function is switched on.
T he rear w indow defogger ~¢
page 68 and
the seat heat ing
Q] ¢ page 68 are described
separately .
Automatic climate cont rol system
We recommend p ress ing t he IAU TOI button and
se tting the temperature to 72
°F (22 °(). T he au
tomatic climate control system au tomatically
maintains a temperature once it has been set .
The temperature of the ai r from the vents, fan
speed, and a ir distribution are also automatically
adjusted. In all heating mode functions except
defrost, the b lower only sw itches to a higher
speed once the engine coo lant has reached ace r
tain tempe rat ure.
ll Thi s fun ctio n is not ava ilable in a ll countries.
66
A WARNING
You shou ld not use the recirculation mode for
an extended period s ince no fresh air is drawn
i n . With the air-conditioning* switched off,
the w indows can fog up, which increases the
risk of an a cciden t.
IA/C l Switching the cooling mode on and off
The cooli ng sys tem is turned on a nd off with the
IAJC I button. The ai r is no t cooled and humid ity is
not removed when cooling mode is switched off .
This can cause fog on the windows. The coo ling
mode switches off automatically when there are
cold o utside temperatures.
IAU TO I Switching automatic mode on and off
The au tomatic mode is turned on using the
IAU TO I button. A UTO mode switches off once a
button in the climate contro l system is pressed.
Automat ic mode maintains a constant tempera
ture i nside the vehicle. Air temperature, a irflow
and air distribut ion are contro lled automatically.
When automatic mode is active, pressing the
IAUTOI b utton briefly activates the "Eco"
mode*
1> . I n "E co" mode*, a ll setti ngs are lowered
s ligh tly to save fuel. Whe n in "E co" mode *,
Eco is .,..
Page 69 of 282
shown in the disp lay. To exit "Eco" mode*, press
the
! AUTO ! button again .
I• I • I Setting the temperature
The temperature can be adjusted individually for
the dr iver and front passenger using the dials.
Tempe ratures between 60 °F ( +16 °C) and 84 ° F
(+28 °C) can be set. If outside of this range, LO or
HI will appear in the climate control system dis
p lay. In both settings, the climate contro l runs
with constantly at the maximum cooling or heat ing level. The temperature is not regulated.
Synchronization: by pressing the IAUTO I button
for two seconds, the temperature setting for the
driver is transferred to the front passenger's side.
This applies a temperature change to the front
passenger's side.
~ Adjusting the blower
To prevent the windows from fogging over, the b lower sho uld a lways ru n at a low speed. You can
ad just the volume of air generated by the b lower
to your preference. To have the blower regu lated
automatically, press the !AU TO I button .
Adjusting the air distribution
The air distribution is adjusted with the~, U!i
and ~ buttons. To have the air d istr ibut ion regu
lated automatically, press the
IAUTOI button.
The round air vents in the cockpit are adjustable
¢page 68.
To keep the windows from fogging in damp
weather, we recommend opening the side air
vents and ti lting them to the side
~ page 68,
Adjusting the air vents .
Foot vents are located under the front seats and
adjustable vents on the end o f the center console
to heat the rear of the vehicle .
~ Switching the defroster on and off
The windshield and side windows are defrosted
or cleared of condensation as quickly as possible .
The maximum amount of air flows main ly from
M
N the vents below the windshie ld. Recirculation 0
iii mode switches off . The temperat ure is contro lled
~ automatically. In the Ii] sett ing, the IA/C i cooling
Vl
Vl
......
Warm and cold
mode switches on automatically, depending on
the outside air temperat ure.
T he
IAUTO ! button switches the defroster off.
l"""I Switching recirculation mode on and off
The recircu lation mode can be turned on manual
ly or automatically* .
- Switching manual recirculation mode on and
off : press
1.,,.,1 The LED light up when switched
on .
- Automatic* recirculation mode: the auto recir
culat ion must be act ivated in the MMI. Select:
the
I MENU I button > Car > Systems* control
button
> AC > Auto recirculation . The air quali
ty sensor that is designed for diesel and gaso
line exhaust automatically switches the recircu
lation mode on or off depending on the level of
pollutants in the outside air .
In recircu lation mode, the air inside the vehicle is
c ir cula ted and filtered. This prevents the unfil
tered air outside the vehicle from entering the
vehicle interior. We recommend switching recir
cu lation mode on when driving through a tunnel
or when sitting in traffic~ &.
T he
1-1 button, !AUTO ! or the [ii bu tton switches
recirculation mode off.
T he system switches to recirculation mode when
driv ing in reverse when the engine is cold.
_&. WARNING
You should not use the recirculation mode for
an extended period sin ce no fresh air is drawn
in. With the air-conditioning switched off, the
windows can fog up, which increases the risk
of an acc ident.
67
Page 70 of 282
Warm and col d
Adjusting the air vents
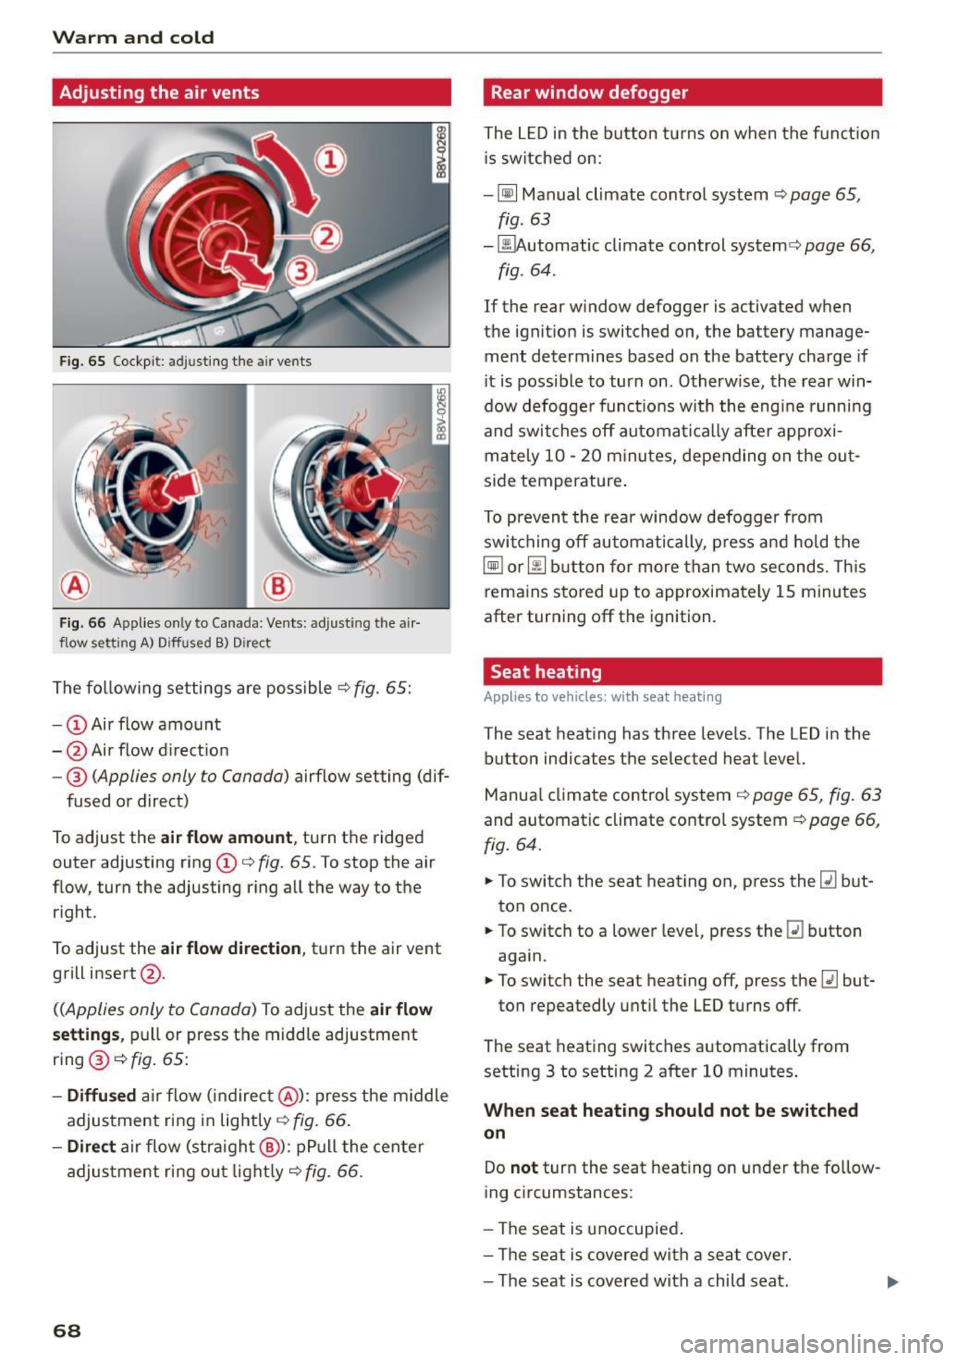
Fig. 65 Cockp it: adjusting the air vents
®
Fig. 66 Applies on ly to Canada: Ven ts: adjusting the air
flow setting A) Diffused B) Dire ct
The fo llow ing settings are possible .:;> fig. 65:
- CD Air flow amount
- @ Air flow d irection
- @
(Applies only to Canada) airflow setting (dif-
fused or direct)
To adjust the
air flow amount , turn the ridged
outer adjusting ring CD¢
fig. 65. To stop the air
flow, turn the adjusting r ing all the way to the
right .
To adjust the
air flow di rection , tu rn the air vent
grill insert @.
((Applies only to Canada) To adjust the air flow
s etting s,
pull or press the midd le adjustment
ring @¢
fig. 65:
-Diffu sed ai r flow (indirec t@ ): press the m iddle
adjustment ring in lightly¢
fig. 66 .
-Direct air flow (stra ight @): pP ull the center
adjus tment ri ng ou t light ly¢
fig. 66 .
68
Rear window defogger
The L ED in the button tu rns on when the funct ion
i s sw itched on:
- ~ Manual climate contro l system ¢
page 65,
fig. 63
- ~ utomatic climate control system¢ page 66,
fig . 64 .
If the rear window defogger is activated when
the ignit ion is switched on, the battery manage
ment determines based on the battery charge if
i t is possible to turn on . Otherw ise, the rear win
dow defogge r funct ions w ith the eng ine runni ng
and swit ches off automat ically afte r approxi
mately 10 -20 m inu tes, depending o n the ou t
s ide temperature .
To p revent the rear window defogger from
swi tching off automatically, p re ss and hold t he
~ or~ button fo r more than two seconds. Th is
rema ins stored up to approximately 1 5 minutes
after turning off the ignition .
Seat heating
Applies to vehicles: with seat heating
The seat heat ing has three leve ls. The LED in the
button indicates the selected heat level.
Manua l climate control system ¢
page 65, fig. 63
and automatic climate control system ¢ page 66,
fig. 64.
.. To swi tch the seat heat ing on, press the~ but
ton once.
.. To switch to a lowe r leve l, p ress the ~ button
aga in.
.. To switch the seat heating off, press the~ but-
ton repeatedly unti l the LED turns off.
The seat heating switches automatically from
setting 3 to setting 2 after 10 minutes .
When seat heating should not be switched
on
Do not turn the seat heating on under t he fo llow
ing circumstances:
- The seat is unoccupied .
- The se at is covered wit h a seat cover.
- The seat is covered with a child seat.
Page 71 of 282
M N
0 > co ,...., \!) ,.,.,
,.,.,
,.,., ,....,
-The seat is damp or wet.
~ WARNING
Individuals with reduced sensitivity to pain or
temperature could develop burns when using
the seat heating function. To reduce the risk
of injury, these individuals should not use seat
heating.
(D Note
To avoid damage to the heating elements in the seats, do not kneel on the seats or place
heavy loads on a small area of the seat.
(D Tips
- The setting for the seat heating on the driv
er's side is assigned to the key that is in use.
- If the front passenger's seat heating is
turned on, it will not turn on again automat
ically if more than 10 minutes have passed
between switching the ignition
off and
switching it on again.
Auxiliary heater
Appl ies to vehicles: with diesel engine
In cool outside temperatures, the electric auxili
ary heater helps the vehicle interior to warm
more quickly. The auxiliary heater switches on
and
off automatically according to the vehicle
heating settings.
The "auxiliary heater" function can be switched
on and
off in the MMI. Select: the !MENUI button
> Car > Systems* control button > AC > Auxiliary
heater.
Warm and cold
69
Page 72 of 282
Driving
Driving
General information
The first 1,000 miles (1,500 km) and
afterwards
The new engine needs to be run-in during the
first 1,000 miles (1,500 km) .
For the first 600 miles (1 ,000 k ilometers ):
.. Do not use full throttle.
.. Do not drive at engine speeds that are more
than 2/3 of the maximum permitted RPM .
.. Avoid high engine speeds .
From 600 to 1,000 miles (1,000 to
1,500 kilometers):
.. Speeds ca n gradually be increased to the maxi
mum perm issible road or eng ine speed .
During and after break-in period
.. Do not rev the engine up to high speeds when it
is cold. This applies whether the transmission is
in N (Neutral) or in gear .
After the break-in peri od
.. Do not exceed maximum engine speed under
any circumstances.
.. Upshift into the next higher gear
before reach
ing the red area at the end of the tachometer
scale
opage 10.
During the first few hours of driving, the engine's
internal friction is higher than later when all the
mov ing parts have been broken in. How well this
break-in process is done depends to a cons idera
b le extent on the way the vehicle is driven dur ing
the first 1,000 miles (1,500 kilometers).
0 Note
Extremely high engine speeds are automati
cally reduced. However, these rpm limits are
programmed for an engine well run-in, not a
new engine.
@ For the sake of the environment
Do not dr ive with unnecessarily high eng ine
speeds -upshifting early saves fuel, reduces
noise and protects the environment.
70
· Driving through water on roads
Note the following to avoid veh icle damage when
driving through water, for example on flooded
roads:
- The water must not be any higher than the bot
tom of the vehicle body .
- Do not dr ive faster than walk ing speed .
A WARNING
After driv ing through water or mud, the brak
ing effect can be reduced due to moisture on
the brake discs and bra ke pads. A few careful
brake applications sho uld dry off the brakes .
(D Note
Vehicle components such as the eng ine,
transmission, suspension or electrical system
can be severe ly damaged by driv ing through
water .
(D Tips
- Determine the depth before driving through
water.
- Do not stop the vehicle, drive in reverse or
switch the engine off when driv ing th rough
water .
- Keep in mind that oncoming veh icles may
create waves that raise the water level and
make it too deep for your vehicle to drive
through safely.
- Avoid driving through salt wate r (corrosion).
Economical and environ
mentally-friendly driving
General
Your personal style of driving will determine the
economy of your vehicle, as well as exhaust and
noise levels.
Fuel economy, env ironmental impact, and wear
on your engine, brakes and tires largely depend
on three factors :
- your personal driving style
- operating conditions
- technical limitations
 1
1 2
2 3
3 4
4 5
5 6
6 7
7 8
8 9
9 10
10 11
11 12
12 13
13 14
14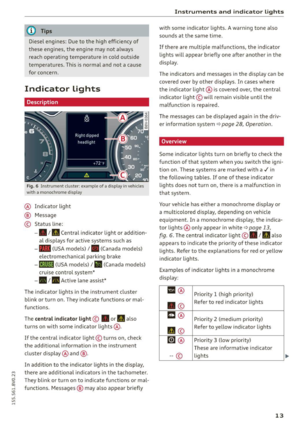 15
15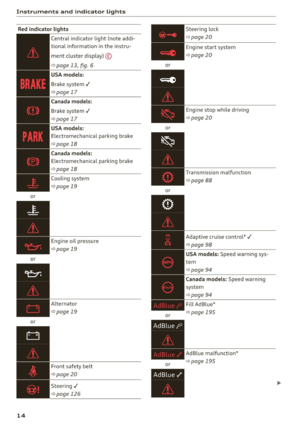 16
16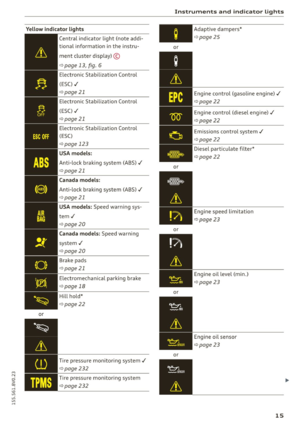 17
17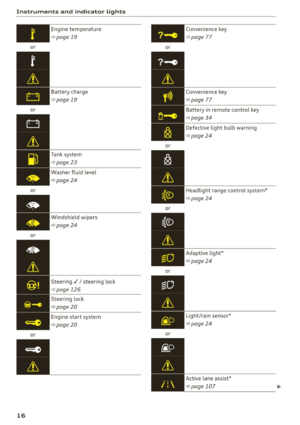 18
18 19
19 20
20 21
21 22
22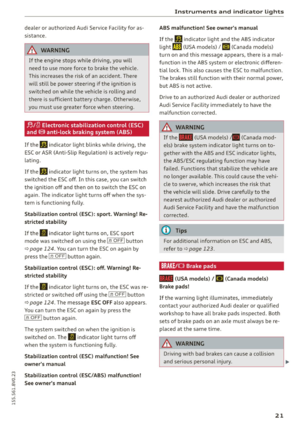 23
23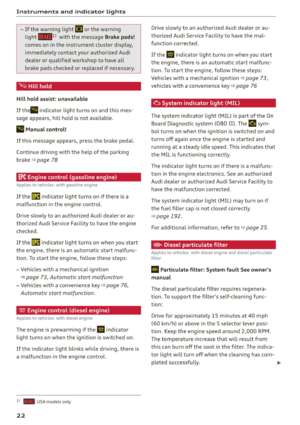 24
24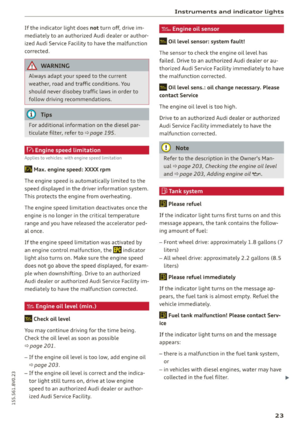 25
25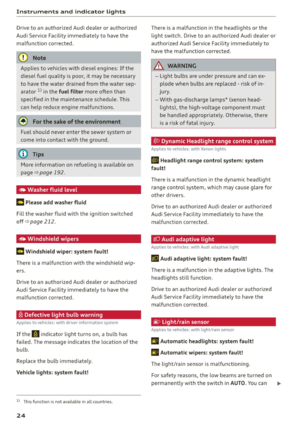 26
26 27
27 28
28 29
29 30
30 31
31 32
32 33
33 34
34 35
35 36
36 37
37 38
38 39
39 40
40 41
41 42
42 43
43 44
44 45
45 46
46 47
47 48
48 49
49 50
50 51
51 52
52 53
53 54
54 55
55 56
56 57
57 58
58 59
59 60
60 61
61 62
62 63
63 64
64 65
65 66
66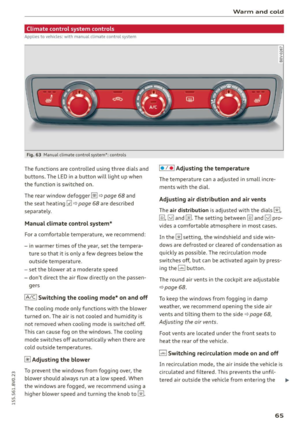 67
67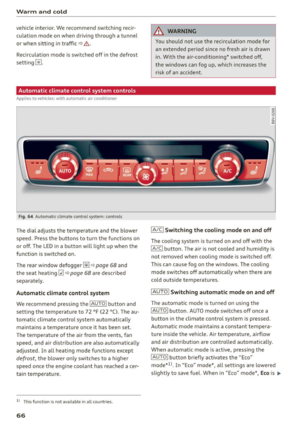 68
68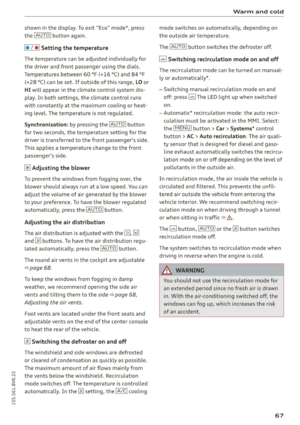 69
69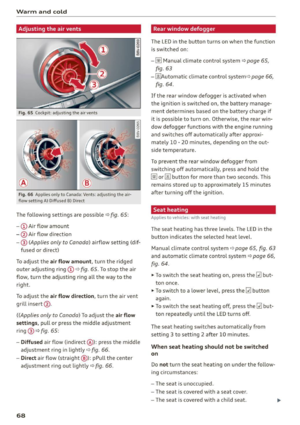 70
70 71
71 72
72 73
73 74
74 75
75 76
76 77
77 78
78 79
79 80
80 81
81 82
82 83
83 84
84 85
85 86
86 87
87 88
88 89
89 90
90 91
91 92
92 93
93 94
94 95
95 96
96 97
97 98
98 99
99 100
100 101
101 102
102 103
103 104
104 105
105 106
106 107
107 108
108 109
109 110
110 111
111 112
112 113
113 114
114 115
115 116
116 117
117 118
118 119
119 120
120 121
121 122
122 123
123 124
124 125
125 126
126 127
127 128
128 129
129 130
130 131
131 132
132 133
133 134
134 135
135 136
136 137
137 138
138 139
139 140
140 141
141 142
142 143
143 144
144 145
145 146
146 147
147 148
148 149
149 150
150 151
151 152
152 153
153 154
154 155
155 156
156 157
157 158
158 159
159 160
160 161
161 162
162 163
163 164
164 165
165 166
166 167
167 168
168 169
169 170
170 171
171 172
172 173
173 174
174 175
175 176
176 177
177 178
178 179
179 180
180 181
181 182
182 183
183 184
184 185
185 186
186 187
187 188
188 189
189 190
190 191
191 192
192 193
193 194
194 195
195 196
196 197
197 198
198 199
199 200
200 201
201 202
202 203
203 204
204 205
205 206
206 207
207 208
208 209
209 210
210 211
211 212
212 213
213 214
214 215
215 216
216 217
217 218
218 219
219 220
220 221
221 222
222 223
223 224
224 225
225 226
226 227
227 228
228 229
229 230
230 231
231 232
232 233
233 234
234 235
235 236
236 237
237 238
238 239
239 240
240 241
241 242
242 243
243 244
244 245
245 246
246 247
247 248
248 249
249 250
250 251
251 252
252 253
253 254
254 255
255 256
256 257
257 258
258 259
259 260
260 261
261 262
262 263
263 264
264 265
265 266
266 267
267 268
268 269
269 270
270 271
271 272
272 273
273 274
274 275
275 276
276 277
277 278
278 279
279 280
280 281
281


