2015 AUDI S3 SEDAN rear view mirror
[x] Cancel search: rear view mirrorPage 46 of 282

Light and Vision
When switched on, adaptive light adjusts to
curves depending on the vehicle speed and steer·
ing wheel angle . This provides better lighting
through the curve. The system operates in a
speed range from approximately 6 mph (10 km/
h) to 68 mph (110 km/h).
Static cornering light* (vehicles with adaptive
light)· the cornering light switches on automati
cally when the steering wheel is turned at acer
tain ang le at speeds up to approximately 44 mph
(70 km/h) and whe n the turn signal is activated
at speeds up to approximately 25 mph (40 km/
h). The area to the side of the vehicle is illuminat
ed better when tu rning.
Speed depend ent light distribution* -The speed
dependent light distribution adapts the light in
towns and on highways or expressways. In tersec
tions can also be illum inated on veh icles with a
navigat ion system*.
Highway light function*
(Vehicles with adaptive light or LED headlights) -
This function adapts the light ing for highway
driving based on vehicle speed .
..&, WARNING
-Automatic headlights* are only int ended to
assist the driver. They do not relieve the
driver of his responsibility to check the
headlights and to turn them on manually
according to the current light and visibi lity
condit ions. For example, fog cannot be de·
tected by the light sensors . So always switch
on the low beam under these weather con
ditions and when driving in the dark
io.
- Accidents could occur if you can not see the
road ahead of you well and if others on the
road cannot see you . Always switch your
head lightsonsothatyoucanseetheroad
ahead of you and others can see your vehicle
from behind.
- Please observe legal regulations when using
the lighting systems described .
44
(D Note
The rear fog lights shou ld only be turned on in
accordance with traffic regulation, as the lights are bright for following traffic.
@ Tips
-The light sensor for the automatic head
lights * is in the rearview mirror mount.
Therefore, do not place any stickers in this
area on the windshield.
- Some functions of the exterior lighting can
be adjusted
c> page 45.
- If you turn off the ignition whi le the exterior
lights are on and open the door, you will
hear a warning tone.
- In some market-specific versions, the tail
lights do not turn on when switching on the
daytime running lights.
- In cool or damp weather, the inside of the headlights, turn signals and taillights can
fog over due to the temperature difference
between the inside and outside . They will
clear shortly after switching them on. This
does not affect the serv ice life of the light
ing .
- A message will appear in the instrument
cluster if there is a malfunction in the light
sensor
c> page 24.
Emergency flasher
Fig. 32 Ins trumen t panel : em ergenc y flasher bu tton
The emergency flashers makes other dr ivers
aware of your vehicle in dangerous s ituations .
.. Press the~ button to switch the emergency
flashers on or off.
Page 50 of 282
Lig ht a nd Vis ion
outside forces (such as an impact when ma
neuvering), you must use the power folding
funct ion to fold the mir ror all the way out.
You will hear a loud noise when the mirrors
are latched back in place. The mirror hous
i ng must not be moved back into place by
hand because th is would impair the func
tion of the mirror mechanism.
-Applies to vehicles without power fold ing
exterior mirrors: if the mirror housing was moved by outside forces (such as in impact
during maneuve ring), you must move the
mirror ho us ing ba ck into p lace by hand.
- If you wash the veh icle in an automatic car
wash, you m ust fold the exterior m irrors in
to reduce the risk of damage to the mirrors .
Never fold power folding exterior mirrors*
by hand. Only fo ld them in and out using
the power controls.
@ Tips
If the power adjustment fails, both mirrors
can be adjusted by hand by pressing on the
edge of the mirror surface.
Dimming the mirrors
Your vehicle is equipped with a manual or auto
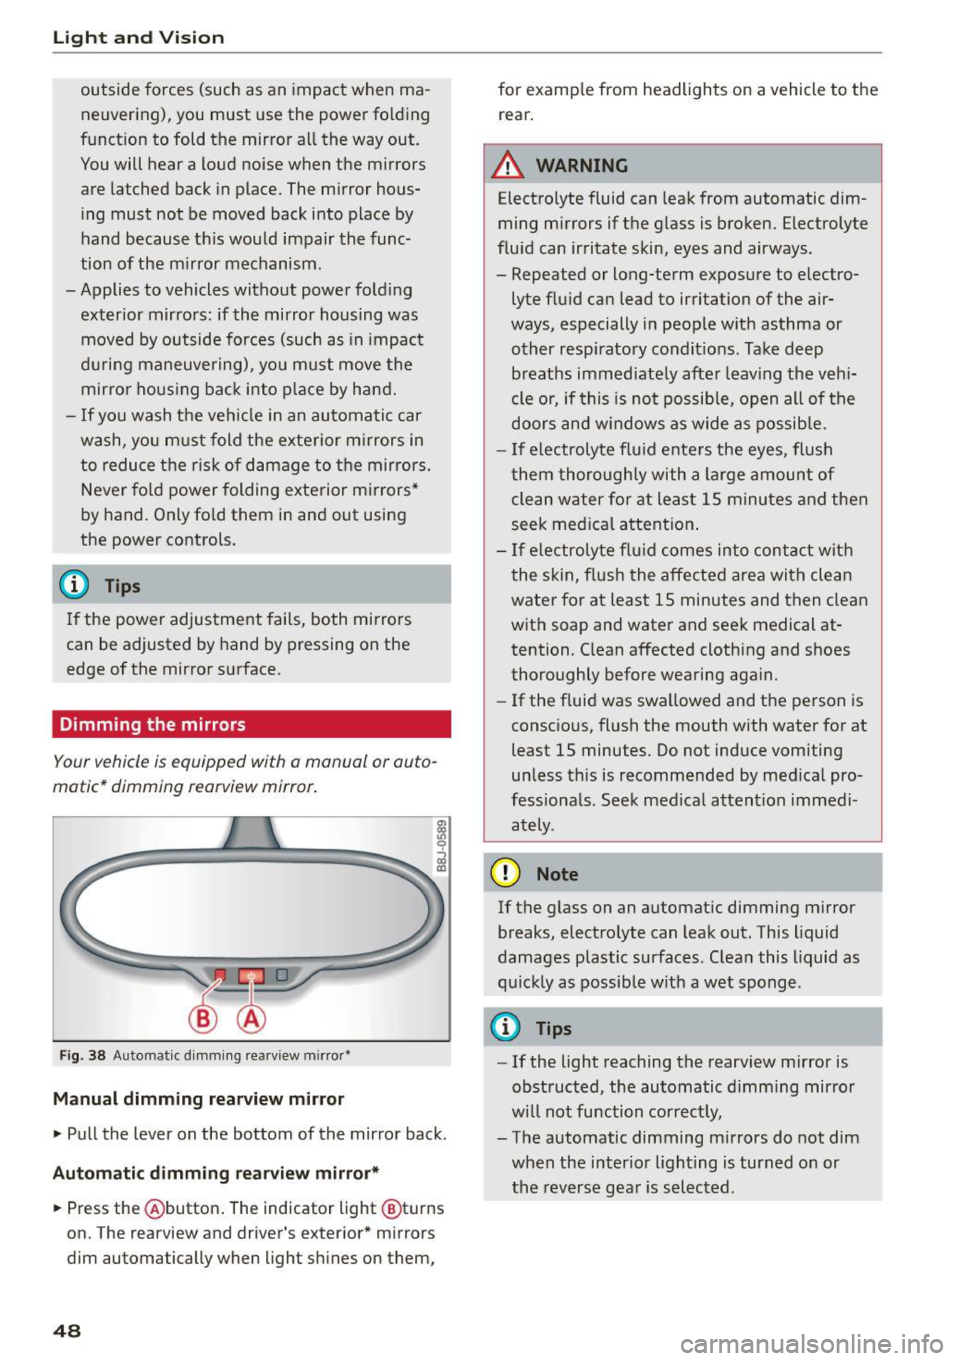
matic* dimming rearview mirror .
Fig. 38 Automatic d imm ing rearv iew mirro r•
M anual dimming rea rvi ew mirror
• Pull the lever on the bottom of the mirror back.
Autom atic dimm ing r ear view mirr or*
• Press the @button . The indicator light @turns
on. The rearview and driver's exterior * mirrors
dim automatically when light sh ines on them,
48
for examp le from headlights on a vehicle to the
rear.
A WARNING
Electrolyte fluid can leak from automatic dim
ming mirrors if the g lass is broken. Electrolyte
flu id can irritate skin, eyes and airways .
- Repeated or long-term exposure to electro
lyte fluid can lead to irritation of the air
ways, especially in people w ith asthma or
other resp iratory condit ions . Take deep
breaths immed iate ly after leav ing the veh i
cle or, if this is not possib le, open all of the
doors and w indows as wide as possib le.
- If electrolyte flu id ente rs the eyes, flush
them thoroughly with a large amount of
clean water for at least 15 m inutes and then
seek med ica l attention .
- If electroly te f lu id comes into contac t with
the skin, flush the affected area with clean
water for at least 15 minutes and then clean
with soap and water and seek medical at
tention. C lean affected clothing and shoes
thoroughly before wearing aga in.
- If the f luid was swa llowed and the person is
consc io us, fl ush the mouth with water for at
least 15 minutes. Do not induce vomiting
unless th is is recommended by med ica l pro
fessiona ls . Seek med ical attention immedi
ately .
(D Note
If the glass on an automat ic dimming m irror
breaks, electro lyte can leak out. This liquid
damages plastic surfaces. C lean this liquid as
q uick ly as possib le w ith a wet sponge .
{D Tips
- If the light reaching the rearview mirror is
obstructed, the automatic d imm ing mirror
w ill not function correct ly,
- The automatic dimming m irrors do not dim
when the interior lighting is turned on or
the reverse gea r is selected .
Page 53 of 282
....,
N
0 > co
rl I.O
"'
"'
"'
rl
-You should not drive your vehicle or press
the windshie ld wiper lever when the wiper
arms are folded away from the w indshield.
The windshield wipers would move back in
to their original position and could damage
the hood and windshield .
- To prevent damage to the windshield wash
er system, a lways loosen wiper blades that
have frozen to the windsh ield before turn
i ng the wipers on .
- To prevent damage to the wiper blades, do
not apply gasoline, petro leum, th inning
agents or other solvents on the wiper b lades or near them.
- To prevent damage to the wiper arms or
othe r components, do not try to move the
windsh ield wipers by hand.
@ Tips
- Commerc ial hot wax such as the types used
by car washe s make it more difficult t o clean
the w indshie ld.
- You can also use the service pos ition, for ex
ample, if you want to p rotect the w indshie ld
from i cing by us ing a cover.
- You cannot activate the service pos it ion
whe n the hood is open.
Digital compass
Switching the compass on and off
Ap plies to vehicles: w ith digi tal compass
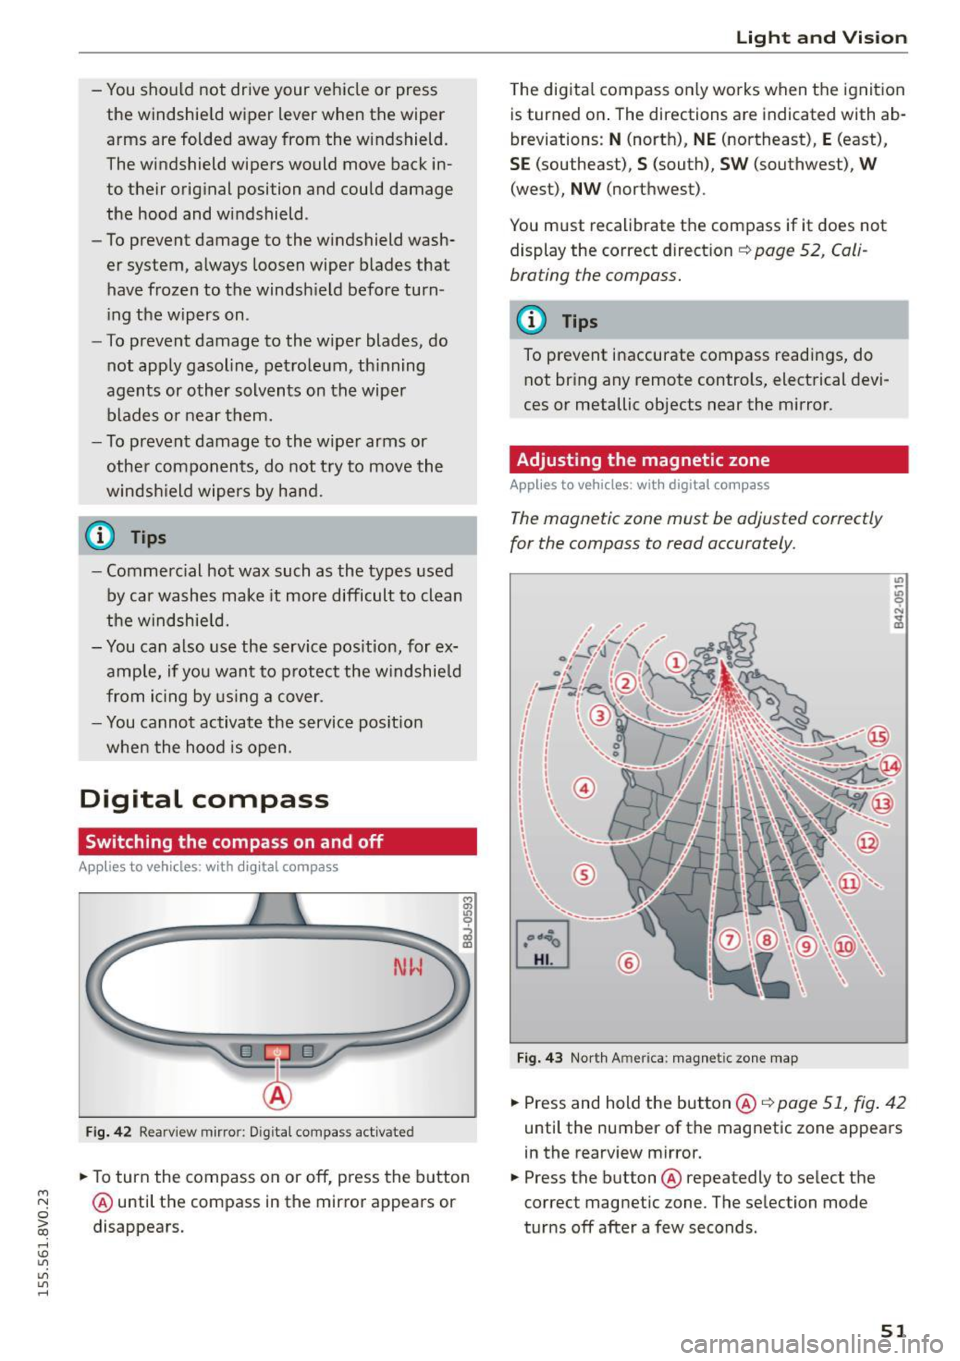
Fig. 4 2 Rearview mirro r: Dig ital compass act ivated
... To turn the compass on or off, press the button
@ until the compass in the mirror appears or
disappears.
Light and Visio n
The dig ita l compass on ly works when the ignit ion
is turned on . The directions a re indicated with ab
breviations:
N (nort h), NE (northeast), E (east),
SE (southeast), S (south), SW (southwest), W
(west), NW (northwest).
You must recalibrate t he compass if it does not
display the correct direct ion
¢ page 52, Cali
brating the compass.
(D Tips
To prevent inaccurate compass readings, do not br ing any remote controls, electrical devi
ces or metallic objects near the mirror.
Adjusting the magnetic zone
Appl ies to vehicles: wit h digita l co mp ass
The magnetic zone must be adjusted correctly
for the compass to read accurately.
®
Fig. 4 3 Nor th Ameri ca: magnet ic zone map
... Press and hold the button @ ¢page 51, fig . 42
until the number of the mag netic zone appears
in the rearview mirror .
... Press the butt on @ repeatedly to select the
correct magnetic zone. The se lection mode
tur ns off after a few seconds .
51
Page 54 of 282
Light and Vi sion
Calibrating the compass
Appl ies to veh icles: w ith digital compass
You must recalibrate the compass if it does not
display the correct direction .
.,. Press and hold the button ® c:> page 51, fig. 42
until a C appears in the rearview mirror .
.,. Drive in a circle at about 5 mph (10 km/h) until
a d irect ion is displayed in the rearv iew m irror .
A WARNING
- To avoid endanger ing yourself and othe r
dr ivers, calibrate the compass in an area
where there is no traffic.
-
- T he dig ita l compass shou ld only be used as
an orientation aid .
If you want to check the
compass while driving, you must still pay at
tention to traffic, the road, the weather and any other possible hazards.
52
Page 111 of 282
....,
N
0 > co
rl I.O
"'
"'
"'
rl
_& WARNING
With the vibration warning switched off, no
visible warning will appear in t he instrument
cluster dis play when crossing a lane ma rker.
(D Tips
Ma rket-specific: your settings are automati
cally stored and assigned to the remote con
trol key being used .
Audi side assist
Description
Applies to vehicles: with Audi side assist
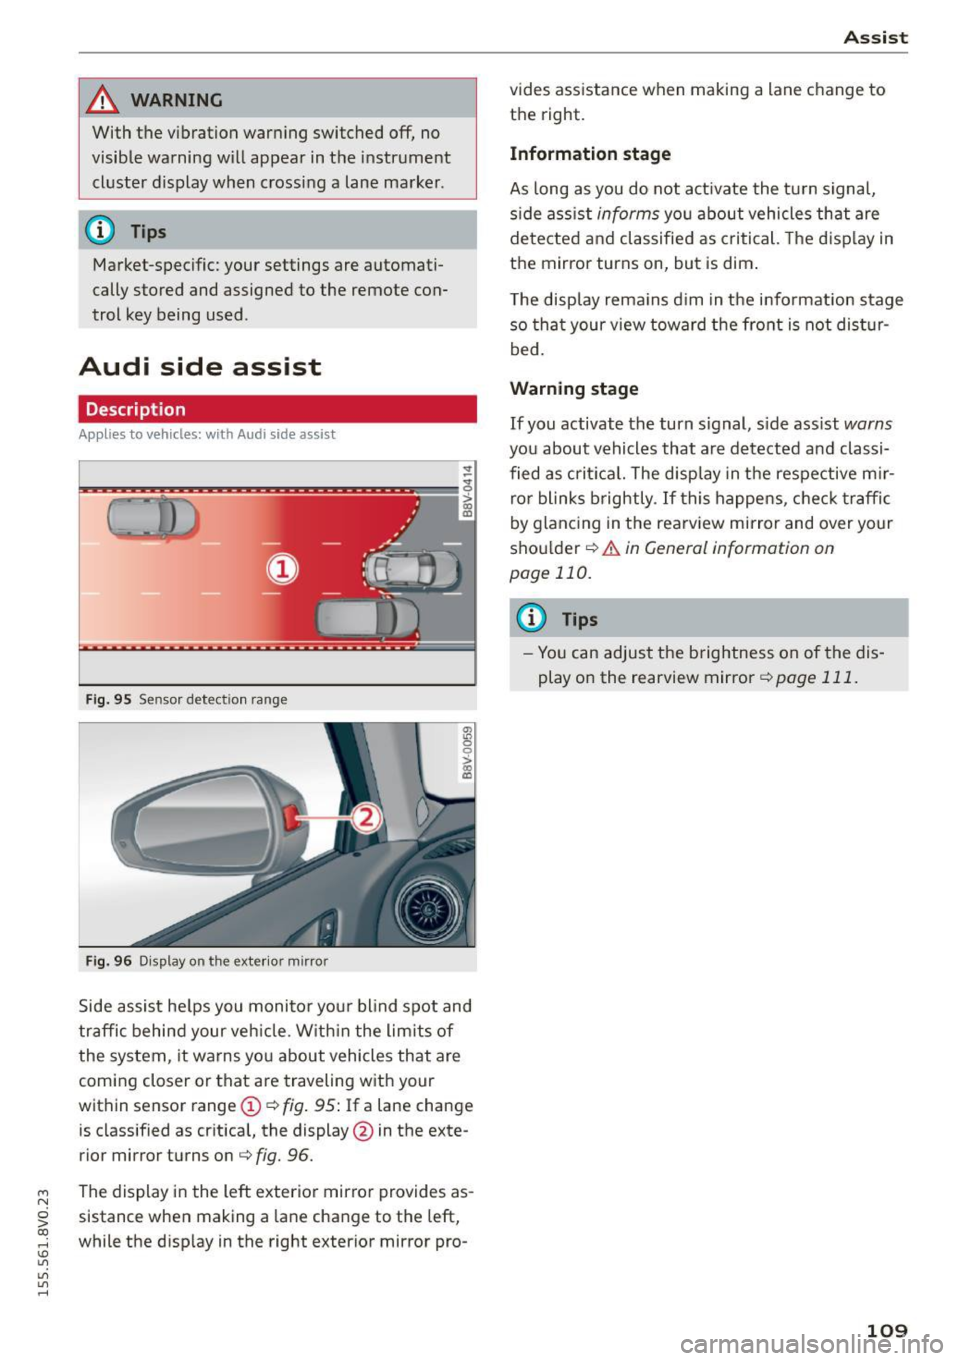
Fig . 9 5 Sensor detect io n range
Fig . 96 Display on the exterior mirror
fR 0
0
> CX)
traffic behind your ve hicle. W it hi n the limit s of
the system, it warns yo u about vehicles that are
coming closer or that are traveling with your
within sensor range
(D ¢ fig . 95: If a lane change
is classified as cr it ica l, the display @in the exte
rior mirror turns on
c:> fig. 96.
The display in the left exterior mirro r provides as
sistance when making a la ne change to the left,
while the d isp lay in the right exterior mirror pro-
A ssi st
vides assistance when making a lane change to
th e right.
Information stage
As long as you do not act ivate the tu rn signa l,
s ide ass ist
informs yo u about vehicles that are
de te cted a nd classified as criti cal. The d is pl ay in
the mirror turns on, but is dim .
T he display rema ins d im in the info rmation stage
so tha t your v iew toward the front is not dis tur
bed.
Warn ing stage
If you activate the turn s ignal, s ide ass ist warns
you about vehicles that are de tected and classi
fied as cri tica l. The display in the respective m ir
ro r blinks brightly . If this happe ns, che ck tr affi c
by glanc ing in the rearv iew mirror and over your
sho ulder
c:> .&. in General information on
page 110.
@ Tips
- Yo u can adjust the brightness on of the dis
play on the rearview mirror
c:> page 111 .
109
Page 117 of 282
M N
0 > co ,...., \!) ..,.,
..,.,
..,., ,....,
Parking systems
General information
Applies to vehicles: with rea r parking sys te m s/park in g system
p lus/rearview camera
Depending on your vehicle's equipment, various
parking aids will help you when parking and ma
neuvering.
The
rear parking system is an audible parking aid
that warns you of obstacles
behind the vehicle
¢ page 116.
The parking system plus assists you when park
ing by audibly and visually indicating objects de
tected
in front of and behind the vehicle
¢ page 116.
The rearview camera shows the area behind the
vehicle in the MMI display. This display assists
you when you are cross or parallel parking. The
parking system plus functions are also available
¢page 117.
A WARNING ,--
- Always look for traffic and check the area
around your vehicle by looking at it directly
as well. The parking system cannot replace
the driver's attention. The driver is a lways
responsible when entering or leaving a park
ing space and during similar maneuvers .
- Please note that some surfaces, such as
clothing, are not detected by the system.
- Sensors and cameras have blind spots in
which people and objects cannot be detect
ed . Be especially cautious of small children
and animals .
- Always pay attention to the area around the
vehicle - using the rearview mirror, too.
- The sensors can be displaced by impacts or
damage to the radiator grille, bumper,
wheel housing and the underbody . The park
ing system may become impaired as a re
sult . Have an authorized Audi dealer or au
thorized Audi Service Facility check their
function.
- Make sure the sensors are not obstructed by
st ickers, deposits or other materials.
If they
are the sensor function could be impaired .
'
Parking systems
For additional information on cleaning, re
fer to
¢ page 235.
@ Note
- Some objects are not detected or displayed
by the system under certain circumstances:
- Objects such as barrier chains, trailer draw
bars, vertical poles or fences
- Objects above the sensors such as wall ex
tensions
- Objects with specific surfaces or struc
tures such as chain link fences or powder
snow
- If you continue driving closer to a low-lying
object, it may disappear from the sensor
range. Note that you will no longer be
warned about this obstacle.
- The sensors can be displaced by impacts or
damage to the radiator grille, bumper,
wheel housing and the underbody. The park
ing system may become impaired as a re
sult. Have an authorized Audi dealer or au
thorized Audi Service Facility check their
function.
(D Tips
- The system may provide a warning even
though there are no obstacles in the cover
age area in some situations, such as:
- certain road surfaces or for long grass .
- external ultrasonic sources e.g. from
cleaning vehicles.
- heavy rain, snow, or thick vehicle exhaust.
- We recommend that you practice parking in
a traffic-free location or parking lot to be
come familiar with the system. When doing
this, there should be good light and weather
conditions.
- You can change the volume and pitch of the
signals as well as the display¢
page 121 .
-What appears in the MMI display is some
what time-delayed.
- The sensors must be kept clean and free of
snow and ice for the park assist to operate .
115
Page 120 of 282
Parking syste m s
General information
App lies to vehicles: with parking system p lus with rearview
camera
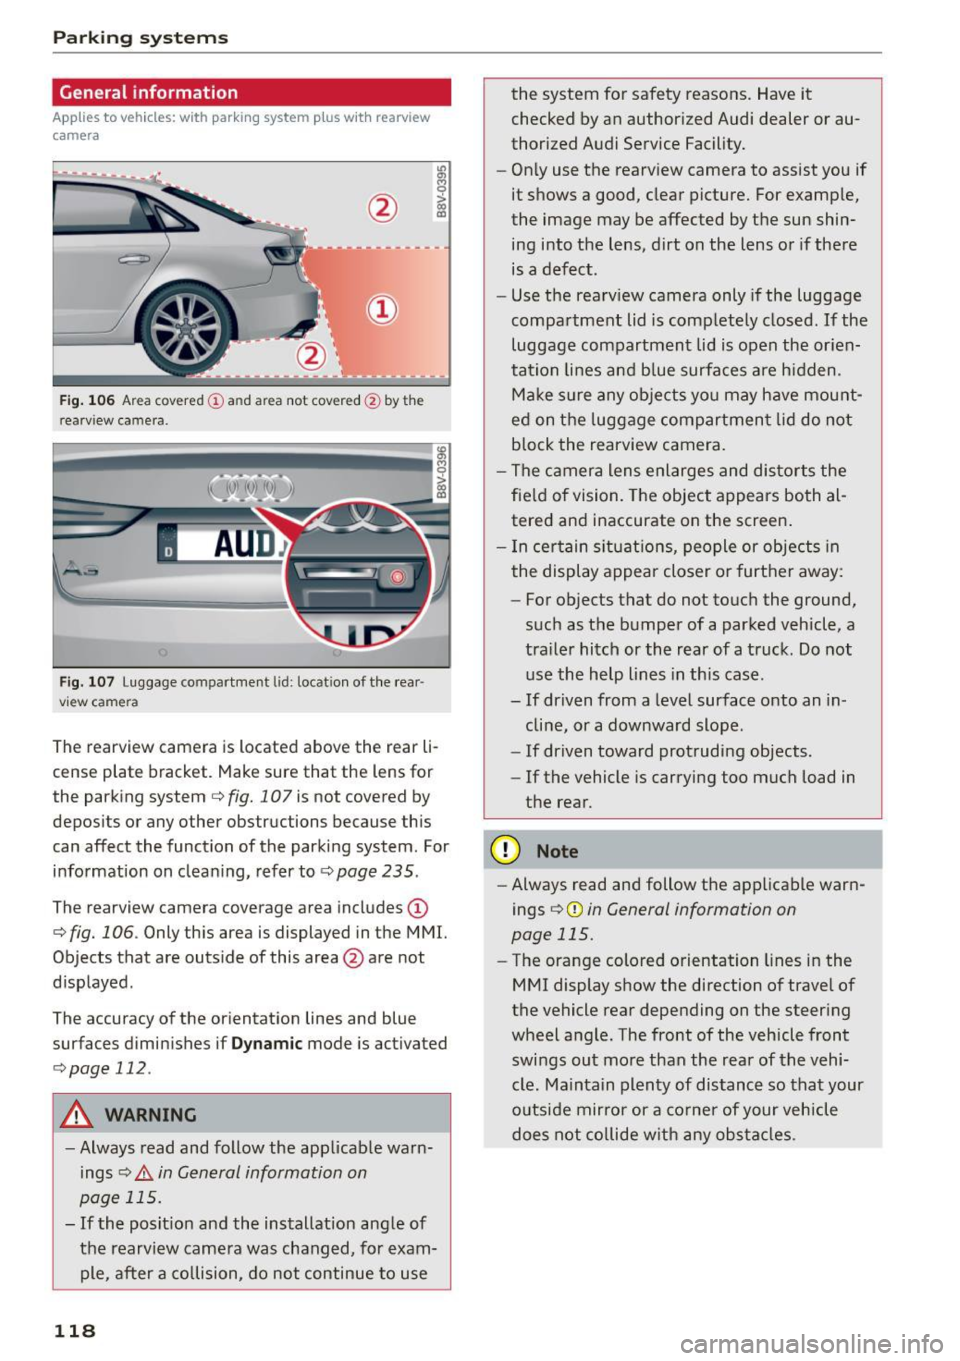
F ig . 106 Ar ea covered (!) an d area not cove red@ by th e
r earv iew ca mera .
Fig. 107 Luggage compartment lid : locat ion of the rear
vi ew came ra
The rearview camera is located above the rear li
cense plate bracket . Make sure that the lens for
the parking system
c::> fig. 107 is not covered by
deposits or any other obstructions because th is
can affect the function of the parking system . For
information on cleaning, refer to
c::> page 235 .
The rearview camera coverage area includes (D
c::> fig. 106. Only this area is displayed in the MMI.
Objects that are outside of this area @are not
displayed .
The accuracy of the or ientation lines and blue
surfaces diminishes if
D yn am ic mode is activated
c::> page 112.
A WARNING
-Always read and follow the app licable warn
ings
c::> .&. in General information on
page 115.
- If the posit ion and the installation ang le of
the rearview camera was changed, for exam ple, after a co llision, do not continue to use
118
the system for safety reasons. Have it
checked by an author ized Audi dealer or au
thorized Audi Service Facility.
- On ly use the rearview camera to assist you if
it shows a good, clear picture. For examp le,
the image may be affected by the sun shin
ing into the lens, dirt on the lens or if there
is a defect.
- Use the rearv iew camera only if the luggage
compartment lid is completely closed.
If the
luggage compartment lid is open the or ien
tation lines and b lue surfaces are h idden.
Make s ure any objects yo u may have mount
ed on t he luggage compartmen t lid do not
block the rearview camera.
- The camera lens enlarges and distorts the
fie ld of vision. The object appears both al
tered and inaccurate on the screen .
- I n ce rtain si tuat ions, people or objects in
the display appea r closer or further away:
- For objects that do not to uch the ground,
such as the bumper of a parked vehicle, a
tra ile r hitch or the rear of a truck. Do not
use the help lines in this case.
- If driven from a level surface onto an in
cline, or a downward slope .
- If driven toward protruding objects.
- If the vehicle is carrying too much load in
the rear.
(D Note
- Always read and follow the applicable warn
ings
c::> (D in General information on
page 115.
- The orange colored o rientation lines in the
MMI display show the direction of trave l of
the vehicle rear depending on the steer ing
wheel a ngle . The front of the vehicle front
swings out more than the rear of the vehi
cle. Ma intain plenty of distance so that your
o utside mirror or a co rne r of your vehicle
does not co llide w ith any ob stacl es .
Page 271 of 282

with the convenience key. . . . . . . . . . . . . . . 36
with the door lock . . . . . . . . . . . . . . . . . . . . 3 7
Cockpit (overview) . . . . . . . . . . . . . . . . . . . . . . 8
Coming home . . . . . . . . . . . . . . . . . . . . . . . . . 45
Compartments . . . . . . . . . . . . . . . . . . . . . . . . 58
Compass in the mirror . . . . . . . . . . . . . . . . . . 51
Compliance . . . . . . . . . . . . . . . . . . . . . . . . . . 265
Consumer information . . . . . . . . . . . . . . . . . 262
Consumer Information . . . . . . . . . . . . . . . . . 138
Consumption (fuel) . . . . . . . . . . . . . . . . . . . . 28
Contacting NHTSA . . . . . . . . . . . . . . . . . . . . 138
Convenience key Emergency operation . . . . . . . . . . . . . . . . . . 77
Indicator light . . . . . . . . . . . . . . . . . . . . . . . 77
Starting the engine (START ENGINE STOP button) . . . . . . . . . . . . . . . . . . . . . . . . . . . . . 75
Stopping the engine (STAR T ENGIN E STOP
button) . . . . . . . . . . . . . . . . . . . . . . . . . . . . . 76
Sw itching on the ignit ion . . . . . . . . . . . . . . 75
un locking/locking . . . . . . . . . . . . . . . . . . . . 36
Convenience opening/closing . . . . . . . . . . . . 41
Convertible child safety seats . . . . . . . . . . . 179
Convertible locking retractor
Activating . . . . . . . . . . . . . . . . . . . . . . . . . . 184
Deact ivating . . . . . . . . . . . . . . . . . . . . . . . . 185
Using to secure a child safety seat . . . . . . 184
Coolant
refer to Engine coolant . . . . . . . . . . . . . . . 205
Cooling mode (automatic climate control sys-
tem) . . . . . . . . . . . . . . . . . . . . . . . . . . . . . . . . . 66
Cooling mode (manua l climate control sys -
tem)................................. 65
Cooling system Adding coolant . . . . . . . . . . . . . . . . . . . . . . 206
Coolant leve l checking . . . . . . . . . . . . . . . . 206
Coolant temperature indicator . . . . . . . . . . 12
Indicator light . . . . . . . . . . . . . . . . . . . . . . . 19
Cornering light . . . . . . . . . . . . . . . . . . . . . . . . 43
Cruise control system Changing speed . . . . . . . . . . . . . . . . . . . . . . 95
D escr iption . . . . . . . . . . . . . . . . . . . . . . . . . . 94
Preselecting speed . . . . . . . . . . . . . . . . . . . . 95
Sw itch ing off . . . . . . . . . . . . . . . . . . . . . . . . 95
~ switching on . . . . . . . . . . . . . . . . . . . . . . . . . 95 0
iii Cup holders . . . . . . . . . . . . . . . . . . . . . . . . . . . 58 ,....,
~ Current consumpt ion ................ 27, 28
Vl
Vl
,....,
Index
D
Data recorder . . . . . . . . . . . . . . . . . . . . . . . . 122
Date display . . . . . . . . . . . . . . . . . . . . . . . . . . 10
Daytime running lights. . . . . . . . . . . . . . . . . . 43
Declaration of compliance
Adaptive cruise control . . . . . . . . . . . . . . . 265
Audi side assist . . . . . . . . . . . . . . . . . . . . . 265
Cell phone package . . . . . . . . . . . . . . . . . . 265
Convenience key . . . . . . . . . . . . . . . . . . . . . 265
E le ctronic immobili zer . . . . . . . . . . . . . . . . 265
Homelink universal remote control . . . . . 265
Remote control key . . . . . . . . . . . . . . . . . . 265
Defective light bulb warning
Indicator light . . . . . . . . . . . . . . . . . . . . . . . 24
Defrost ing (windshield)
automatic climate control system . . . . . . . 67
manual climate control system . . . . . . . . . . 65
DEF (instrument cluster) . . . . . . . . . . . . . . . . 11
Deluxe automatic cl imate control
refer to Climate control system (automatic) .66
Determining correct load limit . . . . . . . . . . 228
Diesel
Indicator light . . . . . . . . . . . . . . . . . . . . . . . 22
Preheating (button) . . . . . . . . . . . . . . . . . . . 75
Preheating (key) . . . . . . . . . . . . . . . . . . . . . . 73
Diesel fuel . . . . . . . . . . . . . . . . . . . . . . . . . . . 191
Diesel particulate filter . . . . . . . . . . . . . . . . 195
Digital compass . . . . . . . . . . . . . . . . . . . . . . . 51
Dimensions . . . . . . . . . . . . . . . . . . . . . . . . . . 259
Dimming the rearview mirror . . . . . . . . . . . . 48
Distance . . . . . . . . . . . . . . . . . . . . . . . . . . . . . 28
Door/luggage compartment lid warning . . . 27
Door contact sw itch . . . . . . . . . . . . . . . . . . . . 46
Doors Child safety lock (mechanical) . . . . . . . . . . . 40
Driver informa tion system . . . . . . . . . . . . . . . 27
Boost . . . . . . . . . . . . . . . . . . . . . . . . . . . . . . 29
CD/rad io display . . . . . . . . . . . . . . . . . . . . . . 27
Door/luggage compartment lid warning . . 27
Efficie ncy program . . . . . . . . . . . . . . . . . . . . 29
Engine oil temperature indicator . . . . . . . . 30
Indicator lights . . . . . . . . . . . . . . . . . . . . . . 13
Lap timer . . . . . . . . . . . . . . . . . . . . . . . . . . . 30
Messages . . . . . . . . . . . . . . . . . . . . . . . . . . . 13
On -board computer . . . . . . . . . . . . . . . . . . . 28
Outside temperature display . . . . . . . . . . . . 27
269