Page 25 of 284

"' N
a: LL co
rl I.O
"' rl
"' rl
Driver information
display
Introduction
The Driver information display inside the in
strument cluster provides you, the driver,
with important information .
Fig. 7 Instrument cl uster: ce nter display
Fi g. 8 Wiper lever: controls for the menu display
Center d ispla y
With the ignition on, the display in the Dr iver
I nforma tion System shows the fo llowing in
formation :
- CD* inserted or Radio* station set
- Outs ide temperature*: At temperatures be-
low 41 °F (+S
0 (), a snowflake symbol ap
pears in front of the temperature display
c::>&_ .
- Warning if one of the doors, front lid or en-
gine compartment lid is not closed .
Additional function s
You can open the following functions in the
Driver Informat ion System display by pressing
the
! RESET I button c::> fig. 8 one or more times:
Digital speedometer *
Tire pressure monitoring*
c::> page 239
Dri ver inform ation di spl ay 23
Trip computer c::>page24
Service interval disp lay c::> page 26
Speed warning c::> page 80
Gearshift selector positions c::> page 83
Automatic transmission
Adapt ive cru ise control*
c::> page 90
Lap timer c::> page 27
Eng ine oil temperature i ndica-c::> page 26
tor
Auto Check C ontrol
Some functions and vehicle components are
scanned for their operating stat us when yo u
switch the ignition on and whi le you are driv
ing. Malfunc tions or required service proce
dures a re signaled audib ly and indicated by
red and yellow i llumina ted symbols and re
minders in the disp lay .
A WARNING ~
-Never re ly exclusively on the o utside
temperature display to determine if a
road surface is icy or not . Keep in mind
that road surfaces, espec ia lly br idges
and overpasses, could be ice covered and
slippery even at an outside tempe rature
above 41 ° F (+ S
0
() .
-Always remember, even if the "snow
f lake" symbo l (ice warning) does not ap
pea r in t he d isp lay, black ice co uld be on
t he road .
- Always reduce your speed and d rive with
special care in cold weathe r conditions
when t he ch ance of enco un tering icy
road surfaces inc reases .
(D Tips
If the vehicle is stationa ry, or if you a re
driv ing at a ve ry low speed, the temper a
ture show n in the display might be s light ly
higher th an the actua l outs ide tempera
ture . This is caused by the heat being radi
ated from the engine.
Page 26 of 284

24 Driver information d isplay
Trip computer
Introduction
The trip computer gives you information on
current and average fuel mileage, average
speed, fuel range and driving time .
Fig. 9 Trip computer display: Average fuel mileage
The following information is continuously
eva luated by the trip computer and can be dis
played sequentially in the instrument cluster
display:
Fuel range
The estimated cruising range in miles (km)
appears in the display. This tells you how far
your ve hicle wi ll be able to travel on the cur
rent tank of fuel and with the same driving
style. The display changes in increments of
5 miles (10 km).
The cruising range is calcu lated based on the
fuel consumption for the last 18 miles
(30 km).
If you drive conservat ively, the cruis
ing range will increa se.
Average fuel mileage The average fuel economy in MPG (l/100 km)
since you last cleared the memory appears in
this display. You can use this display to adjust
your driving technique to achieve a desired mileage.
Current fuel mileage
The instantaneous fuel consumption in mi les
per gallon (l/100 km) is shown in this display .
You can use this display to adjust your driving
technique to achieve a desired mileage. Fuel
consumption is recalcu lated at intervals
of 33 yards (30 meters). This disp lay switches
to gallons/hour (liters/hour) when the vehicle is not moving.
Average speed
T he average speed in mph (km/h) s ince you
last reset the memory appears in the display.
Elapsed time
The length of time that you have been driving
s ince you last reset the memory appears in
th is disp lay.
Distance
The distance that has been covered since the
last t ime the memory was cleared appears in
the display.
(0 Tips
- Fuel consumptions (average and cur rent), range and speed are displayed in
metric units on Canadian models.
- All stored values will be lost if the vehi
cle battery is disconnected .
Memories
The trip computer is equipped with two fully
automatic memories.
Fig. 10 Tri p computer display: memory level 1
You can swi tch between the trip computer 1
and 2 by pressing the
I RESET I button @
r:!>poge 25, fig. 11.
You can te ll wh ich memory leve l is currently
active by the number or the sign in the display
¢fig. 10. The data from the single-trip mem
ory (memory level 1) is being displayed if a
O .,.
Page 27 of 284

M N
er
u..
co ,...., \!) ..,.,
,...., ..,., ,....,
appears in the display. If a fJ is shown, then
the data from the total -trip memory is being
disp layed (memory leve l 2) .
Single-trip memory (Trip computer 1)
The single-t rip memory stores the trip infor
mat ion from the time the ignition is turned on
unti l it is turned
off. If the trip is continued
within 2 hours from the time the ignition was
turned
off, the new data will be included in
the calculation of the current trip informa
tion . If the trip is interrupted for
more than 2
hours
the memory is reset automatically .
Total-trip memory (Trip computer 2)
Unlike the sing le-trip memory, the tota l-trip
memory is not reset automatically. Th is per
mits you to evaluate your driving data for the
entire period between manual resets.
Operation
The trip computer is controlled by two
switches on the windshield wiper lever.
Fig. 11 Windsh ield w iper lever : contro ls fo r th e trip
co mpute r
Operating
• To disp lay the trip computer memory levels,
press the
I RESET I button @¢ fig. 11 re
peatedly unti l the desired memory leve l is
shown in the d isplay.
• To d isplay trip information within a memory
level, press the top or bottom part of the
function selection switch @.
The trip computer will not operate unless the ignit ion is on. When you turn on the ignition,
the function that was in use when you last
turned the ign ition
off will be displayed .
Driver information display 25
In addition to information about the trip com
puter (trip computer 1 and 2), information
about other systems can a lso be shown in the
display. To switch the display between the dif
ferent information, tap the
I RESET I button @
briefly.
Resetting values to zero
• Select a value in the desired trip comp uter.
• Press and hold the
I RESET I button @for at
least one second. All values in the selected
trip computer are reset to zero.
With some vehicle equipment levels, the val
ues for the sing le trip or total trip memory
can a lso be reset in the Infotainment system
¢page 25.
(!) Tips
All stored va lues will be lost if the veh icle
battery is disconnected.
Basic Settings for the trip computer
The radio or MMI* operating unit is used for
setting the trip computer's basic settings.
• Select: Function button !CAR !> Instrument
cluster > On-board computer
1 or On-board
computer
2.
The values in the sing le-trip or the total-trip
memory can all be reset to zero at the same
time under
Reset in the menu.
In addition, yo u can determine what informa
tion from the trip computer should be shown
in the instrument cluster display. If one of the
pieces of driver information is turned
Off , that
driver information will not be shown in the
display. The information w ill continue to be
calculated by the tr ip computer and can be
turned back
On at any time.
(j) Tips
This function is not available on all
vehicles.
Page 28 of 284

26 Driver information d isplay
Service interval display
The service interval display reminds you when
your next service is due.
Fig. 12 Display : Service interva l display
The schedule for the next oil change or inspec
tion is calculated automatically and displayed
accordingly. The display works in two stages :
Service reminder
30 days before the next service is due, a serv
ice reminder appears in the display when you
turn on the ignition
r::;; fig. 12.
After about 5 seconds the display switches
back to normal. The d istance and time re
maining are updated each time the ignition is
turned on until the date due for service is
reached .
Service due
When the due date for service is reached, the
message
Service due! appears in the instru
ment cluster immediately after you turn on
the ignition. Additionally, a warn ing tone
sounds . After about 5 seconds the display
switches back to normal.
Calling up the service schedules
If or when an oil change or inspection is due,
can be shown in the radio or MMI* display by
selecting the serv ice interval display in the car
menu. SelectlCARlfunction button>
Service
interval display
or I CARI function button > Car
systems*
control button > Servicing &
checks. Resetting the
service interval display
Your authorized Audi dea ler will reset the cor
responding service schedule after performing
the appropriate service on your vehicle. You
also have the possibil ity to reset the oil
change schedule after having performed an
oil change according to Audi specifications.
Select I CAR ! function button >
Service interval
display
> Reset oil change interval or I CAR I
function button
> Car systems* control but
ton >
Servicing & checks > Reset oil change
interva l.
(D Note
-Only reset the oil change display when
you have comp leted an oil change.
- If you disconnect the battery terminals,
no ca lculations can be made for the serv
ice interval display dur ing this time and
no serv ice reminder will appear. Remem
ber that observing the proper service in
tervals is vita lly important to extending
the life of your vehicle, particularly the
engine, and maintaining its value. Even if
the mileage driven is low, the maximum
period of one year from one service to
the next must not be exceeded.
{D Tips
The information in the Service Reminder
remains stored even when the vehicle bat
tery is d isconnected .
Engine oil temperature
indicator
Fig. 13 Display : engine o il temperature indicato r
Page 29 of 284

"' N
a: LL co
rl I.O
"' rl
"' rl
.. With the ignition switched on, press the
I RESE T I button <=> page 25, fig. 11 repeated
ly until the engine o il temperature indicator
is shown.
If the engine o il temperature is be low 140 ° F
(60
°(), the 1!11 symbol followed by three hy
phens"- --" and the
0
( unit is shown.
At an engine o il temperature above 140 °F
(60 °C) the engine has reached its operating
temperature. The engine oil temperature may be higher if there is heavy engine load and
high temperatures outside. This is not a cause
for concern as long as the.<=>
page 17 or
the
Bl <=> page 17 warning light in the display
does not flash .
Lap timer
Introduction
You can record and eva luate lap times with
the lap timer in the display<=>
page 27,
fig . 15 . The time is measured in minutes, sec
onds and 1/10 seconds . The hours are also
shown when the lap time exceeds 60 minutes .
The maximum ind ividual measurement is 99
hou rs. A max imum of 99 laps may be reco rd
ed.
_& WARNING
-
Please devote your fu ll attent ion to driv
ing . As the driver, you have comp lete re
sponsibility for safety i n traffic. Only use
the functions in such a way that you always ma intain complete control over your veh i
cle in all traff ic situations .
@ Tips
When the lap timer stopwatch is running,
you can call up the trip computer informa
tion with the
I RESE TI button. Dri
ver inform ation di spl ay 2 7
Calling up the lap timer and timing
Fig. 14 Contro ls
F ig . 1 S Display: Lap t imer
Calling up the lap t imer
.. Press the I RESET ! button<=> fig. 14@ until
the lap timer <=>
fig. 15 appears .
Timing laps
.. To sta rt timing, press the upper section of
t he wiper swi tch@ . The time measurement
is shown in line@<=>
fig. 15.
.. To stop t iming, press the upper section of
the wiper switch ® again . This also starts
timing the next round. The prev ious t iming
always moves one line down, first into line
@ , and then into lines @ and @. The lap
number that corresponds to the tim ing is
disp layed in front of the ind iv idual timings.
Di splaying inte rmediat e time and pau sing
timing
.. To display an intermed iate time, press the
lower section of the wiper switch @. The
tim ing continues to run i n the background .
.. To pause t iming, press the lower section of
the wiper swi tch @ agai n.
.. To continue tim ing, p ress the uppe r section
of the wiper switch @.
Ill>
Page 30 of 284

28 Driver information d isplay
If timing is paused, you can continue it late r
even if you sw itch the ignition off .
Evaluating times and continuing or
resetting timing
You can evaluate the fastest, slowest and
average lap times.
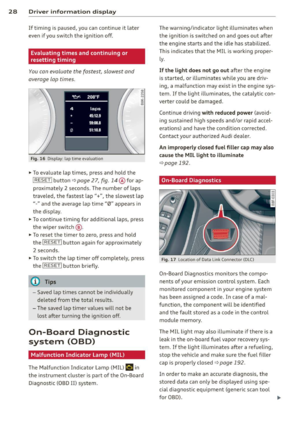
Fig. 16 Dis play : lap time eva luat ion
.,. To evaluate lap times, press and hold the
I RESET I button ¢ page 27, fig. 14 @for ap
proximate ly
2 seconds. The number of laps
t raveled, the fastest lap"+", the slowest lap
" -" and the average lap time "0" appears in
the display .
.,. To continue timing for additional laps, press
the wiper switch @ .
.,. To reset the timer to zero, press and hold
the
I RESET I button again for approximately
2 seconds .
.,. To switch the lap timer off comp letely, press
the
I RESET I button br iefly.
@ Tips
- Saved lap times cannot be ind ividually
deleted from the total results.
- The saved lap timer values will not be
l ost after turning the ignition off .
On-Board Diagnostic
system (OBD)
Malfunction Indicator Lamp (MIL )
The Malfunction Indicator Lamp (MIL) ¢"4 in
the instrument cluster is part of the On-Board
Diagnostic (OBD II) system. T
he warning/indicator light illuminates when
the ignition is switched on and goes out after
the engine starts and the id le has stabilized .
This indicates that the MIL is working proper
ly.
If the light does not go out after the engine
is started, or illum inates while you are dr iv
ing, a malfunction may exist in the engine sys
tem . If the light illuminates, the catalytic con
verter could be damaged .
Cont inue driving
with reduced power (avoid
ing sustained high speeds and/or rapid accel
erations) and have the condition corrected.
Contact your authorized Audi dea ler .
An improperly closed fuel filler cap may also
cause the
MIL light to illuminate
¢ page 192 .
On-Board Diagnostics
Fig. 17 Locat io n of Data Link Co nnector (O LC)
On-Board Diagnostics monitors the compo
nents of your emission contro l system. Each
monitored component in your engine system
has been assigned a code. In case of a mal
function, the component will be identified
and the fault stored as a code in the control
module memo ry.
The MIL light may also illuminate if there is a leak in the on-board fuel vapor recovery sys
tem .
If the light illuminates after a refueling,
stop the vehicle and make sure the fuel filler
cap is properly closed
¢ page 192.
In order to make an accurate diagnosis, the
stored data can on ly be displayed using spe
cial diagnostic equipment (generic scan tool
for 080) .
ll>-
Page 31 of 284
M N
er
u..
co ,...., \!) ..,.,
,...., ..,., ,....,
In o rder to connect the special diagnostic
equipment, push the plug into the Data Link
Connector (DLC) . The DLC is located to the
right of the hood re lease
c:> fig. 17.
Your author ized A udi dealer or qualified work
shop can interpret the code and perform the necessary repa ir.
A WARNING
Do not use the diagnostic connector for
personal use. Incorrect usage can cause
ma lfunctions, which can increase the risk
of a coll is ion!
-
Dri ver information di spla y 29
Page 32 of 284

30 Openin g and clo sing
Opening and closing
Power locking system
General description
The power locking system locks or unlocks all
doors and the rear lid simultaneously.
You can lock and unlock the vehicle centrally.
You have the following choices:
- Remote master key~
page 33,
-Door handles with convenience key*
~page 34,
-Lock cy linder at the dr iver's door
~ page 35, or
- Power loc king switch inside
~ page 34.
Automatic l ocking
The automatic locking feature locks all the ve
h icle doors and the rear lid when you drive
faster than 9 mph ( 15 km/h) .
The car is unlocked again once the ignition key is removed. In addition, the veh icle can be un
locked if the opening function in the power
lock ing system switch or at one of the door
leve rs is actuated. The Auto Loc k function can
be turned on and off in the rad io or
MMI*
~ page 35.
Addit ionally, in the event of a crash with a ir
bag deployment the doors are automatically
un locked to allow access to the veh icle.
Selective unlocking
When you lock the vehicle, the power locking
system w ill lock the doors and the rear lid .
When unlocking, you can set in the rad io or
MMI* whether
only the dr iver's door or the
enti re ve hicle should be unlocked
~ page 35.
Anti -th eft alarm warning system
If the anti-theft alarm warning system de
tects a break- in into the vehicle, acoust ic and
visua l wa rning signals are triggered.
The anti -theft warn ing system is act ivated au
tomatically when you lock the vehicle .
It is de
activated when u nlocking using the remote key, with the mechanica
l key, and when yo u
switch on the ignition.
T he alarm a lso t urns off when t he a la rm cycle
has expired.
Turn signals
When you u nlock the veh icle, the turn s ignals
flash twice , when you lock it once . If they do
not flash, one of the doo rs, the luggage com
partment lid or the hood is not locked or the
ignition is s till sw itched on.
Unint entionally locking yourself out
In the follow ing cases there safegua rds to
prevent you lock ing you r remote master key in
the vehicle:
- The vehicle does not lock w ith the power
lock ing switch ~
page 34 if the drive r's
door is open .
- On veh ides with convenience key*, if the
most recently used master key is in the lug
gage compa rtment, the rear lid is automat i
cally un locked again after it is closed.
Do not lock your veh icle w ith the remote mas
ter key or convenience key* unt il all doors and
the rea r lid a re closed . In this way you avoid
locking yourself out accidentally .
A WARNING
-
-When you leave t he veh icle, alw ays re
move the ignition key and take it with
you . This will prevent passengers (chil
dren, for example) from acc identally be
ing locked in the vehicle should they acci
dentally press the power locking switch in the front doors .
- Do not leave ch ildren inside the vehicle
unsuperv ised. In an emergency it would
be imposs ible to open the doors from
the o utside without the key .
(D Tips
- In the event of a crash with airbag de
ployment all locked doors will be auto
matically unlocked to give access to the
vehicle occupants from the outside.