Page 49 of 246
 Owners Manual Displaying the distance and days until the next service interval
You can view the remaining distance and days until the next service appoint- ment at any time when the ignition is switched on by going")
Displaying the distance and days until the next service interval
You can view the remaining distance and days until the next service appoint- ment at any time when the ignition is switched on by going to the Service
menu item » page 45, Settings or from the Vehicle status in the main menu of
the Maxi DOTdisplay. » page 44, Main menu .
The following message is displayed for 10 seconds. Oil change ... km / ... days
Inspection ... km / ... days
Prompt in the segment display
Fig. 29
Segment display: Example of a
message
Explanation of a graphic » Fig. 29 .
Service due
Differentiating between types of service
Days remaining until the next service interval
Kilometres remaining until the next service interval 1)
Differentiating between types of service
The service type is determined by the number in position
A
» Fig. 29 .
Oil change service
Inspection
ABCService due
If a service becomes due, then the following information is displayed for about
10 seconds » Fig. 29.
› The number
1 or 2 is displayed in position A
.
› The symbol
and the number of days remaining until the next service inter-
val are displayed in position
B
.
› The symbol
and the number of kilometres remaining until the next service
interval are displayed in position
C
.
As soon as the due date for the service has been reached, the flashing icon
and the message OIL CHNG or INSPEC_ appear in the display for about 20 sec-
onds after the ignition has been switched on.
Display the days and distance until the next service interval
You can press button
3
» Fig. 20 on page 28 repeatedly to display the remain-
ing distance and time to until the next service whenever the ignition is switch-
ed on.
Information on the oil change service is displayed at first, followed by informa-
tion on the inspection when button
3
is pressed again.
› The number
1 or 2 is displayed in position
A
.
› The symbol
and the number of days remaining until the next service inter-
val are displayed in position
B
.
› The symbol
and the number of kilometres remaining until the next service
interval are displayed in position
C
.
Resetting the service interval display
We recommend that the display reset is completed by a specialist garage.
We recommend that you do not reset the service interval display yourself. In-
correctly setting the service interval display could cause problems to the vehi-
cle.
Variable service interval
For vehicles with variable service intervals, after resetting the oil change serv-
ice display, the values of a new service interval are displayed, which are based
on the previous operating conditions of the vehicle.
These values are then continuously matched according to the actual operating
conditions of the vehicle.
1)
The kilometres remaining until the next service interval are displayed instead of the odometer.
47Information system
Page 50 of 246
 Owners Manual Unlocking and opening
Unlocking and locking
Introduction
This chapter contains information on the following subjects:
Vehicle key
49
Unlock/lock with remote control
49
Unlocking / locking - KESSY
5")
Unlocking and opening
Unlocking and locking
Introduction
This chapter contains information on the following subjects:
Vehicle key
49
Unlock/lock with remote control
49
Unlocking / locking - KESSY
50
Information message
51
Parking the vehicle
51
Safe securing
51
Individual settings
52
Locking/unlocking the vehicle from the inside
52
Child safety lock
53
Opening/closing a door
53
Your car is equipped with a central locking system.
The central locking system allows you to lock and unlock all doors, the fuel fill-
er flap and tailgate at the same time based on the current setting 1)
.
The safe securing system » page 51 is integrated in the central locking sys-
tem. Once the car is locked from the outside, the door locks 2)
are automatically
blocked by the safe securing system »
.
The following takes place after unlocking 1)
.
› The doors, the boot lid and the fuel filler flap are unlocked.
› The interior light, which is switched by the door contact, comes on.
› The safe securing system is switched off 2)
.
› The indicator light in the driver door stops flashing.
› The anti-theft alarm system is deactivated.
The following takes place after locking 1)
.
› The doors, the boot lid and the fuel filler flap are locked.
› The interior lights switched by the door contact come on.
› The safe securing system is switched on 2)
.
› The indicator light in the driver door begins flashing.
› The anti-theft alarm system is activated.
Displaying an error If the indicator light in the driver's door initially flashes quickly for around 2
seconds, and then lights up for 30 seconds without interruption before flash-
ing again slowly, you will need to seek the assistance of a specialist garage.WARNING■ Never leave the key in the vehicle when you exit the vehicle. Unauthor-
ized persons, such as children, for example, could lock the car, turn on the
ignition or start the engine - there is a danger of injury and accidents!■
When leaving the vehicle, never leave persons who are not completely in-
dependent, such as children, unattended in the vehicle. The children might,
for example, release the handbrake or take the vehicle out of gear. The ve-
hicle could then start to move – risk of injury and accidents! These individu-
als might also not be able to leave the vehicle on their own or to help
themselves. Can be fatal at very high or very low temperatures!
■
If the car is locked from the outside and the safelock system is switched
on, there must not be any person in the car as it is then not possible to
open either a door or a window from the inside. The locked doors make it
more difficult for rescuers to get into the vehicle in an emergency – risk to
life.
Note
■ When leaving the vehicle, always check if it is locked.■In the event of an accident in which the airbags are deployed, the locked
doors are automatically unlocked in order to enable rescuers to gain access to
the vehicle.■
Upon failure of the central locking system the key can be used only to unlock
and lock the driver's door. The other doors and the boot lid can be emergency
locked or released. ■ Emergency locking of the door » page 212.
■ Emergency unlocking of the boot lid » page 212.
1)
Depending on the individual setting » page 52 .
2)
This function is only enabled in certain countries.
48Operation
Page 51 of 246
 Owners Manual Vehicle keyFig. 30
Remote control key
Read and observe on page 48 first.
Two remote control keys are provided with the vehicle» Fig. 30.
The transmitter with the battery is housed in the handle of")
Vehicle keyFig. 30
Remote control key
Read and observe on page 48 first.
Two remote control keys are provided with the vehicle» Fig. 30.
The transmitter with the battery is housed in the handle of the remote control key. The receiver is located in the interior of the vehicle.
The operating range of the remote control key is approx. 30 m. But this range of the remote control can be reduced if the batteries are weak.
The wireless key has a flip-out key bit.
The spare key must by initialised by a specialist garage after repair or replace- ment of the receiver unit. Only then can the remote control key be used again.
CAUTION
■ Each key contains electronic components; therefore it must be protected
against moisture and severe shocks.■
Keep the groove of the keys absolutely clean. Impurities (textile fibres, dust,
etc.) have a negative effect on the functionality of the locking cylinder and ig-
nition lock.
■
The battery must be replaced if the central locking or anti-theft alarm system
does react to the remote control at less than approx. 3 metres
away » page 211 .
Note
If you lose a key, please contact a specialist garage, who will be able to provide
you with a new one.Unlock/lock with remote controlFig. 31
Remote control key
Read and observe on page 48 first.
Image description » Fig. 31
Unlocking the vehicle
Locking the vehicle
Unlocking the boot lid
Folding out/folding up of the key bit
Warning light
Unlocking
The turn signal lights flash twice as confirmation that the vehicle has been un-
locked.
If you unlock the vehicle and do not open a door or the boot lid within the next
30 seconds, the vehicle will lock again automatically and the safe lock system 1)
or anti-theft alarm system will be switched on. This function is intended to prevent the car being unlocked unintentionally.
The seat and mirror are adjusted after the vehicle is unlocked » page 82.
Locking
The turn signal lights flash once as confirmation that the vehicle has been
locked.
If the doors or the boot lid remain open after the vehicle has been locked, the
turn signal lights do not flash until they have been closed.
The current position of the seat and mirror after the vehicle is
locked » page 82 .
AB1)
This function is only enabled in certain countries.
49Unlocking and opening
Page 52 of 246
 Owners Manual Checking the battery condition
If the red indicator light B » Fig. 31 does not flash when you press a button on
the remote control key, the battery is empty. Replace the battery » page 211.
CAUTI")
Checking the battery condition
If the red indicator light B » Fig. 31 does not flash when you press a button on
the remote control key, the battery is empty. Replace the battery » page 211.
CAUTION
■
Only operate the remote control when the doors and boot lid are closed and
the vehicle is in your line of sight.■
If the driver door is open, the vehicle cannot be locked using the remote con-
trol key.
■
The operation of the remote control may temporarily be affected by signal in-
terference from transmitters close to the car and which operate in the same
frequency range (e.g. mobile phone, TV transmitter).
Note
For vehicles with anti-theft alarm the acoustic signals can also be activated/
deactivated by locking/unlocking » page 45.
Unlocking / locking - KESSY
Fig. 32
KESSY: Name of the zones/sensors in the handle of the front door
Read and observe
on page 48 first.
The KESSY system (Keyless Entry Start Exit System) enables unlocking and
locking of the vehicle without actively using the remote control key.
Unlocking or locking areas » Fig. 32
Front door left
Front door right
Luggage compartment lid
Roof front
ABCDThe KESSY system (Keyless Entry Start Exit System) enables unlocking and
locking of the vehicle without actively using the remote control key. The key
must be in one of the areas A,
B
or
C
» Fig. 32 (about 1.5 meters away from
the vehicle).
Unlocking
›
Grab the door handle of the front door or cover the sensor
2
» Fig. 32 with
the whole palm of your hand » .
Locking
›
Touch the sensor
1
» Fig. 32 with your fingers.
On vehicles fitted with automatic gearbox, the selector lever must be moved
into the position P before unlocking.
Unlocking the boot lid
›
Press the button in the handle of the boot lid » page 55.
Switching off the safelock system
›
Touch the sensor
1
» Fig. 32 twice within 2 seconds with your fingers.
If you cover the sensor
2
at the same time as the sensor
1
when unlocking
the vehicle, it is not unlocked.
If the vehicle is locked via the sensor
1
, it will not be possible to unlock it
again in the following
2
seconds via the sensor 2 - prevents accidental un-
locking.
The KESSY system can find the valid key, even if it was left in the front of the
vehicle's roof for example
D
» Fig. 32 . It is therefore not always necessary to
know where the key is.
CAUTION
■ Do not use objects which might prevent direct contact between the hand
and the sensor.■
Some types of gloves can impair the function of the grip sensor.
■
After leaving the vehicle, it does not lock automatically, the procedure for
locking the vehicle must therefore be observed.
■
If the battery in the key is weak or discharged, the vehicle may not be un-
locked or locked via the KESSY system. In this case, use the emergency unlock-
ing or emergency locking on the driver's door » page 212.
50Operation
Page 53 of 246
 Owners Manual Information messageRead and observe
on page 48 first.
Key in the vehicle
The protection against inadvertently locking the key in the vehicle unlocks the
vehicle automatically if the following condit")
Information messageRead and observe
on page 48 first.
Key in the vehicle
The protection against inadvertently locking the key in the vehicle unlocks the
vehicle automatically if the following conditions are met.
The vehicle, including the boot lit, has been locked.
The key with which the vehicle has been locked remains in the vehicle in
the zone
D
» Fig. 32 on page 50 .
The turn signal lights flash four times as confirmation that the vehicle has
been unlocked again.
The following message is shown in the information cluster display. Key in vehicle.
KEY IN VEHICLE
Additionally, on vehicles which are fitted with the anti-theft alarm system, an audible signal sounds.
The system has not found a key
If the system has not found a key in the vehicle, the following message ap-
pears in the display of the instrument cluster.
Key not found.
NO KEY
This can occur if the key is outside the vehicle, the battery in the key is dis-
charged, the key is defective or the electromagnetic field is strongly disturbed.
Fault in KESSY system
If there is a fault in the KESSY system, the following message will appear in
the display of the instrument cluster.
Keyless access system faulty.
CHECK KEYLESS
Low voltage of the key battery
If the voltage of the battery in the remote control key is too low, the following
message appears in the display of the instrument cluster.
Change the key battery!
KEY BATTERY
Change the key battery » page 211!
Parking the vehicle
Read and observe
on page 48 first.
If the vehicle is not unlocked within 60 or 90 hours, the sensors in the handle
of the driver or front passenger's door are deactivated automatically » Fig. 32
on page 50 .
Activation after 60 hours
›
Unlock the driver's door using the sensor
2
» Fig. 32 on page 50 .
›
Press the handle of the boot lid.
›
Unlock the vehicle using the symbol button
on the remote control key.
›
Unlocking the driver's door in an emergency » page 212.
Activation after 90 hours
›
Unlock the vehicle using the symbol button on the remote control key.
›
Unlocking the driver's door in an emergency
» page 212.
Safe securing
Read and observe
on page 48 first.
The door locks are blocked automatically if the vehicle is locked from the out-side. Afterwards, it is not possible to open the doors with the door handle ei-
ther from the inside or from the outside.
This fact is pointed out by the following message on the display of the instru-
ment cluster after switching out the ignition.
Check SAFELOCK! Log book!
CHECK SAFELOCK
Switching off
The safe lock can be switched off in one of the following ways.
›
By locking twice within 2 seconds.
›
By disabling the interior monitoring » page 54, Interior monitor and towing
protection .
If the vehicle is locked and the safe securing system is switched off, the door can be opened separately from the inside by a single pull on opening lever.
Switching on
The safelock switches on automatically the next time the vehicle is locked and
unlocked.
51Unlocking and opening
Page 54 of 246
 Owners Manual Switch-on display
The indicator light flashes for around 2 seconds in quick succession, after-
wards it begins to flash evenly at longer intervals.
Switch-off display
The indicator light in the driver")
Switch-on display
The indicator light flashes for around 2 seconds in quick succession, after-
wards it begins to flash evenly at longer intervals.
Switch-off display
The indicator light in the driver door flashes for about 2 seconds fast, goes out
and starts to flash at longer intervals after about 30 seconds.WARNINGIf the car is locked and the safe securing system activated, no people must
remain in the car as it will then not be possible to either unlock a door or
open a window from the inside. The locked doors make it more difficult for
rescuers to get into the vehicle in an emergency – risk to life!
Note
This function is only enabled in certain countries.
Individual settings
Read and observe
on page 48 first.
The following central locking functions can be set via the MAXI DOT dis-
play » page 45 , Settings .
Opening a single door
This function makes it possible to only unlock the driver's door. The other
doors and the boot lid remain locked and are only unlocked after being opened
again.
Unlocking doors on one side of a vehicle
This function enables you to unlock both doors on the driver's side. The other doors and the boot lid remain locked and are only unlocked after being opened
again.
Unlocking the vehicle with the KESSY system
This function enables you to unlock all the doors, individual doors, both doors
on the left or right vehicle side. The other doors and the boot lid remain locked
and are only unlocked after being opened again.
Automatic locking/unlocking
All doors are locked from a speed of around 15 km/h. The button in the handle
of the boot lid is deactivated.
If the ignition key is withdrawn, the car is then automatically unlocked again.
In addition, it is possible for the driver or front passenger to unlock the car by
pressing the central locking button
.
The vehicle doors can be unlocked and opened at any time by pulling once on
the door opening lever.WARNINGLocked doors prevent unwanted entry into the vehicle from outside, for ex-
ample at road crossings.
Locking/unlocking the vehicle from the inside
Fig. 33
Central locking button
Read and observe on page 48 first.
If the vehicle was not locked from the outside, it can also be unlocked and
locked with the rocker switch on the door opening lever of the driver or front
passenger door » Fig. 33 even without the ignition switched on. While a door is
opened, the vehicle cannot be locked.
Locking
›
Press the button
/ » Fig. 33 press.
The symbol
in the button lights up.
Unlocking
›
Press the button
/ » Fig. 33 press.
The symbol
in the button goes out.
52Operation
Page 55 of 246
 Owners Manual The following applies if your vehicle has been locked using the central locking
button.
› It is not possible to open the doors or the boot lid from the outside (safety
feature, e.g. when stopping at")
The following applies if your vehicle has been locked using the central locking
button.
› It is not possible to open the doors or the boot lid from the outside (safety
feature, e.g. when stopping at traffic lights etc.).
› The doors can be unlocked and opened from the inside by a single pull on the
opening lever of the respective door.
› In the event of an accident in which the airbags are deployed, the locked
doors are automatically unlocked in order to enable rescuers to gain access
to the vehicle.WARNING■ Doors locked from the inside make it difficult for rescuers to get into the
vehicle in an emergency – risk to life!■
If the safelock system is switched on » page 51, the door opening lever
and the central locking buttons do not operate.
Child safety lock
Fig. 34
Parental Control: Left rear door
Read and observe on page 48 first.
The child safety lock prevents the rear door from being opened from the in- side. The door can only be opened from the outside.
You can switch the child safety lock on and off using the vehicle key.
Switching on
›
Turn the slot of the safety lock in the direction of the arrow » Fig. 34 (the
other way around on the right-hand door).
Switching off
›
Turn the slot of the safety lock in the opposite direction to the ar-
row » Fig. 34 (the other way around on the right-hand door).
Opening/closing a doorFig. 35
Door handle/door opening lever:
Read and observe
on page 48 first.
Opening from the outside
›
Unlock the vehicle and pull the door handle
A
» Fig. 35 on the door you wish
to open.
Opening from the inside
›
Pull on door opening lever
B
of the respective door and push the door away
from you.
Closing from the inside
›
Grasp pull handle
C
and close the door.
WARNING■ Make sure that the door has closed correctly as it can open suddenly
while driving – risk of death!■
Only open and close the door when there is no one in the opening/closing
range – risk of injury!
■
An opened door can close automatically if there is a strong wind or the
vehicle is on an incline – risk of injury!
■
Never drive with the doors open - there is a risk of death!
53Unlocking and opening
Page 56 of 246
 Owners Manual Anti-theft alarm system
Introduction
This chapter contains information on the following subjects:
Activating/deactivating
54
Interior monitor and towing protection
54
The anti-theft alarm system (h")
Anti-theft alarm system
Introduction
This chapter contains information on the following subjects:
Activating/deactivating
54
Interior monitor and towing protection
54
The anti-theft alarm system (hereinafter referred to only as alarm system) in-
creases protection against break-in attempts into the vehicle.
The alarm system triggers audible and visual signals if an attempt is made to
break into the vehicle (hereafter referred to only as alarm).
An alarm is triggered when the following monitored areas of the vehicle have a fault.
› Bonnet.
› Boot lid.
› Doors.
› Ignition lock.
› Vehicle inclination
» page 54.
› Interior of car
» page 54.
› A drop in voltage of the on-board power supply.
› Socket of the factory-fitted towing device
» page 163, Towing a trailer .
An alarm is immediately triggered if either of the two battery terminals is dis-
connected while the anti-theft alarm system is activated.
The alarm is switched off by unlocking the vehicle or switching on the ignition.
CAUTION
Before leaving the vehicle, it must be checked that all of the windows, doors
and the sliding/tilting roof are locked in order to ensure the full functionality of
the anti-theft alarm system.
Note
The working life of the alarm siren is 5 years.Activating/deactivating
Read and observe
on page 54 first.
Activating
The anti-theft alarm system is activated automatically approximately 30 sec-
onds after the vehicle is locked.
If you unlock the vehicle and do not open a door or the boot lid within the next
30 seconds, the vehicle will lock again automatically and the safelock system
or anti-theft alarm system will be switched on. This function is intended to
prevent the car being unlocked unintentionally.
Deactivating
The anti-theft alarm system is deactivated automatically after the vehicle is
unlocked. If the vehicle is not opened within 30 seconds, the anti-theft alarm
system is automatically activated again.
The alarm system is also deactivated if you unlock the driver door using the
key within 45 seconds of locking the vehicle.
Note
■ If the car is unlocked with the key in the driver door, insert the key into the
ignition and switch the ignition to deactivate the alarm system.■
You can switch the audible signalling of the activation of the warning system
on and off in the Maxi DOT display in the menu item ATA confirm » page 45 .
Interior monitor and towing protection
Fig. 36
Button for interior monitor and
towing protection
Read and observe on page 54 first.
The interior monitor detects movements inside the car and then triggers the
alarm.
54Operation
 1
1 2
2 3
3 4
4 5
5 6
6 7
7 8
8 9
9 10
10 11
11 12
12 13
13 14
14 15
15 16
16 17
17 18
18 19
19 20
20 21
21 22
22 23
23 24
24 25
25 26
26 27
27 28
28 29
29 30
30 31
31 32
32 33
33 34
34 35
35 36
36 37
37 38
38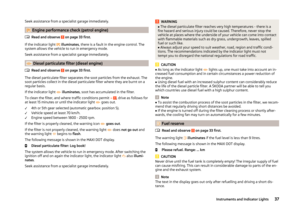 39
39 40
40 41
41 42
42 43
43 44
44 45
45 46
46 47
47 48
48 49
49 50
50 51
51 52
52 53
53 54
54 55
55 56
56 57
57 58
58 59
59 60
60 61
61 62
62 63
63 64
64 65
65 66
66 67
67 68
68 69
69 70
70 71
71 72
72 73
73 74
74 75
75 76
76 77
77 78
78 79
79 80
80 81
81 82
82 83
83 84
84 85
85 86
86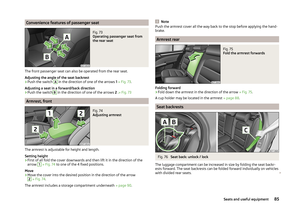 87
87 88
88 89
89 90
90 91
91 92
92 93
93 94
94 95
95 96
96 97
97 98
98 99
99 100
100 101
101 102
102 103
103 104
104 105
105 106
106 107
107 108
108 109
109 110
110 111
111 112
112 113
113 114
114 115
115 116
116 117
117 118
118 119
119 120
120 121
121 122
122 123
123 124
124 125
125 126
126 127
127 128
128 129
129 130
130 131
131 132
132 133
133 134
134 135
135 136
136 137
137 138
138 139
139 140
140 141
141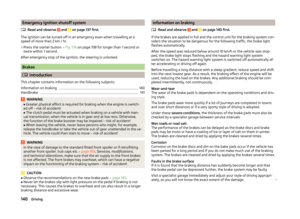 142
142 143
143 144
144 145
145 146
146 147
147 148
148 149
149 150
150 151
151 152
152 153
153 154
154 155
155 156
156 157
157 158
158 159
159 160
160 161
161 162
162 163
163 164
164 165
165 166
166 167
167 168
168 169
169 170
170 171
171 172
172 173
173 174
174 175
175 176
176 177
177 178
178 179
179 180
180 181
181 182
182 183
183 184
184 185
185 186
186 187
187 188
188 189
189 190
190 191
191 192
192 193
193 194
194 195
195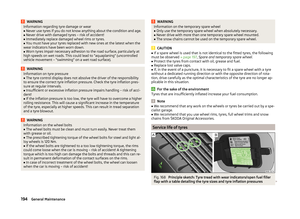 196
196 197
197 198
198 199
199 200
200 201
201 202
202 203
203 204
204 205
205 206
206 207
207 208
208 209
209 210
210 211
211 212
212 213
213 214
214 215
215 216
216 217
217 218
218 219
219 220
220 221
221 222
222 223
223 224
224 225
225 226
226 227
227 228
228 229
229 230
230 231
231 232
232 233
233 234
234 235
235 236
236 237
237 238
238 239
239 240
240 241
241 242
242 243
243 244
244 245
245