Page 201 of 246

Winter tyres
Fitting winter tyres will significantly improve the handling of your vehicle when
driving in wintry road conditions. Summer tyres have less grip on ice, snow and
at temperatures below 7 °C. This is especially true of vehicles fitted with wide
tyres or high-speed tyres .
In order to achieve the best possible handling properties, winter tyres must be
fitted on all 4 wheels, the minimum tread depth must be 4 mm and tyres must
be no older than 4 years.
Winter tyres of a lower speed category can be used provided that the permissi-
ble maximum speed of these tyres is not exceeded even if the possible maxi-
mum speed of the vehicle is higher.
The speed limit for winter tyres can be set in the MAXI DOT display in the
menu item Winter tyres » page 45 .
For the sake of the environment
Fit the summer tyres on again in good time as they provide better handling
properties, a shorter braking distance, less tyre noise, and reduced tyre wear
on roads which are free of snow and ice as well as at temperatures above 7 °C.
The fuel consumption is also lower.
Snow chains
When driving in wintry road conditions, snow chains improve not only traction,
but also the braking performance.
Snow chains must only be mounted on the front wheels.
For technical reasons, it is only permissible to fit snow chains with the follow-
ing wheel/tyre combinations.
Wheel sizeDepth (D)Tyre size7J x 16 a)45 mm205/556J x 16 a)50 mm205/556J x 1745 mm205/50a)
Not valid for vehicles with 3.6 l/191 kW FSI engine.
Only use fine-link snow chains . They must not project more than 9 mm - in-
cluding the chain lock.
CAUTION■ The chains must be removed when driving on roads which are free of snow.
They adversely affect the handling of your vehicle, damage the tyres and are
rapidly destroyed.■
Remove the full wheel trims » page 198 before fitting the snow chains.
199Wheels
Page 202 of 246

Do-it-yourself
Emergency equipment and self-help
Emergency equipment
Introduction
This chapter contains information on the following subjects:
First aid kit and warning triangle
200
fire extinguisher
200
Vehicle tool kit
201
First aid kit and warning triangle
Fig. 173
Stowage compartment for the first aid kit: Superb / Superb Com-
bi
Fig. 174
Placing of the warning triangle
First-aid box
The compartment for stowing the first-aid box is located in the right of the
boot » Fig. 173 .
Warning triangle
The warning triangle can be attached to the rear wall trim panel with rubber
straps » Fig. 174 .WARNINGThe first-aid kit and warning triangle must always be secured safely so that
they do not come loose when making an emergency braking or in a vehicle
collision which could cause injuries to occupants.
Note
■ Pay attention to the expiration date of the first-aid kit.■We recommend using a first-aid kit from ŠKODA Original Accessories, which
are available from a ŠKODA Partner.
fire extinguisher
Fig. 175
Fire extinguisher
The fire extinguisher is attached by two straps in a holder under the driver
seat.
Removing / attaching
›
Loosen the two straps by pulling the buckles in the direction of the ar-
row » Fig. 175 .
›
Remove the fire extinguisher.
Installation is carried out in the reverse order.
Please read carefully the instructions which are attached to the fire extin- guisher.
200Do-it-yourself
Page 203 of 246

The fire extinguisher must be checked by an authorised person once a year.
The national legal requirements must be observed.WARNINGThe fire extinguisher must always be secured safely so that they do not
come loose when making an emergency braking or in a vehicle collision
which could cause injuries to occupants.
Note
■ The fire extinguisher must comply with national legal requirements.■Pay attention to the expiration date of the fire extinguisher. Proper function-
ing of the fire extinguisher is not assured once it has passed its expiry date.■
The fire extinguisher is part of the scope of delivery in certain countries only.
Vehicle tool kit
Fig. 176
Vehicle tool kit
The vehicle tool kit and the lifting jack are housed in a plastic box in the spare
wheel or in the storage space for the spare wheel. There is also space here for
the removable ball rod for the trailer towing device. The box is attached with a
strap on the spare wheel.
The components of the vehicle tool kit (if included in the vehicle) » Fig. 176.
Screwdriver
Key for removing and installing the tail light
Adapter for anti-theft wheel bolts
123Towing eye
Clamps for removing the wheel trims
Car jack
Crank for the jack
Wheel wrench
Extraction pliers for wheel bolt caps
Replacement bulb set
Screw the car jack back into its initial position after use in order to store it back
in the box with the vehicle tool kit.WARNING■ The factory-supplied lifting jack is only intended for your model of vehicle.
Under no circumstances use it to lift heavier vehicles or other loads – risk of
injury!■
Ensure that the vehicle tool kit is safely secured in the boot.
■
Ensure that the box is always secured with the strap.
Changing a wheel
Introduction
This chapter contains information on the following subjects:
Preliminary work
202
Changing a wheel
202
Follow-up work
202
Loosening/tightening wheel bolts
203
Raising the vehicle
203
Securing wheels against theft
204WARNING■ If you are in flowing traffic, switch on the hazard warning light system
and set up the warning triangle at the prescribed distance! The national le-
gal requirements must be observed.■
Park the vehicle as far away as possible from the flow of traffic. Park on
as flat and firm a surface as possible.
■
The following instructions must be followed if the vehicle is subsequently
fitted with tyres or rims that differ from the factory-fitted ones » page 195,
New tyres .
45678910201Emergency equipment and self-help
Page 204 of 246

WARNINGNotes for vehicle lifting■If the wheel has to be changed on a slope, first of all block the opposite
wheel with a stone or similar object to prevent the vehicle from unexpect-
edly rolling away.■
Secure the base plate of the lifting jack with suitable means to prevent
possible moving. A soft and slippery ground under the base plate may move
the lifting jack, causing the vehicle to fall down. It is therefore always nec-
essary to place the lifting jack on a solid surface or use a wide and stable
base. Use a non-slip base (e.g. a rubber foot mat) if the surface is smooth,
such as cobbled stones, tiled floor, etc.
■
Only attach the lifting jack to the attachment points provided for this pur-
pose.
■
Always raise the vehicle with the doors closed.
■
Never position any body parts, such as arms or legs under the vehicle,
while the vehicle is raised with a lifting jack.
■
Never start the engine when the vehicle is raised – risk of injury.
WARNINGInformation on the wheel bolts■The wheel bolts must be clean and must turn easily. Never treat them
with grease or oil.■
The prescribed tightening torque of the wheel bolts for steel and light al-
loy wheels is 120 Nm.
■
If the wheel bolts are tightened to a too low tightening torque, the rims
could come loose when the car is moving – risk of accident! A tightening
torque which is too high can damage the bolts and threads and this can re-
sult in permanent deformation of the contact surfaces on the rims.
■
In case of incorrect treatment of the wheel bolts, the wheel can loosen
when the car is moving – risk of accident!
Note
The national legal requirements must be observed when changing a wheel.
Preliminary work
Read and observe
on page 201 first.
Always change a wheel on a level surface as far as possible.
The following steps must be carried out before actually changing the wheel:
› Have
all the occupants get out. The passengers should not stand on the
road (instead they should remain behind a crash barrier, for instance) while
the wheel is being changed.›
Switch off the engine.
›
Move the gearshift lever into Neutral or move the selector lever for the auto-
matic gearbox into position P .
›
Apply the handbrake firmly.
›
Uncouple a trailer.
›
Remove the vehicle tool kit » page 201 and the spare wheel » page 197 from
the boot.
Changing a wheel
Read and observe
on page 201 first.
›
Remove the full wheel trim » page 198 or caps » page 198 .
›
First of all slacken the anti-theft wheel bolt and then the other wheel
bolts » page 203 .
›
Jack up the vehicle until the wheel that needs changing is clear of the
ground » page 203 .
›
Unscrew the wheel bolts and place them on a clean surface (cloth, paper,
etc.).
›
Remove the wheel carefully.
›
Attach the spare wheel and slightly screw on the wheel bolts.
›
Lower the vehicle.
›
Alternately tighten wheel bolts opposite (diagonally) with the wheel wrench.
Tighten the anti-theft wheel bolt last » page 203.
›
Replace the wheel trim or the caps.
Note
■
All bolts must be clean and must turn easily.■Under no circumstances grease or oil the wheel bolts!■
When fitting unidirectional tyres, ensure that the direction of rotation is cor-
rect » page 193 .
Follow-up work
Read and observe
on page 201 first.
The following steps must also be performed after changing the wheel.
›
Stow and attach the replaced wheel in the spare wheel well using a special
bolt » page 197 .
202Do-it-yourself
Page 205 of 246

›Stow the tool kit in the space provided and secure using the band.›Check
the tyre pressure on the installed spare wheel as soon as possible.›
Have the tightening torque of the wheel bolts checked with a torque
wrench as soon as possible.
›
Replace the damaged wheel or consult a specialist garage about repair op-
tions.
Note
■ If it is determined that the wheel bolts are corroded and difficult to turn
when changing the wheel, the bolts must be replaced before checking the
tightening torque.■
Drive cautiously and only at a moderate speed until the tightening torque
has been checked.
Loosening/tightening wheel bolts
Fig. 177
Changing a wheel: Loosening the
wheel bolts
Read and observe on page 201 first.
Releasing
›
Push the wheel wrench onto the wheel bolt as far as the stop 1)
.
›
Grip the wrench at its end and turn the bolt about one turn in the direction of
the arrow » Fig. 177.
Tightening
›
Push the wheel wrench onto the wheel bolt as far as the stop 1)
.
›
Grip the wrench at its end and turn the bolt against the direction of the ar-
row » Fig. 177 until it is tight.
WARNINGUndo the wheel bolts only a little (about one turn) provided that the vehicle
has not yet been jacked up. Otherwise the wheel could come off and fall
down – risk of injury!
Note
If it proves difficult to undo the bolts, carefully apply pressure to the end of the
wrench with your foodt. Keep hold of the vehicle when doing so, and make
sure you keep your footing.
Raising the vehicle
Fig. 178
Jacking points for positioning
lifting jack
Fig. 179
Attach lifting jack
Read and observe
on page 201 first.
Position the car jack below the jacking point closest to the flat tyre » Fig. 178.
The jacking point is located directly below the engraving in the lower sill.
1)
Use the appropriate adapter for undoing and tightening the anti-theft wheel bolts
» page 204.
203Emergency equipment and self-help
Page 206 of 246
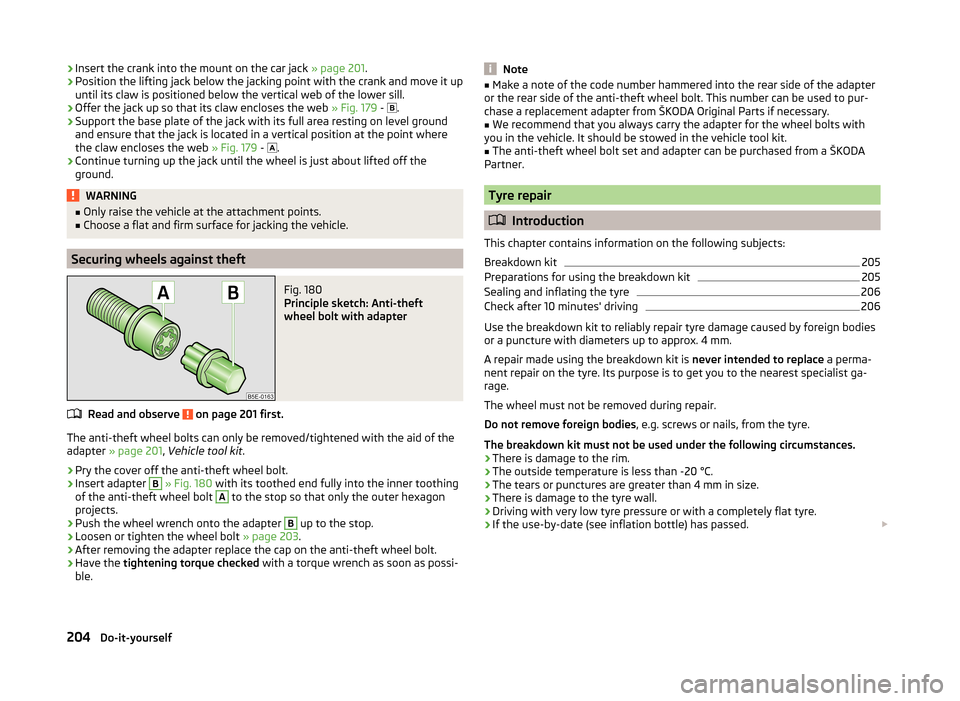
›Insert the crank into the mount on the car jack
» page 201.›Position the lifting jack below the jacking point with the crank and move it up
until its claw is positioned below the vertical web of the lower sill.›
Offer the jack up so that its claw encloses the web » Fig. 179 -
.
›
Support the base plate of the jack with its full area resting on level ground
and ensure that the jack is located in a vertical position at the point where
the claw encloses the web » Fig. 179 -
.
›
Continue turning up the jack until the wheel is just about lifted off the
ground.
WARNING■ Only raise the vehicle at the attachment points.■Choose a flat and firm surface for jacking the vehicle.
Securing wheels against theft
Fig. 180
Principle sketch: Anti-theft
wheel bolt with adapter
Read and observe on page 201 first.
The anti-theft wheel bolts can only be removed/tightened with the aid of the
adapter » page 201 , Vehicle tool kit .
›
Pry the cover off the anti-theft wheel bolt.
›
Insert adapter
B
» Fig. 180 with its toothed end fully into the inner toothing
of the anti-theft wheel bolt
A
to the stop so that only the outer hexagon
projects.
›
Push the wheel wrench onto the adapter
B
up to the stop.
›
Loosen or tighten the wheel bolt » page 203.
›
After removing the adapter replace the cap on the anti-theft wheel bolt.
›
Have the tightening torque checked with a torque wrench as soon as possi-
ble.
Note■ Make a note of the code number hammered into the rear side of the adapter
or the rear side of the anti-theft wheel bolt. This number can be used to pur-
chase a replacement adapter from ŠKODA Original Parts if necessary.■
We recommend that you always carry the adapter for the wheel bolts with
you in the vehicle. It should be stowed in the vehicle tool kit.
■
The anti-theft wheel bolt set and adapter can be purchased from a ŠKODA
Partner.
Tyre repair
Introduction
This chapter contains information on the following subjects:
Breakdown kit
205
Preparations for using the breakdown kit
205
Sealing and inflating the tyre
206
Check after 10 minutes' driving
206
Use the breakdown kit to reliably repair tyre damage caused by foreign bodies
or a puncture with diameters up to approx. 4 mm.
A repair made using the breakdown kit is never intended to replace a perma-
nent repair on the tyre. Its purpose is to get you to the nearest specialist ga-
rage.
The wheel must not be removed during repair.
Do not remove foreign bodies , e.g. screws or nails, from the tyre.
The breakdown kit must not be used under the following circumstances. › There is damage to the rim.
› The outside temperature is less than -20 °C.
› The tears or punctures are greater than 4 mm in size.
› There is damage to the tyre wall.
› Driving with very low tyre pressure or with a completely flat tyre.
› If the use-by-date (see inflation bottle) has passed.
204Do-it-yourself
Page 207 of 246

WARNING■A tyre filled with sealant has the same driving characteristics as a stand-
ard tyre.■
Do not travel faster than 80 km/h.
■
Avoid accelerating at full throttle, sharp braking and fast cornering.
■
Check the tyre pressure after driving for 10 minutes.
■
The sealant is hazardous to heath. Remove immediately if it comes into
contact with the skin.
For the sake of the environment
Used sealant or sealant whose expiry date has passed must be disposed of in
accordance with environmental protection regulations.
Note
■ Observe the manufacturer's usage instructions for the breakdown kit.■A new bottle of sealant can be purchased from ŠKODA Original Parts.■
Immediately replace the tyre that was repaired using the breakdown kit, or
consult a specialist garage about repair options.
Breakdown kit
Fig. 181
Principle sketch: Components of the breakdown kit
Read and observe
on page 205 first.
The kit is located in a box under the floor covering in the luggage compart-
ment.
Components of the breakdown kit » Fig. 181
Valve remover
Sticker with speed designation “max. 80 km/h”/“max. 50 mph” Inflation hose with plug
Air compressor
Tyre inflation hose
Tyre inflation pressure indicator
Air release valve
ON and OFF switch
12 volt cable connector
Tyre inflator bottle with sealing agent
Replacement valve core
The valve remover 1
has a slot at its lower end which fits into the valve core.
This is the only way in which you can remove and re-install the valve core from
the tyre valve. The same also applies to the replacement valve core
11
.
Preparations for using the breakdown kit
Read and observe
on page 205 first.
The following preparatory work must be carried out before using the break-
down kit.
›
Park the vehicle as far away as possible from the flow of traffic. Park on as
flat and firm a surface as possible.
›
If you are in flowing traffic, switch on the hazard warning light system and
set up the warning triangle at the prescribed distance! The national legal re-
quirements must be observed.
›
Have all the occupants get out. The passengers should not stand on the
road (instead they should remain behind a crash barrier, for instance) while
the wheel is being changed.
›
Switch off the engine and move the gearshift lever into Neutral or move the
selector lever on the automatic gearbox into position P.
›
Apply the handbrake firmly.
›
Check that you can carry out the repairs with the breakdown kit » page 204.
Uncouple a trailer.
›
Remove the breakdown kit from the boot.
›
Stick the sticker
2
» Fig. 181 on page 205 on the dashboard in the driver's
field of view.
1234567891011205Emergency equipment and self-help
Page 208 of 246

›Do not remove the foreign body, e.g. screw or nail, from the tyre.›Unscrew the valve cap.›
Use the valve remover
1
to unscrew the valve core and place it on a clean
surface (rag, paper, etc.).
Sealing and inflating the tyre
Read and observe
on page 205 first.
Sealing
›
Shake the tyre inflator bottle
10
» Fig. 181 on page 205 vigorously several
times.
›
Firmly screw the inflation hose
3
onto the tyre inflator bottle
10
in a clock-
wise direction. The film on the cap is pierced automatically.
›
Remove the plug from the inflation hose
3
and plug the open end fully onto
the tyre valve.
›
Hold the bottle
10
with the bottom facing upwards and fill all of the sealing
agent from the tyre inflator bottle into the tyre.
›
Remove the empty tyre inflator bottle from the valve.
›
Screw the valve core back into the tyre valve using the valve remover
1
.
Inflating
›
Screw the air compressor tyre inflation hose
5
» Fig. 181 on page 205 firmly
onto the tyre valve.
›
Check that the air release valve
7
is closed.
›
Start the engine and run it in idle.
›
Plug the connector
9
into 12 Volt socket » page 89, Cigarette lighter .
›
Switch on the air compressor with the ON and OFF switch
8
.
›
Allow the air compressor to run until a pressure of 2.0 - 2.5 bar is achieved.
Maximum run time of 8 minutes »
›
Switch off the air compressor.
›
If you cannot reach an air pressure of 2.0 – 2.5 bar, unscrew the tyre inflation
hose
5
from the tyre valve.
›
Drive the vehicle 10 metres forwards or backwards to allow the sealing agent
to “distribute” in the tyre.
›
Firmly screw the tyre inflation hose
5
back onto the tyre valve and repeat
the inflation process.
›
If you cannot reach the required tyre inflation pressure here either, this
means the tyre has sustained too much damage. You cannot seal with tyre with the breakdown kit »
.
›
Switch off the air compressor.
›
Remove the tyre inflation hose
5
from the tyre valve.
Once a tyre inflation pressure of 2.0 – 2.5 bar is reached, continue the journey
at a maximum speed of 80 km/h (50 mph).
Check the tyre inflation pressure after driving for 10 minutes » page 206.WARNING■
The tyre inflation hose and air compressor may get hot as the tyre is be-
ing inflated – there is a risk of injury.■
Do not place the hot tyre inflation hose or hot air compressor on flamma-
ble materials – there is a risk of fire.
■
If you cannot inflate the tyre to at least 2.0 bar, this means the damage
sustained was too serious. The sealing agent cannot be used to seal the
tyre.
Do not drive the vehicle. Seek help from a specialist garage.
CAUTION
Switch off the air compressor after running 8 minutes at the latest – there is a
risk of overheating. Allow the air compressor to cool a few minutes before
switching it on again.
Check after 10 minutes' driving
Read and observe
on page 205 first.
Check the tyre inflation pressure after driving for 10 minutes!
If the tyre pressure is 1.3 bar or less
›
Do not drive the vehicle! You cannot properly seal with tyre with the
breakdown kit.
If the tyre pressure is 1.3 bar or more
›
Adjust the tyre inflation pressure to the correct value (see inside of fuel filler
cap).
›
Continue driving carefully to the nearest specialist garage at a maximum speed of 80 km/h (50 mph).
206Do-it-yourself
 1
1 2
2 3
3 4
4 5
5 6
6 7
7 8
8 9
9 10
10 11
11 12
12 13
13 14
14 15
15 16
16 17
17 18
18 19
19 20
20 21
21 22
22 23
23 24
24 25
25 26
26 27
27 28
28 29
29 30
30 31
31 32
32 33
33 34
34 35
35 36
36 37
37 38
38 39
39 40
40 41
41 42
42 43
43 44
44 45
45 46
46 47
47 48
48 49
49 50
50 51
51 52
52 53
53 54
54 55
55 56
56 57
57 58
58 59
59 60
60 61
61 62
62 63
63 64
64 65
65 66
66 67
67 68
68 69
69 70
70 71
71 72
72 73
73 74
74 75
75 76
76 77
77 78
78 79
79 80
80 81
81 82
82 83
83 84
84 85
85 86
86 87
87 88
88 89
89 90
90 91
91 92
92 93
93 94
94 95
95 96
96 97
97 98
98 99
99 100
100 101
101 102
102 103
103 104
104 105
105 106
106 107
107 108
108 109
109 110
110 111
111 112
112 113
113 114
114 115
115 116
116 117
117 118
118 119
119 120
120 121
121 122
122 123
123 124
124 125
125 126
126 127
127 128
128 129
129 130
130 131
131 132
132 133
133 134
134 135
135 136
136 137
137 138
138 139
139 140
140 141
141 142
142 143
143 144
144 145
145 146
146 147
147 148
148 149
149 150
150 151
151 152
152 153
153 154
154 155
155 156
156 157
157 158
158 159
159 160
160 161
161 162
162 163
163 164
164 165
165 166
166 167
167 168
168 169
169 170
170 171
171 172
172 173
173 174
174 175
175 176
176 177
177 178
178 179
179 180
180 181
181 182
182 183
183 184
184 185
185 186
186 187
187 188
188 189
189 190
190 191
191 192
192 193
193 194
194 195
195 196
196 197
197 198
198 199
199 200
200 201
201 202
202 203
203 204
204 205
205 206
206 207
207 208
208 209
209 210
210 211
211 212
212 213
213 214
214 215
215 216
216 217
217 218
218 219
219 220
220 221
221 222
222 223
223 224
224 225
225 226
226 227
227 228
228 229
229 230
230 231
231 232
232 233
233 234
234 235
235 236
236 237
237 238
238 239
239 240
240 241
241 242
242 243
243 244
244 245
245


