Page 65 of 83
 Columbus Infotinment Navigation System Manual The timing of the navigation announcement depends on the type of road and
the driving speed. For example, on motorways the first announcement is made
about 2000 m (6000 ft) before the location where y")
The timing of the navigation announcement depends on the type of road and
the driving speed. For example, on motorways the first announcement is made
about 2000 m (6000 ft) before the location where you want to leave the mo-
torway.
During dynamic route guidance, the unit notifies the driver of traffic problems.
If a new route is calculated due to traffic problems, the Calculating the route...
announcement is sounded.
Set the output volume of the navigation announcements or mute it during a
phone call » page 49.
Route
When there is a calculated route to the destination, the recommended route is
displayed.
›
In the Navigation main menu, press
.
The following menu is displayed: ■ Stop route guidance - Stops route guidance
■ New dest./stopover - Enter a new destination or add a destination to the
calculated route » page 55 or » page 65
■ Route information - Display information about the destination and the calcu-
lated route (setup of information displayed » page 49)
■ - Arrival time at destination/stopover 1)
■ - Remaining travelling time to destination or stopover 1)
■ - Remaining travelling distance to destination or stopover
■ Store destination - Stores the destination on the input screen » page 8
■ Route list - Displays the list of route sections
■ Tour - display of tour destinations » page 65
■ Congestion ahead - If you hear of a traffic problem (e.g. congestion), you can
enter this traffic problem manually. After entering, this device recalculates
and provides an alternative route. The traffic jam information increases or
decreases by touching the scale /
or by turning the menu button
2
» Fig. 1 on page 5 .
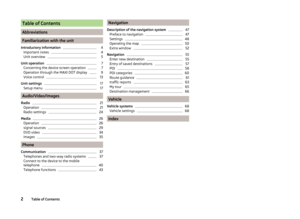
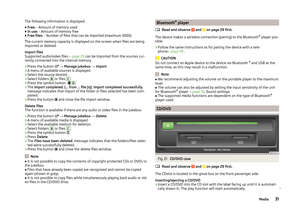
Lane guidanceFig. 47
Lane guidance
A split screen lane guidance
A
» Fig. 47 may sometimes be shown during the
route guidance at some intersections, motorway junctions, multilane roads,
and similar.
This split screen with the lane guidance is only displayed only if information
about the traffic area is available in the navigation data.
Switch function » page 49on/off.
traffic reports
Introduction
This chapter contains information on the following subjects:
Operation
64
Switching dynamic route on/off
64
Detailed traffic reports
64
The traffic is getting denser. For this reason, information on the current road
and traffic conditions will continue to gain in importance.
TMC traffic reports are used to optimise the route during route guidance when
there are traffic disruptions.
The device can obtain this information from the following sources:
1)
If the time of arrival or remaining travelling time is greater than 24 hours,
is displayed inside the sym-
bol.
63Navigation
Page 66 of 83
 Columbus Infotinment Navigation System Manual ›Traffic programme TP in the FM frequency range
» page 23.
› Traffic programme in the DAB frequency range
› TMC traffic information with a dynamic adjustment for the current route
The followin")
›Traffic programme TP in the FM frequency range
» page 23.
› Traffic programme in the DAB frequency range
› TMC traffic information with a dynamic adjustment for the current route
The following conditions are required for the correct TMC function: The vehicle is within reception range of the FM RDS-TMC.
Adequate and uninterrupted signal reception of a traffic information sta-
tion 1)
.
Current navigation data in the device.
Operation
TMC (Traffic Message Channel) is a digital data service emitted by the radio
station for continuous transmission of traffic information.
›
Press to display a list of traffic reports
Traffic report …/….
Touch one of the traffic report entries to display traffic report de-
tails » page 64 .
If a TMC traffic radio station is available for current location, the TMC traffic re-
ports are updated continuously in the background. The station you are listen-
ing to does not have to be a TMC station.
The reception of TMC traffic reports is always switched on and cannot be
turned off.
The accuracy of the dynamic route guidance depends on the transmitted traf-
fic reports. The radio stations broadcasting this information are responsible for
the content.
TMC traffic reports can only be evaluated and saved by the radio navigation
system when navigation data are available for the driven area.
Switching dynamic route on/off
›
In the Navigation main menu, press
→ Route Options → Dynamic route .
When the Dynamic route » page 48 function is switched on, the traffic reports
influence the dynamic route guidance by means of TMC messages.
Dynamic route switched on
Information on traffic problems received via TMC which affect the route are displayed in the map by means of a coloured symbol (e.g.,
,
,
, etc.). Traffic
problems, which do not affect the route, are displayed in the map by means of
a grey symbol. The direction in which a traffic problem is found, is displayed by
means of an arrow in the symbol.
Dynamic route switched off
You are not alerted to received traffic disruptions along your route and are gui-
ded through the traffic disruption by the radio navigation system. The traffic
reports are updated automatically in the unit and displayed by pressing the
button
.
If one of the announced traffic disruptions lies on your route, you can switch on dynamic route guidance during your current route guidance or block the
route manually » page 63.
Note
Making a diversion from a traffic jam based on TMC traffic reports may not al-
ways offer a time advantage, e.g. if the diversion route is also congested.
Detailed traffic reports
After pressing the
button, a screen appears with the following informa-
tion:
■ Function key All - Show all traffic information
■ Function key Route - only display the traffic information on the current route
■ A map showing the traffic obstruction
■ A window with a description of the traffic information
■ Location of event, the accuracy depends on the timeliness of the naviga-
tion data
■ Description of up to three events related to the respective information
■ Description of the direction with respect to the event
■ probable duration of the event
■ Additional information, such as probable delay time
■ An information line, on how current the information is and on the provider
of the message
■ Symbol that specifies the type of information
■ - zoom in window with described traffic obstruction
1)
For vehicles with window antennas, if the windows have foil stuck to them or metal-coated stickers this
may cause you to experience some interference.
64Navigation
Page 67 of 83
 Columbus Infotinment Navigation System Manual ■ - zoom out window with described traffic obstruction
■ - show previous traffic information
■ - show the following traffic information
■ - display list of all received traffic")
■ - zoom out window with described traffic obstruction
■ - show previous traffic information
■ - show the following traffic information
■ - display list of all received traffic messages
My tour
Introduction
This chapter contains information on the following subjects:
New tour
65
Tour editing
65
Tour memory
65
First and foremost, pay attention to the safety instructions » page 4 , Impor-
tant notes .
New tour
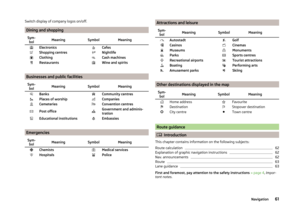
Fig. 48
Entering a new tour
›
In the Navigation main menu, press
→ New tour to open a menu for en-
tering a new tour.
The route can be preset. After entering the route, you can start the guidance or save the route for use at a later date.
You can switch the individual destinations by pressing a destination and drag- ging it to another position.
Pressing the function key with the destination opens a window with function
keys for destination processing.
Explanation of graphic
Enter a new destination
Select a destination from the list of stored destinations » page 57
Save the route in the tour memory
Calculate the specified route and start the route guidance
Stop the route guidance
Stopover with sequential number
Destination
Arrival time at destination/stopover
Distance to destination or stopover
Delete the stopover
Start direct route guidance
Open the destination details » page 66
When you press the name of the destination or stopover, the system displays
a menu where you can edit the destination ( ,
,
).
After the route has been calculated, the unit displays the arrival times at the
individual destinations and the remaining distance to the destination.
Tour editing
›
In the Navigation main menu, press
→ Edit tour to open a list containing
the destinations for the current route.
The route guidance is not cancelled.
When you press the name of the destination or stopover, the system displays
a menu where you can edit the destination » page 65.
Tour memory
›
In the Navigation main menu, press
→ Tour memory to open a list con-
taining all saved routes.
When you confirm a route from the list, the system opens a menu for the se-
lected route containing destinations; here, you can edit the destinations and
start the route guidance. » page 65
ABCDE65Navigation
Page 68 of 83
 Columbus Infotinment Navigation System Manual Destination management
Introduction
This chapter contains information on the following subjects:
Stopover
66
n details
66
First and foremost, pay attention to the safety instructions » page 4 , I")
Destination management
Introduction
This chapter contains information on the following subjects:
Stopover
66
n details
66
First and foremost, pay attention to the safety instructions » page 4 , Impor-
tant notes .
Stopover
It is possible to add up to ten stopovers to the route during route guidance.
The route guidance is according to the sequence of the stopovers on the
route. After the next stopover has been reached, route guidance to the follow-
ing stopover continues.
›
In the Navigation main menu, press
New dest./stopover a menu opens for
entering a new destination » page 55 and then in the next step a menu for
destination details » page 66.
If the route guidance is active, then after confirming with Start the device
shows after entering the stopover the message, Route guidance is already ac-
tive. Do you want to start route guidance directly to the new destination or
add the new destination as a stopover? and the following points » Fig. 48 on
page 65 :
■ Cancel - the stopover destination input and the destination guidance to the
original destination is continued
■ Stopover - the destination entered is added to the route and guidance to
this destination is initially provided
■ Start - the destination entered is added as the final destination and the orig-
inal final destination is replaced by this new destination
After reaching the maximum number of ten stopover destinations one of the stopover destinations is to be deleted in order to enter the next destination.
n detailsFig. 49
Destination details
The following information and functions are displayed in the destination de-
tails.
› preview map with indication of the destination by means of the symbol
› detailed destination information
›
- reduce preview map display
›
- enlarge preview map display
The following function keys are displayed, depending on the target type.
New destination or a destination stored in the list of last destinations
The menu is shown at the destination entry point by pressing if this destina-
tion is not in the destination memory.
Start - Start route calculation
Route options - Display a menu for setting the route parame-
ters » page 48
Store - Store the destination in the destination memory » page 8
Destination in destination memory
The menu is shown at the destination entry point by pressing if this destina-
tion is in the destination memory or the favourites list.
■ Start - Start route calculation
■ Route options - Display a menu for setting the route parameters » page 48
■ Edit - Edit the stored destination
■ Favourite - Add or remove the destination to/from the list of favourites
■ Delete - Delete the destination
■ Store as - Edit the name and then store the destination » page 8
POI
The menu is displayed:
ABC66Navigation
Page 69 of 83
›by touching
the menu item in the list of found POIs;
› by touching the POI symbol on the map.
■ Dial No. - Start a telephone call 1)
(If a telephone is connected via Bluetooth ®
and the destination has been entered including the contact telephone num-
ber)
■ Start - Start route calculation » page 62
■ Store - Store the destination in the destination memory
In the POI details, individual POIs can be shown from the POIs found by tap-
ping on
/
or by finger motion across the screen.
Home address
The menu is displayed after the home address has been entered.
■ Store - Store the home address in the unit memory1)
This function is only supported by some telephones.
67Navigation
Page 70 of 83
 Columbus Infotinment Navigation System Manual Vehicle
Vehicle systems
Vehicle settings
Introduction
This chapter contains information on the following subjects:
Selection of travel mode (Driving Mode Selection)
68
Vehicle data
69
Auxiliary hea")
Vehicle
Vehicle systems
Vehicle settings
Introduction
This chapter contains information on the following subjects:
Selection of travel mode (Driving Mode Selection)
68
Vehicle data
69
Auxiliary heater and ventilation
70
ESC-and ASR systems
70
Tyre
70
Assistance systems
71
Parking and manoeuvring
71
Light
72
mirrors and wiper
72
Opening and closing
72
Seats
72
Multifunction display
73
Service
73
Restore factory settings
73
Climatronic settings
73
First and foremost, pay attention to the safety instructions » page 4 , Impor-
tant notes .
Settings relating to the vehicle systems can only be made when the ignition is
switched on.
Note
■ The individual systems are described in the » Vehicle Owner's Manual .■If the functions of some systems are disabled, some functions, such as parts
of the ESC system, are switched on again automatically for security reasons,
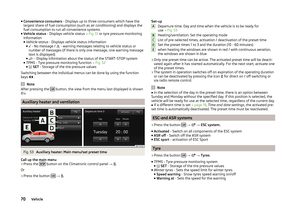
after switching the ignition off and on.Selection of travel mode (Driving Mode Selection)Fig. 50
Button for selecting the driving mode: Version 1/version 2
The menu for the selection of the driving mode allows you to select one of the
driving modes ( Normal, Sport , Eco , Individual ).
If a driving mode other than Normal is selected, then the symbol lights up on
the button or
» Fig. 50 .
The currently selected driving mode is displayed in the info field in the main
menus next to the icons
» Fig. 55 on page 73 (top left).
Call up the main menu
›
Press the button or
» Fig. 50 .
■ Normal - Activates Normal mode
■ Cancel - Cancel the menu to select the driving mode
■ Information - Information concerning the mode settings
■ Sport - Activates Sport mode
■ Cancel - Cancel the menu to select the driving mode
■ Information - Information concerning the mode settings
■ Eco - Activates the fuel-saving mode
■ Cancel - Cancel the menu to select the driving mode
■ Information - Information concerning the mode settings
■ Individual - Activates the Individual mode
■ Cancel - Cancel the menu to select the driving mode
■ Setup - Individual setting
■ Steering: - Set the power steering characteristics
■ Normal - Normal
■ Sport - Sports
68Vehicle
Page 71 of 83
 Columbus Infotinment Navigation System Manual ■Engine: - Set the engine (drive) characteristics
■ Normal - Normal
■ Sport - Sports
■ Eco - Economical
■ ACC: - Set the vehicle acceleration when adaptive cruise control is activa-
ted")
■Engine: - Set the engine (drive) characteristics
■ Normal - Normal
■ Sport - Sports
■ Eco - Economical
■ ACC: - Set the vehicle acceleration when adaptive cruise control is activa-
ted
■ Normal - Normal
■ Sport - Sports
■ Eco - Economical
■ Dynamic cornering light: - Set the characteristics of the adaptive head-
lights
■ Normal - Normal
■ Sport - Sports
■ Eco - Economical
■ Air conditioning: - Sets the Climatronic characteristics
■ Normal - Normal
■ Eco - Economical
■ Reset mode - Setting for all menu items in the Individual mode to Normal
■ Cancel - Keep the current settings
■ Reset - Set all menu items to Normal
Note
If you do not operate the unit for longer than approx. 10 seconds in the "Select
driving mode" menu, it will switch to the last selected menu or switch itself off.
Vehicle data
Fig. 51
Travel data / vehicle status
Fig. 52
TPMS - Display example: the sys-
tem indicates a tire pressure
change on the rear right
Explanation of graphic
Distance
Driving time
Average speed
Average fuel consumption
Approximate range 1)
Range (if the estimated range is less than 300 km, the vehicle starts to ap-
proach the symbol )
Vehicle representation (the zones of the vehicle are shown in different
colours, corresponding to any warning messages that occur. The warning
messages are displayed once you touch vehicle)
Call up the main menu
›
Press the button
→
.
■ Driving data - Display travel data
You can display one of three trip memories on the screen » Fig. 51.
■ Since start - Driving data for the individual trip
■ Long-term - Long-term driving data
■ Since refuelling - Data since last refuelling
Switching between the individual driving data storage locations can be done
by using the function keys
.
ABCDEFG1)
For vehicles with CNG drive the approximate range with gasoline and CNG is also displayed separately.
69Vehicle systems
Page 72 of 83
 Columbus Infotinment Navigation System Manual ■Convenience consumers - Displays up to three consumers which have the
largest share of fuel consumption (such as air conditioning) and displays the
fuel consumption to run all convenience systems")
■Convenience consumers - Displays up to three consumers which have the
largest share of fuel consumption (such as air conditioning) and displays the
fuel consumption to run all convenience systems
■ Vehicle status - Displays vehicle status » Fig. 51 or tyre pressure monitoring
information
■ Vehicle status - Displays vehicle status information
■ - No message /
- warning messages relating to vehicle status or
number of messages (if there is only one message, one warning message
text is displayed)
■ - Display information about the status of the START-STOP system
■ TPMS - Tyre pressure monitoring function » Fig. 52
■ SET - Storage of the tire pressure values
Switching between the individual menus can be done by using the function
keys
.
Note
After pressing the button, the view from the menu last displayed is shown
Auxiliary heater and ventilation
Fig. 53
Auxiliary heater: Main menu/set preset time
Call up the main menu
›
Press the button on the Climatronic control panel
→
.
Or
›
Press the button
→
.
Set-up
Departure time: Day and time when the vehicle is to be ready for
use » Fig. 53
Heating/ventilation: Set the operating mode
List of pre-selected times, activation / deactivation of the preset time
Set the preset times 1 to 3 and the duration (10 - 60 minutes) when heating the windows are shown in red / with continuous aeration,the windows are shown in blue
› Only one preset time can be active. The activated preset time will be deacti-
vated again after it has started automatically. For the next start, activate one
of the preset times.
› The system in operation switches off on expiration of the operating duration
or can be deactivated by pressing the icon for direct on / off switching or
via radio remote control.
Note
■ In the selection of the day in the preset time, there is an option between
Sunday and Monday without the specified day. If this position is selected, the
vehicle will be ready for use at the selected time, regardless of the current day.■
If a different time is set » page 19, Time and date settings , the activated pre-
set time is automatically deactivated. The preset time must be reactivated.
ESC-and ASR systems
›
Press the button
→
→ ESC system: .
■ Activated - Switch on all components of the ESC system
■ ASR off - Switch off the ASR system
■ ESC sport - activation of ESC Sport
Tyre
›
Press the button
→
→ Tyres .
■ TPMS - Tyre pressure monitoring system
■
SET - Storage of the tire pressure values
■ Winter tyres - Sets the speed limit for winter tyres
■ Speed warning - Snow tyres speed warning on/off
■ Warning at - Sets the speed for the warning
ABCDE70Vehicle


 Columbus Infotinment Navigation System Manual ›by touching
the menu item in the list of found POIs;
› by touching the POI symbol on the map.
■ Dial No. - Start a telephone call 1)
(If a telephone is connected via Bluetooth ®
and the")