Page 57 of 83
 Columbus Infotinment Navigation System Manual Navigation
Enter new destination
Introduction
This chapter contains information on the following subjects:
Input destination possibilities
55
Address
55
Map
56
First and foremost, pay attention to")
Navigation
Enter new destination
Introduction
This chapter contains information on the following subjects:
Input destination possibilities
55
Address
55
Map
56
First and foremost, pay attention to the safety instructions » page 4 , Impor-
tant notes .
Input destination possibilities
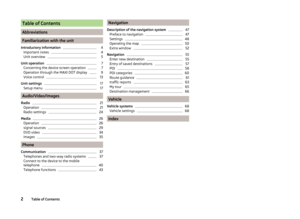
Fig. 39
Destination entry options
Explanation of graphic
Address » page 55
POI » page 58
in the map » page 56
Select the menu with the option to enter a destination » Fig. 39.
›
In the Navigation main menu, press
→ Options →
.
or
›
In the Navigation main menu, press
→ New dest./stopover → Options →
.
or
›
In the Navigation main menu, press
→ Other POIs → Options →
.
ABCMake sure that the destination has been entered correctly, for example, by
checking that the destination is displayed in the map. Some names of places
and other destinations can occur at several places.
Address
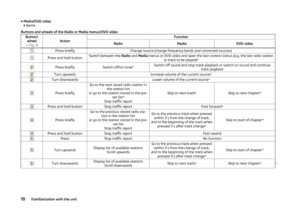
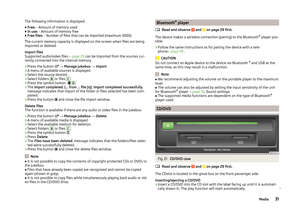
Fig. 40
Destination entry by address
Explanation of graphic Country
City / town
Street
Enter building number (the function key is enabled only after the street
has been entered)
Enter junction (the function key is enabled only after the street has been
entered)
Return to the higher-level menu
Delete characters in the entry line
Switch to letters » page 8
Switch to special characters
Input a junction (crossroads)
Confirmation of text entered into the entry line
Open the map display » page 56
›
In the Navigation main menu, press
→ Options → Address .
or
›
In the Navigation main menu, press
→ New dest./stopover → Options →
Address .
or
ABCDE
55Navigation
Page 58 of 83
 Columbus Infotinment Navigation System Manual ›In the
Navigation main menu, press → Other POIs → Options → Address .
Some address positions are already pre-filled with the data of the last destina-
tion.
The pre-filled positio")
›In the
Navigation main menu, press → Other POIs → Options → Address .
Some address positions are already pre-filled with the data of the last destina-
tion.
The pre-filled positions can be adjusted by touching the item and then adjust-
ing it in the input screen » page 8.
To start navigation, you need to enter country, city and street.
The information is entered step by step in individual input screens.
When entering the street, instead of a street name, it is possible to select the centre of the entered city by touching Centre. Then it is no longer necessary to
enter the house number or junction.
When entering the address, the function key Map is displayed on the input
screen » page 8 . When you press the function key, the system opens a screen
with the map » page 56 where you can specify the address more precisely or
check it.
You need to enter both the building number and a further address indicator in
the form of a number. The device displays a list of destinations found from
combinations of the two numbers.
If the entered house number was not found, a menu opens to clarify the desti-
nation:
■ No house number - Enter an address without a house number and display a
menu with destination details
■ Nearest house number: - Confirmation of the proposed house number
■ Enter junction - Open a menu with junctions with the selected street
If the address is entered correctly, destination details are dis-
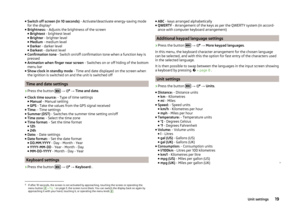
played » page 66 .MapFig. 41
Destination entry in the map
›
In the
Navigation main menu, press
→ Options → On Map .
or
›
In the Navigation main menu, press
→ New dest./stopover → Options →
On map .
or
›
In the Navigation main menu, press
→ Other POIs → Options → On map .
Entry on the map is also used for entering the search area for
POIs » page 58 .
›
In the Navigation main menu, press
→ Other POIs → Search area → Se-
lect on map → Edit .
The destination can be entered on the map by using the GPS coordinates or
the crosshairs » Fig. 41 .
GPS coordinates
The travel destination can be entered using latitude and longitude (GPS coor- dinates).
Press the function key with the latitude or longitude value for the point to dis-
play a menu with the option to focus in. The reference can be set with the
function key with the symbol /
. Touch the screen outside the function
keys to display a basic menu for entering points on the map.
The crosshairs shift to the coordinates entered so that the entered destination position can be checked.
56Navigation
Page 59 of 83
 Columbus Infotinment Navigation System Manual Crosshairs
The crosshairs indicate the position of the pre-filled address.
Drag the desired destination to the centre of the crosshairs on the map with your finger.
Touch the map with your finger to m")
Crosshairs
The crosshairs indicate the position of the pre-filled address.
Drag the desired destination to the centre of the crosshairs on the map with your finger.
Touch the map with your finger to move the point of contact in the crosshair
while adjusting the latitude and longitude valuesfor the entered point.
The symbol
displays the current map scale. This can be changed while the
entry is being made » page 51.
The bottom of the screen displays the address or the longitude and latitude of
the selected item.
Confirm target
Confirm the destination by touching OK. Then the following items are dis-
played:
■ Store - Store the destination in the destination memory » page 8
■ Edit - Return to the main menu with the option to input a destina-
tion » page 55
■ Route opts. - Display a menu for setting the route parameters » page 48
■ Start - Route calculation starts with subsequent selection of route type and
route guidance or with guidance according to the preferred route type
Map zoom in / out
by pressing the function key the map goes to full screen display
by pressing the function key the map is displayed on a split screen along
with the menu for the entry using the GPS coordinates.
Entry of saved destinations
Introduction
This chapter contains information on the following subjects:
My destinations
57
Home address
57
Own destination (vCard)
58
First and foremost, pay attention to the safety instructions » page 4 , Impor-
tant notes .
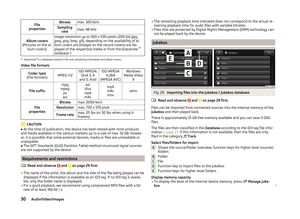
My destinationsFig. 42
My destinations menu
The menu is used to select the type of destinations stored in the unit memo-
ry » Fig. 42 .
›
In the
Navigation main menu, press
→ Dest. and contacts →
.
or
›
In the Navigation main menu, press
→ Last destinations →
.
Destinations lists Last destinations
Destination memory (stored destinations and flag destinations)
Favourites
List of contacts with stored addresses 1)
(the phone must be connected via
Bluetooth ®
» page 37 )
Confirm one of the menu items of dests. and contacts to display the following: ■ Find - The function key is displayed if more than 5 entries exist. Touch to
start the search for a destination or a contact by the name stored in the des-
tination menu » page 8
■ - Detailed information on the destination or contact
Confirm a destination to start guidance depending on the context or to display
details of the destination » page 66.
Home address
The menu provides a quick destination guide to a stored home address.
›
In the Navigation main menu, press
→ Home address .
1)
This function is only supported by some telephones.
57Navigation
Page 60 of 83
 Columbus Infotinment Navigation System Manual If the preferred route type has been set, then touching the Home address will
start the calculation and route guidance, or after the calculation, you need to
select the route type before the route gui")
If the preferred route type has been set, then touching the Home address will
start the calculation and route guidance, or after the calculation, you need to
select the route type before the route guidance starts.
If the home address has not been entered, an input window is displayed with
the following message:
Please select as your home address: your current position or a new address.
The following function keys are displayed:
› Position
- Entry of the home address through taking the current position of
the vehicle;
› Address
- Enter the home address in writing.
Description of the adjustment or deletion process of the home address:
The home address is also available in the main navigation menu, by pressing
the symbol key
→ Manage memory → Define home address .
Own destination (vCard)
You can import custom destinations in vCard format from an SD memory card,
a CD/DVD or a USB storage device into the device.
›
In the Navigation main menu, press
→ Import destinations .
A list of possible data import sources is displayed » page 26.
After selecting the source and confirming the menu item Import all vCards
from this folder the importing the data stored in vCard format into the device
memory begins.
POI
Introduction
This chapter contains information on the following subjects:
Input a new POI
58
Search area for POIs
59
Find and select a POI
59
Quick select a POI
59
Search selection near the location, destination, stopover and along the
route
59
Search near the entered address or near the point entered on the map
60First and foremost, pay attention to the safety instructions » page 4 , Impor-
tant notes .
Input a new POI
Fig. 43
Main menu
Explanation of graphic
Select search area
Menu with context-sensitive search areas
Search for POI by name
Search for POI by category
Open the main menu.
›
In the Navigation main menu, press
→ Options → POI .
or
›
In the Navigation main menu, press
→ New dest./stopover → Options →
POI .
or
›
In the Navigation main menu, press
Other POIs
123458Navigation
Page 61 of 83
 Columbus Infotinment Navigation System Manual Search area for POIsFig. 44
Search area for POIs
Explanation of graphicNear current location - search in immediate vicinity of vehicle
Near destination -Near the destination
Near next stopover dest")
Search area for POIsFig. 44
Search area for POIs
Explanation of graphicNear current location - search in immediate vicinity of vehicle
Near destination -Near the destination
Near next stopover destination - in the stopover vicinity
Along the route - Along the calculated route
Near address - Near the entered address
Select on map - In the vicinity of the point entered on the map
First select a search area for the POI.
›
In the main menu, to enter a new POI, press
1
» Fig. 43 on page 58 .
Depending on the context, the following search options
2
» Fig. 43 on
page 58 can be displayed.
Find and select a POI
The POIs are searched for in the selected search area » page 59.
Search option: » Fig. 43 on page 58
Search by the entered POI name » page 8
Search by the selected POI category » page 60
The menu with the found destinations is displayed when the search has finish- ed. The menu is sorted by the distance to the specified search area and in-
cludes a maximum of 200 entries found.
Details are displayed after confirming a menu item » page 66 .
ABCDEF34Quick select a POI›
In the Navigation main menu, press
.
Speed dial Car park
Restaurant
Petrol stations
When you touch a menu item, a list of the nearest POIs in the selected catego-
ry is displayed.
By selecting a menu item in the list of the selected POIs, the POI details is dis-
played.
Search selection near the location, destination, stopover and
along the route
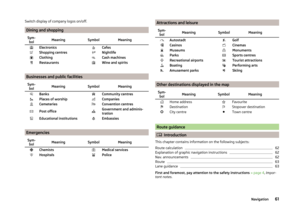
Fig. 45
Search area for POIs
Explanation of graphic
Country
City
Street
The menu items displayed in the search area are for information only and can- not be changed.
The figure applies to the following search-area options near
1
» Fig. 43 on
page 58 .
■ Near current location - current position
■ Near destination - Destination
■ Near next stopover destination - Stopover
■ Along the route - Route
ABC59Navigation
Page 62 of 83
 Columbus Infotinment Navigation System Manual Touch 3 or 4 » Fig. 43 on page 58 to start the POI search for the selected
search area.
Search near the entered address or near the point entered on the
map
Fig. 46
POI search: near the entered ad")
Touch 3 or 4 » Fig. 43 on page 58 to start the POI search for the selected
search area.
Search near the entered address or near the point entered on the
map
Fig. 46
POI search: near the entered address entered/near the entered
map point
Explanation of graphic Country
City
Street
touch to open a screen to enter a point on the map » page 56
Country
City
Street
The figure applies to the following search area options
1
» Fig. 43 on
page 58 .
■ Near address - Searches in the vicinity of the entered address
■ Select on map - Searches in the vicinity of the entered map point
The displayed menu items, in the search area by address entry, can be
changed.
The menu items in the search area by map point entry are for information only
and cannot be changed.
Touch
3
or
4
» Fig. 43 on page 58 to start the POI search for the selected
search area.
ABCDEFGPOI categories
Introduction
This chapter contains information on the following subjects:
Car and travel
60
Dining and shopping
61
Businesses and public facilities
61
Emergencies
61
Attractions and leisure
61
Other destinations displayed in the map
61
First and foremost, pay attention to the safety instructions » page 4 , Impor-
tant notes .
The map screen can display symbols for the destination type name.
■ Select all - Displays a list of all destinations in the search area, with the near-
est POI listed at the top
■ Categories (alphabetical) - Displays all POI categories in alphabetical order
■ Car and travel
■ Dining and shopping
■ Companies and public services
■ Emergencies
■ Attractions and leisure
Car and travel
Sym-
bolMeaning SymbolMeaningBus stops Petrol stationsLPG filling stations Natural gas stationsMotorway intersections Motorway junctionsHotels and motels Border crossingsAirports Railway stationsMotorway services Car parksCar rental Skoda dealersSkoda service Ferries and motorail trainsTourist information 60Navigation
Page 63 of 83
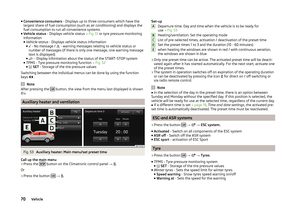
 Columbus Infotinment Navigation System Manual Switch display of company logos on/off.
Dining and shopping
Sym-bolMeaning SymbolMeaningElectronics CafesShopping centres NightlifeClothing Cash machinesRestaurants Wine and sp")
Switch display of company logos on/off.
Dining and shopping
Sym-bolMeaning SymbolMeaningElectronics CafesShopping centres NightlifeClothing Cash machinesRestaurants Wine and spirits
Businesses and public facilities
Sym-bolMeaning SymbolMeaningBanks Community centresPlaces of worship CompaniesCemeteries Convention centresPost office Government and adminis-
trationEducational institutions Embassies
Emergencies
Sym- bolMeaning SymbolMeaningChemists Medical servicesHospitals Police Attractions and leisureSym-bolMeaning SymbolMeaningAutostadt GolfCasinos CinemasMuseums MonumentsParks Sports centresRecreational airports Tourist attractionsBoating Performing artsAmusement parks Skiing
Other destinations displayed in the map
Sym-bolMeaning SymbolMeaningHome address FavouriteDestination Stopover destinationCity centre Town centre
Route guidance
Introduction
This chapter contains information on the following subjects:
Route calculation
62
Explanation of graphic navigation instructions
62
Nav. announcements
62
Route
63
Lane guidance
63
First and foremost, pay attention to the safety instructions » page 4 , Impor-
tant notes .
61Navigation
Page 64 of 83
 Columbus Infotinment Navigation System Manual Route calculation
The route is calculated automatically according to the entered destination. The calculation takes the settings of the route options » page 48 (route type, dy-
namic route, etc.) in")
Route calculation
The route is calculated automatically according to the entered destination. The calculation takes the settings of the route options » page 48 (route type, dy-
namic route, etc.) into account.
The route is recalculated each time if you ignore driving recommendations or
change the route. This process takes only a few seconds. Nav. announcements
can only then be re-transmitted.
If Demo mode is switched on » page 49, a prompt appears asking whether you
want the guidance to start in demo mode or normal mode.
Demo mode provides a travel simulation to the entered destination. It offers
the chance to travel the calculated route “virtually” on the device screen.
If an alternative route option is set, function keys are displayed, following the
calculation, for the route types with information on the route length and the
expected travelling time.
Route Type economically
quickly
short
Selecting the route type will start route guidance.
After the route has been calculated, additional information specific to the se-
lected route is displayed on the function keys for the route types » page 48,
e.g., use of motorways , toll roads
and the like.
If the option for alternative routes is disabled, the route is calculated and route
guidance is started according to the preferred route » page 48.
It is possible to select a pre-calculated route before the calculation of the re-
maining routes is completed.
The unit tries to allow for continued guidance even if the navigation data is in-
complete or there is no data at all for the given area (e.g., one-way streets,
road types, etc.).Interrupt and continue route guidance
If the ignition is switched off and on again and the key was left in the ignition
(in vehicles with the KESSY system, when the ignition was switched off):
› within 30 minutes - route guidance is continued, taking into account the cal-
culated route
› Between 30 and 40 min - the screen switches to “standby” mode (energy-
saving mode of the screen); the route guidance continues using the calcula-
ted route
› Between 40 min and 120 min - the unit screen displays the message
Contin-
ue route guidance? ; after you confirm the message, the route guidance con-
tinues using the calculated route;
› After 120 min - The route guidance is cancelled.
Switch ignition off and on again and remove the key temporarily (in vehicles
with the KESSY system, switch off the ignition and open the driver's door):
› Within 10 min - route guidance is continued, taking into account the calcula-
ted route
› Between 10 min and 120 min - the screen switches to “standby mode” (ener-
gy-saving mode of the screen); the unit screen displays the message Contin-
ue route guidance? ; after you confirm the message, the route guidance con-
tinues using the calculated route
› After 120 min - The route guidance is cancelled.
Explanation of graphic navigation instructions
The graphical navigation instructions are displayed: › in the MAXI DOT display
» page 9;
› in the extra window of the device screen
» page 53.
Nav. announcements
The device outputs the navigation announcements. The navigation announce-
ments are started as soon as the route calculation is complete or a route type
has been selected.
The navigation announcements are generated by the instrument system. The
flawless clarity of the message (eg, road or city name) cannot always be guar-
anteed.
Before turning, up to 3 recommendations are issued:
The last navigation announcement can be repeated: › by pressing the menu knob
2
» Fig. 1 on page 5 ;
› Press the dial
2
» Fig. 10 on page 12 on the multifunction steering wheel.
62Navigation