Page 49 of 83
 Columbus Infotinment Navigation System Manual Navigation
Description of the navigation system
Preface to navigation
Introduction
This chapter contains information on the following subjects:
Main menu
47
Navigation data
48
First and foremost, p")
Navigation
Description of the navigation system
Preface to navigation
Introduction
This chapter contains information on the following subjects:
Main menu
47
Navigation data
48
First and foremost, pay attention to the safety instructions » page 4 , Impor-
tant notes .
The unit uses the GPS (Global Positioning System) satellite system for naviga-
tion. The satellite signal allows you to determine your current vehicle position.
If the unit is outside the range of the GPS satellite signal (e.g. in dense vegeta-
tion, in tunnels, parking garages, etc.), the unit navigates only with restrictions
using on-vehicle sensors.
Navigation is done: › by graphical instructions in device display screen and in the display of the in-
strument cluster;
› by announcements.
The navigation unit can be operated:
› using the buttons on the unit
» page 47;
› using the function keys in the unit screen
» page 47;
› using voice control
» page 16.
› via the display of the instrument cluster
» page 12 .
WARNING■
E.g. information about traffic lights, stop and right of way signs, parking
and stopping restrictions as well as lane constrictions or speed restrictions
is not detected for navigation by the device.■
Always adjust the driving speed to the road, traffic and weather condi-
tions.
WARNING (Continued)■ The nav. announcements provided may vary from the actual situations,
e.g. due to road works or out-of-date navigation data.■
The volume should be adjusted to ensure that acoustic signals from out-
side, e.g. sirens from vehicles which have the right of way, such as police,
ambulance and fire brigade vehicles, can be heard at all time.
CAUTION
In some countries, some unit features can no longer be selected when the ve-
hicle is running faster than a certain speed. These limitations comply with na-
tional legal requirements.
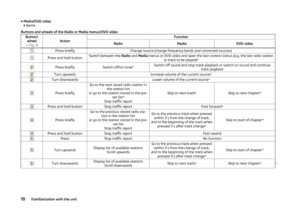
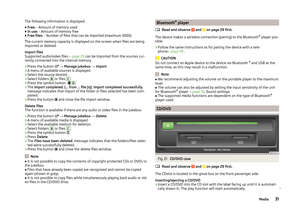
Main menu
Fig. 31
Main menu Navigation
Read and observe and on page 47 first.
›
Press the button.
The last opened navigation menu opens.
If a menu other than the main menu » Fig. 32 on page 50 is opened, the main
menu can be opened by pressing
again.
Function keys of the navigation menu
ButtonMeaningEnter a new destination » page 55 or display the Route
menu » page 63Display the menu My dests. » page 57Display the menu My tours » page 65Enter/search for a POI » page 58Set up map and additional window display » page 5047Description of the navigation system
Page 50 of 83
 Columbus Infotinment Navigation System Manual ButtonMeaning/Media/radio playback » page 21Setting the navigation menu » page 48
Navigation data
Read and observe
and on page 47 first.
Navigation data source
The navigation data is pa")
ButtonMeaning/Media/radio playback » page 21Setting the navigation menu » page 48
Navigation data
Read and observe
and on page 47 first.
Navigation data source
The navigation data is part of the device and is stored in the internal device
memory.
Data update
The navigation data should be updated at regular intervals.
Navigation data is subject to constant changes (such as new streets, changes of street names and house numbers), and this can become out of date over
time. For this reason, the guidance may be inaccurate or incorrect.
For more information on updating the data, please visit the ŠKODA website or contact a ŠKODA Partner.
The version of the navigation data for maps can be found in the navigation
settings
→
→ Version information .
Settings
Introduction
This chapter contains information on the following subjects:
Main menu
48
Route options
48
Map
49
Fuel options
49
Navigation announcements
49
Advanced settings
49
Manage memory
49
First and foremost, pay attention to the safety instructions » page 4 , Impor-
tant notes .
Main menu
Call up the main menu›
In the Navigation main menu, press
.
Setting:
■ Route options - Set the parameters for route calculation » page 48
■ Fuel options - Select preferred fuel station, switch on/off reminder of low
fuel level warning with the possibility to find the nearest fuel sta-
tion » page 49
■ Advanced setup - Display additional information » page 49
■ Import destinations - Import custom destinations previously pre-
pared » page 58
■ Map - Map display » page 49
■ Nav. announcements - Set the volume and the type of the navigation an-
nouncements » page 49
■ Manage memory - Sort contacts, enter your home address, and delete desti-
nations » page 49
■ Version information View the current version of the navigation data
Route options
›
In the Navigation main menu, press
→ Route options .
■ Suggest 3 alternative routes - Switch on/off manual selection of the route
type (economical, fast, short) » page 62
■ Route: - Automatic selection of the preferred route type (manual route selec-
tion is switched off)
■ Economical - Calculate the most economical route with shortest travelling
time and distance travelled – displayed in green
■ Fast - Calculate the fastest route to the destination, even if a detour is nec-
essary - displayed in red
■ Short - Calculate the shortest route to the destination, even if a longer
travelling time is required - displayed in orange
■ Dynamic route - Switch on/off dynamic route calculation using TMC traffic
reports » page 63
■
Avoid motorways - switches on/off the use of motorways
■
Avoid ferries and motorail trains - Switch use of ferries and motorail
trains on/off
■
Avoid toll roads switches on/off the use of toll roads
■
Avoid tunnels - Switch use of tunnels on/off
48Navigation
Page 51 of 83
 Columbus Infotinment Navigation System Manual ■ Avoid routes requiring toll stickers - Switch use of routes requiring toll
stickers on/off
■ Show available toll stickers - select from the list of routes requiring toll
stickers for which")
■ Avoid routes requiring toll stickers - Switch use of routes requiring toll
stickers on/off
■ Show available toll stickers - select from the list of routes requiring toll
stickers for which a valid toll sticker is available
Map
›
In the Navigation main menu, press
→ Map .
■ Day/night: - Select the background colour of the map
■ Day - light coloured background
■ Night - dark coloured background
■ Automatic - map with light or dark coloured background; the background
changes once you turn on the lights (does not apply to daytime running
lights)
■ Autozoom - Switch on/off the automatic zoom in/out of the map display
while driving » page 51
■ Show traffic signs - Switch on/off the display of traffic signs
■ Select categories for POIs - Select POIs to be displayed in the map from a list
of available POIs (max. 10 POIs) » page 60
■ Show brands for POIs - Switch on/off the display company logos at the POIs
■ Show favourites - Switch on/off the display of favourites
■ Lane guidance - Switch on/off the display of a window with the recommen-
ded lane for complicated intersections » page 63
Fuel options
›
In the Navigation main menu, press
Fuel options .
The following warning message is displayed when the fuel gauge pointer rea-
ches the reserve marking: Warning: fuel tank almost empty. Would you like to
find a fuel station nearby?
■ Select preferred fuel station - Select your preferred fuel station brand (the
selected station brand will be displayed on the first positions of the list)
■ Fuel warning - Switch on/off the display of the warning message for low on
fuel with the following: ■ Cancel - Close the window with the warning
■ Find - Search for the nearest fuel station; when you select the fuel station,
the new route will be calculated from your current position
Navigation announcements›
In the Navigation main menu, press
→ Nav. announcements
■ Volume - Set the volume of the navigation announcements
■ Nav. announcements: - Set the type of navigation announcements
■ Comprehensive - Full navigation announcements
■ Brief - Short navigation announcements
■ Congestion only - navigation announcements only when there is conges-
tion
■ No voice guidance during call - Switch on/off navigation announcements
during a telephone call (if using a phone connected to the device » page 37)
Advanced settings
›
In the Navigation main menu, press
press
→ Advanced setup .
■ Time display: - Select the time to be displayed in the status line
■ Time of arrival - displays the expected time to destination
■ Travelling time - Display the expected travelling time to the destination
■ Status line: Status line - Display information about your selected destination
in the status line ■ Destination - Display information about the length and duration of the
guidance to the destination
■ Next stopover - Display information about the length and duration of the
guidance to the stopover
■ Note: national border crossed - Switch on/off the display of the information
window with speed limits when crossing the national border
■ Demo mode - Switch on/off guidance in demo mode
■ Define demo mode starting point - Enter the starting point for preliminary
route calculation in demo mode
■ Cancel - Cancel the entry
■ Position - Select the current vehicle position as the starting point
■ Address - Select an address as the starting point
Manage memory
›
In the Navigation main menu, press
→ Manage memory .
■ Sort by: - Sort contacts downloaded from a connected telephone
■ Surname - Sort by contact name
■ Name - Sort by contact first name
49Description of the navigation system
Page 52 of 83
 Columbus Infotinment Navigation System Manual ■Define home address - Display/enter/edit the home address
■ Current position - Set the home address to the current vehicle position
■ Address - Enter a new address » page 51. If the home a")
■Define home address - Display/enter/edit the home address
■ Current position - Set the home address to the current vehicle position
■ Address - Enter a new address » page 51. If the home address has al-
ready been entered, the following is displayed:
■ - Reduces map display
■ - Enlarges map display
■ Edit - Edit the home address
■ Delete my points of interest (Personal POI) - Delete saved personal points
of interest
■ Update my points of interest (personal POI) - Update saved personal POI
■ Delete user data - Select the data to be deleted (the selected data is deleted
by pressing Delete)
■ Last destinations - Delete the list of last destinations
■ Destination memory - Delete the list of stored destinations
■ Tour memory - Delete the list of stored tours
■ My points of interest (Personal POI) - Delete the list of personal points of
interest
■ Entered towns - Delete the list of entered towns
■ Home address - Delete the set home address
■ Flagged destination - Delete the flagged destination
Operating the map
Introduction
This chapter contains information on the following subjects:
Introductory information
50
Map display options
50
Map operation
51
Traffic signs
51
Home address entry
51
First and foremost, pay attention to the safety instructions » page 4 , Impor-
tant notes .
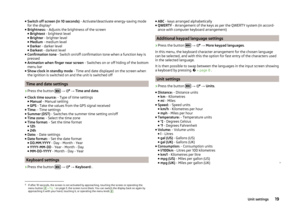
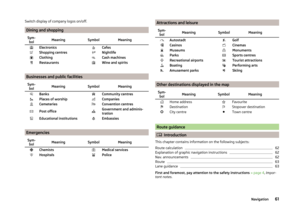
Introductory informationFig. 32
Map display: Main menu
Explanation of graphic
Map
Traffic sign symbol » page 51
Current vehicle position
Status bar » page 49
POI icons » page 60
›
Press the button.
The last opened navigation menu opens.
If a menu other than the main menu » Fig. 32 is opened, the main menu can be
opened by pressing
again.
Map display options
Switch between different navigation map display modes depending on the
context. You can also display an additional window with further navigation in-
formation.
›
In the Navigation main menu, press
. There is a list of function keys dis-
played.
List of Function Keys 2D - current vehicle position in the 2D map display
3D - current vehicle position in the 3D map display
3D map with spatial representation of buildings (topographic map)
Destination display (appears after route calculation)
Displays the overview map to the destination. (After calculating the
route, the device displays the route from the vehicle location to the des-
tination. The scale is adjusted to the length of the route.)
ABCDE50Navigation
Page 53 of 83
 Columbus Infotinment Navigation System Manual Map display with light or dark backgroundSwitches the split screen on/off in the map » page 52
Map operation
Moving the map
The map can be moved in any direction by touching it with your finger and")
Map display with light or dark backgroundSwitches the split screen on/off in the map » page 52
Map operation
Moving the map
The map can be moved in any direction by touching it with your finger and
dragging it on the screen in the desired direction.
Changing the scale
› with the menu button
2
›by touching the screen with two fingers and pulling the fingers together or
apart.
Function keys and map display symbols
■ - Context-dependent change in the map orientation
■ 2D map display - the map rotates and the direction of travel arrow
C
» Fig. 32 on page 50 points to the top of screen, or the north is aligned
with the top edge of the screen, and the arrow
C
shows the direction of
travel
■ 3D map view -the direction of travel arrow
C
points to the top of the
screen (if the map scale is larger than 100 km, the map is aligned to the north).
■ - Touch to align the map to the position of the vehicle (the function key is
available when you move the map in the vehicle position display)
■ - Touch to align the map to the destination position and/or route display
(the function key is available when you move the map within the destina-
tion- or route display )
■ - The number located below the symbol indicates the elevation 1)
■ - Touch to increase the map scale for a few seconds before it resets to the
original scale (quick view)
■ - Displays the manually set map scale
■ - Displays the automatic map scale
■ - Switches the autozoom on/off during route guidance. Active autozoom is
indicated by a green symbol. If Autozoom is active, the map scale will change
automatically depending on the route travelled (motorway trip: large map
scale - city: small map scale)
Day/night
Split screenThe autozoom can be switched off by touching
→ or off by changing
the map scale. Touching again the (function key highlighted in green) turns
the autozoom on again. Autozoom can also be switched on/off in the naviga-
tion settings » page 49
Autozoom is only functional when the map is aligned with the vehicle position
(the function key
with the symbol).
Traffic signs
The system provides the option to display traffic signs
B
» Fig. 32 on page 50
in the information display and on the unit screen that are:
› stored in the navigation data of the maps;
› recognised by the camera.
The information given by traffic signs that are recognized by the front camera
always takes precedence over stored navigation data.
If the Traffic signs split screen is not switched on, only one traffic sign is dis-
played on the unit screen.
Switching on the traffic sign display function » page 49.
Home address entry
›
In the Navigation main menu, press
→ Manage memory → Define home
address .
If the home address has not been entered, an input window is displayed with
the following message:
Please select as your home address: your current position or a new address.
The following function keys are displayed:
› Current position
- Entry of the home address via the acquisition of the cur-
rent location;
› Address
- Enter the home address in writing » page 55
Description of the adjustment or deletion process of the home ad-
dress » page 49 .
1)
Display of elevation requires the reception of signals from at least five satellites. Route guidance must
not be running in demo mode.
51Description of the navigation system
Page 54 of 83
 Columbus Infotinment Navigation System Manual Extra window
Introduction
This chapter contains information on the following subjects:
Menus in the extra window
52
Audio
52
Compass
53
Man.
53
Traffic signs / Traffic
53
GPS
54
Map
54
First and f")
Extra window
Introduction
This chapter contains information on the following subjects:
Menus in the extra window
52
Audio
52
Compass
53
Man.
53
Traffic signs / Traffic
53
GPS
54
Map
54
First and foremost, pay attention to the safety instructions » page 4 , Impor-
tant notes .
Menus in the extra window
Additional information is displayed in the extra window depending on the con-
text of the selected menu.
Switching on
›
In the Navigation main menu, press .
or
›
In the Navigation main menu, press
→ Split screen .
The last opened split screen is displayed.
Switching off
›
In the Navigation main menu, press .
or
›
in the split screen on .
or
›
In the Navigation main menu, press
→ Split screen .
Menus in the split screen:
■ Audio - Playback operation of the currently selected audio source » page 52
■ Compass - Displays the current vehicle location in relation to the compass di-
rections » page 53
■
Man. - Displays the next or following navigation instructions (manoeuvres),
the next POIs or an intersection detail » page 53;
■ Traffic signs - Displays traffic signs that are stored in the navigation data of
the maps or that are recognised by the front camera » page 53
■ GPS - Displays the geographical coordinates of the current vehicle loca-
tion » page 54
■ Map - Map display » page 54.
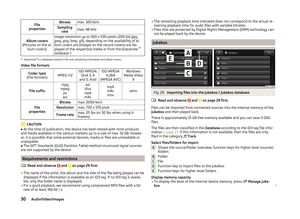
Audio
Fig. 33
Split screen: Audio
In the Audio split screen, the playback of the currently selected audio source
can be operated » page 21.
Function keyActionOperation/PressChanging the station
/Press
Playback/Pause: the play
function is stopped in
the current position and
the symbol changes to
- after pressing again
the play function will
continue in this position.Press briefly (within
5 seconds of the start of playback of the track)Plays the previous track
from the startPress briefly (5 seconds after the start of play- back of the track)Plays the current track
from the startPress button for a long period of time a)Fast-reverse of the track
52Navigation
Page 55 of 83
 Columbus Infotinment Navigation System Manual Function keyActionOperationPress brieflyPlays the next track
from the startPress button for a long period of time a)Fast-forward of the
tracka)
The longer the button is pressed, the faster the f")
Function keyActionOperationPress brieflyPlays the next track
from the startPress button for a long period of time a)Fast-forward of the
tracka)
The longer the button is pressed, the faster the fast forward/reverse.
Compass
Fig. 34
Split screen: Compass
The Compass split screen displays the current vehicle position in relation to
the compass.
Man.
Fig. 35
Split screen: Manoeuvre
The Man. extra window displays a navigation announcement (manoeuvre).
Displayed information:
› When approaching the manoeuvre area (e.g., junction), details of the naviga-
tion instruction are displayed in the split screen. Once you have passed this
area, the unit displays information on the next navigation instructions again;
› The street name and number for the current vehicle position and the three
following directions for the navigation instructions, along with street names
and numbers;
› Distance and time to the city with the following navigation instruction in-
cluding numeric indication of the remaining distance;
› Information about the next points of interest (e.g., fuel stations, car parks).
Traffic signs / Traffic
Fig. 36
Split screen: Traffic signs
The
Traffic split screen displays traffic signs.
Up to 3 traffic signs and 3 additional traffic signs can be displayed in the extra
window.
If the message No traffic sign available. are displayed in the split screen, the
front camera did not recognise any traffic sign or you are outside the range of
the navigation data.
Further information » page 51.
53Description of the navigation system
Page 56 of 83
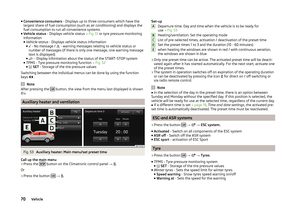
 Columbus Infotinment Navigation System Manual GPSFig. 37
Split screen: GPS
The GPS split screen displays information on the current geographical position
of the vehicle.
Displayed information
■ - Longitude 1)
■ - Latitude 1)
■ ")
GPSFig. 37
Split screen: GPS
The GPS split screen displays information on the current geographical position
of the vehicle.
Displayed information
■ - Longitude 1)
■ - Latitude 1)
■ - Elevation 2)
■ Satellites: - Number of received/available satellites
Map
Fig. 38
Split screen: Map
An additional map is displayed on the Map split screen.
Map options
■ - Context-dependent change in the map orientation
■ 2D map display - the map rotates and the direction of travel arrowC
» Fig. 32 on page 50 points to the top of screen, or the north is aligned
with the top edge of the screen, and the arrow
C
shows the direction of
travel
■ 3D map view -the direction of travel arrow
C
points to the top of the
screen (if the map scale is larger than 100 km, the map is aligned to the north).
■ - Route display (the scale of the map is adjusted to the route length)
■ - 2D - current vehicle position in the 2D map display
■ - 3D - current vehicle position in the 3D map display
■ - Displays the manually set map scale
■ - Displays the automatic map scale
■ - Switches on autozoom during route guidance. Active autozoom is indica-
ted by a green symbol. If Autozoom is active, the map scale will change auto- matically depending on the route travelled (motorway trip: large map scale -
city: small map scale)
1)
To view the information on the longitude and latitude of the current vehicle position display requires the
reception of GPS signals from at least three satellites.
2)
Display of elevation requires the reception of GPS signals from at least five satellites. Route guidance
must not be running in demo mode.
54Navigation