Page 25 of 83
 Columbus Infotinment Navigation System Manual You can switch between memory groups of individual preset buttons using the
function keys C.
Search available stations (Scan)
Read and observe
on page 21 first.
This function plays all the receivabl")
You can switch between memory groups of individual preset buttons using the
function keys C.
Search available stations (Scan)
Read and observe
on page 21 first.
This function plays all the receivable stations in succession for a few seconds
each.
Switching on
›
Press the menu knob
2
» Fig. 1 on page 5 .
or
›
In the radio menu, press the function key
→ Scan .
Switching off
›
Press the menu knob
2
.
or
›
press any function key in the device screen.
After switching off the function, the device plays the station at which the
function was cancelled.
Station logos
Read and observe
on page 21 first.
The present buttons
B
» Fig. 14 on page 21 can be linked to logos (images) of
the radio stations.
Store station logos automatically (FM / DAB)
›
Before you store the radio station to a station button function key press in
the Radio menu the function key
→ Activate Advanced settings .
›
Activate the menu item Auto-save station logos » page 24 , Advanced Set-
tings (FM) and » page 25 , Advanced Settings (DAB) .
When you save the station to a station button, the station is assigned a logo
from the device memory if the logo is available in the memory.
Storing station logos manually
A logo can be assigned manually for the previously stored stations.
›
The function key
Press
→ Station logos .
A menu with preset buttons for radio stations is displayed.›
Press the preset button for the station, which a logo is to be assigned to.
A menu of media (CD, SD card, USB) is displayed.
›
In the the relevant madia select the image you want to have.
By selection of the image it is assiagned to the relevant station button.
Note
■ The following image formats are supported: jpg, gif, png, bmp.■We recommend a resolution of up to 500 x 500 pixels.
Traffic programme
Read and observe
on page 21 first.
Switching on/off
›
In the radio menu, press the function key
.
›
Enable or disable the menu item
Traffic programme (TP)
Traffic news
During a traffic announcement, the following menu is displayed.
›
Cancel - interruption of the current traffic report. The TP function remains
activated.
›
Deactivate - Exit the current traffic report and turn off TP function.
Note
Some radio stations misleadingly identify themselves as traffic programs. It is
therefore not an error with the unit that there is no traffic news with these
stations.■
During playback in the media menu the traffic information from the last se-
lected radio station is received.
■
Should this radio station not transmit traffic reports or the signal is not avail-
able, then the device automatically searches for a TP station.
23Radio
Page 26 of 83
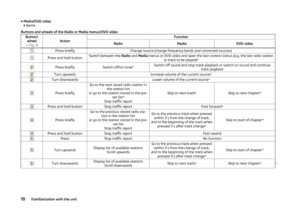
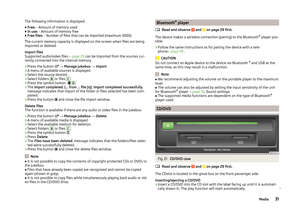
 Columbus Infotinment Navigation System Manual Station information DAB)Fig. 16
Station information
Read and observe on page 21 first.
DAB allows the transmission of various additional information. The display op-
tions for this informationcan be")
Station information DAB)Fig. 16
Station information
Read and observe on page 21 first.
DAB allows the transmission of various additional information. The display op-
tions for this informationcan be adjusted on the screen in the following menu.
›
In the radio menu, press the fbutton
.
■ Preset list - Display only stored DAB stations
■ Station info. - Displays DAB station information, accompanying text (radio
text) and images (e.g., artist name or programme and image type where
these are broadcast)
■ Radio text - Displays one radio text
■ Slide show - Displays one image; (the image will switch to full-screen view
until you switch the screen back on by moving your hand towards it)
Note
If you touch the screen in the area where the accompanying text (radio text) is
displayed, the screen will only display this information. If you touch the screen
in the area of the displayed image, only images will be displayed on the screen.
Radio settings
Introduction
This chapter contains information on the following subjects:
Settings
24
Advanced Settings (FM)
24
Advanced Settings (DAB)
25First and foremost, pay attention to the safety instructions » page 4 , Impor-
tant notes .
The basic setting of the radio functions is the same for all broadcast ranges.
The Advanced setup menu is different for FM and DAB. The AM broadcast area
does not have this menu.
Settings
›
In the radio menu, press the fbutton
.
■ Sound - Sound settings » page 18, Sound settings
■ Scan - Auto-play all stations in the current frequency band, each station for
around five seconds.
■ Arrow buttons: - Set the station select function in the Radio menu
■ Preset list - only switch preset radio stations (Preset buttons)
■ Station list - Switches all radio stations currently in range for the selected
frequency band
■ Traffic programme (TP) - Switches traffic programme on/off
■ Delete presets - Deletes the stored stations (preset buttons)
■ - Delete a certain radio station (preset button)
■
Delete all - Deletes the stored stations (preset buttons)
■ Station logos - manual assignment of station logos » page 23
■ Radio text - Switching the text display radio (FM and DAB) on and off
■ Advanced setup - another setting that is different depending on the selec-
ted broadcasting range(FM and DAB)
Advanced Settings (FM)
›
In the radio menu, press the function key
.
■ Advanced setup
■ Alternative frequency (AF) - Switching on/off the search for alternative fre-
quencies of the station currently being heard, when you turn off AF off is
displayed on the device screen
■ Radio Data System (RDS) - Switches on/off the RDS function
24Audio/Video/Images
Page 27 of 83
 Columbus Infotinment Navigation System Manual ■RDS Regional: - Switch on/off the automatic tracking of related regional
stations
■ Fixed - Maintains the selected regional station continuously. When the
signal is lost, another regional stati")
■RDS Regional: - Switch on/off the automatic tracking of related regional
stations
■ Fixed - Maintains the selected regional station continuously. When the
signal is lost, another regional station must be set manually.
■ Automatic - Auto-selects the station with the best reception at the mo-
ment. If you lose reception the region, the unit will automatically set an-
other available region.
■ Auto-save station logos - Auto save the station logo according to the PI
code of the radio station » page 23
Advanced Settings (DAB)
›
Select the DAB band in the Radio menu, and press the function key
→
Activate Advanced settings .
■ Advanced setup
■ DAB traffic announcements - Switch on/off DAB announcements
■ Other DAB announcements - Switch on/off other announcements (e.g.,
warnings, regional weather, sports reports, financial news)
■ DAB - DAB station tracking - Switch on/off automatic DAB station tracking
in other station groups
■ Automatic DAB - FM switching - Switch on/off auto-switching from DAB to
the FM frequency band if the DAB signal is lost
■ L-Band - Switch on/off the automatic DAB station search in L-band
■ Auto-save station logos - Automatic association of the logo with station
detected » page 23
DAB programme tracking
If a DAB station is a member of several sender groups, when the signal is poor,
the same station is searched in a different sender group.
Auto-change DAB -FM
If the DAB signal is poor, the unit will try to find a corresponding FM station for
the DAB station you are currently listening to.
For auto-change to work, the DAB and FM stations must send a sender ID.
› While the station is being received on the FM band, (
) is displayed after the
station name. The () marker disappears when the relevant DAB station can
be received again
).
› If a DAB station is also not available in the FM band due to poor reception,
the device will be switched to mute.
› If you do not want automatic station change (e.g. when driving through tun-
nels, when reception may be lost temporarily), you can deactivate this func-
tion.
L-band
For the DAB radio reception in different countries, different frequency ranges
are used. In some countries the DAB radio reception only in the so-called L-
band.
› If you have any problems with the DAB wireless reception it is necessary to
ensure that the DAB Automatic tuning in L-band is on.
› If no L-band DAB radio reception is possible in the country then it is better to
leave this menu item turned off. The channel scan is therefore faster.25Radio
Page 28 of 83
 Columbus Infotinment Navigation System Manual Media
Operation
Introduction
This chapter contains information on the following subjects:
Main menu
26
Title / folder list
27
Track/folder database
27
Playback
28
Media settings
28
First and foremo")
Media
Operation
Introduction
This chapter contains information on the following subjects:
Main menu
26
Title / folder list
27
Track/folder database
27
Playback
28
Media settings
28
First and foremost, pay attention to the safety instructions » page 4 , Impor-
tant notes .
You can use the unit to play audio and video files in different for-
mats » page 29 , connect different signal source types, or store audio files in
the internal memory of the Jukebox.
When the signal source has been connected, the device starts to automatically
play audio files in alphabetical order.
Types of device operation » page 7 .
› On the device via the operating elements.
› Using the function keys on the device screen.
› Using the Maxi DOT display.
Main menu
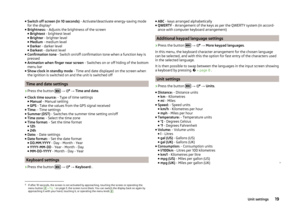
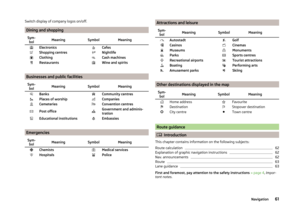
Fig. 17
Media: Main menu
Call up the main menu›Press the
button.
Explanation of graphic Information for the current file (e.g., artist, track title)
selected source / display of the album image 1)
(cover art), with only your
finger over the surface of the function key, you can scroll the album list
Display of the playing time / remaining time and the playing time axis is
possible within the track (file) by moving the slider or by touching the de-
sired location on the time axis
Signal source selection
Track/folder list
Media settings » page 28
Select input source
The function key menu D
» Fig. 17 .
CD/DVD - Changes to a CD/DVD in the player » page 31
SD card 1 - Changes to a memory card inserted in SD 1 » page 32
SD card 2 - Changes to a memory card inserted in SD 2 » page 32
USB - Changes to a data medium connected to the USB input » page 33
iPod - Changes to an iPod (iPhone, iPad) connected at the USB in-
put » page 33
AUX - Changes to an external audio source connected to the AUX in-
put » page 33
BT audio - Changes to a Bluetooth ®
player » page 31
Jukebox - Changes to the Jukebox » page 30
ABCD1)
So long as this is in the Gracenote ®
database or part of the file is being played (ID3 tag).
26Audio/Video/Images
Page 29 of 83
 Columbus Infotinment Navigation System Manual Title / folder listFig. 18
Track/folder list
Menu display
›
Press the function key in the menu Media
.
Explanation of graphic Displays the folder structure, function keys of higher-level fol")
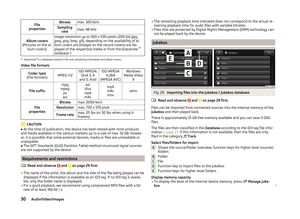
Title / folder listFig. 18
Track/folder list
Menu display
›
Press the function key in the menu Media
.
Explanation of graphic Displays the folder structure, function keys of higher-level folders
Change to track/folder database » page 27
Play the source or folder selected
Play the tracks in the source or folder selected in random order
Repeat playback of the source or folder selected Auto-play function for 10 seconds » page 28
Where the source is SD card 1, SD card 2 or USB 1 , you can change between
Folder display or Database display.
It is only possible to change the display of the basic overview of the files/fold-
ers for the source concerned. The status line
A
shows the source currently
selected.
Note
■ In the title / folder list a maximum of 1000 files / folders are displayed alpha-
betically.■
If the file format is not supported by the unit or the file is damaged and can-
not be played the title / folder list displays a struck-through icon.
ABTrack/folder databaseFig. 19
Track/folder database
The unit is capable of classifying files according to the information in the ID3
tag file properties into the various categories of Database.
Explanation of graphic Displays the folder structure, function keys of higher-level folders
Change to track/folder database » page 27
Play the source or folder selected Auto-play function for 10 seconds » page 28
Where the source is SD card 1, SD card 2 or USB 1 , you can change between
Folder display or Database display.
It is only possible to change the display of the basic overview of the files/fold-
ers for the source concerned. The status line
A
shows the source currently
selected.
By pressing the function key with the symbol is a
Database or a list of ti-
tles / folders displayed in the currently selected track will be played.
To sort the files in the Database on the current source by the following
categories:
Track list - Track lists by popularity 1)
/playback frequency
Artist - Sorted by artist's name
Album - Sorted by album name
Genre - Sorted by the genre assigned to the tracks
AB1)
The popularity of titles such as
is determined by the setting the ID3 tag properties for the various ti-
tles.
27Media
Page 30 of 83
 Columbus Infotinment Navigation System Manual Track - Sorted by the track title
Video - Files containing a video recording
Note
■
In the title / folder database a maximum of 1000 files / folders can be dis-
played alphabetically.■
If the fil")
Track - Sorted by the track title
Video - Files containing a video recording
Note
■
In the title / folder database a maximum of 1000 files / folders can be dis-
played alphabetically.■
If the file format is not supported by the unit or the file is damaged and can-
not be played the title / folder database displays a struck-through icon.
Playback
The device plays the files in alphabetical order.
Description of the playback keys
ButtonActionFunction /PressPlay / PausePress briefly a)Play the previous titlePress briefly b)Plays the current track from the startPress and hold but-
tonc)Fast-reverse of the trackPress brieflyPlay the next titlePress and hold but-
tonc)Fast-forward of the track
First pressTurn on the track repeat
Second pressTurn on the repetition of the entire folder /
source of signal Third pressSwitch off the repetitionPressTurn on / off the random playback of the
folder / source (mix mode)First pressAutomatic play from the folder / sourceSecond pressTurn off the function a)
Within about 3 seconds after the start of the track playback.
b)
After about 5 seconds after the start of playback of the track.
c)
The longer the button is pressed, the faster the fast forward/reverse.
Scan function
The Scan function can also be started/stopped in the main Media menu by
pressing button
2
» Fig. 1 on page 5 .
The
scanning feature can also be cancelled by switching to another file / signal
source or a function key is pressed for playback.
Note
The function keys listed in the table are different depending on the currently
selected menu screen.
Media settings
›
Press the button in the menu Media
.
■ Sound - Sound settings » page 18, Sound settings
■ Manage jukebox - Save/delete supported audio/video files in the internal
unit memory » page 30
■ Mix/repeat/scan including subfolders - switching the song playback in the
following modes (Shuffle / Repeat / Automatic play) including subfolders in
the current folder
■ Bluetooth - Settings for the Bluetooth ®
function » page 20
■ Video setup (files) - Set the parameters of the video being played back from
a file
■ Format: - Set the screen width/height ratio
■ Automatic - adjust the picture to the screen size
■ 16:9
■ 4:3
■ 14:9
■ 47:20
■ Video (DVD) settings - Set the parameters of the video being played back
from a DVD source » page 31
■ Traffic programme (TP) - Switches traffic programme on/off
■ External AUX device - Activate/deactivate the input of the external AUX au-
dio source
■ Reset codec to system settings - Codec default settings
■ Remove safely - safe removal of the source connected
■ Select device
■ SD card 1
■ SD card 2
■ USB 1
28Audio/Video/Images
Page 31 of 83
 Columbus Infotinment Navigation System Manual signal sources
Introduction
This chapter contains information on the following subjects:
Sources and file formats supported
29
Requirements and restrictions
30
Jukebox
30
Bluetooth ®
player
31
CD")
signal sources
Introduction
This chapter contains information on the following subjects:
Sources and file formats supported
29
Requirements and restrictions
30
Jukebox
30
Bluetooth ®
player
31
CD/DVD
31
SD memory card
32
USB-, AUX inputs
33
First and foremost, pay attention to the safety instructions » page 4 , Impor-
tant notes .
WARNING■
Never place external signal sources close to the airbags. Loose objects
could hit a deployed airbag and injure occupants – danger of death!■
Never place external signal sources on the console panel. Loose objects
can be thrown forward during a sudden manoeuvre or in case of an acci-
dent and can injure the occupants or other road users.
■
Do not hold external sources while driving in your hand or on your knees.
Loose objects can be thrown forward during a sudden manoeuvre or in
case of an accident and can injure the occupants or other road users.
■
Always route the connection cable of the external signal source such that
is does not restrict you when driving in any way.
CAUTION
We recommend that you do not save any important data to the Jukebox, to
CD /DVD media, Bluetooth ®
players, to SD memory cards or connected external
signal sources. The ŠKODA Partner is not responsible for damage due to the
loss of data stored on these storage devices.
Note
With some signal sources, the output level can be changed at source.Sources and file formats supported
Read and observe
and on page 29 first.
Supported signal sourcesSignal
sources
SD memory cardSD, SDHC, SDXCUSB devicesUSB stick, USB MP3 player, HDD (without spe-
cial software)Other external sourcesPortable player (e.g., iPod ®
, iPad ®
, iPhone ®
,
MTP player, Bluetooth ®
player
CD/DVD drive:
Audio CD (up to 80 min), CD-R and CD-RW
(with a capacity of up to 700 MB), DVD ± R /
RW; conventional DVD, DVD video and DVD
audio
Specifica- tion
SD memory cardFile system FAT16, VFAT, FAT32, exFat, NTFS
USB devices
USB 1.x and 2.x or higher, supported by USB
2.x (the speed of data transmission then cor-
responds to the maximum speed of USB 2.x )
Max. speed of 480 Mb/s
File system FAT16, VFAT, FAT32, NTFSBluetooth ®
-
PlayerBluetooth protocolsA2DPand AVRCP (1.0 - 1.3)CD/DVDISO9660, Joliet (Level 1,2,3), UDF 1.x, UDF 2.x
Formats of audio files
Codec type
(File formats)MPEG-1/2 (layer 3)Windows
Media Audio
7, 8, 9 and 10MPEG-2/4FLAC, WAV, OGGFile suffixmp3wmaasfaacflac
wav oggPlaylistsm3u, pls, wpl, m3u8; asx 29Media
Page 32 of 83
 Columbus Infotinment Navigation System Manual File
propertiesBitratemax. 320 kb/sSampling ratemax. 48 kHzAlbum covers
(Pictures on the al- bum covers)Image resolution up to 500 x 500 pixels (200 kb) (jpg,
jpeg, png, bmp, gif), depending on the av")
File
propertiesBitratemax. 320 kb/sSampling ratemax. 48 kHzAlbum covers
(Pictures on the al- bum covers)Image resolution up to 500 x 500 pixels (200 kb) (jpg,
jpeg, png, bmp, gif), depending on the availability of al-
bum covers are (images on the record covers) are dis-
played of the respective media or from the Gracenote ®
database a)
.a)
Gracenote ®
is a database stored in the unit containing information and album covers.
Video file formats
Codec type
(File formats)MPEG-1/2ISO-MPEG4; DivX 3, 4
and 5; XvidISO-MPEG4 H.264
(MPEG4 AVC)Windows
Media Video 9
File suffix
mpg
mpeg ps
aviavi
divx
mp4 m4vmp4m4vmovwmvFile
properties
Bitratemax. 2000 kb/sResolutionmax. 720 x 576 pixelFrame ratemax. 25 fps (or 30 fps when using b-
frames)
CAUTION
■ At the time of publication, the device has been tested with most products
and media available in the various markets up to a size of max. 32 GB. Howev-
er, it is possible that some external devices, media or files are unreadable or
unplayable.■
The GPT Standards (GUID Partition Table) method structured signal sources
are not supported by the device.
Requirements and restrictions
Read and observe
and on page 29 first.
›The name of the artist, the album and the title of the file being played can be
displayed if the information is available as an ID3 tag. If no ID3 tag is availa-
ble, only the folder name is displayed.
› For a good playback, we recommend using compressed MP3 files with a bit
rate of at least 160 kb / s.
› The remaining playback time indicated does not correspond to the actual re-
maining playback time for audio files with variable bitrates.
› Files that are protected by Digital Rights Management (DRM) technology can-
not be played back by the device.
Jukebox
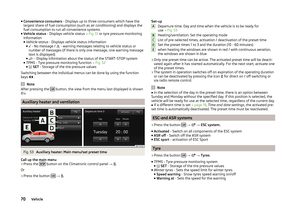
Fig. 20
Importing files into the Jukebox / Jukebox database
Read and observe
and on page 29 first.
Files can be imported from connected sources into the internal memory of the
Jukebox and then played back.
There is approximately 10 GB free memory available and you can save 3 000
files.
The files are then classified in the Database according to the ID3 tag file infor-
mation » page 27 . If this information is not available, then the files are only
filed in the category
Track .
Select files/folders for import Shows the source/folder overview, function keys for higher-level sources/
folders
Folder
File
Function key to import files to the Jukebox
Function keys for higher-level folders
Display memory capacity
› To display the level of the internal device memory, press
Manage juke-
box .
ABCDE30Audio/Video/Images