2014 SKODA OCTAVIA fuel
[x] Cancel search: fuelPage 2 of 83

Structure of this Owner's Manual (explanations)
This Owner's Manual has been systematically designed to make it easy for you
to search for and obtain the information you require.
Chapters, table of contents and subject index
The text of the Owner's Manual is divided into relatively short sections which
are combined into easy-to-read chapters. The chapter you are reading at any
particular moment is always specified on the bottom right of the page.
The Table of contents arranged according to chapter and the detailed Subject
index at the end of the Owner's Manual help you to rapidly find the information
you are looking for.
Direction indications
All direction indications such as “left”, “right”, “front”, “rear” relate to the direction of travel of the vehicle.
Units of measurement
All values are expressed in metric units.
Explanation of symbolsDenotes a reference to a section with important information and safety
advice in a chapter.Denotes the continuation of a section on the next page.®Denotes a registered trademark.
Examples of the information listed in the Owner's Manual
Press the button
→ → Sound .
This information means that the first the button
on the device and then the
function key on the device screen is to be operate and then the menu is to
be confirmed by pressing the function key Sound
The “ →” symbol indicates the next step.
Example of the menu, the available menus, menu items or functions. ■ xyz - the first menu level
■ xyz - the second menu level
■ xyz - the third menu level
■ xyz - the first menu level
NotesWARNINGThe most important notes are marked with the heading WARNING. These
WARNING notes draw your attention to a serious risk of accident or injury .
CAUTION
A Caution note draws your attention to the possibility of damage to your vehicle
(e.g. damage to gearbox), or points out general risks of an accident.
For the sake of the environment
An Environmental note draws your attention to environmental protection as-
pects. This is where you will, for example, find tips aimed at reducing your fuel
consumption.
Note
A normal Note draws your attention to important information about the opera-
tion of your vehicle. 5E0012720GD
Page 50 of 83
ButtonMeaning/Media/radio playback » page 21Setting the navigation menu » page 48
Navigation data
Read and observe
and on page 47 first.
Navigation data source
The navigation data is part of the device and is stored in the internal device
memory.
Data update
The navigation data should be updated at regular intervals.
Navigation data is subject to constant changes (such as new streets, changes of street names and house numbers), and this can become out of date over
time. For this reason, the guidance may be inaccurate or incorrect.
For more information on updating the data, please visit the ŠKODA website or contact a ŠKODA Partner.
The version of the navigation data for maps can be found in the navigation
settings
→
→ Version information .
Settings
Introduction
This chapter contains information on the following subjects:
Main menu
48
Route options
48
Map
49
Fuel options
49
Navigation announcements
49
Advanced settings
49
Manage memory
49
First and foremost, pay attention to the safety instructions » page 4 , Impor-
tant notes .
Main menu
Call up the main menu›
In the Navigation main menu, press
.
Setting:
■ Route options - Set the parameters for route calculation » page 48
■ Fuel options - Select preferred fuel station, switch on/off reminder of low
fuel level warning with the possibility to find the nearest fuel sta-
tion » page 49
■ Advanced setup - Display additional information » page 49
■ Import destinations - Import custom destinations previously pre-
pared » page 58
■ Map - Map display » page 49
■ Nav. announcements - Set the volume and the type of the navigation an-
nouncements » page 49
■ Manage memory - Sort contacts, enter your home address, and delete desti-
nations » page 49
■ Version information View the current version of the navigation data
Route options
›
In the Navigation main menu, press
→ Route options .
■ Suggest 3 alternative routes - Switch on/off manual selection of the route
type (economical, fast, short) » page 62
■ Route: - Automatic selection of the preferred route type (manual route selec-
tion is switched off)
■ Economical - Calculate the most economical route with shortest travelling
time and distance travelled – displayed in green
■ Fast - Calculate the fastest route to the destination, even if a detour is nec-
essary - displayed in red
■ Short - Calculate the shortest route to the destination, even if a longer
travelling time is required - displayed in orange
■ Dynamic route - Switch on/off dynamic route calculation using TMC traffic
reports » page 63
■
Avoid motorways - switches on/off the use of motorways
■
Avoid ferries and motorail trains - Switch use of ferries and motorail
trains on/off
■
Avoid toll roads switches on/off the use of toll roads
■
Avoid tunnels - Switch use of tunnels on/off
48Navigation
Page 51 of 83
■ Avoid routes requiring toll stickers - Switch use of routes requiring toll
stickers on/off
■ Show available toll stickers - select from the list of routes requiring toll
stickers for which a valid toll sticker is available
Map
›
In the Navigation main menu, press
→ Map .
■ Day/night: - Select the background colour of the map
■ Day - light coloured background
■ Night - dark coloured background
■ Automatic - map with light or dark coloured background; the background
changes once you turn on the lights (does not apply to daytime running
lights)
■ Autozoom - Switch on/off the automatic zoom in/out of the map display
while driving » page 51
■ Show traffic signs - Switch on/off the display of traffic signs
■ Select categories for POIs - Select POIs to be displayed in the map from a list
of available POIs (max. 10 POIs) » page 60
■ Show brands for POIs - Switch on/off the display company logos at the POIs
■ Show favourites - Switch on/off the display of favourites
■ Lane guidance - Switch on/off the display of a window with the recommen-
ded lane for complicated intersections » page 63
Fuel options
›
In the Navigation main menu, press
Fuel options .
The following warning message is displayed when the fuel gauge pointer rea-
ches the reserve marking: Warning: fuel tank almost empty. Would you like to
find a fuel station nearby?
■ Select preferred fuel station - Select your preferred fuel station brand (the
selected station brand will be displayed on the first positions of the list)
■ Fuel warning - Switch on/off the display of the warning message for low on
fuel with the following: ■ Cancel - Close the window with the warning
■ Find - Search for the nearest fuel station; when you select the fuel station,
the new route will be calculated from your current position
Navigation announcements›
In the Navigation main menu, press
→ Nav. announcements
■ Volume - Set the volume of the navigation announcements
■ Nav. announcements: - Set the type of navigation announcements
■ Comprehensive - Full navigation announcements
■ Brief - Short navigation announcements
■ Congestion only - navigation announcements only when there is conges-
tion
■ No voice guidance during call - Switch on/off navigation announcements
during a telephone call (if using a phone connected to the device » page 37)
Advanced settings
›
In the Navigation main menu, press
press
→ Advanced setup .
■ Time display: - Select the time to be displayed in the status line
■ Time of arrival - displays the expected time to destination
■ Travelling time - Display the expected travelling time to the destination
■ Status line: Status line - Display information about your selected destination
in the status line ■ Destination - Display information about the length and duration of the
guidance to the destination
■ Next stopover - Display information about the length and duration of the
guidance to the stopover
■ Note: national border crossed - Switch on/off the display of the information
window with speed limits when crossing the national border
■ Demo mode - Switch on/off guidance in demo mode
■ Define demo mode starting point - Enter the starting point for preliminary
route calculation in demo mode
■ Cancel - Cancel the entry
■ Position - Select the current vehicle position as the starting point
■ Address - Select an address as the starting point
Manage memory
›
In the Navigation main menu, press
→ Manage memory .
■ Sort by: - Sort contacts downloaded from a connected telephone
■ Surname - Sort by contact name
■ Name - Sort by contact first name
49Description of the navigation system
Page 55 of 83
Function keyActionOperationPress brieflyPlays the next track
from the startPress button for a long period of time a)Fast-forward of the
tracka)
The longer the button is pressed, the faster the fast forward/reverse.
Compass
Fig. 34
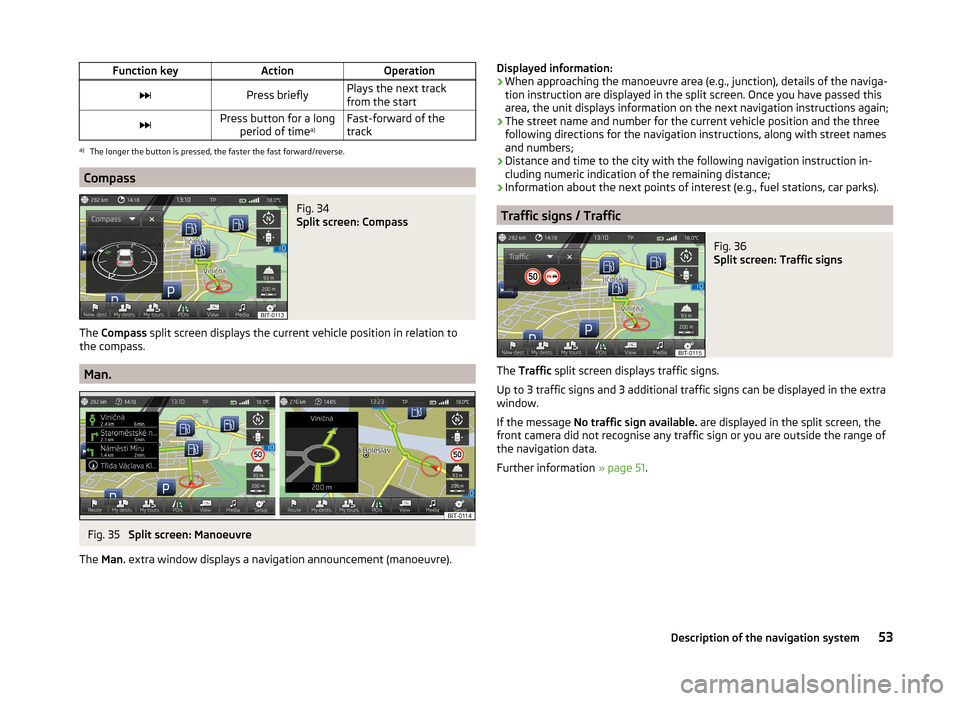
Split screen: Compass
The Compass split screen displays the current vehicle position in relation to
the compass.
Man.
Fig. 35
Split screen: Manoeuvre
The Man. extra window displays a navigation announcement (manoeuvre).
Displayed information:
› When approaching the manoeuvre area (e.g., junction), details of the naviga-
tion instruction are displayed in the split screen. Once you have passed this
area, the unit displays information on the next navigation instructions again;
› The street name and number for the current vehicle position and the three
following directions for the navigation instructions, along with street names
and numbers;
› Distance and time to the city with the following navigation instruction in-
cluding numeric indication of the remaining distance;
› Information about the next points of interest (e.g., fuel stations, car parks).
Traffic signs / Traffic
Fig. 36
Split screen: Traffic signs
The
Traffic split screen displays traffic signs.
Up to 3 traffic signs and 3 additional traffic signs can be displayed in the extra
window.
If the message No traffic sign available. are displayed in the split screen, the
front camera did not recognise any traffic sign or you are outside the range of
the navigation data.
Further information » page 51.
53Description of the navigation system
Page 70 of 83
Vehicle
Vehicle systems
Vehicle settings
Introduction
This chapter contains information on the following subjects:
Selection of travel mode (Driving Mode Selection)
68
Vehicle data
69
Auxiliary heater and ventilation
70
ESC-and ASR systems
70
Tyre
70
Assistance systems
71
Parking and manoeuvring
71
Light
72
mirrors and wiper
72
Opening and closing
72
Seats
72
Multifunction display
73
Service
73
Restore factory settings
73
Climatronic settings
73
First and foremost, pay attention to the safety instructions » page 4 , Impor-
tant notes .
Settings relating to the vehicle systems can only be made when the ignition is
switched on.
Note
■ The individual systems are described in the » Vehicle Owner's Manual .■If the functions of some systems are disabled, some functions, such as parts
of the ESC system, are switched on again automatically for security reasons,
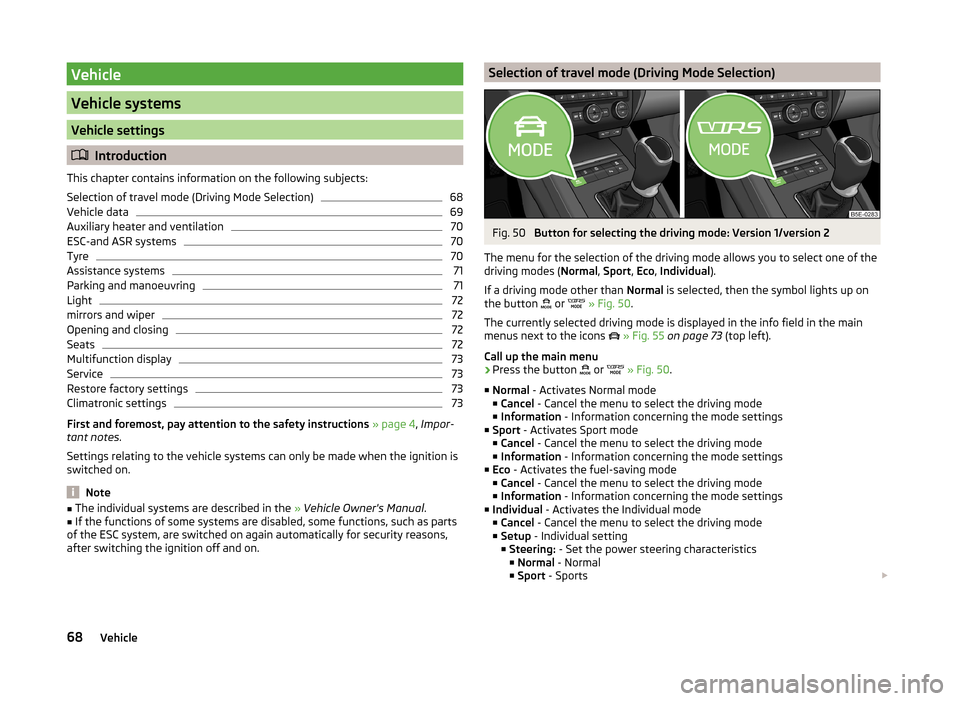
after switching the ignition off and on.Selection of travel mode (Driving Mode Selection)Fig. 50
Button for selecting the driving mode: Version 1/version 2
The menu for the selection of the driving mode allows you to select one of the
driving modes ( Normal, Sport , Eco , Individual ).
If a driving mode other than Normal is selected, then the symbol lights up on
the button or
» Fig. 50 .
The currently selected driving mode is displayed in the info field in the main
menus next to the icons
» Fig. 55 on page 73 (top left).
Call up the main menu
›
Press the button or
» Fig. 50 .
■ Normal - Activates Normal mode
■ Cancel - Cancel the menu to select the driving mode
■ Information - Information concerning the mode settings
■ Sport - Activates Sport mode
■ Cancel - Cancel the menu to select the driving mode
■ Information - Information concerning the mode settings
■ Eco - Activates the fuel-saving mode
■ Cancel - Cancel the menu to select the driving mode
■ Information - Information concerning the mode settings
■ Individual - Activates the Individual mode
■ Cancel - Cancel the menu to select the driving mode
■ Setup - Individual setting
■ Steering: - Set the power steering characteristics
■ Normal - Normal
■ Sport - Sports
68Vehicle
Page 71 of 83
■Engine: - Set the engine (drive) characteristics
■ Normal - Normal
■ Sport - Sports
■ Eco - Economical
■ ACC: - Set the vehicle acceleration when adaptive cruise control is activa-
ted
■ Normal - Normal
■ Sport - Sports
■ Eco - Economical
■ Dynamic cornering light: - Set the characteristics of the adaptive head-
lights
■ Normal - Normal
■ Sport - Sports
■ Eco - Economical
■ Air conditioning: - Sets the Climatronic characteristics
■ Normal - Normal
■ Eco - Economical
■ Reset mode - Setting for all menu items in the Individual mode to Normal
■ Cancel - Keep the current settings
■ Reset - Set all menu items to Normal
Note
If you do not operate the unit for longer than approx. 10 seconds in the "Select
driving mode" menu, it will switch to the last selected menu or switch itself off.
Vehicle data
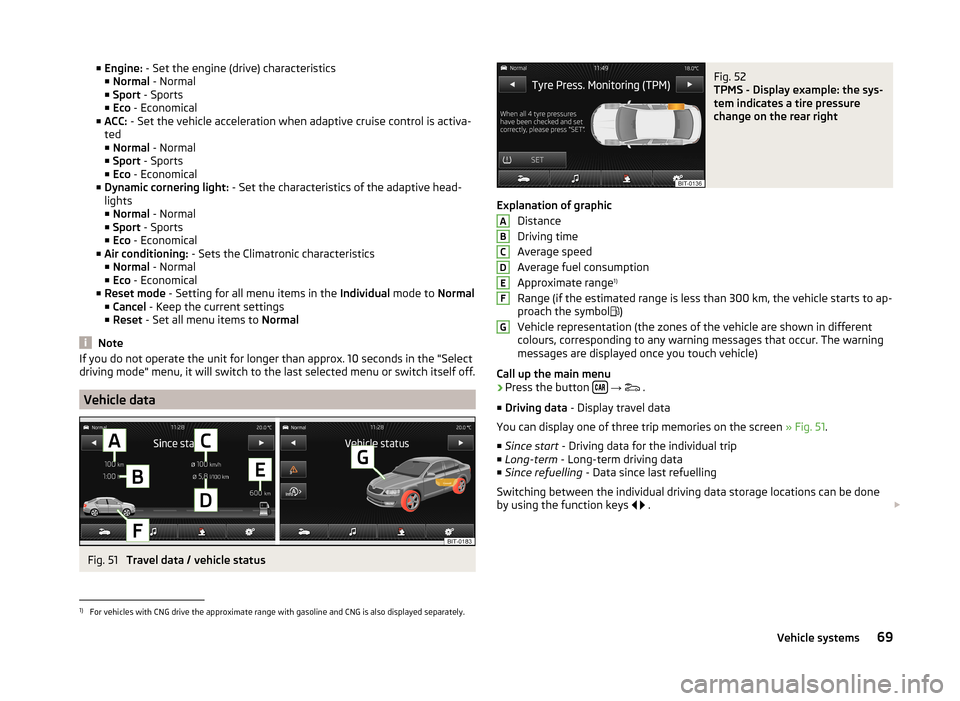
Fig. 51
Travel data / vehicle status
Fig. 52
TPMS - Display example: the sys-
tem indicates a tire pressure
change on the rear right
Explanation of graphic
Distance
Driving time
Average speed
Average fuel consumption
Approximate range 1)
Range (if the estimated range is less than 300 km, the vehicle starts to ap-
proach the symbol )
Vehicle representation (the zones of the vehicle are shown in different
colours, corresponding to any warning messages that occur. The warning
messages are displayed once you touch vehicle)
Call up the main menu
›
Press the button
→
.
■ Driving data - Display travel data
You can display one of three trip memories on the screen » Fig. 51.
■ Since start - Driving data for the individual trip
■ Long-term - Long-term driving data
■ Since refuelling - Data since last refuelling
Switching between the individual driving data storage locations can be done
by using the function keys
.
ABCDEFG1)
For vehicles with CNG drive the approximate range with gasoline and CNG is also displayed separately.
69Vehicle systems
Page 72 of 83
■Convenience consumers - Displays up to three consumers which have the
largest share of fuel consumption (such as air conditioning) and displays the
fuel consumption to run all convenience systems
■ Vehicle status - Displays vehicle status » Fig. 51 or tyre pressure monitoring
information
■ Vehicle status - Displays vehicle status information
■ - No message /
- warning messages relating to vehicle status or
number of messages (if there is only one message, one warning message
text is displayed)
■ - Display information about the status of the START-STOP system
■ TPMS - Tyre pressure monitoring function » Fig. 52
■ SET - Storage of the tire pressure values
Switching between the individual menus can be done by using the function
keys
.
Note
After pressing the button, the view from the menu last displayed is shown
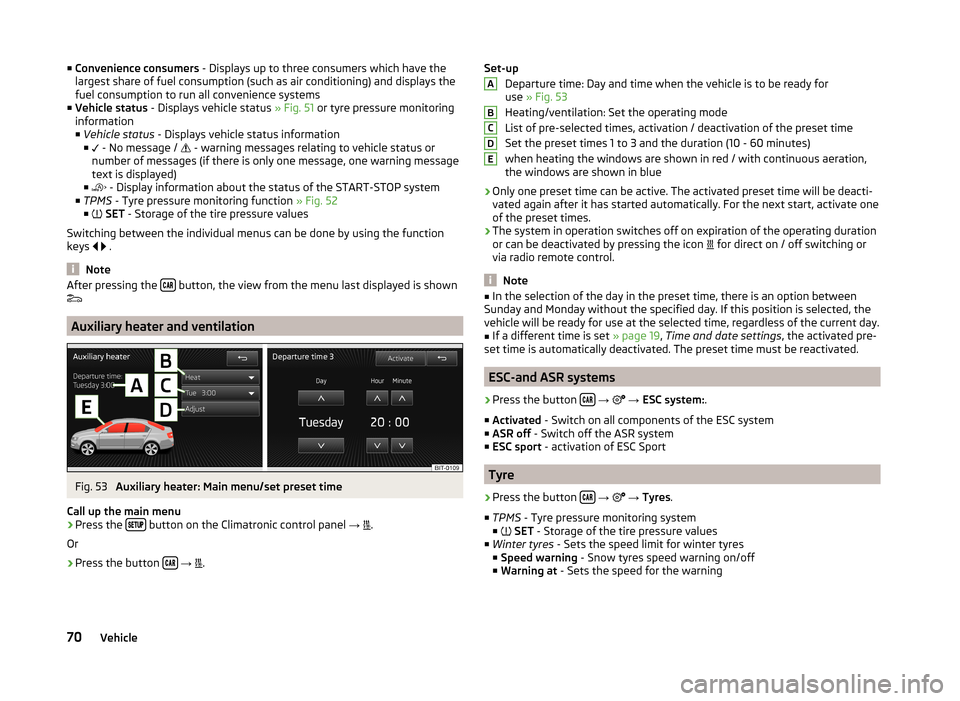
Auxiliary heater and ventilation
Fig. 53
Auxiliary heater: Main menu/set preset time
Call up the main menu
›
Press the button on the Climatronic control panel
→
.
Or
›
Press the button
→
.
Set-up
Departure time: Day and time when the vehicle is to be ready for
use » Fig. 53
Heating/ventilation: Set the operating mode
List of pre-selected times, activation / deactivation of the preset time
Set the preset times 1 to 3 and the duration (10 - 60 minutes) when heating the windows are shown in red / with continuous aeration,the windows are shown in blue
› Only one preset time can be active. The activated preset time will be deacti-
vated again after it has started automatically. For the next start, activate one
of the preset times.
› The system in operation switches off on expiration of the operating duration
or can be deactivated by pressing the icon for direct on / off switching or
via radio remote control.
Note
■ In the selection of the day in the preset time, there is an option between
Sunday and Monday without the specified day. If this position is selected, the
vehicle will be ready for use at the selected time, regardless of the current day.■
If a different time is set » page 19, Time and date settings , the activated pre-
set time is automatically deactivated. The preset time must be reactivated.
ESC-and ASR systems
›
Press the button
→
→ ESC system: .
■ Activated - Switch on all components of the ESC system
■ ASR off - Switch off the ASR system
■ ESC sport - activation of ESC Sport
Tyre
›
Press the button
→
→ Tyres .
■ TPMS - Tyre pressure monitoring system
■
SET - Storage of the tire pressure values
■ Winter tyres - Sets the speed limit for winter tyres
■ Speed warning - Snow tyres speed warning on/off
■ Warning at - Sets the speed for the warning
ABCDE70Vehicle
Page 75 of 83

■Store seat position - Store the driver's seat position and exterior mirror posi-
tion in the remote control key when locking the vehicle ■ Vehicle key activated - Activate/deactivate storing the driver's seat posi-
tion and exterior mirror position when locking the vehicle
Multifunction display
›
Press the button
→
→ Multifunction display .
In this menu it is possible to hide/show the appearance of the menu items in
the instrument cluster multifunction display and reset the driving data.
■ Current consumption - Display of current fuel consumption on/off
■ Average consumption - Display of average fuel consumption on/off
■ Refuel quantity - Display of refuel quantity on/off
■ Convenience consumers - Display of fuel consumption of convenience con-
sumers on/off
■ Eco tips - Display of tips for economical driving on/off
■ Travelling time - Display of travelling time on/off
■ Distance - Display of distance travelled on/off
■ Average speed - Display of average speed on/off
■ Digital speed display - Display of current speed on/off
■ Speed warning - Winter tyres warning on/off
■ Oil temperature - Oil temperature on/off
■ Reset "Since start" driving data - Reset the single-trip memory in the device
screen and in the display of the instrument cluster
■ Reset "Long-term" driving data - Reset the long-term memory in the device
screen and in the display of the instrument cluster
Service
›
Press the button
→
→ Service .
■ Vehicle number: - Display of the vehicle identification number
■ Inspection: --- / --- - - Number of km/days remaining until the next service
event
■ Oil change service: --- / --- - Number of km/days remaining until the next oil
change
Restore factory settings
›
Press the button
→
→ Factory settings .
In this menu you have the possibility to reset the menu items in the settings of
the vehicle systems to factory settings.
■ All settings - Restoration of the settings all menu items
■ Driver assistance - Restoration of the driver assistance menus
■ Parking and manoeuvring - Restoration of the Parking and manoeuvring
menu items
■ Light - Restoration of the light menus
■ Mirrors and wipers - Restoration of the Mirrors and wipers menu
■ Opening and closing - Restoration of the Opening/closing menu items
■ Multifunction display - Restoration of the Multifunction display menus
If one of the above menu items is selected, the system will ask you whether
you really want to restore the settings.
■ Cancel - Return to higher-level menu
■ Reset - Restore the settings
Climatronic settings
Fig. 55
Climatronic: Main menu
In the Climatronic menu the system displays the desired temperature for the
driver's side and front passenger side » Fig. 55.
Depending on the desired temperature, the airflow from the air outlet vents is
shown in blue (temperature under 22 °C) or red (temperature above 22.5 °C).
When using Climatronic in automatic mode, the lettering AUTO is shown on
the screen.
Call up the main menu
›
Press the button on the Climatronic control panel.
■ Air con. profile: - Set the Climatronic operating mode
■ ON /OFF - Switches Climatronic on/off
■ - Set the auxiliary heater and ventilation
» page 70
73Vehicle systems