2014 SKODA OCTAVIA ignition
[x] Cancel search: ignitionPage 6 of 83

Familiarization with the unit
Introductory information
Important notes
Introduction
This chapter contains information on the following subjects:
Declaration of conformity
4
Component protection
4
These operating instructions describe all possible equipment variants without
identifying them as special equipment, model variants or market-dependent
equipment.
Consequently, this vehicle does not need to contain all of the equipment com-
ponents described in these operating instructions.
The level of equipment of your vehicle refers to your purchase contract of the
vehicle. More information is available from the ŠKODA Partner 1)
where you
bought the vehicle.
Please note that these instructions are meant only as an addendum to the in-
formation presented in the Owner's Manual of the vehicle. Therefore, they can
be used only in conjunction with the latest manual for this vehicle. For a de- tailed description of some functions listed in these instructions, see the Vehi-
cle Manual for your vehicle.
The illustrations can differ in minor details from your unit; they are only inten-
ded for general information.
WARNING■ Concentrate fully at all times on your driving! As the driver you are fully
responsible for the operation of your vehicle.■
Only use the device in a way that you are in full control of your vehicle in
every traffic situation – there is the risk of accidents!
WARNING (Continued)■ Adjust the volume to ensure that acoustic signals from outside, e.g. sirens
from vehicles which have the right of way, such as police, ambulance and
fire brigade vehicles, can be heard at all time.■
High volumes can cause hearing damage!
Declaration of conformity
Read and observe
on page 4 first.
ŠKODA AUTO a.s. hereby declares that the ŠKODA Infotainment systems meet
the basic requirements and additional provisions of Directive 1999/5/EC with
reference to radio equipment and telecommunications devices.
ŠKODA AUTO a.s. hereby declares that the “connection and the use of this
communication device is granted by the Nigerian Communications Commis-
sion.”
Component protection
Read and observe
on page 4 first.
Some electronic control units are factory-equipped with component protec-
tion.
Component protection serves as a protection mechanism for the following:
› for the impairment of factory- or garage-fitted control units after installation
in another vehicle (for example, after a theft);
› for the impairment of components operated outside of the vehicle.
› for the possibility of a legitimate installation or change of control units for re-
pairs at a ŠKODA 1)
specialist garage.
When component protection is enabled, the following message appears on the
unit display Component theft protection: the infotainment system is not fully
available at present. Please switch on the ignition.
If the component protection does not activate by switching on the ignition,
please contact a ŠKODA specialist garage.
1)
Terms used » manual , chapter Preface.
4Familiarization with the unit
Page 8 of 83

Switching the unit on/off›
Press the knob to switch the device on or off.
When the device is switched on, the audio source and operating mode that
were active before switching off the device will be restored.
If Telephone mode was active before you switched off the unit and the igni-
tion and Bluetooth ®
function is not switched on, the screen displays the mes-
sage » page 38 . Switch on the ignition or the Bluetooth ®
func-
tion » page 20 .
If the vehicle key is pulled out of the ignition lock while the unit is switched on,
the unit will switch off automatically. After switching on the ignition, the unit
is turned on automatically.
If the device was switched off using the
knob, then the device will not
switch on automatically after switching on the ignition.
The unit will switch off automatically after the engine is switched off and the
door is opened if your vehicle is fitted with the KESSY system. If you open the
driver's door before switching off the engine, the device will also switch off.
When the ignition is switched off, the device switches off automatically after
approx. half an hour (discharge protection of the vehicle battery).
Unit menus
Fig. 2
Unit menus
Call up the main menu
›
Press the button.
Function keys in the MENU main menu Radio - Menu Radio » page 21
Media - Menu Media » page 26
Pictures - Menu Pictures » page 35
Sound - Sound settings » page 18
Setup - Unit settings » page 17
Vehicle - Vehicle system settings » page 68
Navigation - Menu Navigation » page 47
Telephone - Menu Telephone » page 37
Adjusting volume
Increase the volume
›
Turn the knob to the right.
Reduce the volume
›
Turn the knob to the left.
Muting
›
Set the volume to 0 using the knob.
Note
■
The change in volume is displayed on the screen of the unit.■The following symbol appears in the display when the sound is muted : .■
High volumes can cause sound resonance in the vehicle.
■
The car speakers may be damaged if the volume is set too loud or is distor-
ted.
■
The loudspeakers in the vehicle are designed for a power output of the de-
vice of 4x20 W.
■
When equipped with a sound system the speakers are matched for a total
power amplifier output of 570 W.
6Familiarization with the unit
Page 11 of 83

- Input screen in the Telephone menu » page 44 .
- Input screen in the Navigation menu » page 55
Operation through the MAXI DOT display
Introduction
This chapter contains information on the following subjects:
Operate with the control lever buttons
9
Operation with the buttons and wheels on the multifunction steering
wheel - Audio
9
Operation with the buttons and wheels on the multifunction steering
wheel - Telephone
11
Operation with the buttons and wheels on the multifunction steering
wheel - Navigation
12
First and foremost, pay attention to the safety instructions » page 4 , Impor-
tant notes .
Some of the device's features are also displayed in the MAXI DOT display 1)
. De-
pending on the equipment, these features can be operated as follows.
■ With the buttons on the operating lever
■ With the buttons and wheels on the multifunction steering wheel
NoteIf the ignition and the side light are switched on, the buttons and dials on the
multifunction steering wheel will also be illuminated.
Operate with the control lever buttons
Fig. 7
Buttons on the control lever
The separate menus and menu items displayed in the MAXI DOT display can be operated as follows with the buttons on the control lever.
Press and hold - open main menu
Press briefly - select individual menu items or menus
Press briefly - select menu item or menu
AAB
Operation with the buttons and wheels on the multifunction steering wheel - Audio
Fig. 8
Multifunction steering wheel - Audio menu
The Maxi DOT display the menu Audio displayed menu items can be operat-
ed with the buttons / dials on the multifunction steering wheel.
The information shown on the MAXI DOT display (depending on the menu
selected) ■ Radio
■ current frequency band of the radio station;
■ currently playing station of receivable radio stations in the given frequency
band if less than 5 are receivable;
■ if more than 5 stations can be received, a list of receivable radio stations is
displayed with an option to choose one of them;
■ TP traffic announcements. 1)
The display in the MAXI DOT is described in the
» Manual , chapter Information system
9Unit operation
Page 16 of 83

WARNING■Please pay attention to the traffic first and foremost! As the driver you
are fully responsible for road safety. Only use the system so that you are in
full control of your vehicle in every traffic situation - risk of accident!■
Do not use the voice control system when under stress or in an emergen-
cy. Your voice commands may not be recognized in such situations. The tel-
ephone connection may not be established or the connection may take too
much time to complete. The emergency number should be dialled manually!
Function requirements
Read and observe
on page 14 first.
Function requirements for voice control. The ignition is switched on.
The unit is switched on.
No phone call is in progress.
The parking aid is not active.
Requirements for optimum voice command recognition.
› Only give voice commands when the symbol is displayed on the device
screen or in the information display.
› Speak with a normal tone of voice without intonation and excessive pauses.
› Avoid a bad pronunciation.
› Close doors, windows and the sliding roof, in order to prevent external dis-
turbances affecting recognition of the voice commands.
› It is recommended to speak louder at higher speeds, so that the tone of your
voice is louder than the increased surrounding noise.
› During voice control, limit additional noise in the vehicle, e.g. passengers
talking at the same time.
CAUTION
For some languages, there is no voice control available. This device indicates
this fact through a text message that is displayed after setting the device lan-
guage screen » page 17.Note■
During voice control, no navigation announcements and traffic announce-
ments are played.■
Some voice commands must be spelled out when pronouncing depending on
the selected language of communication, such as the Source Selection “ SD”
card one .
Switching on/off
Fig. 11
Multifunction steering wheel
Read and observe
on page 14 first.
Switching on voice control › Briefly press the
button on the device.
› Briefly press the symbol key
1
on the multifunction steering wheel.
Activation of voice control is indicated by an acoustic signal and the device
screen will display a collection of basic voice commands for the current menu.
The menu display as well as the acoustic signal can be enabled or disa-
bled » page 20 .
Switching off voice control › Press the
button on the device for a long time or press it twice.
› With a long or double press the symbol key
on the multifunction steering
wheel.
› Touch the screen with your fingers (any part of the screen with the excep-
tion of the function key ).
› Press a button on the device (except for a short pressing of the
button).
› Utter the voice command
Cancel voice control.
14Familiarization with the unit
Page 21 of 83

■Switch off screen (in 10 seconds) - Activate/deactivate energy-saving mode
for the display 1)
■ Brightness: - Adjusts the brightness of the screen
■ Brightest - brightest level
■ Brighter - brighter level
■ Medium - medium level
■ Darker - darker level
■ Darkest - darkest level
■ Confirmation tone - Switch on/off confirmation tone when a function key is
pressed
■ Animation when finger near screen - Switches on or off hiding of the bottom
menu bar
■ Show clock in standby mode - Time and date displayed on the screen when
the ignition is switched on and the unit is switched off
Time and date settings
›
Press the button
→
→ Time and date .
■ Clock time source: - Type of time settings
■ Manual - Manual setting
■ GPS - Take the values from the GPS signal received
■ Time: - Time settings
■ Summer (DST) - Switches the summer time setting on/off
■ Time zone: - Select the time zone
■ Time format: - Set the time format
■ 12h
■ 24h
■ Date: - Date settings
■ Date format: - Set the date format
■ DD.MM.YYYY - Day - Month - Year
■ YYYY-MM-DD - Year - Month - Day
■ MM-DD-YYYY - Month - Day - Year
Keyboard settings
›
Press the button
→
→ Keyboard: .
■
ABC - keys arranged alphabetically
■ QWERTY - Arrangement of the keys as per the QWERTY system (in accord-
ance with computer keyboard arrangement)
Additional keypad language settings
›
Press the button
→
→ More keypad languages .
In this menu, the keyboard character arrangement for the chosen language
can be selected, and with this the option for fast entry of the characters used
in the selected language.
It is then possible to swap between the languages in the input screen showing
a keyboard by pressing.
» page 8 .
Unit settings
›
Press the button
→
→ Units .
■ Distance: - Distance units
■ km - Kilometres
■ mi - Miles
■ Speed: - Speed units
■ km/h - Kilometres per hour
■ mph - Miles per hour
■ Temperature: - Temperature units
■ ° - Degrees Celsius
■ ° - Degrees Fahrenheit
■ Volume: - Volume units
■ l - Litres
■ gal (US) - Gallons (US)
■ gal (UK) - Gallons (UK)
■ Consumption: - Consumption units
■ l/100km - Litres per 100 kilometres
■ km/l - Kilometres per litre
■ mpg (US) - Miles per gallon (US)
■ mpg (UK) - Miles per gallon (UK)
1)
If after 10 seconds, the screen is not activated by approaching, touching the screen or operating the
menu button
2
» Fig. 1 on page 5 , the screen turns black. You can switch the display back on again by
approaching it with your hand, touching it, or operating the menu knob
2
.
19Unit settings
Page 22 of 83

■Gas consumption: - Gas consumption units
■ kg/100km - Kilograms per 100 km
■ km/kg - Kilometres per kilogram
■ m³/100km - Cubic metres per 100 kilometres
■ km/m³ - Kilometres per cubic metre
■ Pressure: - Pressure units for tyre pressure
■ kPa - Kilopascal
■ bar - bar
■ psi - Pounds per square inch
Voice control settings
›
Press the button
→
→ Voice control .
■ Dialogue style: - Setting the dialogue style
■ Long - Long dialogue (the system plays complete acoustic messages)
■ Short - Short dialogue (the system shortens some acoustic messages or
substitutes them with an acoustic signal)
■ Display available commands - Switch on/off the menus containing basic
voice commands when voice control is activated
■ Voice control session start tone - Switch on/off the audible signal that is
output when voice control is activated
■ Voice control session end tone - Switch on/off the audible signal that is out-
put when voice control is ended
■ Input tone in voice dialogue - Switch on/off the audible signal that is output
to signal that voice control is waiting for a command
Restore factory settings
›
Press the button
→
→ Factory settings .
■ Reset all settings and data
■ Restore factory settings - Reset all factory settings
■ Reset individual settings/data
■ Sound - Restore default settings for sound
■ Radio - Restore default settings for radio
■ Vehicle - Restore default settings for the vehicle systems
■ Telephone - Restore default settings for phone
■ Media - Restore default settings for media
■ Voice control - Restore default settings for voice control
■
Navigation - Restore default settings for navigation
■ System - Restore the system default settings
Bluetooth ®
settings
›
Press the button
→
→ Bluetooth .
■ Bluetooth - Switch on/off Bluetooth ®
function
■ Visibility: - Switch on/off the visibility of the Bluetooth ®
device for other de-
vices
■ Visible - Visibility is always on
■ Hidden - Visibility is off
■ At start-up - Turns on visibility for 5 minutes after switching on the ignition
or until the driving speed has exceeded 5 km/h
■ Name: - Open the input screen with keyboard - Change the device name
■ Paired devices - Display the list of paired Bluetooth ®
devices; connect or de-
lete a paired device; delete the list of paired devices ■ Delete all - Delete all paired Bluetooth ®
devices
■ - Delete the paired Bluetooth ®
device
■ Find devices - Searches for available external devices with enabled Blue-
tooth ®
functions and activated visibility » page 41
■ Bluetooth audio (A2DP/AVRCP) - Switch on/off the connection option for
Bluetooth ®
profiles A2DP and AVRCP 1)
1)
A2DP and AVRCP are Bluetooth
®
profiles that support multimedia functions.
20Familiarization with the unit
Page 35 of 83

CAUTION■Only use standard sizeSD cards. When using smaller SD cards with the adapt-
er the SD memory card can fall out of the adapter while driving due to vehicle
vibrations.■
We recommend using SD memory cards of class 4 and higher. This guaran-
tees the fastest possible access to the audio files.
■
Always store the SD cards in suitable cases to protect them from dirt, dust
and other forms of damage.
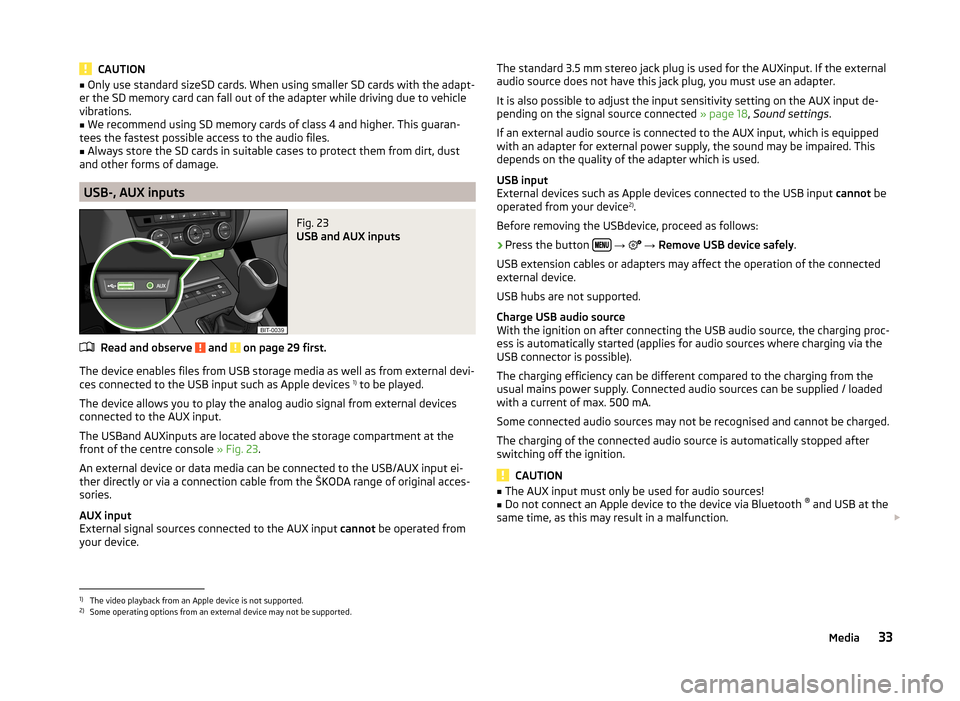
USB-, AUX inputs
Fig. 23
USB and AUX inputs
Read and observe and on page 29 first.
The device enables files from USB storage media as well as from external devi-
ces connected to the USB input such as Apple devices 1)
to be played.
The device allows you to play the analog audio signal from external devices
connected to the AUX input.
The USBand AUXinputs are located above the storage compartment at the
front of the centre console » Fig. 23.
An external device or data media can be connected to the USB/AUX input ei-
ther directly or via a connection cable from the ŠKODA range of original acces-
sories.
AUX input
External signal sources connected to the AUX input cannot be operated from
your device.
The standard 3.5 mm stereo jack plug is used for the AUXinput. If the external
audio source does not have this jack plug, you must use an adapter.
It is also possible to adjust the input sensitivity setting on the AUX input de- pending on the signal source connected » page 18, Sound settings .
If an external audio source is connected to the AUX input, which is equipped
with an adapter for external power supply, the sound may be impaired. This
depends on the quality of the adapter which is used.
USB input
External devices such as Apple devices connected to the USB input cannot be
operated from your device 2)
.
Before removing the USBdevice, proceed as follows:›
Press the button
→
→ Remove USB device safely .
USB extension cables or adapters may affect the operation of the connected
external device.
USB hubs are not supported.
Charge USB audio source
With the ignition on after connecting the USB audio source, the charging proc-
ess is automatically started (applies for audio sources where charging via the
USB connector is possible).
The charging efficiency can be different compared to the charging from the
usual mains power supply. Connected audio sources can be supplied / loaded
with a current of max. 500 mA.
Some connected audio sources may not be recognised and cannot be charged.
The charging of the connected audio source is automatically stopped after
switching off the ignition.
CAUTION
■ The AUX input must only be used for audio sources!■Do not connect an Apple device to the device via Bluetooth ®
and USB at the
same time, as this may result in a malfunction.
1)
The video playback from an Apple device is not supported.
2)
Some operating options from an external device may not be supported.
33Media
Page 39 of 83

Phone
Communication
Telephones and two-way radio systems
Introduction
This chapter contains information on the following subjects:
Introductory information
38
Main menu
38
Problems with the Telephone function
38
Phonebox
39
Settings
39
The Telephone menu is available when the following conditions are met.
The ignition is switched on.
The Bluetooth ®
function on the device is switched on.
The visibility of the mobile phone is switched on » page 20.
The visibility of the telephone is switched on.
The phone is within range of the Bluetooth ®
signal.
The phone is supported by the device.
After the device is switched on, the system attempts to connect to the most
recently connected telephone 1)
.
If a telephone is connected to the device and the device is turned off, the con-
nection to the telephone is not lost. The connection is only lost after switching
off the ignition (for vehicles with the system KESSY after switching off the ig-
nition and opening the driver's door).
WARNING■ The national regulations for using a mobile phone in a vehicle must be
observed.■
If a mobile phone or a two-way radio system is operated in a vehicle with-
out an external aerial or an external aerial which has been installed incor-
rectly, this can increase the strength of the electromagnetic field inside the
vehicle.
■
Two-way radio systems, mobile phones or mounts must not be installed
on airbag covers or within the immediate deployment range of the airbags.
■
Never leave a telephone in the deployment area of an airbag, on a seat,
on the dash panel or in another area, from which it can be thrown during a
sudden braking manoeuvre, an accident or a collision - risk of injury. There
are storage compartments with lids and if necessary there is the multime-
dia storage compartments to hold this » Vehicle owner's manual , chap-
ter Practical equipment.
■
Before transport of the vehicle by air, the Bluetooth ®
function must be
switched off by a specialist company.
CAUTION
■ In areas with no signal and possibly in tunnels, garages and subways a tele-
phone conversation can be interrupted and no telephone connection can be
established - not even in an emergency!■
The range of the Bluetooth ®
connection to the hands-free system is limited
to the vehicle interior. The range is dependent on local factors, e.g. obstacles
between the devices and mutual interferences with other devices. If your tele-
phone is in a jacket pocket, for example, this can lead to difficulties when es-
tablishing a connection with the device or transferring data.
Note
Available updates for Bluetooth ®
devices as well as information about the
phone support can be obtained from the ŠKODA website www.infotain-
ment.skoda-auto.com .1)
With some phones, it is necessary to set the connection to the device as "authorised" in order for the
automatic connection to be successful. If this is not set, the system will prompt you for a confirmation
each time you attempt to connect to the telephone.
37Communication