Page 9 of 60

Unit operation
Concerning the device screen operation
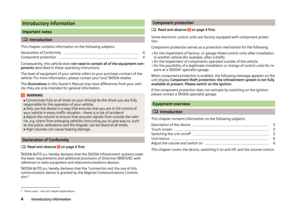
Introduction
This chapter contains information on the following subjects:
Operation
7
Alphanumeric with keyboard
8
This chapter covers the device operation and the operation of the touch
screen and the input keyboards.
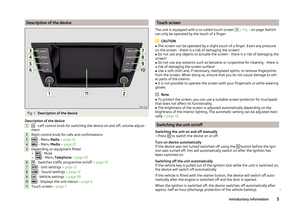
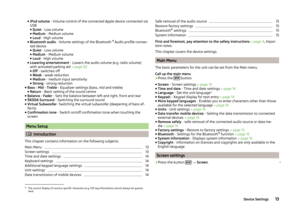
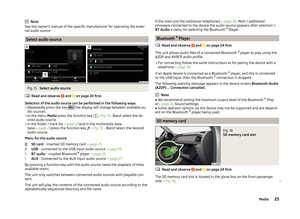
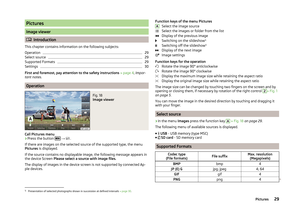
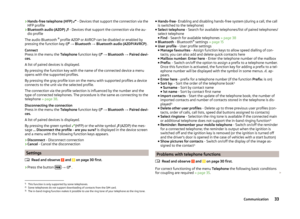
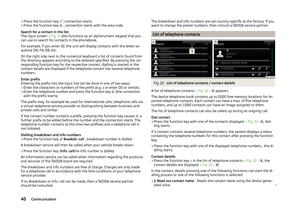
Operation
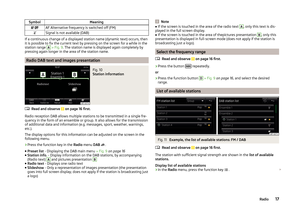
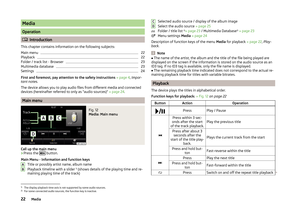
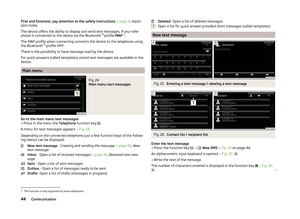
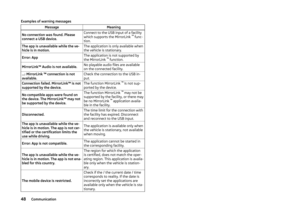
Fig. 3
Screen area / screen display
Description of the display Status bar area
Display and operating range of the selected menu
Function key area of the selected menu Identification of the current menu
Return to the higher-level menu
Scroll bar - Shows the position in the menu (touch the scroll bar to navi-
gate the menu)
Currently selected function
Function with “checkbox”
Function not available.
Open a submenu of the function with the “pop-up window”
ABCDEFGHIJFunction keys
Screen areas which confirm a function or a menu are called “ function keys”.
Function keys with a white background are active and selectable.
Function keys with a green background represent currently selectable func-
tions or menus.
Function keys with a grey background are inactive and therefore not selecta-
ble.
Status line
In some menus a status bar located at the top of the screen shows the time
and outdoor temperature along with other information.
Selecting menu/menu item/function › Drag your finger over the screen in the required direction
› By turning the right control2
» Fig. 1
on page 5 .
Confirming menu/menu item/function
› Touch the function key with your finger
› By pressing the right menu control
2
.
Returning to higher-level menu
› by pressing the function key
.
› By pressing the relevant button next to the screen;
› By touching the screen outside of the “pop-up window” with your finger.
Open submenu of a function
› by pressing the function key
a “pop-up window” with a function menu
opens.
Switching function on/off with “checkbox”
›
or
- Function is switched on
›
or
- Function is switched off
Set value › by touching the function keys with the symbols
.
› By touching or moving your finger over the scale.
Note
For some menus or menu items, the current setting is displayed, e.g.
Distance:
Km ... or distance: ... mi .7Unit operation
Page 10 of 60
 keyboard / ABC keyboard
The alphanumeric keyboard is used to search for entries (e.g. telephone con-
tacts) or for entry (e.g. renaming the Bluetooth")
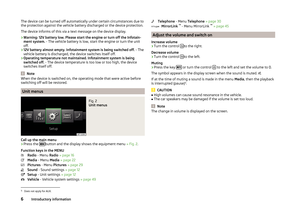
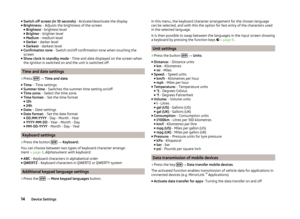
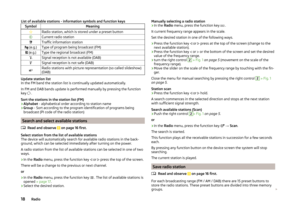
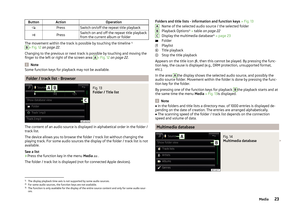
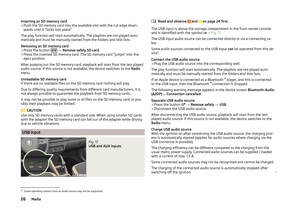
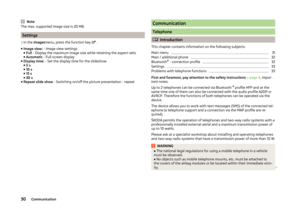
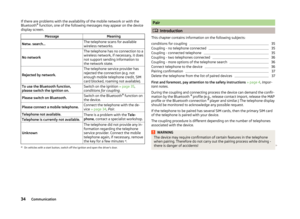
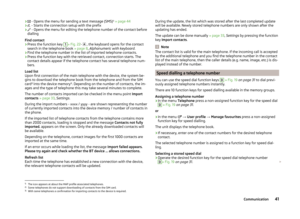
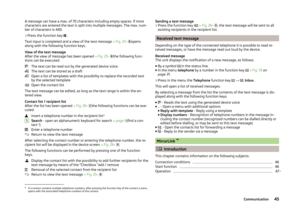
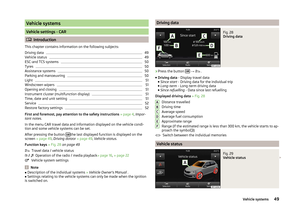
Alphanumeric with keyboardFig. 4
QWERTY (QWERTZ) keyboard / ABC keyboard
The alphanumeric keyboard is used to search for entries (e.g. telephone con-
tacts) or for entry (e.g. renaming the Bluetooth ®
Unit, writing an SMS etc.).
Description of the alphanumeric keyboard Input line
Return to the higher-level menu
Confirmation of selected entries
Confirmation of text entered into the entry line
Delete characters in the entry line
Toggle upper case to lower case and vice versa
Display the menu with letters the chosen language » page 14, Additional
keypad language settings
Switch to the numeric and special characters
Switch to special characters
Switch to letters
Enters a blank
Move the cursor within the input line to the rear
Move the cursor within the input line to the front
Look for
By pressing the keyboard function key, the character required appears in the
entry line
A
» Fig. 4 .
AWhile entering characters a search of the most relevant entries takes place
with characters already entered. Therefore, it is not always necessary to enter
the entire entry name.
Do not forget to enter a space for terms made up of more than one word, such
as Lorem Ipsum.
The entry such as a telephone contact to be searched for must be entered
along with the special characters (diacritics).
In the function key
the number of matching selected entries is displayed. A
list of related items will be opened by pressing this button.
The numbers 1 - 99 indicate the quantity of corresponding entries. If more than 99 entries are found, then instead of a number the symbols are shown
appears. If less than 5 entries were found, a list of the found entries opens au-
tomatically.
Enter
By pressing the keyboard function key, the character required appears in the
entry line A
» Fig. 4 .
by pressing the function key the input operation is ended.
Operation through the MAXI DOT display
Introduction
This chapter contains information on the following subjects:
Operate with the control lever buttons
9
Operating the audio menu (radio/media) using the buttons / dials on the
multifunction steering wheel
9
operation of the telephone menu via the buttons / dials on the
multifunction steering wheel
11
First and foremost, pay attention to the safety instructions » page 4 , Impor-
tant notes .
Some of the device's menus are also displayed in the MAXI DOT display 1)
.
Depending on the equipment they can be operated using the buttons on the
lever or the buttons / dials on the multifunction steering wheel.
1)
The display in the MAXI DOT is described in the » Manual , chapter Information system .
8Unit operation
Page 11 of 60

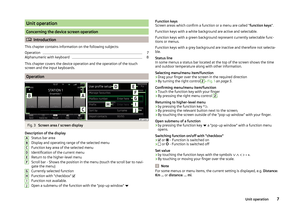
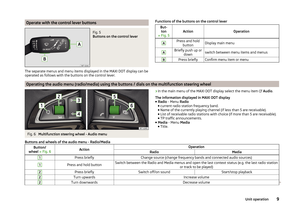
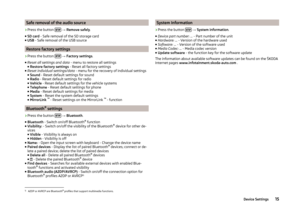
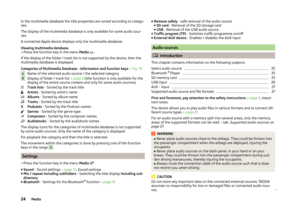
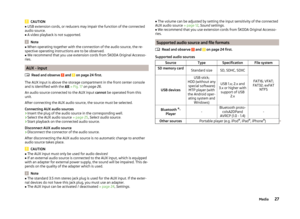
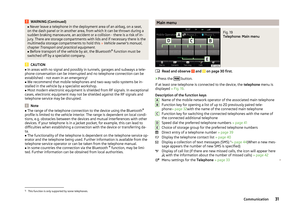
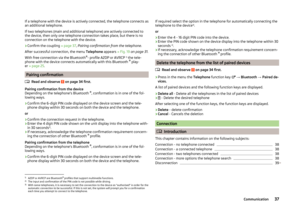
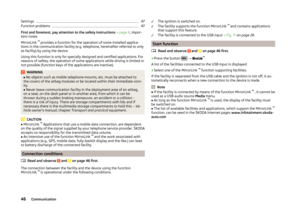
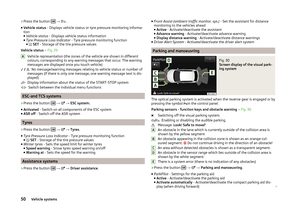
Operate with the control lever buttonsFig. 5
Buttons on the control lever
The separate menus and menu items displayed in the MAXI DOT display can beoperated as follows with the buttons on the control lever.
Functions of the buttons on the control leverBut- ton
» Fig. 5ActionOperation
APress and hold buttonDisplay main menuABriefly push up or downswitch between menu items and menusBPress brieflyConfirm menu item or menuOperating the audio menu (radio/media) using the buttons / dials on the multifunction steering wheel
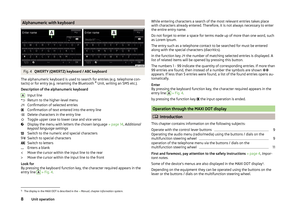
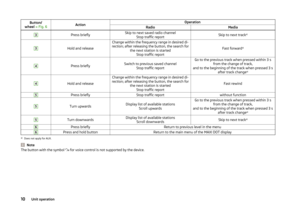
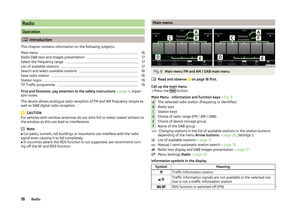
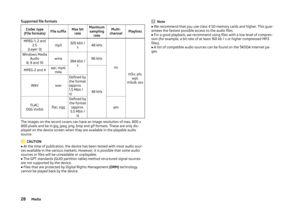
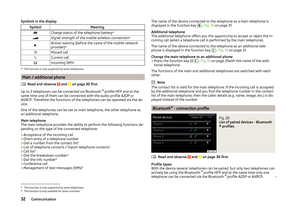
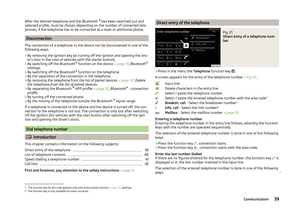
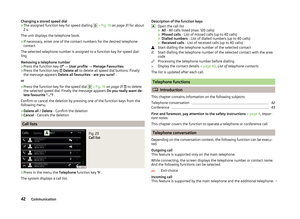
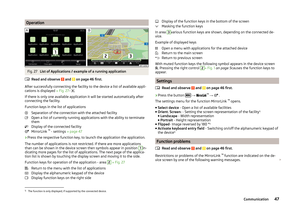
Fig. 6
Multifunction steering wheel - Audio menu
›In the main menu of the MAXI DOT display select the menu item
Audio .
The information displayed in MAXI DOT display
■ Radio - Menu Radio
■ current radio station frequency band.
■ Name of the currently playing channel (if less than 5 are receivable).
■ List of receivable radio stations with choice (if more than 5 are receivable).
■ TP traffic announcements.
■ Media - Menu Media
■ Title.Buttons and wheels of the audio menu - Radio/MediaButton/
wheel » Fig. 6ActionOperationRadioMedia1Press brieflyChange source (change frequency bands and connected audio sources)1Press and hold buttonSwitch between the Radio and Media menus and open the last context status (e.g. the last radio station
or track to be played)2Press brieflySwitch off/on soundStart/stop playback2Turn upwardsIncrease volume2Turn downwardsDecrease volume 9Unit operation
Page 12 of 60
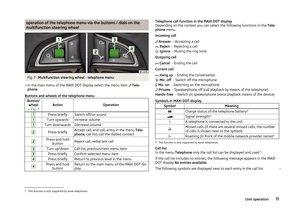
3
Hold and release
Change within the frequency range in desired")
Button/
wheel » Fig. 6ActionOperationRadioMedia3Press brieflySkip to next saved radio channel
Stop traffic reportSkip to next track a)3
Hold and release
Change within the frequency range in desired di-
rection; after releasing the button, the search for the next station is startedStop traffic report
Fast forward a)
4
Press brieflySwitch to previous saved channel
Stop traffic reportGo to the previous track when pressed within 3 s from the change of track,
and to the beginning of the track when pressed 3 s after track change a)4
Hold and release
Change within the frequency range in desired di-
rection; after releasing the button, the search for the next station is startedStop traffic report
Fast rewind
5Press brieflyStop traffic reportwithout function5
Turn upwardsDisplay list of available stations Scroll upwardsGo to the previous track when pressed within 3 s from the change of track,
and to the beginning of the track when pressed 3 s after track change a)5Turn downwardsDisplay list of available stations
Scroll downwardsSkip to next track a)6Press brieflyReturn to previous level in the menu6Press and hold buttonReturn to the main menu of the MAXI DOT displaya)
Does not apply for AUX.
NoteThe button with the symbol
for voice control is not supported by the device.10Unit operation
Page 13 of 60

operation of the telephone menu via the buttons / dials on the
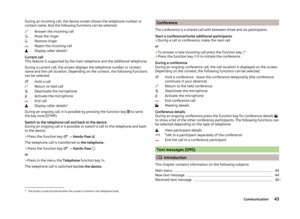
multifunction steering wheelFig. 7
Multifunction steering wheel - telephone menu
›
In the main menu of the MAXI DOT display select the menu item
Tele-
phone
Buttons and wheels of the telephone menu
Button/ wheel
» Fig. 7ActionOperation
1Press brieflySwitch off/on sound1Turn upwardsIncrease volume1Turn downwardsDecrease volume2Press brieflyAccept call, end call, entry in the menu Tele-
phone , call list, call the dialled contact2Press and hold
buttonReject call, redial last call3Turn up/downCall list, previous/next menu item3Press brieflyConfirm selected menu item4Press brieflyReturn to previous level in the menu4Press and holdbuttonReturn to the main menu of the MAXI DOT dis-
playTelephone call function in the MAXI DOT display
Depending on the context you can select the following functions in the Tele-
phone menu.
Incoming call - Accepting a call
- Rejecting a call - Muting the ring tone
Outgoing call - Ending the call
Current call - Ending the conversation
- Switch off the microphone
- Switching on the microphone - Speakerphone off (call playback by means of the telephone) - Switch on speakerphone (voice playback means of the device)
Symbols in MAXI DOT displaySymbolMeaningCharge status of the telephone battery a)Signal strengtha)A telephone is connected to the unitMissed calls (if there are several missed calls, the number
of calls is shown next to the symbol)Roaming (in front of the mobile network provider name) a)a)
This function is only supported by some telephones.
Call list
In the menu Telephone only the call list can be displayed and used 1)
.
If the call list includes no entries, the following message appears in the MAXI
DOT display No entries available.
The following symbols are displayed next to each entry in the call list.
Answer Reject Ignore Cancel Hang up Mic. off Mic. on PrivateHands-free1)
This function is only supported by some telephones.
11Unit operation
Page 14 of 60

SymbolMeaningIncoming callOutgoing callMissed call
Note
The button with the symbol for voice control is not supported by the device.Device Settings
Menu Sound
Introduction
This chapter contains information on the following subjects:
Sound settings
12
First and foremost, pay attention to the safety instructions » page 4 , Impor-
tant notes .
This chapter covers the sound setting of the device and the volume setting of
the connected equipment.
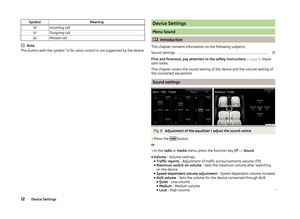
Sound settings
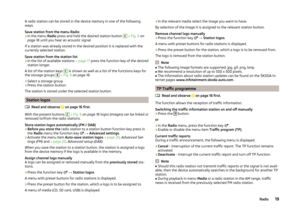
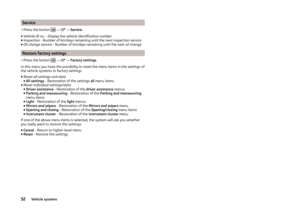
Fig. 8
Adjustment of the equalizer / adjust the sound centre
›
Press the button.
or
›
In the radio or media menu, press the function key
→ Sound .
■ Volume - Volume settings
■ Traffic reports - Adjustment of traffic announcements volume (TP)
■ Maximum switch-on volume - Sets the maximum volume after switching
on the device
■ Speed-dependent volume adjustment - Speed-dependent volume increase
■ AUX volume - Sets the volume for the device connected through AUX
■ Quiet - Low volume
■ Medium - Medium volume
■ Loud - High volume
12Device Settings
Page 15 of 60

■iPod volume - Volume control of the connected Apple device connected via
USB
■ Quiet - Low volume
■ Medium - Medium volume
■ Loud - High volume
■ Bluetooth audio - Volume settings of the Bluetooth ®
Audio profile connec-
ted device ■ Quiet - Low volume
■ Medium - Medium volume
■ Loud - High volume
■ Lowering entertainment - Lowers the audio volume (e.g. radio volume)
with activated parking aid » page 50
■ Off - switches off
■ Weak - weak reduction
■ Medium - medium input sensitivity
■ Strong - strong reduction
■ Bass - Mid - Treble - Equalizer settings (bass, mid and treble)
■ Return - Basic setting of the sound centre
■ Balance - Fader - Sets the balance between left and right, front and rear
■ ŠKODA Surround - Switching the surround sound
■ Virtual Subwoofer - Switching the virtual subwoofer (deepening of bass ef-
fects)
■ Confirmation tone - Switch on/off confirmation tone when touching the
screen
Menu Setup
Introduction
This chapter contains information on the following subjects:
Main Menu
13
Screen settings
13
Time and date settings
14
Keyboard settings
14
Additional keypad language settings
14
Unit settings
14
Data transmission of mobile devices
14Safe removal of the audio source15Restore factory settings15
Bluetooth ®
settings
15
System Information
15
First and foremost, pay attention to the safety instructions » page 4 , Impor-
tant notes .
This chapter covers the device settings.
Main Menu
The basic parameters for the unit can be set from the Main menu.
Call up the main menu
›
Press the button.
■ Screen - Screen settings » page 13
■ Time and date - Time and date settings » page 14
■ Language - Set the unit language 1)
■ Keypad: - Keypad display for text entry » page 14
■ More keypad languages - Enables you to enter characters other than those
available for the selected language » page 14
■ Units - Unit settings » page 14
■ Data transfer mobile devices - Setting the data transmission to connected
external devices » page 14
■ Remove safely - safe removal of the connected audio source or data me-
dia » page 15
■ Factory settings - Restore to factory settings » page 15
■ Bluetooth - Settings for the Bluetooth ®
function » page 15
■ System information - Displays system information » page 15
■ Copyright - Information on licences and copyrights are only available in the
English language
Screen settings
›
Press the button
→ Screen .
1)
The correct display of country-specific characters (e.g. ID3 tag information) cannot always be guaran-
teed.
13Device Settings
Page 16 of 60
 - Activate/deactivate the display
■ Brightness: - Adjusts the brightness of the screen
■ Brightest - brightest level
■ Brighter - brighter level
■ Medi")
■Switch off screen (in 10 seconds) - Activate/deactivate the display
■ Brightness: - Adjusts the brightness of the screen
■ Brightest - brightest level
■ Brighter - brighter level
■ Medium - medium level
■ Darker - darker level
■ Darkest - darkest level
■ Confirmation tone - Switch on/off confirmation tone when touching the
screen
■ Show clock in standby mode - Time and date displayed on the screen when
the ignition is switched on and the unit is switched off
Time and date settings
›
Press
→ Time and date .
■ Time: - Time settings
■ Summer time - Switches the summer time setting on/off
■ Time zone: - Select the time zone
■ Time format: - Set the time format
■ 12h
■ 24h
■ Date: - Date settings
■ Date format: - Set the date format
■ DD.MM.YYYY - Day - Month - Year
■ YYYY-MM-DD - Year - Month - Day
■ MM-DD-YYYY - Month - Day - Year
Keyboard settings
›
Press the button
→ Keyboard: .
You can choose between two types of keyboard character arrange-
ment » page 8 , Alphanumeric with keyboard .
■ ABC - Keyboard characters in alphabetical order
■ QWERTZ - Keyboard characters in QWERTZ or QWERTY system
Additional keypad language settings
›
Press the
→ More keypad languages button.
In this menu, the keyboard character arrangement for the chosen language
can be selected, and with this the option for fast entry of the characters used
in the selected language.
It is then possible to swap between the languages in the input screen showing
a keyboard by pressing the function keys
» page 8 .
Unit settings
›
Press the button
→ Units .
■ Distance: - Distance units
■ km - Kilometres
■ mi - Miles
■ Speed: - Speed units
■ km/h - Kilometres per hour
■ mph - Miles per hour
■ Temperature: - Temperature units
■ ° - Degrees Celsius
■ ° - Degrees Fahrenheit
■ Volume: - Volume units
■ l - Litres
■ gal (US) - Gallons (US)
■ gal (UK) - Gallons (UK)
■ Consumption: - Consumption units
■ l/100km - Litres per 100 kilometres
■ km/l - Kilometres per litre
■ mpg (US) - Miles per gallon (US)
■ mpg (UK) - Miles per gallon (UK)
■ Pressure: - Pressure units for tyre pressure
■ kPa - Kilopascal
■ bar - bar
■ psi - Pounds per square inch
Data transmission of mobile devices
›
Press the key →
Data transfer mobile devices .
The activated function enables transmission of vehicle data for applications in
connected devices (e.g. MirrorLink ™
Applications).
■ Activate data transfer for apps - Turning the data transfer on and off
14Device Settings