Page 49 of 84
.
a) This function button is only displayed with route guidance ac-
tivate")
NavigationFunction button: effect
Satellite data: current vehicle position in coordinates and
GPS status (satellite reception).
a) This function button is only displayed with route guidance ac-
tivated.
Press the function button to deactivate the
split screen.
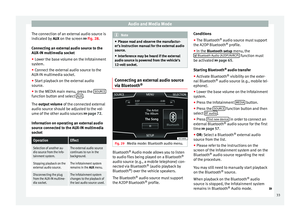
Map display Fig. 40
Messages and function buttons on
the map display. Function buttons and messages on the map
display.
To activate function buttons
and , press
function button .
Function button: effect
To select automatic scaling. If the function is
active, the symbol is displayed in blue.
Current altitude indicator.
View map scale. Turn the setup button to mod-
ify the scale of the map.
To change the orientation of the map (north-
facing or direction of travel). This function is
only available in 2D mode.
To centre the vehicle position on the map.
To centre the destination on the map. This
function button is only displayed if
Display
destination on map is selected ››› page 46.
Briefly zooms in on the map. After a few sec-
onds, it automatically returns to the last selec-
ted scale.
Traffic reports and dynamic route
guidance (TRAFFIC)
The Infotainment system constantly receives
traffic reports (TMC/TMCpro) in the back-
ground, provided a TMC traffic news station
can be received at the current location. The
station being listened to does not have to be
the traffic news station.
TMC traffic reports are displayed on the map
with symbols
››› page 48, Traffic reports on
map (selection) and are required for dynamic r
out
e guidance
››› page 47, Dynamic route
guidance
.
List of available traffic reports
● Press the TRAFFIC button on the Infotain-
ment system to display a list of the current
traffic reports.
● Press the OPTIONS function button and
then select All or Route.
Function button: effect
All: This will display all the traffic reports received.
Route: This will display the traffic reports received that
affect the calculated route. Dynamic route guidance
In order for dynamic route guidance to func-
tion,
Dynamic route
must be activated in the
route options ›››
page 49.
If during route guidance a traffic report is re-
ceived that affects the route being travelled,
an alternative route will be searched for if the
Infotainment system calculates that time can
be saved.
If it calculates that time will not be saved us-
ing the alternative route, it will continue on
the route with the traffic congestion. An an-
nouncement will be made in each case. »
47
Page 50 of 84

Navigation
Shortly before arriving at the announced con-
gested traffic, it will be announced once
again.
Avoiding congestion by following the instruc-
tions of a traffic report does not always save
time as the alternate roads may be at a
standstill. The quality of the dynamic route
guidance depends on the information con-
tained in the traffic reports.
The remainder of the route to be travelled
may be manually excluded to cause a new
route calculation ››› page 43.
Traffic reports on map (selection)Symbol: Meaning
: Traffic congestion
: Traffic jam
: Accident
: Black ice
: Risk of skidding
: Danger
: Road works
Symbol: Meaning
: Strong wind
: Road closed to traffic
During route guidance, traffic congestion that
does
not affect the route calculated is dis-
p l
ayed in grey.
The extent of the traffic congestion along the
route calculated is shown by a red line.
Any incidents that affect the route calculated
and have caused the route to be recalculated
are displayed in orange.
The position of a symbol indicates the start
of the traffic congestion if it is clearly defined
in the traffic report.
Importing vCards (electronic business
cards) Importing vCards to the destination memory
● Insert the data storage device with the stor-
ed vCards or connect it to the Infotainment
system ›››
page 23 .
● Pr e
ss the SETUP function button in the
main Navigation
menu.
● In the Nav
igation setup menu, press the
Import destinations function button.●
Select the data carrier with the vCards
saved in the list.
● Press Import all vCards in the folder .
● Confirm the import notice with the OK function button.
The saved vCards will now be in the destina-
tion memory
››› page 44 and may be used for
n av
igation. Note
Only one address per vCard can be imported.
In the event any vCards have several address-
es, only the main address will be imported. Importing Personal POI
Importing the Personal POI to a points of
interest destination memory
● Insert the data storage device with the stor-
ed Personal POI or connect it to the Infotain-
ment system ›››
page 23 .
● Pr e
ss the Infotainment MENU button and
then select Setup .
● In the System setup
menu, press the
System information function button.
● Press Update software to import the Personal
POI.
● Confirm the import notice with the OK function button.
48
Page 51 of 84

Navigation
The stored Personal POI are now in the points
of interest destination memory ››› page 45
and can be used for navigation purposes.
The stored Personal POI can be deleted in the
Navigation Setup menu ››› page 49.
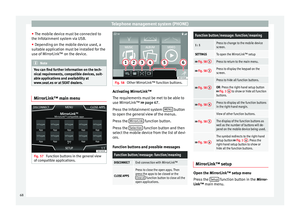
Navigation with images Fig. 41
Images main menu. Selecting an image and starting route
guidance
Bear in mind the requirements and formats of
the compatible images
››› page 23.
● Insert the data storage device with the stor-
ed images or connect it to the Infotainment
system.
● Press the Infotainment system MENU but-
ton and then select Images .●
Press the SOURCE
››› Fig. 41 function button
and sel ect
the data storage device where the
images are stored.
● Select the desired image.
● If the image displayed was taken using GPS
localisation, the function button will ap-
pear. Press to start route guidance.
Road sign indicators The road sign indicators must be active in the
Navigation Setup menu ››› page 49.
If road signs for the road being travelled are
stored in the navigation data, the system can
show them on the map display (e.g. a speed
restriction).
Please bear in mind how recent the naviga-
tion data is and the limitations of the system
››› page 40
!
R out
e guidance in demo mode If demo mode is activated in the
Setup Navi-
gation menu ›››
page 49 , an additional pop-
up w indo
w opens when you start route guid-
ance.
● Pressing the Demo mode function button
starts a “virtual route guidance” to the desti-
nation you have entered. ●
If you press the Normal function button, a
“real route guidance” starts.
The sequence of events and the operations in
virtual route guidance are similar to those in
real route guidance.
Virtual route guidance is repeated when you
reach the fictitious destination and always
starts again from the starting point if not
aborted beforehand.
If the starting point for demo mode has been
defined manually in the Setup Navigation
menu, virtual route guidance will start from
the position set.
A manually entered starting point is overwrit-
ten with the current vehicle location if the ve-
hicle moves off. Note
Disable demo mode after use, otherwise you
will be prompted to choose between virtual
and normal route guidance each time you
start route guidance. Navigation setup
●
Press the SETUP function button in the
main Navigation
menu.
Function button: effect
Route options: To make adjustments to route calculation.» 49
Page 52 of 84

NavigationFunction button: effect
Suggest 3 alternative routes: After starting route guid-
ance, 3 alternative routes are suggested ››› page 42.
Route: Select the route type.
Economic: The route is calculated by taking into
consideration economic aspects.
Fast: The fastest route to the destination.
Short: shortest route to the destination, even if it
results in a longer travelling time.
Dynamic route: Route guidance with TMC is active
››› page 47.
Avoid motorways: Motorways will be excluded from
the calculation whenever possible.
Avoid ferries and motorail trains: Ferries and motorail
trains will not be considered in the calculation of the
route whenever possible.
Avoid toll roads: Toll roads will be excluded from the
calculation whenever possible.
Avoid tunnels: Tunnels will be excluded from the cal-
culation whenever possible.
Avoid routes requiring toll stickers (vignette): Routes re-
quiring toll stickers will be excluded from the calcula-
tion whenever possible.
Show available toll stickers: To mark the available toll
stickers on the list ( Avoid routes requiring toll stickersmust be active).
Roads requiring toll stickers that have been marked
as having said toll sticker will be taken into account
in the calculation of the route.
Function button: effect
Map: To make adjustments to the visual display of the
map.
Show road signs: The road signs stored in the naviga-
tion data for the road being travelled will be dis-
played during route guidance ››› page 49.
Lane guidance: During route guidance, when driving
and turning on multi-lane roads, an additional dis-
play is shown with lane guidance. This will only ap-
pear if there is information in the database for the
area being driven in.
Show favourites: The stored destinations are shown
on the map as favourites (orange symbol)
Show POI
Select categories for POI: To select which point of in-
terest categories are displayed on the map
››› page 45.
Show POI flags.: View of category logos of the se-
lected points of interest (e.g. view of petrol station
logos).
Fuel options: To make adjustments relating to fuel.
Select preferred petrol station: The selected petrol station
mark will be shown before other points of interest in
the search.
Fuel warning: The warning to refuel is active.
If the fuel level reaches the reserve level, the corre-
sponding warning is generated which permits the
search for petrol stations.
Navigation announcements: To make adjustments to naviga-
tion announcements.
Function button: effect
Volume: To adjust the volume for driving recommen-
dations.
Navigation announcements: To adjust driving recommen-
dations during route guidance.
Comprehensive: Detailed driving recommendations
and other directions.
Brief: Some recommendations and directions are
muted.
Congestion only: Recommendations are only given
in the event of congestion along the route (e.g.
traffic jam).
No navigation sound during call: No audible driving in-
structions will be given during a telephone conversa-
tion.
Advanced setup: To make advanced adjustments to the
navigation.
Time display: displayed during route guidance.
ETA: The estimated time of arrival at the final des-
tination is displayed.
Duration: The estimated travelling time to the final
destination is displayed.
Status bar: displayed during route guidance.
Destination: The distance calculated to final desti-
nation is displayed.
Next stopover: The calculated distance until next
stopover is displayed.
Note: Country border crossed: Displays the speed limits
of the country in question when crossing the border. 50
Page 53 of 84

NavigationFunction button: effect
Demo mode: When Demo mode is activated and
route guidance is started, virtual guidance to the en-
tered destination can be initiated ››› page 49.
Define demo mode starting point: if demo mode is activa-
ted, a fictitious starting point for virtual route guid-
ance can be defined when the vehicle is stationary.
Manage memory: To modify saved destinations.
Sort by: To select the sequential order of the entries
in the phonebook that have (postal) addresses, see
also ››› page 44.
Define home address: To assign or edit a home address,
see also ››› page 44.
Delete my points of interest (Personal POI): To delete the
points of interested stored in the points of interest
destination memory ››› page 48.
Update my points of interest (Personal POI): To update the
stored points of interest ››› page 48.
Delete user data: To delete the stored destinations
(e.g., the Last destinations or the Destination memo-
ry).
Import destinations: To import electronic business cards
(vCards) into the destination memory ››› page 48.
Version information: Information on the stored navigation
data.
Speed limits: Shows the speed limits, depending on the
road, for the current country. 51
Page 54 of 84

CAR menu
CAR menu Introduction to managing the
CAR menu Car menu By pressing the “CAR” infotainment button
you will access its main menu with the follow-
ing options:
● VIEW
● MINIPLAYER (Radio and Media function)
● PREVIOUS-NEXT (to change screen)
● SETUP ›››
Booklet Instruction Manual,
chapter System setup (CAR)
With the function button View you can access
the following information:
● OFFROAD*
● CONSUMERS
● DRIVING DATA
● ECOTRAINER*
● VEHICLE STATUS Offroad*
Fig. 42
CAR Menu Offroad. ●
Press the CAR button on the Infotainment
system.
● Press the VIEW function button and then
select OFFROAD.
If the corresponding equipment is available,
the information that appears is the following: Compass.
Altimeter: altitude above sea level.
Turning angle of steered wheels.
1 2
3 Electrical consumer
Fig. 43
Comfort consumption. By pressing the
Consumption button, informa-
tion on the status of the vehicle's main con-
sumption devices is obtained. It is shown via
a consumption indicator bar in l/h (gal/h) 1)
. 1)
In the case of Gas (CNG) vehicles, the units are in
kg/h.
52
Page 55 of 84

CAR menu
Driving data Fig. 44
Trip data. The onboard computer is equipped with 3
memories that work automatically. In these
memories you can see the distance travelled,
average speed, time passed, average con-
sumption and autonomy of the vehicle.
1. Since start
Indicates and stores the values of the journey
completed and the consumption from when
the ignition is switched on to when it is
switched off.
2. Since refuel
Display and storage of the values for the jour-
ney and the consumption. By refuelling, the
memory will be erased automatically. 3. Long-term
The memory records the values for a specific
number of partial trips, up to a total of 19
hours and 59 minutes or 99 hours and 59 mi-
nutes, or 1999.9 km (or miles) for 9999 km
(or miles), depending on the model of instru-
ment panel.
When one of these values is reached (de-
pending on the version of the instrument
panel), the memory is automatically deleted
and it starts counting from 0 again.
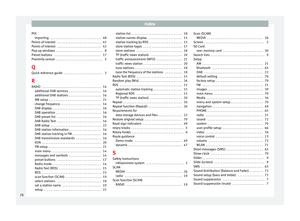
Ecotrainer* Fig. 45
CAR Menu Ecotrainer. Fig. 46
Driving style symbols. Open ECOTRAINER menu
● With the vehicle stopped, press the CAR button on the Infotainment system.
● Press the VIEW function button and then
select ECOTRAINER.
If the corresponding equipment is available,
the ECOTRAINER will provide information on
driving style. The information on driving style
is only evaluated and displayed when mov-
ing forward.
∅ ECO points: Driving style display
Thi s
indicates the driving style since starting
the vehicle on a scale of 0 to 100. The higher
the score displayed, the more efficient the
driving style. To see more information, press
the display. It shows statistics for the last 30
minutes of driving since starting the vehicle. »
53
Page 56 of 84

CAR menu
If the car has not yet been driven for 30 mi-
nutes, it shows values from the last trip in
grey.
∅ l/100 km: Average fuel consumption
Sho w
s the average fuel consumption. The
value is calculated by using the kilometres
covered since starting the vehicle. To see
more information, press the display. It shows
statistics for the last 30 minutes of driving
since starting the vehicle. If the car has not
yet been driven for 30 minutes, it shows val-
ues from the last trip in grey.
ECO tips: Tips on how to save fuel
By pressing the ECO tips function button, you
can view tips on how to save fuel. These tips
can only be viewed when the vehicle is stop-
ped.
Evaluation of efficient driving style
The efficiency of the driving style is reflected
by different elements on the display.
Display ››› Fig. 45: Meaning
1Different symbols are shown on the left of the col-
umns that report on the current driving style ››› ta-
ble on page 54 .
2
The white column is an indication of where the ef-
ficiency graph begins (from left to right).
It shows the position of the evaluation that is cur-
rently being performed.
Display ››› Fig. 45: Meaning
3
Bars to represent acceleration.
The position of the car represents the acceleration.
If the acceleration is constant, the car remains in
the central area. When accelerating or braking, the
car moves forward or backward respectively.
4
Columns to show driving style efficiency.
On the horizon, the columns represent the effi-
ciency of the driving style in a retrospective man-
ner and move from left to right every five seconds
or so. The higher the height of the columns, the
more efficient the driving style.
The colour of the sky represents the average of the
last three minutes. The colour changes from grey
(less efficient) to blue (more efficient).
Symbols ››› Fig. 46: Meaning
AForesight when driving.
BGear-change indicator.
CThe current vehicle speed is having a negative im-
pact on fuel consumption.
DEcological driving style. Vehicle status
Fig. 47
Standard representation: vehicle sta-
tus. Fig. 48
Standard representation: vehicle sta-
tus. Press the
Vehicle status button to access infor-
mation on the Vehicle status messages and
Start-Stop System . The Vehicle status mes-
sages are set out ››› Fig. 47 , in addition to be-
in g s
pecified on the corresponding button.
54