Page 17 of 84
 offers addition-
al information in FM such as the visualisation")
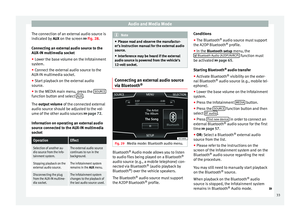
Audio and Media Mode
RDS radio data services Fig. 9
RADIO main menu Fig. 10
Radio mode: list of stations. The RDS (Radio Data System) offers addition-
al information in FM such as the visualisation
of the station name, automatic station track-
ing (Alternative Frequencies AF), text emitted
by radio (Radio Text), traffic reports (TP) and
station types (PTY). RDS is not supported by all units and is not
available everywhere or on every FM radio
station.
Depending on the country and the unit in
question, the RDS can be deactivated in the
FM setup menu ››› page 21 .
W ithout
RDS it is not possible to use radio
data services
.
Name of the station and automatic station
tracking
If equipped with the RDS function, the names
of the stations can be displayed in the main
RADIO
menu and in the FM station list.
FM radio stations may occasionally or contin-
uously broadcast different content on differ-
ent regional frequencies under the same sta-
tion name (e.g. Station 3).
By default, automatic station tracking always
switches to the currently selected station's
frequency that offers the best reception, as
the vehicle travels from one area to the next.
As a result, this may cause the regional sig-
nal to be lost.
Automatic frequency changing and automatic
station tracking can be deactivated in FM set- up ››› page 21. Ra
dio Text (RDS)
Some RDS-enabled stations also broadcast
additional text information known as radio
text.
Radio Text is displayed in the upper half of
the screen above the preset buttons
››› Fig. 7 A .
The Radio Text display can be deactivated in
FM setup ››› page 21 . Note
Radio stations are responsible for the content
of the information they transmit. 15
Page 18 of 84
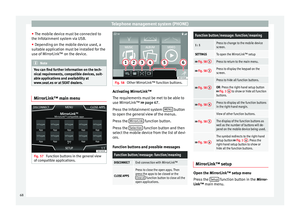
 Fig. 11
Display of preset buttons in DAB
mode. Fig. 12
Display of station information in DAB
mode. The DAB radio receiver supports t")
Audio and Media Mode
Digital radio mode (DAB, DAB+ and
audio DMB) Fig. 11
Display of preset buttons in DAB
mode. Fig. 12
Display of station information in DAB
mode. The DAB radio receiver supports the DAB,
DAB+ and DMB-Audio broadcasting stand-
ards. In Europe, digital radio is transmitted via
Band III frequencies (174 MHz to 240 MHz)
and the L Band (1452 MHz to 1492 MHz).
The frequencies of the two bands are referred
to as “
channels
” and each has a channel
n
ame (e.g. 12 A).
Several DAB stations are combined into one
channel with the additional services availa-
ble in a “block”.
St
arting DAB radio mode
● From the
RADIO main menu press the BAND function button and select
DAB .
The DAB radio station that was last selected
will be played if it can still be received at the
current location.
The selected DAB station is displayed in the
upper bar of the screen; the group of selec-
ted stations is displayed below ››› Fig. 11 .
Ad dition
al DAB stations (Secondary Service
Components)
Some DAB stations temporarily or perma-
nently offer additional stations , (for example,
for broadcasting sports events).
Press the name of the main station in the
DAB menu to select an additional station. Or,
select the additional station from the station
list. The DAB main menu shows the name of the
additional selected station on the right
alongside the abbreviated name of the main
DAB station.
The additional stations cannot be stored.
Automatic station tracking: change from DAB
to FM
DAB is currently
not available in all areas . In
areas without DAB, is displayed in DAB ra-
dio mode.
Automatic station tracking can be activated
in DAB setup to change to the FM frequency
band ››› page 22.
If r
eception of the currently selected DAB sta-
tion is lost (e.g. no DAB reception available),
the Infotainment system attempts to find the
station on the FM frequency band and tune to
it. Automatic station tracking between fre-
quency bands only works if the DAB station
and the FM station transmit the same station
identifier or the DAB signal indicates a corre-
sponding station on the FM frequency band.
Once the corresponding FM station has been
found, (FM) is displayed after the station name. When reception for the corresponding
DAB station returns, the unit will switch back
to DAB mode after a short time. The (FM)
dis-
play is hidden.
If the reception of the selected DAB station is
too weak and the station can no longer be
16
Page 19 of 84

Audio and Media Mode
found on the FM frequency band, the radio
will be muted.
Additional DAB services
The function buttons refer to the menu that
appears when the View button is pressed
››› Fig. 11 .Function button: effect
Preset list: Preset buttons display
››› Fig. 11.
Station information: Simultaneous displaying of Radio Text
››› Fig. 12 A and slideshow B instead of the preset
buttons.
Radio text: Radio Text is displayed instead of preset but-
tons.
Presentation: The slideshows are displayed in full screen. Note
● Not all DAB stations support Radio Text and
slideshows.
● Radio stations are responsible for the con-
tent of the information they transmit. Preset buttons
Fig. 13
RADIO main menu The stations of the currently selected fre-
quency range can be stored on the numbered
function buttons in the RADIO main menu.
The se f
unction buttons are called “station
buttons”.
Functions of the preset buttons
Selecting the
station from the
preset buttons
Press the preset button correspond-
ing to the desired station.
The stored stations can only be
played by pressing the correspond-
ing preset button provided it can be
received at your current location.
Functions of the preset buttons
Switching be-
tween memory
banks
Move your finger over the screen
from left to right or vice-versa.
OR: Press one of the function buttons
››› Fig. 13 1
The preset buttons are displayed in
groups of 5 memory buttons ( 1 to
5, 6 to 10, 11 to 15 and 16 to
18).
Storing stations
automatically
on the preset
buttonsSee: Store stations ››› page 19.
Storing the sta-
tion logo on the
preset buttonsA station logo can be assigned to the
stations stored on the preset buttons
››› page 18. Automatically save station logos in
the saved station buttons (only in FM
and DAB modes)
A station is automatically assigned a logo
when it is saved if it is available from the ra-
dio’s database.
If there are 2 or more logos in the database,
it gives the option to manually choose the
correct one.
»
17
Page 20 of 84

Audio and Media Mode
Note
Not all stations are stored in the database
and therefore it is not always possible to as-
sign logos automatically. Manually save station logos in the
saved station buttons
The station logos can be imported from a
compatible data medium (for example, mem-
ory card or memories with USB port).
● Press the function button Setup and then
Station logos .
● Press the station button where you wish to
store the logo of a station.
● Select the source where the logo is stored
(for example, SD card 1 ). We recommend sav-
ing logos in the memory unit’s root directory.
● Select the station logo.
● Repeat the process to assign other logos;
press the infotainment button RADIO to re-
turn to the RADIO main menu.
● If you wish to change the logo of a preset
button that already has one assigned to it, it
must first be deleted from the button in ques-
tion. Select, tune and store a station
Fig. 14
RADIO main menu Fig. 15
Radio mode: list of stations.Selecting stations
Select stations
with the arrow
buttonsPress either the function button or ››› Fig. 14.
This will change between available
stations ››› page 21.
Selecting stations
Selecting sta-
tions from the
station list
Press the Station
››› Fig. 14 function
button to open the station list.
Search through the list and press the
required station to select it.
To close the station list, press the BACK function button ››› Fig. 15.
The station list closes automatically
after a period of inactivity.
Manually tuning in a station frequency.
Viewing the fre-
quency dialPress the Manual function button
››› Fig. 14.
Changing the
frequency in
stepsTurn the setting knob.
OR: Press the + or – keys on the di-
al that appears on the screen.
Browsing the
frequency band
quickly
Press and hold one of the arrow but-
tons on the left of the multifunction
steering wheel. After releasing the ar-
row button, the unit automatically
tunes to the next available radio sta-
tion.
OR: Place your finger on the slider in
the frequency range and drag it to
move the button. 18
Page 21 of 84

Audio and Media ModeManually tuning in a station frequency.
Hiding the fre-
quency band
Briefly press the setting knob
››› Fig. 1 4.
Manual frequency selection is also
closed if you select a station with a
station button. If no operation is per-
formed, the frequency range will dis-
appear after a period of inactivity.
Storing stations
Storing the sta-
tion being lis-
tened to on a
preset buttonPress and hold
the desired preset
button ››› Fig. 14 until an audible sig-
nal is heard.
The tuned in station will be stored on
this preset button.
Storing stations
Storing a sta-
tion from the
station list to a
preset button
Press the Station
››› Fig. 14 function
button to open the station list.
The stations that are already stored
on a preset button are marked on the
station list with the symbol
››› Fig. 15.
Select the desired station by press-
ing and holding it on the screen. A
screen will appear to store the sta-
tion on the memory buttons.
Press the preset button where the
station is to be stored.
An audible signal is heard and the
station is stored on the preset but-
ton. To continue storing other sta-
tions from the list, repeat the proc-
ess.
Deleting stored
stationsAll the stored stations can be deleted
together or separately from the FM,
AM, DAB Setup menu ››› page 21. Set a station name (FM frequency range)
1)
In some cases the name of the station is too
long. This text may be blocked/unblocked by
pressing on the station name for 3 seconds
until hearing an audible signal (a dot will ap-
pear/disappear on the left and right of the
station name). Scan function (SCAN) When the scan function is active, all availa-
ble stations on the current frequency band
are played in sequence for approximately 5
seconds each.
Starting and stopping the scan function
Starting the scan
functionFrom the main radio screen, briefly
press the setup button
››› Fig. 1 4.
OR: Press the Setup function button
and then select SCAN.
Stopping the
scan function
Press the function button to
stop the scan function at the station
that is currently playing.
OR: Briefly press the setup button.
Manually selecting a station with
the preset buttons or changing the
screen also stops the scan function. Automatic storing of stations
Press and hold the RADIO button for approxi-
mately 10 seconds to carry out the autostore
function to store the radio stations with the
best reception at the present moment. The
stations will be stored on the memory but-
tons.
»1)
Depends on the market and unit in question.
19
Page 22 of 84

Audio and Media Mode
Note
This function can take several minutes, dur-
ing which time the radio will remain muted. In
addition, any stored stations assigned previ-
ously will be deleted. Station list (only in FM mode)
Fig. 16
Standard representation: FM station
list menu Stations that are available at a certain time
are displayed on the station list screen (
STA-
TIONS function button). This list may be ar-
ranged by station group or alphabetically. Traffic news station TP (Traffic
Program)
Fig. 17
RADIO main menu with TP display. Fig. 18
Radio mode: List of stations with TP
display. Traffic news monitoring with the TP function
is only possible when a traffic news station is
available. Stations with a traffic news func-
tion are accompanied on the
RADIO
main
menu b
y a TP indicator ››› Fig. 17 and
››
› Fig. 18. Some st ations that do not broadcast their
own traffic news support the TP function by
broadcasting traffic reports by other stations
(EON).
Switching the TP function on and off
● Using the Setup (FM, AM, DAB) menu, acti-
vat
e or deactivate the Traffic station (TP) by pressing it
››› page 21 .
If the s
tation being listened to does not have
the TP f
unction, a crossed out TP will be dis-
played on the left-hand side, halfway down
the screen.
Active TP function and station selection
While traffic news monitoring is activated,
the letters TP will be displayed on the left-
hand side, halfway down the screen while in
Audio mode ››› Fig. 17. Traffic announce-
ments br
oadcast by the current station or a
linked traffic news station will interrupt the
current audio mode.
In
FM mode, the selected station must sup-
port the TP function.
If a station is selected without the TP func-
tion, the radio tries to find stations with this
function in the background.
In AM mode or
media mode, the unit will al-
ways automatically tune to a traffic news sta-
tion in the background, provided a TP station
20
Page 23 of 84

Audio and Media Mode
is available. This procedure may take some
time, depending on the situation.
Incoming traffic announcement In active Audio mode, an incoming traffic an-
nouncement will play automatically.
During the traffic announcement, a pop-up
window is displayed and the radio changes,
depending on the case, to the traffic news
station (EON).
The media mode is paused and the volume is
adjusted to the preset level
›››
page 72.
The volume of the traffic announcement can
be modified with the volume control . The
adjusted volume setting will be applied to
subsequent announcements.
● Press the Cancel function button to end the
current traffic announcement. The TP function
remains switched on.
● OR: Press the D
e activate function button to
end the traffic announcement and disconnect
the TP function permanently.
Setup (FM, AM, DAB) FM setup
Select the
FM frequency band by pressing
the RADIO Infotainment button. OR: Press function button
››› Fig. 17 1 and
select the FM frequency band.
Pr e
ss the SETUP function button to open the
FM Setup menu.
Function button: effect
Sound: Sound setup ››› page 72.
Scan: Scan function (SCAN function). When the scan
function is active, all available stations on the current
frequency band are played in sequence for approximate-
ly 5 seconds each ››› page 19.
Traffic news station (TP): The TP function (traffic news sta-
tion monitoring) is active ››› page 20.
Delete presets: To delete all or some of the stored sta-
tions.
Delete all entries: All stored stations will be deleted.
To delete the stations one by one, press the preset
button for the desired station.
Station logos: To manually assign or delete the logos of
the stored stations on the preset buttons ››› page 18.
Radio text: Radio Text is active
››› page 15, Radio Text
(RDS).
Advanced setup: Setup of the RDS (radio data system).
Auto-save station logosa)
: Logos can be automatical-
ly assigned to the stations stored on the preset but-
tons if they are available in the Infotainment sys-
tem. Also see ››› page 18.
Function button: effect
Alternative frequency (AF): The automatic station
tracking by RDS is active. When the checkbox is
deactivated, automatic station tracking will be dis-
connected. The regional RDS
function button will be
inactive (grey colour).
Radio data system (RDS)a)
: The Radio Data System
(RDS) is deactivated ››› page 15. If the checkbox
is deactivated, the traffic news station functions
(TP), Radio Text, station name and programme type
will not be available.
Regional RDS: Setting automatic station tracking by
RDS ››› page 15.
Fixed: The unit only switches to alternative fre-
quencies for the selected station if the same
regional service is being broadcast.
Automatic: the unit always switches to the sta-
tion's frequency that currently offers the best
reception. As a result, regional programmes
may be interrupted.
a) This depends on the country and unit in question.
AM Setup
Select the AM
frequency band by pressing
the RADIO Infotainment button.
OR: Press function button
›
›
› Fig. 17 1 and
select the AM frequency band.
Pr e
ss the SETUP function button to open the
AM Setup menu.
»
21
Page 24 of 84
. When the scan
function is active, all available stations on the current
frequenc")
Audio and Media ModeFunction button: effect
Sound: Sound setup
››› page 72.
Scan: Scan function (SCAN function). When the scan
function is active, all available stations on the current
frequency band are played in sequence for approximate-
ly 5 seconds each ››› page 19.
Traffic news station (TP): The TP function (traffic news sta-
tion monitoring) is active ››› page 20.
Delete presets: To delete all or some of the stored sta-
tions.
Delete all entries: All stored stations will be deleted.
To delete the stations one by one, press the preset
button for the desired station.
Station logos: To assign the logos to the stations stored
on the preset buttons ››› page 18. DAB Setup
Select the
DAB frequency range by pressing
the RADIO Infotainment button.
OR: Press function button
›
›
› Fig. 17 1 and
select the DAB frequency range.
Pr e
ss the SETUP function button to open the
DAB Setup menu.
Function button: effect
Sound: Sound setup ››› page 72.
Function button: effect
Scan: Scan function (SCAN function). When the scan
function is active, all available stations on the current
frequency band are played in sequence for approximate-
ly 5 seconds each ››› page 19.
Traffic news station (TP): The TP function (traffic news sta-
tion monitoring) is active ››› page 20.
Delete presets: To delete all or some of the stored sta-
tions.
Delete all entries: All stored stations will be deleted.
To delete the stations one by one, press the preset
button for the desired station.
Station logos: To assign the logos to the stations stored
on the preset buttons ››› page 18.
Radio text: Radio Text (RDS) is active
››› page 15, Radio
Text (RDS) .
Advanced setup: DAB services setup.
Auto-save station logos: The station logos are auto-
matically assigned when the radio stations are stor-
ed to the preset buttons ››› page 18.
DAB traffic announcements: DAB traffic announce-
ments are played in the same way as TP traffic an-
nouncements in all operating modes.
Other DAB alerts: DAB announcements (news,
sport, weather, warnings etc.) will interrupt the cur-
rent DAB radio mode.
DAB-DAB station tracking: automatic station tracking
within the DAB frequency range is activated.
Automatic switch DAB-FM: switching to FM frequency
band is allowed for automatic station tracking.
Function button: effect
L Band: L-band is activated (low-range station fre-
quencies for local reception). 22