Page 65 of 84
Telephone management system (PHONE)
Press the Contacts function button in the
PHONE main menu.Possible functions
Select a con-
tact from the
list
Search the list and press the desired
contact to establish the connection.
OR: If the contact has several tele-
phone numbers, first press the con-
tact and then the number to be used
to establish a connection.
Searching for a
contact in the
search window
Press the Search function button
››› Fig. 52 1 to open the search win-
dow.
Enter the name to be searched for in
the window ››› Fig. 53. As the charac-
ters are entered, a contact is dis-
played in the input field.
The number of matching results is
displayed to the right of the input
field. Press the function button to
change to the list.
Search the list and press the desired
contact to establish the connection.
Opening the
detailed view
of a contact
Press the ››› Fig. 52 function but-
ton located next to the entry in the
contact list.
All the telephone numbers are dis-
played in the detailed view, and
where applicable, the address recor-
ded for the contact in question.
Possible functions
Read contact
namePress the )) function button on the
detailed list for the voice control sys-
tem to say the contact name.
Dialling a con-
tact
Press the desired telephone number
on the detailed list to establish the
connection.
Press the (pencil) icon to edit the
number before calling.
Send an SMS
to a contactPress the function button in the
detailed list.
Starting route
guidance to
the address of
a contactIf the address details of a contact
have been stored, route guidance can
be started for the address of the con-
tact. Press the address data on the
detailed view to start route guidance. Note
If you edit the number before calling, this will
only be used for the call and will not be stor-
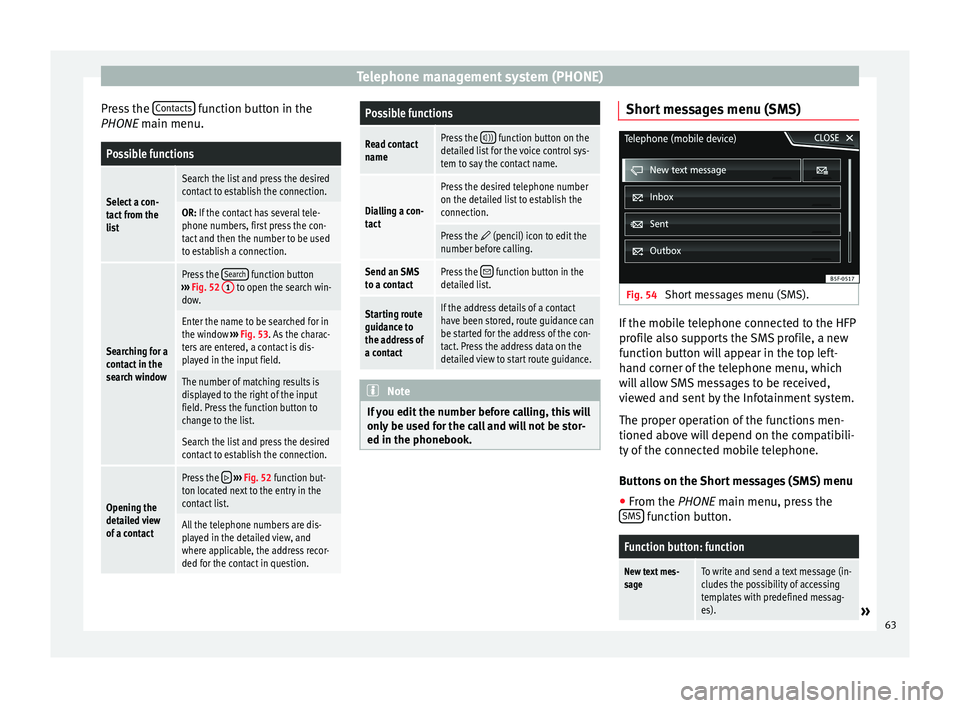
ed in the phonebook. Short messages menu (SMS)
Fig. 54
Short messages menu (SMS). If the mobile telephone connected to the HFP
profile also supports the SMS profile, a new
function button will appear in the top left-
hand corner of the telephone menu, which
will allow SMS messages to be received,
viewed and sent by the Infotainment system.
The proper operation of the functions men-
tioned above will depend on the compatibili-
ty of the connected mobile telephone.
Buttons on the Short messages (SMS) menu
● From the PHONE
main menu, press the
S
MS function button.
Function button: function
New text mes-
sageTo write and send a text message (in-
cludes the possibility of accessing
templates with predefined messag-
es).
»
63
Page 66 of 84
Telephone management system (PHONE)Function button: function
InboxTo open the received text messages
folder.
OutboxTo open the outbox folder. This is
where any unsent text messages are
stored.
SentTo open the sent text messages fold-
er.
DraftsTo select a stored unsent message.
Send contact
detailsTo send the details of a contact from
the contact list.
Possible function buttons for the submenus
Function button: function
ReadIn order for the voice control system
to play the text message.
OptionsOpen the Options menu.
Reply with tem-
plateTo select a text template from a list.
Delete current
text messageDeletes the text message from the
Inbox .
Display tele-
phone numberDisplays the sender's telephone
number.
ForwardTo forward a text message.
ReplyingTo reply to an incoming text mes-
sage.
Function button: function
Enter number
To enter a telephone number or to
select a recipient from the contact
list.
Press the Recipients function button
to select multiple recipients.
RecipientsTo select multiple recipients from
the contact list.
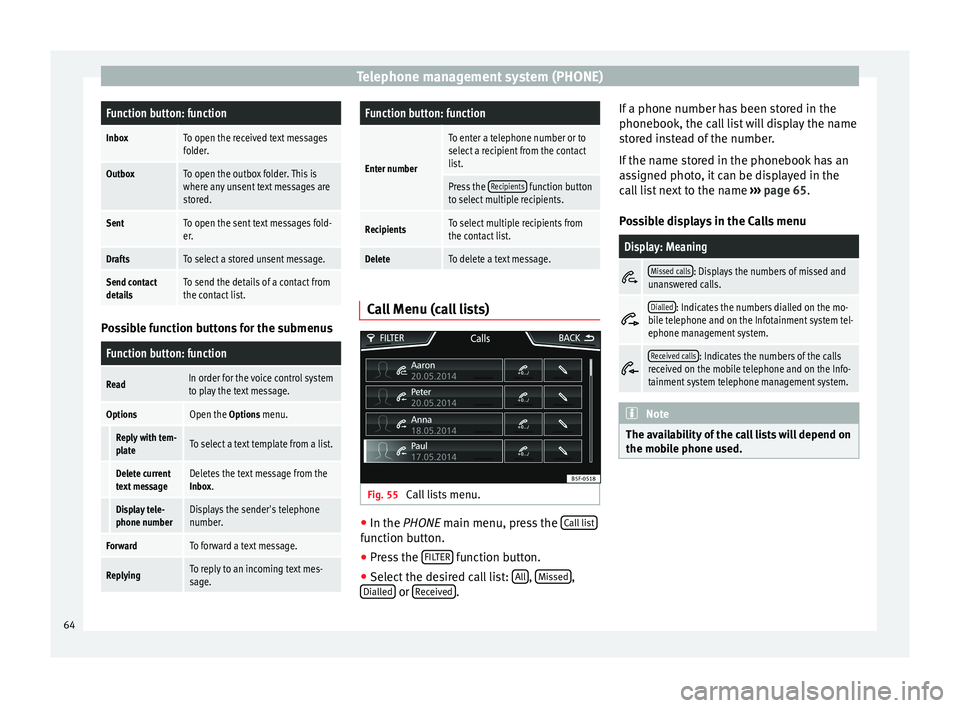
DeleteTo delete a text message. Call Menu (call lists)
Fig. 55
Call lists menu. ●
In the PHONE
main menu, press the C
all list function button.
● Press the FILTER function button.
● Select the desired call list: All ,
Missed ,
Dialled or
Received .If a phone number has been stored in the
phonebook, the call list will display the name
stored instead of the number.
If the name stored in the phonebook has an
assigned photo, it can be displayed in the
call list next to the name
››› page 65.
Possible displays in the Calls menu
Display: Meaning
Missed calls: Displays the numbers of missed and
unanswered calls.
Dialled: Indicates the numbers dialled on the mo-
bile telephone and on the Infotainment system tel-
ephone management system.
Received calls: Indicates the numbers of the calls
received on the mobile telephone and on the Info-
tainment system telephone management system. Note
The availability of the call lists will depend on
the mobile phone used. 64
Page 67 of 84
Telephone management system (PHONE)
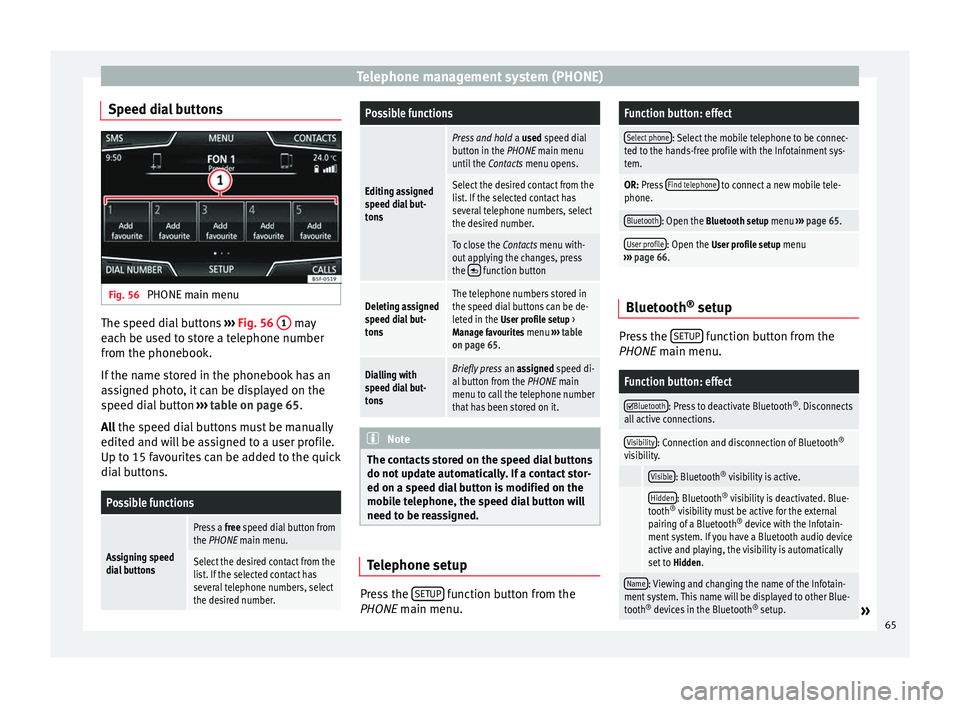
Speed dial buttons Fig. 56
PHONE main menu The speed dial buttons
››› Fig. 56 1 may
each be used to store a telephone number
from the phonebook.
If the name stored in the phonebook has an
assigned photo, it can be displayed on the
speed dial button ››› table on page 65.
All the speed dial buttons must be manually
edit ed and w
ill be assigned to a user profile.
Up to 15 favourites can be added to the quick
dial buttons.
Possible functions
Assigning speed
dial buttons
Press a free speed dial button from
the PHONE main menu.
Select the desired contact from the
list. If the selected contact has
several telephone numbers, select
the desired number.
Possible functions
Editing assigned
speed dial but-
tons
Press and hold a used speed dial
button in the PHONE main menu
until the Contacts menu opens.
Select the desired contact from the
list. If the selected contact has
several telephone numbers, select
the desired number.
To close the Contacts menu with-
out applying the changes, press
the
function button
Deleting assigned
speed dial but-
tonsThe telephone numbers stored in
the speed dial buttons can be de-
leted in the User profile setup >
Manage favourites menu ››› table
on page 65.
Dialling with
speed dial but-
tonsBriefly press an assigned speed di-
al button from the PHONE main
menu to call the telephone number
that has been stored on it. Note
The contacts stored on the speed dial buttons
do not update automatically. If a contact stor-
ed on a speed dial button is modified on the
mobile telephone, the speed dial button will
need to be reassigned. Telephone setup
Press the
SETUP function button from the
PHONE main menu.
Function button: effect
Select phone: Select the mobile telephone to be connec-
ted to the hands-free profile with the Infotainment sys-
tem.
OR: Press Find telephone to connect a new mobile tele-
phone.
Bluetooth: Open the Bluetooth setup menu ››› page 65.
User profile: Open the User profile setup menu
››› page 66. Bluetooth
®
setup Press the
SETUP function button from the
PHONE main menu.
Function button: effect
Bluetooth: Press to deactivate Bluetooth
®
. Disconnects
all active connections.
Visibility: Connection and disconnection of Bluetooth ®
visibility.
Visible: Bluetooth ®
visibility is active.
Hidden: Bluetooth ®
visibility is deactivated. Blue-
tooth ®
visibility must be active for the external
pairing of a Bluetooth ®
device with the Infotain-
ment system. If you have a Bluetooth audio device
active and playing, the visibility is automatically
set to Hidden.
Name: Viewing and changing the name of the Infotain-
ment system. This name will be displayed to other Blue-
tooth ®
devices in the Bluetooth ®
setup.
» 65
Page 68 of 84
Telephone management system (PHONE)Function button: effect
Paired devices: Displays paired devices. To disconnect
and connect Bluetooth ®
devices and Bluetooth ®
pro-
files.
Find devices: Search for visible Bluetooth ®
devices within
the range of the Infotainment system. The maximum
range is approx. 10 metres.
Bluetooth audio (A2DP/AVRCP): This function must be ac-
tive if it is necessary to connect an external audio source
via Bluetooth ®
to the Infotainment system. ››› page 33. User profile setup
In the
PHONE
main menu, press the S
ETUPfunction button and then the
User profile func-
tion button.
Function button: effect
Manage favourites: Editing speed dial buttons.
Speed dial button in use : Press to delete the stored
number.
Speed dial button free : Press to assign a number
from the phonebook to the speed dial button in
question.
Mailbox number: To enter or modify the mailbox number.
Code: To enter a prefix to be placed before the num-
ber entered ››› page 61.
Sort by: To set the order of appearance of the entries in
the phonebook ( Forename and surname or vice-versa).
Function button: effect
Import contacts: Press to import the phonebook of the
connected telephone, or to update the imported phone-
book.
Delete other user profiles: To delete all the inactive user pro-
files or only one of them.
Reminder: don't forget your mobile phone: If there is already
an active Bluetooth ®
connection with another mobile
telephone when turning off the ignition, the following
message appears: “Don't forget your mobile telephone ”.
Select ring tonea)
: To select a ring tone from a list of prede-
fined melodies (tones). The selected ring tone is played
and set up when exiting the submenu.
Show pictures for contactsb)
: If phonebook contacts have
been stored with a photograph, it can be displayed on
the speed dial buttons, on the call lists and in the pho-
nebook.
a) Depending on the mobile telephone used, the selected ring
tone, or the one set up on the mobile telephone, is played. This
function will not be displayed if not supported by the mobile tel-
ephone.
b) Depending on the mobile phone. Note
Some telephones need to be restarted to re-
download the most recent contacts added. Communication protocol between the
Infotainment system and mobile
devices specifically for Applications
(Apps) that control or read
information from the system.
Description
The system has a communication protocol to
establish connections between this and oth-
er mobile devices (smartphones/tablets).
This communication can allow data (media,
navigation, radio, audio and vehicle data) to
be read and/or written. In order to establish
this communication, the Application must be
certified by VW consortium brands as they re-
quire authentication by the Application to be
able to establish communication (this means
that not all the Apps will have access to es-
tablishing communication with the System).
Activation
From the
SETUP menu,
Mobile device data transfer , there is a checkbox
to activate/deactivate the function, and a
dropdown menu called Use apps to operate which controls the level of interaction be-
tween the Apps and the System
›››
table on
page 70 : Deactivate, Confirm, and Allow.
Int er
faces
This communication protocol supports the
connection via WLAN interfaces and USB.
66
Page 69 of 84
Telephone management system (PHONE)
Note
SEAT applications are designed to communi-
cate with the vehicle and interact with it via
the MirrorLink ®
connection, therefore its
functionality is linked to the mobile device
being connected via USB-MirrorLink ®
. Other
Apps certified by the consortium or third par-
ties may have access to this communication
w ith the
System via WLAN without Mirror-
Link ®
. MirrorLink™
Introduction MirrorLink™ is a protocol which enables the
communication between a portable device
and the Infotainment system via USB.
Using it makes it possible to display and
manage the content and functions displayed
on the portable device on the Infotainment
system screen.
To avoid distracting the driver while driving,
only specially adapted applications can be
used
››› .
WARNING
If a mobile terminal is not secured or is incor-
rectly secured in the vehicle, it could move
around the passenger compartment in the event of a sudden driving manoeuvre, emer-
gency stop or accident, resulting in injury.
●
While driving, mobile terminals must be se-
curely fastened in position, outside the air-
bag deployment zones, or safely stowed
away. WARNING
Any applications that are not suitable or exe-
cute incorrectly may cause damage to the ve-
hicle, accidents and serious injuries.
● SEAT recommends the use of the Apps that
SEAT provides for this vehicle.
● For the full use of SEAT Apps, it is necessa-
ry to activate the “Mobile device data trans-
fer” option in Setup ››› page 70.
● Protect the mobile terminal with its appli-
cations from improper use.
● Never make modifications to the applica-
tions.
● Consult the instruction manual for the mo-
bile terminal. WARNING
The use of applications while driving can dis-
tract your attention from the traffic. Distract-
ing the driver in any way can lead to an acci-
dent and cause injuries.
● Always drive carefully and responsibly. CAUTION
● In areas where special regulations apply or
the use of mobile terminals is forbidden, the
mobile terminal must be switched off at all
times. The radiation produced by the mobile
terminal when switched on may interfere with
sensitive technical and medical equipment,
possibly resulting in malfunction or damage
to the equipment.
● SEAT cannot be held liable for any damage
caused to the vehicle as a result of the use of
applications that are of poor quality or are
defective, the inadequate programming of
the applications, the insufficient coverage of
the network, the loss of data during trans-
mission or the improper use of mobile termi-
nals. Note
● The use of MirrorLink™ technology may re-
sult in high consumption of your 3G/4G data
plan.
● SEAT recommends the using the device
with a high battery charge when connected to
MirrorLink™. Requirements
In order to use MirrorLink™, the following re-
quirements must be met:
● The mobile device must be compatible with
MirrorLink™. »
67
Page 70 of 84
Telephone management system (PHONE)
● The mobile device must be connected to
the Infotainment system via USB.
● Depending on the mobile device used, a
suitable application must be installed for the
use of MirrorLink™ on the device. Note
You can find further information on the tech-
nical requirements, compatible devices, suit-
able applications and availability at
www.seat.es or at SEAT dealers. MirrorLink™ main menu
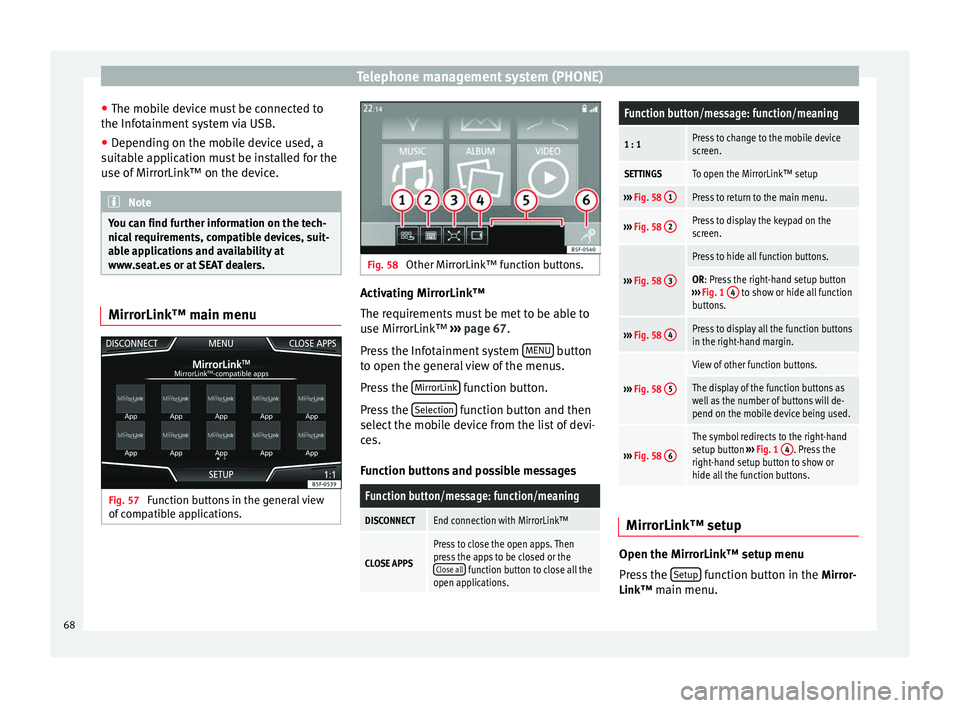
Fig. 57
Function buttons in the general view
of compatible applications. Fig. 58
Other MirrorLink™ function buttons. Activating MirrorLink™
The requirements must be met to be able to
use MirrorLink™
››› page 67 .
Pr e
ss the Infotainment system MENU button
to open the general view of the menus.
Press the MirrorLink function button.
Press the Selection function button and then
select the mobile device from the list of devi-
ces.
Function buttons and possible messages
Function button/message: function/meaning
DISCONNECTEnd connection with MirrorLink™
CLOSE APPS
Press to close the open apps. Then
press the apps to be closed or the Close all
function button to close all the
open applications.
Function button/message: function/meaning
1 : 1Press to change to the mobile device
screen.
SETTINGSTo open the MirrorLink™ setup
››› Fig. 58 1Press to return to the main menu.
›››
Fig. 58 2Press to display the keypad on the
screen.
›››
Fig. 58 3
Press to hide all function buttons.
OR: Press the right-hand setup button
››› Fig. 1 4 to show or hide all function
buttons.
››› Fig. 58 4Press to display all the function buttons
in the right-hand margin.
›››
Fig. 58 5
View of other function buttons.
The display of the function buttons as
well as the number of buttons will de-
pend on the mobile device being used.
›››
Fig. 58 6
The symbol redirects to the right-hand
setup button
››› Fig. 1 4. Press the
right-hand setup button to show or
hide all the function buttons. MirrorLink™ setup
Open the MirrorLink™ setup menu
Press the
Setup function button in the
Mirror-
Link™ main menu.
68
Page 71 of 84
Telephone management system (PHONE)Function button: effect
Select device: Press to connect a mobile device to the In-
fotainment system.
Activate keyboard entry fielda)
: When entering data using
the keypad, the Infotainment system virtual keypad is
displayed rather than the keypad of the mobile device.
a) This function depends on the device being used. 69
Page 72 of 84
Settings
Settings
Menu and system setup Main menu System setup The selection of possible setups will depend
on the country, the unit in question and the
vehicle equipment.
● Press the Infotainment system MENU but-
ton and then press the SETUP function but-
ton.
● To adjust the settings for a certain function,
press the appropriate function button.
Changes are automatically stored when a
menu is closed.Function button: effect
Screen: To perform screen setup.
Switch off screen (in 10 seconds): If this function is ac-
tive and the Infotainment system is not in use, the
screen will switch off after approximately 10 sec-
onds. Pressing the screen or pressing one of the Info-
tainment system buttons will switch the screen back
on.
Brightness: To select the brightness level of the
screen.
Day/Night: To select the display type ( Day, Night or
Automatic).
Confirmation Tone: Confirmation tone for pressing a
function button is activated.
Function button: effect
Proximity sensors: The proximity sensors are activa-
ted. Also see ››› page 10, Proximity sensors .
Show clock in standby mode: In standby mode, the cur-
rent time is shown on the Infotainment system dis-
play.
Date and time: To alter the time and date.
Clock time source: To select the time source (GPS or
manual).
GPS: The date and time can be selected using the
Time zone function button. In this case, the Dateand Time function buttons for manually entering
the data will not be active.
Manually: The date and time can be manually ad-
justed using the Date and Time function buttons.
In this case, the Time zone function button will not
be active.
Time: To manually alter the time.
Automatic summer time (DST) adjustment: The time is set
automatically.
Time zone: To change to the desired time zone.
Time format: To select the time display format (12- or
24-hour clock).
Date: To adjust the current time.
Date format: To select the display format for the date
(DD.MM.YYYY, YY-MM-DD or MM-DD-YY).
Idioma/Language: To select the desired language for the
texts and announcements in the voice control system.
Keyboard: To select the keypad (ABC or QWERTY).
Function button: effect
Additional keypad languages: To select the additional key-
pad languages.
Units: To set the measurement units for the vehicle dis-
plays.
Distance , vehicle speed , temperature, volume, consump-
tion and pressure.
Mobile device data transfer
Activate data transfer for apps : To allow the mobile tele-
phone paired via WLAN or USB to transfer applica-
tions to the system.
Use apps to operate: Allows the execution of all the
available functions from the App.
Deactivate: Limits specific functions that require a
higher level of security. Confirm
: Allows 100% functionality of the App but
with certain actions relating to the Infotainment
system requiring confirmation. Allow
: Allows the execution of all the available
functions from the App.
Voice control: To perform the voice control setup
››› page 11.
Remove safely: To eject the data storage device (SD card
1/SD card 2/USB) from the system. After correctly eject-
ing the data storage device from the system, the func-
tion button becomes inactive (grey colour).
Factory settings: When restoring factory settings, all en-
tries and changes made are deleted, depending on the
selected setup.
Bluetooth: To perform Bluetooth ®
setup ››› page 65. 70