Page 25 of 84
. T")
Audio and Media Mode
Media mode Introduction “Media sources
” are audio sources contain-
in
g audio files on various different data stor-
age devices (e.g. CD, memory card, external
MP3 player). These audio files can be played
by the Infotainment system via their corre-
sponding drives or audio input sockets (inter-
nal CD drive, memory card slot, AUX-IN multi-
media socket etc.). Copyright
Audio and video files on data storage devices
are usually protected by intellectual property
rights, as per the corresponding national and
international laws. Be aware of the current le-
gal provisions!
Additional information and warnings:
● Safety notes relating to the Infotainment
sy s
tem ››› page 3.
● Overview of the controls ››› page 5. ●
General operating instructions ››› page 6. Note
● MPEG-4 HE-AAC audio coding technology
and patents are licensed from Fraunhofer IIS.
● This product is subject to certain intellectu-
al property rights and copyrights owned by
the Microsoft Corporation. The use or distri-
bution of this type of technology outside this
product requires a licence from Microsoft or
an authorised Microsoft company. Requirements for data storage devices and files
Factory-fitted CD and DVD drives conform to
safety class 1 according to DIN IEC 76 (CO)
6/ VDE 0837.
The Infotainment system only accepts stand-
ard 12 cm CDs/DVDs and memory cards with
these dimensions: 32 mm x 24 mm x 2.1 mm
or 1.4 mm.
The supported file formats listed are collec-
tively referred to below as “audio files”. A CD
containing audio files of these types is refer-
red to as an “audio data CD”.
»
23
Page 26 of 84
. Standard video DVD and audio DVD compatible with DVD. CD-RO")
Audio and Media ModeData storage deviceRequirements for playing in the unit
Audio filesVideo files
Audio CDs (up to 80 minutes). Standard video DVD and audio DVD compatible with DVD. CD-ROM, CD-R, CD-RW with audio data up to a maximum of
700 MB (megabyte) using ISO 9660 Level 1 and 2, Joliet or UDF
1.02, 1.5, 2.01 file system
DVD+/-R/RW up to a maximum of 4.7 GB and DVD double layer
up to a maximum of 8.5 GB using Joliet (single-session only) file
system; UDF.
SD and MMC memory cards using FAT12, FAT16, FAT32 or VFAT
file systems up to a maximum of 2 GB (gigabyte) and SDHC mem-
ory cards up to a maximum of 32 GB and SDXC memory cards up to
a maximum of 2 TB (terabyte) using exFAT and NTFS file systems.
– Digital audio specification .
– Format: MP3 files (.mp3) with bit rates of between
32 and 320 kbit/s or with variable transfer rates.
– Format: WMA files(.wma) up to 10.0 mono/stereo
without copy protection.
– Format: AAC files (.m4a, .m4b, .mp4 and .aac).
– Format: OGG-Vorbis.– Transfer rates of up to 2000 kbit/s.
– Maximum resolution 720 x 576 pixel.
– Format: MPEG-1 and MPEG-2 (.mpg, .mpeg).
– Format: ISO MPEG-4; DivX 3, 4 and 5 Xvid (.avi).
– Format: ISO MPEG4 H.264 (.mp4, .m4v, .mov).
– Format: Windows Media Video 10 (.wmv, .asf).
– Playlists in M3U, PLS, ASX and WPL formats.
– Playlists must not exceed 20 kB or more than 1000 entries.
– File names and paths must not exceed 256 characters.
– For DVD, a maximum of 1000 files per media and file.
– For memory cards, a maximum of 4000 files and a maximum of 1000 files per directory.
– For Jukebox (SSD) a maximum of 3000 files.
Playing audio files via Bluetooth
®a)
.– The external media player must be compatible with the A2DP Bluetooth ®
profile ››› page 33.
USB – External data storage device connected to the USB port ››› page 31.
a)
Bluetooth ®
is a registered trademark of Bluetooth ®
SIG, Inc.
Operating requirements for external data
storage devices connected to the USB port
››› page 31
.
Restrictions and notes
Contamination, exposure to high tempera-
tures and mechanical damage may render a
data medium unusable. Please observe the
manufacturer's instructions.
Variations in the quality of data media pro-
duced by different manufacturers can lead to
problems during playback. Please observe copyright laws.
The unit may be unable to read individual
tracks or the entire data medium due to the
data medium configuration or the devices
and programs used for recording. Informa-
tion can be found on the Internet on the best
ways to create audio files and data media
(compression rate, ID3 tag etc.).
The reading time may vary considerably de-
pending on the condition of the data medium
(copying and deleting actions), folder struc-
ture and file type.Playlists only determine a certain playing or-
der.
There are no files stored in a playlist. The
unit will not play a playlist if the files are not
stored on the data medium at the locations
referred to by the playlist (relative file paths). Note
● Do not use memory card adapters.
● SEAT assumes no liability for any deteriora-
tion or loss of files on data storage devices. 24
Page 27 of 84

Audio and Media Mode
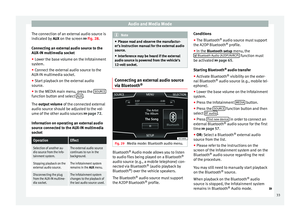
Playing order of files and folders Fig. 19
Possible structure on an audio data
CD The audio files
stored on data storage de-
vices are often organised by means of folders
and playlists to determine a certain
playing order.
Tracks, folders and playlists on a data stor-
age device are sorted by name in alphanu-
meric order. The image shows a standard CD with audio
data which contains tracks
, folders
and
s ubf
olders ››› Fig. 19.
In this
case, the tracks are played in this
manner 1)
:
Tracks 1 and
2 in the CD's root direc-
tory
Tracks 3 and
4 in the
first folder F1 in
the CD's r
oot directory
Track 5 in the
first
subfolder
F1.1 of the
folder F1
Track 6 in the
first
subfolder
F1.1.1 of
the subfolder F1.1
Track 7 in the
second
subfolder F1.2 of
the f
older F1
Tracks 8 and
9 in the
second folder F2 Note
● The play order can be modified by selecting
different playback modes ››› page 26.
● Playlists are not played automatically, in-
stead they have to be specifically selected via
the track selection menu ››› page 28. 1.
2.
3.
4.
5.
6.
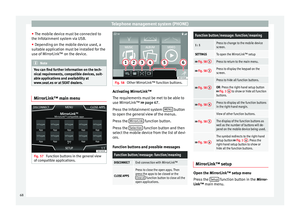
MEDIA main menu Fig. 20
MEDIA main menu. Using the
MEDIA
main menu, different media
sour
ces can be selected and played.
● Press the MEDIA button on the Infotain-
ment system to open the MEDIA main menu
› ›
› Fig. 20.
It w
ill continue playing the last media source
selected from the same point.
The media source being played is indicated
on the dropdown list when pressing the SOURCE function button
››› Fig. 20 .
If ther
e is no available media source, the ME-
DIA
main menu is displayed. »1)
In the Media Setup menu, the
Mix/Repeat including subfolders function must be acti-
vated ››› page 36.
25
Page 28 of 84

Audio and Media Mode
MEDIA main menu function buttonsFunction button: effect
SOURCE
Indicates the media source being played.
Press to select another media source
››› page 27.
JUKEBOX: Internal hard drive (SSD)
››› page 34.
CD/DVD: Internal CD and DVD drive
››› page 30.
SD CARD 1, SD CARD 2: SD memory card
››› page 30.
USB: External data storage device connec-
ted to the USB port ››› page 31.
AUX: External audio source connected to
AUX IN multimedia socket ››› page 32.
BT AUDIO: Bluetooth ®
audio ››› page 33.
WLAN: External audio source connected by
WLAN ››› page 36
SELEC-
TIONOpens the track list ››› page 28.
/ Changes track in Media mode or fast for-
ward/rewind
››› page 27.
Playback stops. The function button
changes to .
Playback is resumed. The function but-
ton changes to .
Function button: effect
Playing similar tracks.
Creates a virtual playlist that includes
tracks similar to the one being played if
available using Gracenote®.
SETTINGSOpens the
Media Setup menu ››› page 36.
RE-
PEAT
Repeat all tracks.
Repeats all the tracks that are on the same
memory level as the track being played at
that moment. If in the Media Setup menu
Mix/Repeat including subfolders is activated,
it also includes the subfolders
››› page 36.
Repeat the current track.
MIX
Random play.
Includes all tracks that are on the same
memory level as the track being played at
that moment. If in the
Media Setup menu
Mix/Repeat including subfolders is activated,
it also includes the subfolders
››› page 36. Messages and symbols on the MEDIA main
menu
Display: Meaning
A
Displays information about the artist
name, album name and song title (CD text
, ID3 tag on compressed audio files).
Audio CD: displays track information if
available via Gracenote
®a)
. If no data is
available, it only displays Track and the
number corresponding to the position it
occupies on the data storage device.
BDisplays album cover, if available on the
data storage device or via Gracenote ®a)
.
C
The playing time so far and time remaining
in minutes and seconds. In the case of au-
dio files with variable bit rates (VBR) the re-
maining time may vary.
RDS Off b)The RDS radio data service is deactivated.
The RDS can be activated in the
FM setup
menu ››› page 21.
TPb)The TP function is active and can be tuned
in
››› page 20.
b)There is no traffic news station available
››› page 20. 26
Page 29 of 84
DAB not available
››› page 16.
a)
Gracenote ®
is a database available on the Infotainment sys-
tem hard drive that contains information on the track")
Audio and Media ModeDisplay: Meaning
b)DAB not available
››› page 16.
a)
Gracenote ®
is a database available on the Infotainment sys-
tem hard drive that contains information on the tracks about dif-
ferent artists and albums. In order for the user to benefit from
the functions offered by Gracenote ®
, it is necessary for the
tracks to contain the artist and/or album data.
b) Depends on the market and unit in question.
Change the media source Fig. 21
MEDIA mode: change media source. ●
From the MEDIA
main menu, press the
MEDIA Infotainment button repeatedly to cy-
cle through the available media sources.
● OR: From the
MEDIA
main menu, press the
SOURCE function button
›››
Fig. 21 and select
the de s
ired media source. Unavailable (grey colour) media sources are
displayed in the pop-up window.
When a media source that has been previ-
ously used is selected again, playback is re-
sumed from the point at which it was stop-
ped.
Optionally selectable media playback
sources
Function button: Media source
JUKEBOXInternal hard drive (SSD)
››› page 34.
CD/DVDInternal CD/DVD drive ››› page 30.
SD CARD 1SD memory card ››› page 30.SD CARD 2
USBExternal data storage device connected to
the USB port ››› page 31.
AUXExternal audio source connected to AUX IN
››› page 32 multimedia socket.
BT AUDIOBluetooth ®
audio ››› page 33.
WLANExternal audio source connected by WLAN
››› page 36 Note
The Media source can be changed in the Track
lis t
view ››› page 28. Changing track in the MEDIA main
menu
Fig. 22
MEDIA main menu. It is possible to browse through the tracks of
the media source that is currently playing us-
ing the arrow buttons.
It is
not possible to exit a playlist or start the
p l
ayback of a playlist using the arrow but-
tons. Both actions must be performed man-
ually from the track selection menu
››› page 28.
»
27
Page 30 of 84

Audio and Media Mode
Controlling playback via the MEDIA main
menuActioneffect
Briefly press the func-
tion button once.
Goes to the start of the cur-
rent track. If the track has
been played for less than 3
seconds, it skips to the be-
ginning of the previous
track.
Quickly press the func-
tion button twice.If the track has been play-
ing for less than 3 seconds,
it skips to the beginning of
the previous track, and
from the first track it pass-
es to the last track on the
data storage device being
played.
Briefly press the func-
tion button once.Next track. It changes from
the previous track to the
first track of the data stor-
age device being played.
Press and hold the function button.Fast reverse.
Press and hold the function button.Fast forward. Selecting an album by its cover
Fig. 23
Selecting by cover. When pressing the current cover
››› Fig. 22
1 , it displays all the album covers available
in the active media source. ››› Fig. 23 .
It i
s possible to browse through all the al-
bums by sliding the covers left or right, by
using the bottom horizontal slide bar, or by
using the setup button ››› Fig. 1
4 .
The selection by cover view will close after
approximately 5 seconds of inactivity and will
return to the main Media menu. Selecting a track from a track list
Fig. 24
Media mode: database view Fig. 25
Media mode: track list from a media
source. Opening a track list
● From the MEDIA
main menu, press the
S
ELECTION function button
››› Fig. 22 to open
the tr ac
k list. The track that is currently play-
ing is highlighted ››› Fig. 25.
28
Page 31 of 84
 or the name of the fi")
Audio and Media Mode
● Search through the track list and press the
desired track.
If there is information available on the track,
the track name is displayed (on the audio
CDs) or the name of the file (MP3) instead of Track + number .
General overview of the function buttons on
the track listFunction button: effect
AOpen the Source menu. Select another me-
dia source by pressing.
B
Indicates the media source being played.
Press to select another media source.
JUKEBOX: Internal hard drive of the Infotain-
ment system (SSD) ››› page 34.
CD/DVD: Internal CD and DVD drive
››› page 30.
SD CARD 1, SD CARD 2: SD memory card
››› page 30.
USB: External data storage device connec-
ted to the USB port ››› page 31.
BT AUDIO: External media player connected
by Bluetooth ®
››› page 33.
AUX: Audio source connected to the AUX-IN
socket ››› page 32
WLAN: External audio source connected by
WLAN ››› page 36
Function button: effect
CPress the function button to open the top
folder of the media source.
Starts playback from the first track.
Repeat all tracks.
Repeats all the tracks that are on the same
memory level as the track being played at
that moment. If in the
Media Setup menu
Mix/Repeat/Scan including subfolders is activa-
ted, it also includes the subfolders
››› page 36.
Random play.
Includes all tracks that are on the same
memory level as the track being played at
that moment. If in the
Media Setup menu
Mix/Repeat/Scan including subfolders is activa-
ted, it also includes the subfolders
››› page 36.
CLOSE ×To close the track list. Note
The tracks, folders and playlists can also be
selected by turning the setup button, and can
be played or opened by pressing it. Database view
Fig. 26
Media mode: database view From the track list, press the
Display database view option. The content of the
current media source will be classified ac-
cording to Track list ,
Artists ,
Albums ,
Musical genres ,
Tracks and
Videos
››› Fig. 24 .
When sel ectin
g one of the Artists ,
Albums or
Tracks folders, a search button appears in the
top right (magnifying glass) which allows a
search to be carried out in the selected cate-
gory. ››› page 9, Input masks with on-screen
keypad .
T o r
eturn to the folder view, press the
Display folder view option from the
SELECTION Menu.
29
Page 32 of 84

Audio and Media Mode
Insert or eject a CD or DVD Fig. 27
Slots for data storage devices in the
glove compartment. The driver should refrain from operating the
unit while the vehicle is in motion. Insert or
change the data storage device before mov-
ing off!
The CD and DVD drive can play audio CDs
and DVDs and audio data CDs and DVDs.
Insert a CD or DVD
● Hold the CD or DVD with the printed side
facing up.
● Push the CD or DVD into the DVD slot
››› Fig. 27 3 to the point where it is drawn in
automatically.
● When the CD is inserted, playback will start
automatically. Eject a CD or DVD
In order to prevent theft, in convertible mod-
els, the ignition key must be in the ignition
lock to eject a CD or DVD (anti-theft protec-
tion).
●
Press button
1 .
● The CD or DVD in the drive will be ejected
and must be removed within approximately
10 seconds.
If the CD or DVD is not removed within the 10
seconds, it is automatically retracted for se-
curity reasons without activating the CD or
DVD mode.
Unreadable or defective CD or DVD
If the data on an inserted CD or DVD cannot
be read or a faulty CD or DVD is inserted, the
corresponding warning appears on screen.
Depending on the unit, unreadable CDs or
DVDs are ejected 3 times automatically and
inserted again to initiate another three at-
tempts before said message is displayed. Note
● Uneven road surfaces and strong vibrations
can cause playback to jump.
● When the temperature inside the unit is too
high, loading and playback of CDs and DVDs
is disabled. ●
If after inserting a number of different CDs
or DVDs and receiving the CD drive error every
time, contact a qualified workshop. Insert or eject a memory card
Only supported audio files are displayed and
played. Other files are ignored.
Inserting a memory card
Insert the compatible memory card, cut-off
corner first and with the label face up (con-
tacts face down), into one of the two slots
››› Fig. 27 2 , until properly inserted.
If a memory card cannot be inserted, make
sure it is positioned correctly and is compati-
ble with the unit.
Playback starts automatically if supported
audio files are stored on the memory card.
Removing a memory card
The inserted memory cards must be prepared
for removal.
● From the main Media menu, press the
SETUP button to open the Media Setup
menu
or press the Infotainment MENU button and
then press Setup to open the System setup
menu.
● Press the Remove safely function button. A
dropdown menu appears with three options:
30