2014 NISSAN TEANA fuse
[x] Cancel search: fusePage 4126 of 4801
HEATED STEERING WHEEL SYSTEMST-23
< DTC/CIRCUIT DIAGNOSIS >
C
D E
F
H I
J
K L
M A
B
ST
N
O P
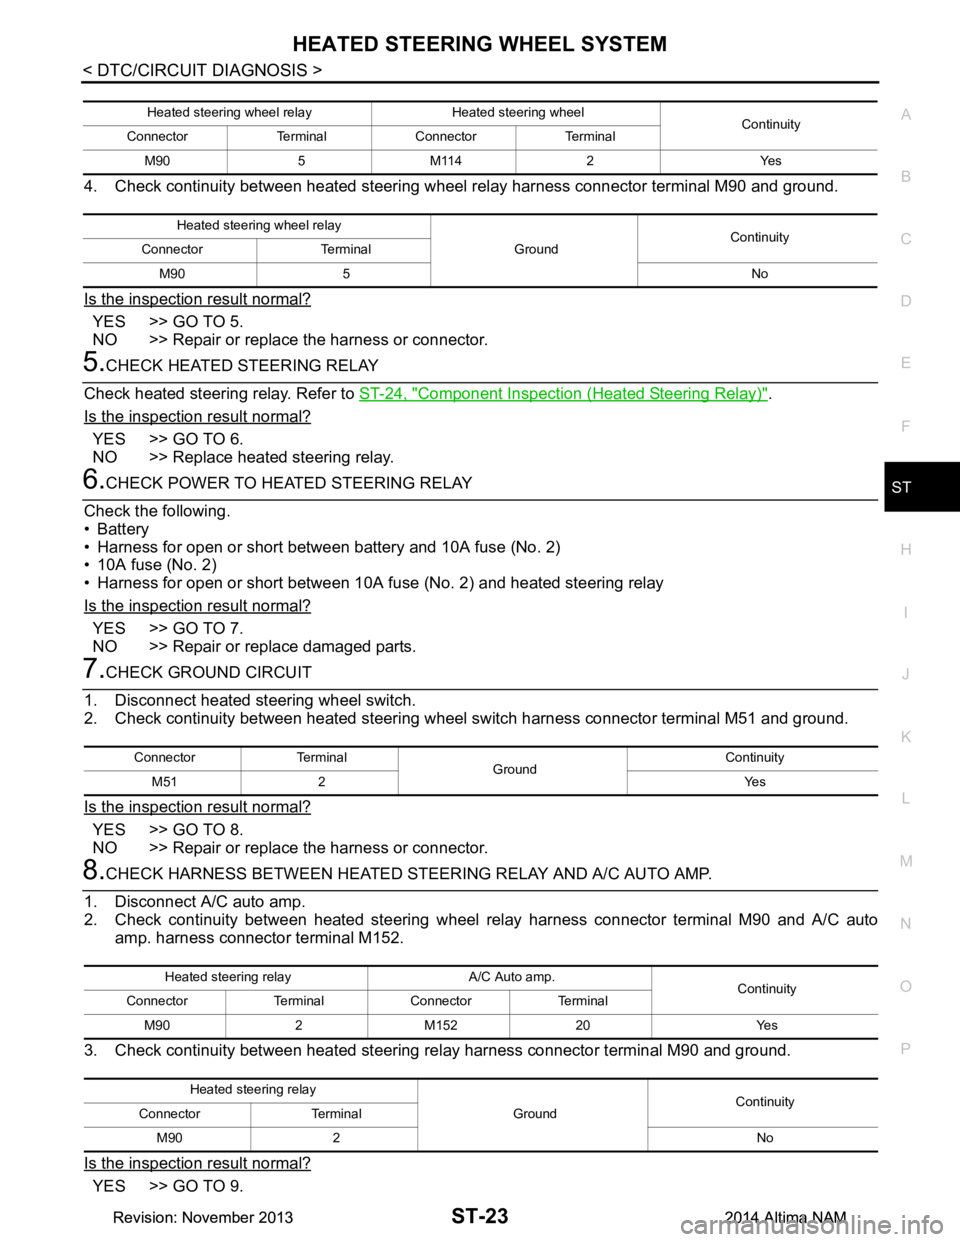
4. Check continuity between heated steering wheel relay harness connector terminal M90 and ground.
Is the inspection result normal?
YES >> GO TO 5.
NO >> Repair or replace the harness or connector.
5.CHECK HEATED STEERING RELAY
Check heated steering relay. Refer to ST-24, "Component Inspection (Heated Steering Relay)"
.
Is the inspection result normal?
YES >> GO TO 6.
NO >> Replace heated steering relay.
6.CHECK POWER TO HEATED STEERING RELAY
Check the following.
•Battery
• Harness for open or short between battery and 10A fuse (No. 2)
• 10A fuse (No. 2)
• Harness for open or short between 10A fuse (No. 2) and heated steering relay
Is the inspection result normal?
YES >> GO TO 7.
NO >> Repair or replace damaged parts.
7.CHECK GROUND CIRCUIT
1. Disconnect heated steering wheel switch.
2. Check continuity between heated steering wheel switch harness connector terminal M51 and ground.
Is the inspection result normal?
YES >> GO TO 8.
NO >> Repair or replace the harness or connector.
8.CHECK HARNESS BETWEEN HEATED STEE RING RELAY AND A/C AUTO AMP.
1. Disconnect A/C auto amp.
2. Check continuity between heated steering wheel relay harness connector terminal M90 and A/C auto
amp. harness connector terminal M152.
3. Check continuity between heated steering re lay harness connector terminal M90 and ground.
Is the inspection result normal?
YES >> GO TO 9.
Heated steering wheel relay Heated steering wheel Continuity
Connector Terminal Connector Terminal
M90 5 M114 2 Yes
Heated steering wheel relay GroundContinuity
Connector Terminal
M90 5 No
Connector Terminal GroundContinuity
M51 2 Yes
Heated steering relay A/C Auto amp. Continuity
Connector Terminal Connector Terminal
M90 2 M152 20 Yes
Heated steering relay GroundContinuity
Connector Terminal
M90 2 No
Revision: November 20132014 Altima NAMRevision: November 20132014 Altima NAM
Page 4130 of 4801
HEATED STEERING WHEEL SWITCH INDICATOR LAMPST-27
< DTC/CIRCUIT DIAGNOSIS >
C
D E
F
H I
J
K L
M A
B
ST
N
O P
4.CHECK HEATED STEERING RELAY
Check heated steering relay. Refer to ST-24, "Component Inspection (Heated Steering Relay)"
.
Is the inspection result normal?
YES >> GO TO 5.
NO >> Replace heated steering relay.
5.CHECK BATTERY POWER
Check the following:
•Battery
• Harness for open or short between battery and 10A fuse (No. 2)
• 10A fuse (No. 2)
• Harness for open or short between 10A fuse (No. 2) and heated steering wheel relay
Is the inspection result normal?
YES >> GO TO 6.
NO >> Repair harness or connector.
6.CHECK HARNESS BETWEEN A/C AUTO AMP. AND HEATED STEERING WHEEL SWITCH
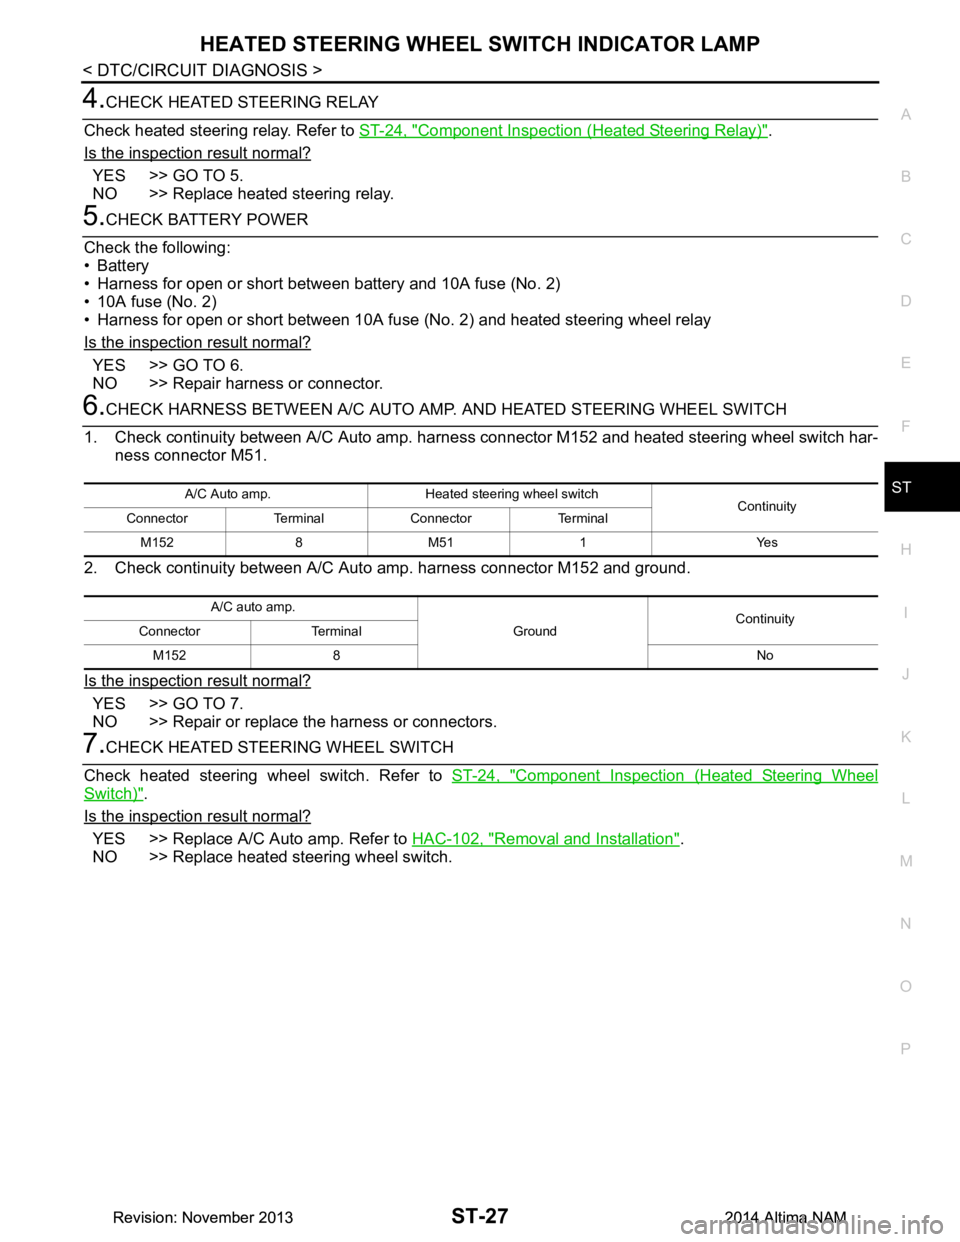
1. Check continuity between A/C Auto amp. harne ss connector M152 and heated steering wheel switch har-
ness connector M51.
2. Check continuity between A/C Auto amp. harness connector M152 and ground.
Is the inspection result normal?
YES >> GO TO 7.
NO >> Repair or replace the harness or connectors.
7.CHECK HEATED STEERING WHEEL SWITCH
Check heated steering wheel switch. Refer to ST-24, "Component Inspection (Heated Steering Wheel
Switch)".
Is the inspection result normal?
YES >> Replace A/C Auto amp. Refer to HAC-102, "Removal and Installation".
NO >> Replace heated steering wheel switch.
A/C Auto amp. Heated steering wheel switch Continuity
Connector Terminal Connector Terminal
M152 8 M51 1 Yes
A/C auto amp. GroundContinuity
Connector Terminal
M152 8 No
Revision: November 20132014 Altima NAMRevision: November 20132014 Altima NAM
Page 4174 of 4801
C1601 BATTERY POWER SUPPLYSTC-23
< DTC/CIRCUIT DIAGNOSIS >
C
D E
F
H I
J
K L
M A
B
STC
N
O P
C1601 BATTERY POWER SUPPLY
DTC LogicINFOID:0000000009460358
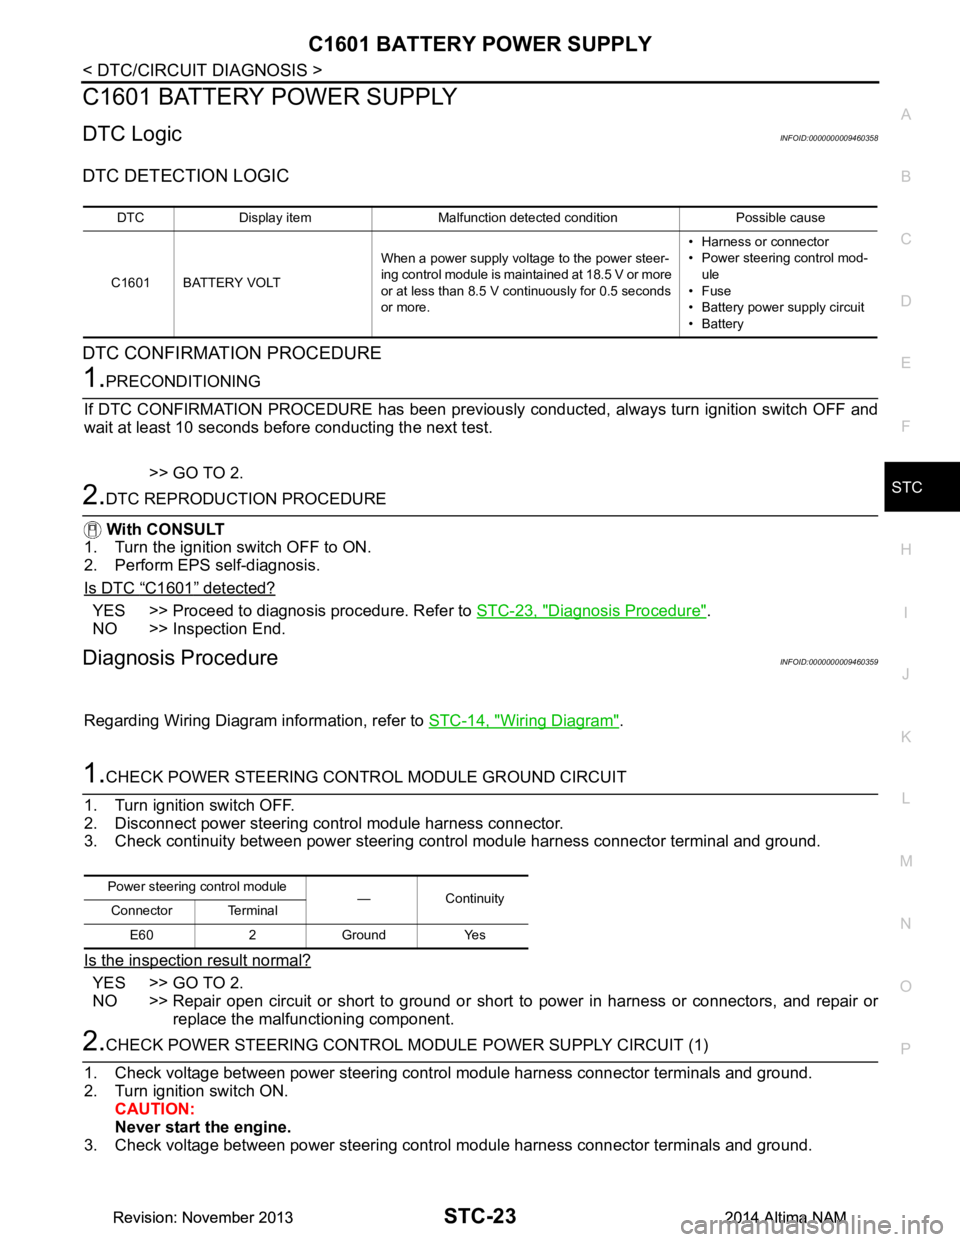
DTC DETECTION LOGIC
DTC CONFIRMATION PROCEDURE
1.PRECONDITIONING
If DTC CONFIRMATION PROCEDURE has been previously conducted, always turn ignition switch OFF and
wait at least 10 seconds before conducting the next test.
>> GO TO 2.
2.DTC REPRODUCTION PROCEDURE
With CONSULT
1. Turn the ignition switch OFF to ON.
2. Perform EPS self-diagnosis.
Is DTC
“C1601” detected?
YES >> Proceed to diagnosis procedure. Refer to STC-23, "Diagnosis Procedure".
NO >> Inspection End.
Diagnosis ProcedureINFOID:0000000009460359
Regarding Wiring Diagram information, refer to STC-14, "Wiring Diagram".
1.CHECK POWER STEERING CONTROL MODULE GROUND CIRCUIT
1. Turn ignition switch OFF.
2. Disconnect power steering control module harness connector.
3. Check continuity between power steering control module harness connector terminal and ground.
Is the inspection result normal?
YES >> GO TO 2.
NO >> Repair open circuit or short to ground or short to power in harness or connectors, and repair or
replace the malfunctioning component.
2.CHECK POWER STEERING CONTROL MO DULE POWER SUPPLY CIRCUIT (1)
1. Check voltage between power steering control module harness connector terminals and ground.
2. Turn ignition switch ON. CAUTION:
Never start the engine.
3. Check voltage between power steering control module harness connector terminals and ground.
DTC Display item Malfunction detected condition Possible cause
C1601 BATTERY VOLT When a power supply voltage to the power steer-
ing control module is maintained at 18.5 V or more
or at less than 8.5 V continuously for 0.5 seconds
or more. • Harness or connector
• Power steering control mod-
ule
•Fuse
• Battery power supply circuit
•Battery
Power steering control module
—Continuity
Connector Terminal
E60 2 Ground Yes
Revision: November 20132014 Altima NAMRevision: November 20132014 Altima NAM
Page 4175 of 4801
STC-24
< DTC/CIRCUIT DIAGNOSIS >
C1601 BATTERY POWER SUPPLY
Is the inspection result normal?
YES >> GO TO 4.
NO >> GO TO 3.
3.CHECK POWER STEERING CONTROL MODULE POWER SUPPLY CIRCUIT (2)
1. Turn ignition switch OFF.
2. Check the 100A fusible link (D).
3. Disconnect battery terminal with fusible link harness connector.
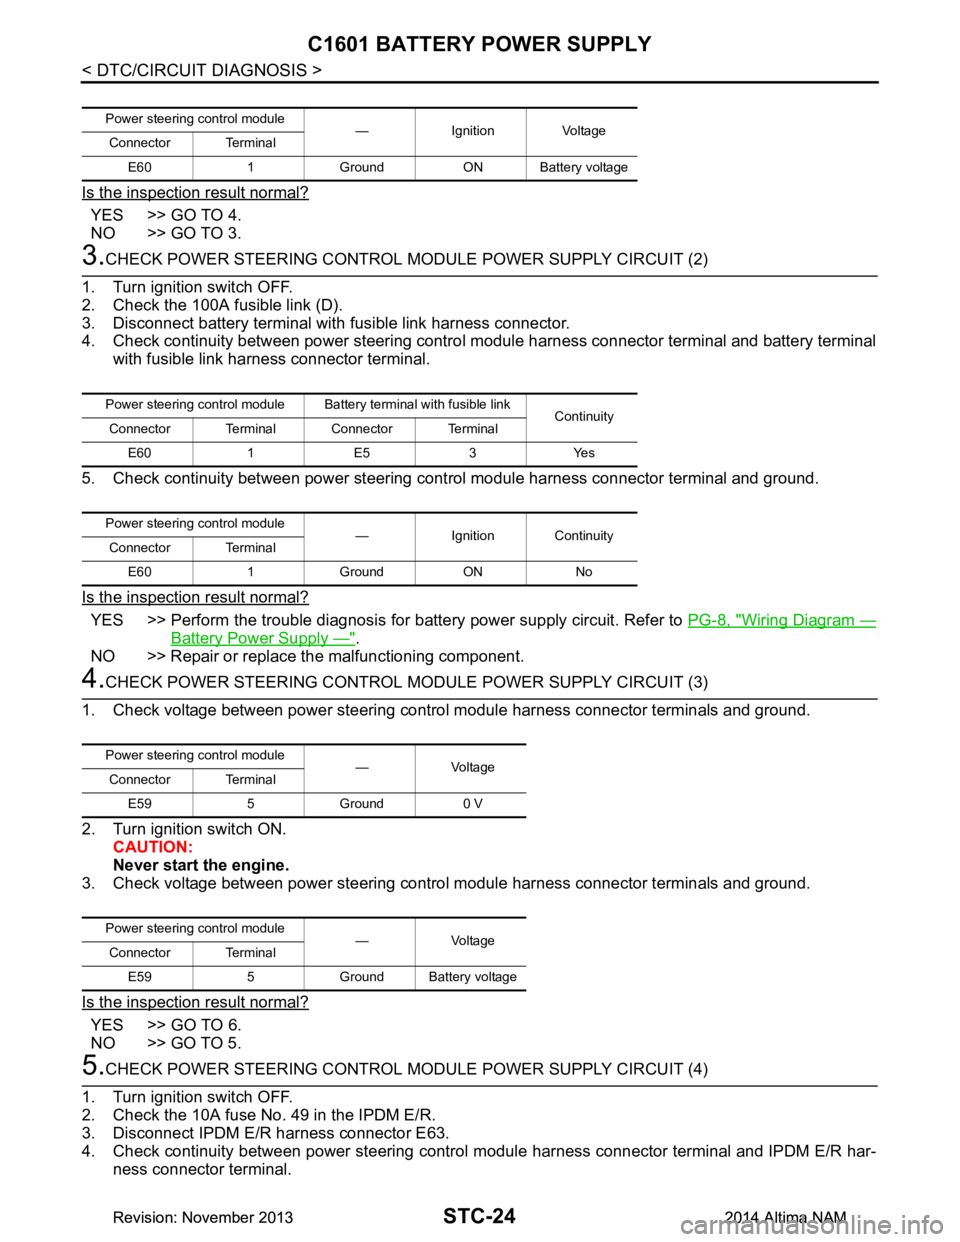
4. Check continuity between power steering contro l module harness connector terminal and battery terminal
with fusible link harness connector terminal.
5. Check continuity between power steering c ontrol module harness connector terminal and ground.
Is the inspection result normal?
YES >> Perform the trouble diagnosis for battery power supply circuit. Refer to PG-8, "Wiring Diagram —
Battery Power Supply —".
NO >> Repair or replace the malfunctioning component.
4.CHECK POWER STEERING CONTROL MODULE POWER SUPPLY CIRCUIT (3)
1. Check voltage between power steering control module harness connector terminals and ground.
2. Turn ignition switch ON. CAUTION:
Never start the engine.
3. Check voltage between power steering control module harness connector terminals and ground.
Is the inspection result normal?
YES >> GO TO 6.
NO >> GO TO 5.
5.CHECK POWER STEERING CONTROL MODULE POWER SUPPLY CIRCUIT (4)
1. Turn ignition switch OFF.
2. Check the 10A fuse No. 49 in the IPDM E/R.
3. Disconnect IPDM E/R harness connector E63.
4. Check continuity between power steering control module harness connector terminal and IPDM E/R har-
ness connector terminal.
Power steering control module — Ignition Voltage
Connector Terminal
E60 1 Ground ON Battery voltage
Power steering control module Batte ry terminal with fusible link
Continuity
Connector Terminal Connector Terminal
E60 1 E5 3 Yes
Power steering control module — Ignition Continuity
Connector Terminal
E60 1 Ground ON No
Power steering control module —Voltage
Connector Terminal
E59 5 Ground 0 V
Power steering control module —Voltage
Connector Terminal
E59 5 Ground Battery voltage
Revision: November 20132014 Altima NAMRevision: November 20132014 Altima NAM
Page 4207 of 4801
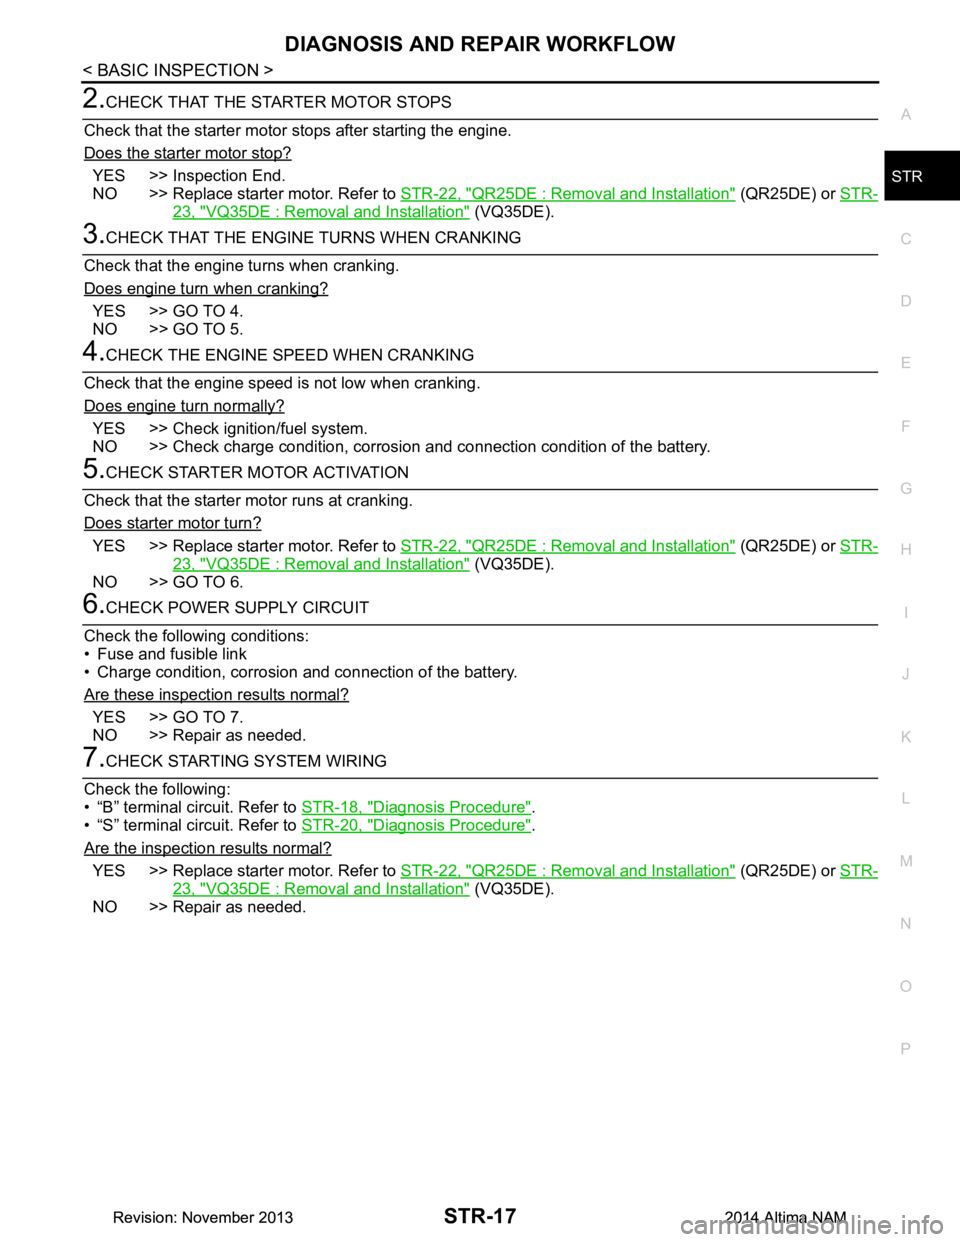
DIAGNOSIS AND REPAIR WORKFLOWSTR-17
< BASIC INSPECTION >
C
D E
F
G H
I
J
K L
M A
STR
NP
O
2.CHECK THAT THE STARTER MOTOR STOPS
Check that the starter motor stops after starting the engine.
Does the starter motor stop?
YES >> Inspection End.
NO >> Replace starter motor. Refer to STR-22, "QR25DE : Removal and Installation"
(QR25DE) or STR-
23, "VQ35DE : Removal and Installation" (VQ35DE).
3.CHECK THAT THE ENGINE TURNS WHEN CRANKING
Check that the engine turns when cranking.
Does engine turn when cranking?
YES >> GO TO 4.
NO >> GO TO 5.
4.CHECK THE ENGINE SPEED WHEN CRANKING
Check that the engine speed is not low when cranking.
Does engine turn normally?
YES >> Check igniti on/fuel system.
NO >> Check charge condition, corrosion and connection condition of the battery.
5.CHECK STARTER MOTOR ACTIVATION
Check that the starter motor runs at cranking.
Does starter motor turn?
YES >> Replace starter motor. Refer to STR-22, "QR25DE : Removal and Installation" (QR25DE) or STR-
23, "VQ35DE : Removal and Installation" (VQ35DE).
NO >> GO TO 6.
6.CHECK POWER SUPPLY CIRCUIT
Check the following conditions:
• Fuse and fusible link
• Charge condition, corrosion and connection of the battery.
Are these inspection results normal?
YES >> GO TO 7.
NO >> Repair as needed.
7.CHECK STARTING SYSTEM WIRING
Check the following:
• “B” terminal circuit. Refer to STR-18, "Diagnosis Procedure"
.
• “S” terminal circuit. Refer to STR-20, "Diagnosis Procedure"
.
Are the inspection results normal?
YES >> Replace starter motor. Refer to STR-22, "QR25DE : Removal and Installation" (QR25DE) or STR-
23, "VQ35DE : Removal and Installation" (VQ35DE).
NO >> Repair as needed.
Revision: November 20132014 Altima NAMRevision: November 20132014 Altima NAM
Page 4208 of 4801
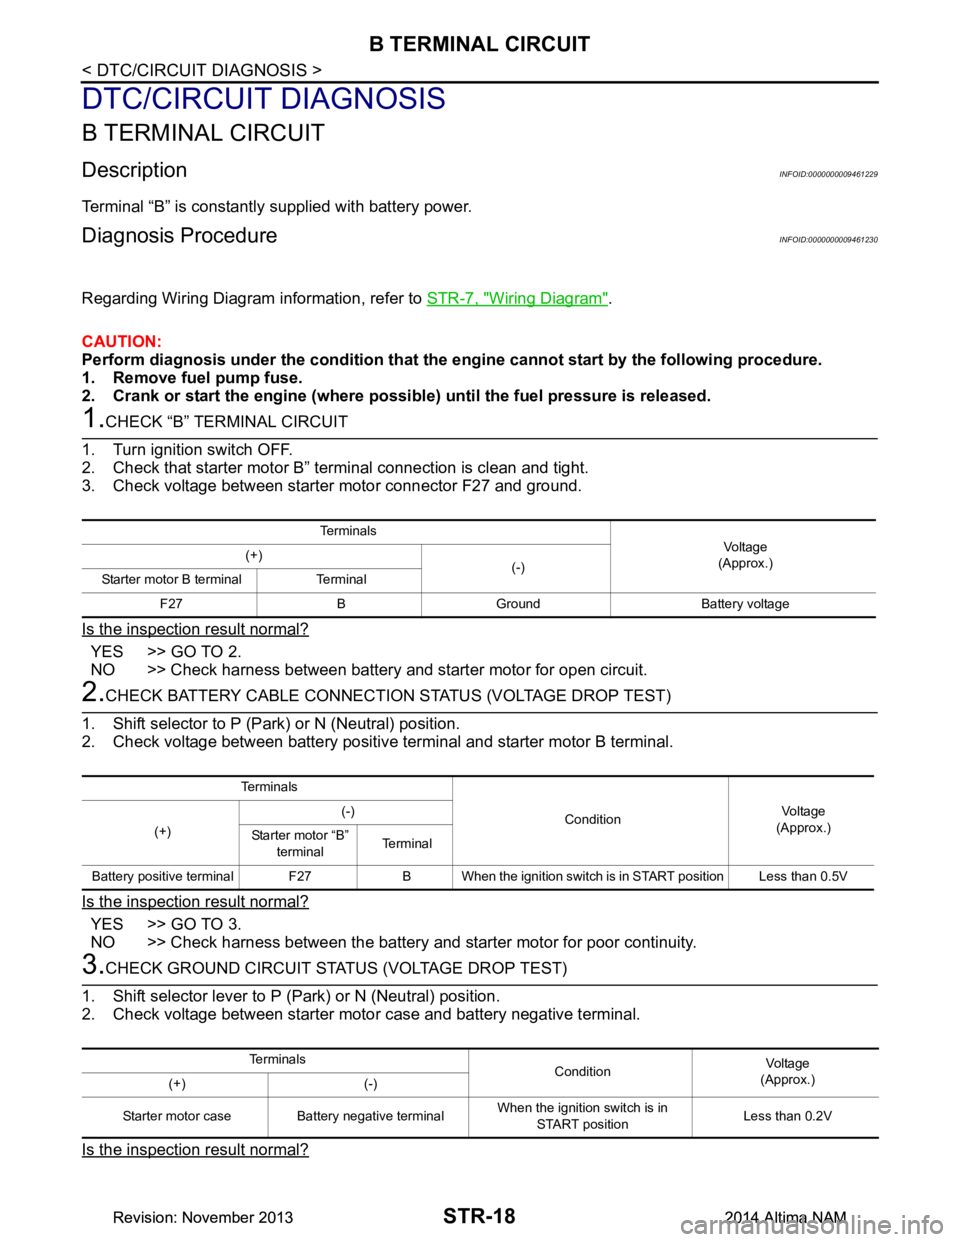
STR-18
< DTC/CIRCUIT DIAGNOSIS >
B TERMINAL CIRCUIT
DTC/CIRCUIT DIAGNOSIS
B TERMINAL CIRCUIT
DescriptionINFOID:0000000009461229
Terminal “B” is constantly supplied with battery power.
Diagnosis ProcedureINFOID:0000000009461230
Regarding Wiring Diagram information, refer to STR-7, "Wiring Diagram".
CAUTION:
Perform diagnosis under the condi tion that the engine cannot start by the following procedure.
1. Remove fuel pump fuse.
2. Crank or start the engine (where possi ble) until the fuel pressure is released.
1.CHECK “B” TERMINAL CIRCUIT
1. Turn ignition switch OFF.
2. Check that starter motor B” terminal connection is clean and tight.
3. Check voltage between starter motor connector F27 and ground.
Is the inspection result normal?
YES >> GO TO 2.
NO >> Check harness between battery and starter motor for open circuit.
2.CHECK BATTERY CABLE CONNECTION STATUS (VOLTAGE DROP TEST)
1. Shift selector to P (Park) or N (Neutral) position.
2. Check voltage between battery positive terminal and starter motor B terminal.
Is the inspection result normal?
YES >> GO TO 3.
NO >> Check harness between the battery and starter motor for poor continuity.
3.CHECK GROUND CIRCUIT STATUS (VOLTAGE DROP TEST)
1. Shift selector lever to P (Park) or N (Neutral) position.
2. Check voltage between starter motor case and battery negative terminal.
Is the inspection result normal?
Te r m i n a l s
Voltage
(Approx.)
(+)
(-)
Starter motor B terminal Terminal
F27 B Ground Battery voltage
Te r m i n a l s
ConditionVoltage
(Approx.)
(+) (-)
Starter motor “B” terminal Te r m i n a l
Battery positive terminal F27 B When the ignition switch is in START position Less than 0.5V
Te r m i n a l s ConditionVoltage
(Approx.)
(+) (-)
Starter motor case Battery negative terminal When the ignition switch is in
START position Less than 0.2V
Revision: November 20132014 Altima NAMRevision: November 20132014 Altima NAM
Page 4210 of 4801
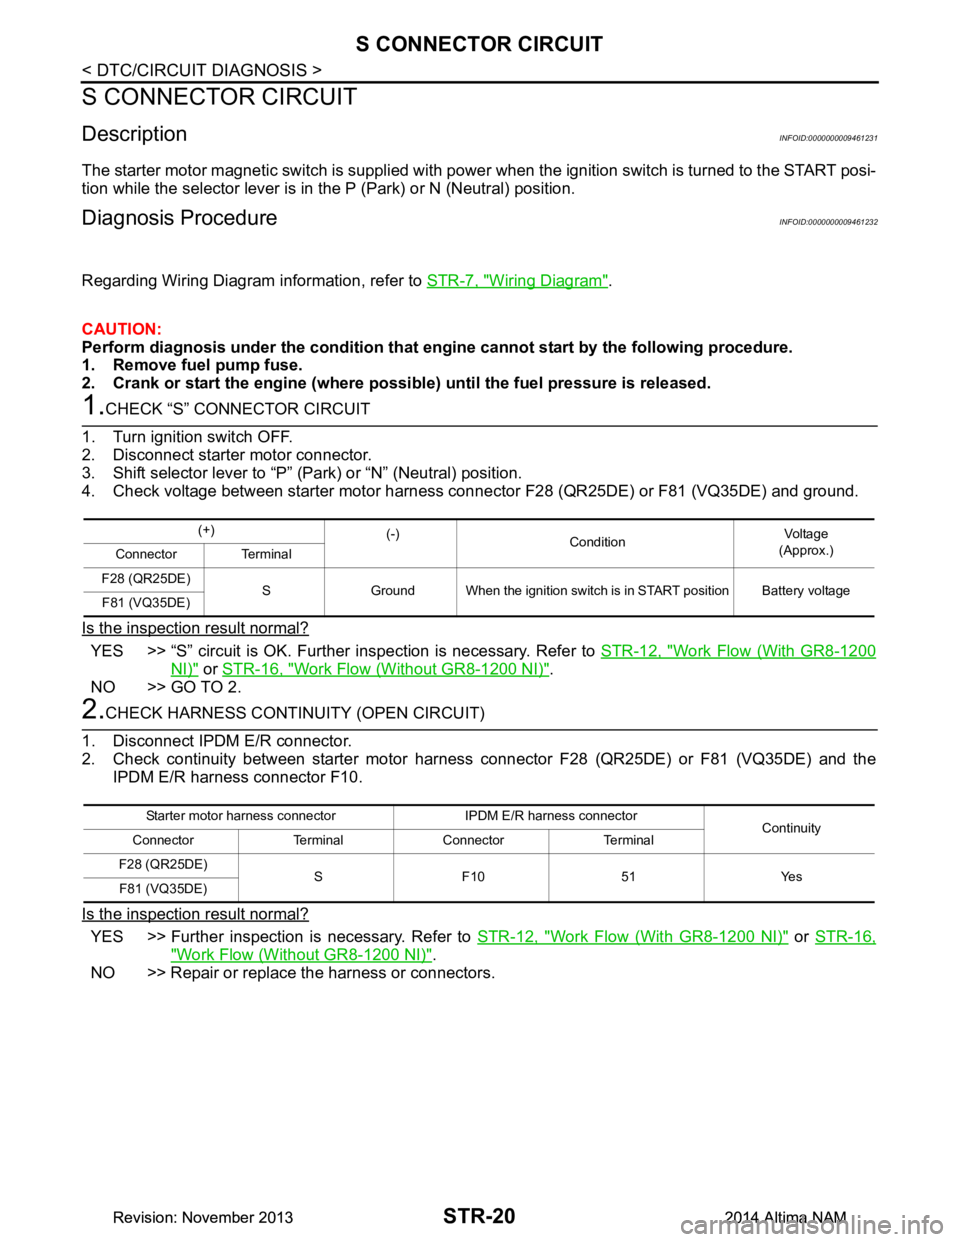
STR-20
< DTC/CIRCUIT DIAGNOSIS >
S CONNECTOR CIRCUIT
S CONNECTOR CIRCUIT
DescriptionINFOID:0000000009461231
The starter motor magnetic switch is supplied with power when the ignition switch is turned to the START posi-
tion while the selector lever is in the P (Park) or N (Neutral) position.
Diagnosis ProcedureINFOID:0000000009461232
Regarding Wiring Diagram information, refer to STR-7, "Wiring Diagram".
CAUTION:
Perform diagnosis under the condi tion that engine cannot start by the following procedure.
1. Remove fuel pump fuse.
2. Crank or start the engine (where possi ble) until the fuel pressure is released.
1.CHECK “S” CONNECTOR CIRCUIT
1. Turn ignition switch OFF.
2. Disconnect starter motor connector.
3. Shift selector lever to “P” (Park) or “N” (Neutral) position.
4. Check voltage between starter motor harness con nector F28 (QR25DE) or F81 (VQ35DE) and ground.
Is the inspection result normal?
YES >> “S” circuit is OK. Further inspection is necessary. Refer to STR-12, "Work Flow (With GR8-1200
NI)" or STR-16, "Work Flow (Without GR8-1200 NI)".
NO >> GO TO 2.
2.CHECK HARNESS CONTI NUITY (OPEN CIRCUIT)
1. Disconnect IPDM E/R connector.
2. Check continuity between starter motor harness connector F28 (QR25DE) or F81 (VQ35DE) and the
IPDM E/R harness connector F10.
Is the inspection result normal?
YES >> Further inspection is necessary. Refer to STR-12, "Work Flow (With GR8-1200 NI)" or STR-16,
"Work Flow (Without GR8-1200 NI)".
NO >> Repair or replace the harness or connectors.
(+) (-)
Condition Voltage
(Approx.)
Connector Terminal
F28 (QR25DE) S Ground When the ignition switch is in START position Battery voltage
F81 (VQ35DE)
Starter motor harness connector IPDM E/R harness connector Continuity
Connector Terminal Connector Terminal
F28 (QR25DE) S F10 51 Yes
F81 (VQ35DE)
Revision: November 20132014 Altima NAMRevision: November 20132014 Altima NAM
Page 4320 of 4801
![NISSAN TEANA 2014 Service Manual
P0706 TRANSMISSION RANGE SENSOR ATM-105
< DTC/CIRCUIT DIAGNOSIS > [CVT: RE0F10D]
C
EF
G H
I
J
K L
M A
B
TM
N
O P
Is the check result normal?
YES >> GO TO 8.
NO >> Repair or replace malfunctioning p NISSAN TEANA 2014 Service Manual
P0706 TRANSMISSION RANGE SENSOR ATM-105
< DTC/CIRCUIT DIAGNOSIS > [CVT: RE0F10D]
C
EF
G H
I
J
K L
M A
B
TM
N
O P
Is the check result normal?
YES >> GO TO 8.
NO >> Repair or replace malfunctioning p](/manual-img/5/57390/w960_57390-4319.png)
P0706 TRANSMISSION RANGE SENSOR ATM-105
< DTC/CIRCUIT DIAGNOSIS > [CVT: RE0F10D]
C
EF
G H
I
J
K L
M A
B
TM
N
O P
Is the check result normal?
YES >> GO TO 8.
NO >> Repair or replace malfunctioning parts.
8.DETECT MALFUNCTIONING ITEMS
Check the following items:
• Harness open circuit or short circuit between ignition switch and IPDM E/R. Refer to PG-19, "Wiring Diagram
— Ignition Power Supply —".
• 10A fuse (No. 46, located in the IPDM E/R). Refer to PG-72, "Fuse, Connector and Terminal Arrangement"
.
• IPDM E/R
Is the check result normal?
YES >> Check intermittent incident. Refer to GI-43, "Intermittent Incident".
NO >> Repair or replace malfunctioning parts.
Component InspectionINFOID:0000000009464044
1.CHECK TRANSMISSION RANGE SWITCH
Check continuity between transmissi on range switch connector terminals.
Is the inspection result normal?
YES >> INSPECTION END
NO >> There is a malfunction of transmission range switch. Replace transaxle assembly. Refer to TM-
206, "Removal and Installation".
IPDM E/R Transmission range switch
Continuity
Connector Terminal Connector Terminal
F83 61 F85 3 Existed
Transmission range switch Condition Continuity
Te r m i n a l
1 – 2 Manual lever: “P” and “N” positions Existed
Other than the above Not existed
3 – 4 Manual lever: “P” position Existed
Other than the above Not existed
3 – 5 Manual lever: “R” position Existed
Other than the above Not existed
3 – 6 Manual lever: “N position Existed
Other than the above Not existed
3 – 7 Manual lever: “D” position Existed
Other than the above Not existed
3 – 8 Manual lever: “DS” position Existed
Other than the above Not existed
Revision: November 20132014 Altima NAMRevision: November 20132014 Altima NAM