Page 2828 of 4801

INTERIOR ROOM LAMP CONTROL SYSTEMINL-7
< SYSTEM DESCRIPTION >
C
D E
F
G H
I
J
K
M A
B
INL
N
O P
INTERIOR ROOM LAMP CONTROL SYSTEM
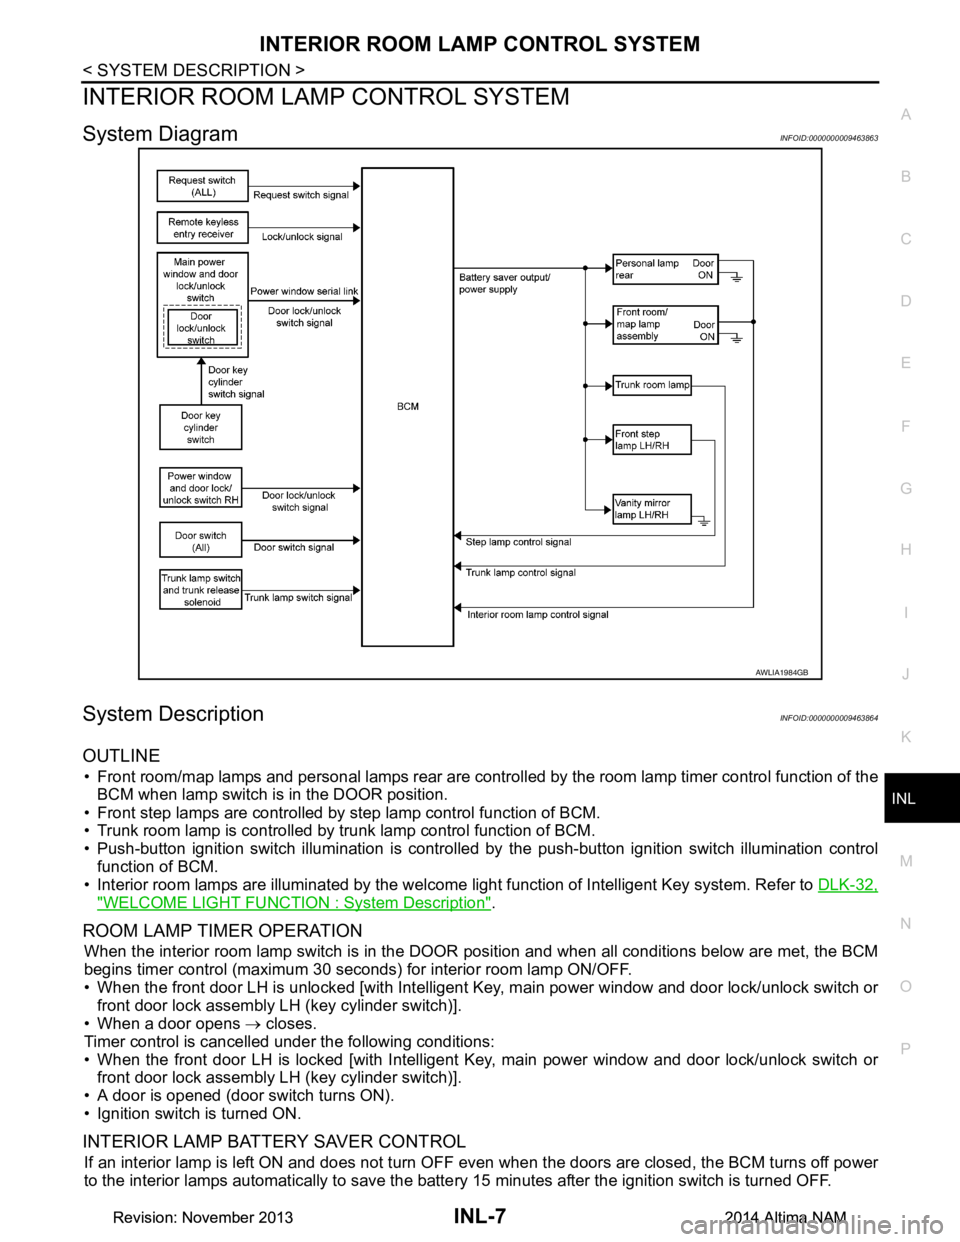
System DiagramINFOID:0000000009463863
System DescriptionINFOID:0000000009463864
OUTLINE
• Front room/map lamps and personal lamps rear are controll ed by the room lamp timer control function of the
BCM when lamp switch is in the DOOR position.
• Front step lamps are controlled by step lamp control function of BCM.
• Trunk room lamp is controlled by trunk lamp control function of BCM.
• Push-button ignition switch illumination is controlled by the push-button ignition switch illumination control
function of BCM.
• Interior room lamps are illuminated by the welcome light function of Intelligent Key system. Refer to DLK-32,
"WELCOME LIGHT FUNCTION : System Description".
ROOM LAMP TIMER OPERATION
When the interior room lamp switch is in the DOOR position and when all conditions below are met, the BCM
begins timer control (maximum 30 seconds ) for interior room lamp ON/OFF.
• When the front door LH is unlocked [with Intelligent Key, main power window and door lock/unlock switch or
front door lock assembly LH (key cylinder switch)].
• When a door opens → closes.
Timer control is cancelled under the following conditions:
• When the front door LH is locked [with Intelligent Key, main power window and door lock/unlock switch or front door lock assembly LH (key cylinder switch)].
• A door is opened (door switch turns ON).
• Ignition switch is turned ON.
INTERIOR LAMP BATTERY SAVER CONTROL
If an interior lamp is left ON and does not turn OF F even when the doors are closed, the BCM turns off power
to the interior lamps automatically to save the batte ry 15 minutes after the ignition switch is turned OFF.
AWLIA1984GB
Revision: November 20132014 Altima NAMRevision: November 20132014 Altima NAM
Page 2829 of 4801
INL-8
< SYSTEM DESCRIPTION >
INTERIOR ROOM LAMP CONTROL SYSTEM
The BCM controls the following interior lamps:
• Front step lamp LH/RH
• Front room/map lamp LH/RH
• Personal lamp rear LH/RH
• Vanity mirror lamp LH/RH (if equipped)
• Trunk room lamp
After the battery saver system turns the la mps OFF, the lamps will illuminate again when:
• A signal is received from an Intelligent Key or main power window and door lock/unlock switch or when the front door lock assembly LH (key cylinder switch) is locked or unlocked.
• A door is opened or closed.
Revision: November 20132014 Altima NAMRevision: November 20132014 Altima NAM
Page 2832 of 4801

DIAGNOSIS SYSTEM (BCM)INL-11
< SYSTEM DESCRIPTION >
C
D E
F
G H
I
J
K
M A
B
INL
N
O P
DIAGNOSIS SYSTEM (BCM)
COMMON ITEM
COMMON ITEM : CONSULT Function (BCM - COMMON ITEM)INFOID:0000000009956797
CAUTION:
After disconnecting the CONSULT vehicle interface (VI) from the data link connector, the ignition must
be cycled OFF → ON (for at least 5 seconds) → OFF. If this step is not performed, the BCM may not go
to ”sleep mode”, potentiall y causing a discharged battery and a no-start condition.
APPLICATION ITEM
CONSULT performs the following functions via CAN communication with BCM.
SYSTEM APPLICATION
BCM can perform the following functions.
Direct Diagnostic Mode Description
Ecu Identification The BCM part number is displayed.
Self Diagnostic Result The BCM self diagnostic results are displayed.
Data Monitor The BCM input/output data is displayed in real time.
Active Test The BCM activates outputs to test components.
Work support The settings for BCM functions can be changed.
Configuration • The vehicle specification can be read and saved.
• The vehicle specification can be written when replacing BCM.
CAN Diag Support Mntr The result of transmit/receive diagnosis of CAN communication is displayed.
System Sub System Direct Diagnostic Mode
Ecu Identification
Self Diagnostic Result
Data Monitor
Active Test
Work support
Configuration
CAN Diag Su pport Mntr
Door lock DOOR LOCK ××××
Rear window defogger REAR DEFOGGER ×××
Warning chime BUZZER ××
Interior room lamp timer INT LAMP ×××
Remote keyless entry system MULTI REMOTE ENT ×××
Exterior lamp HEADLAMP ×××
Wiper and washer WIPER ×××
Turn signal and hazard warning lamps FLASHER ××
Air conditioner AIR CONDITIONER ×
Intelligent Key system INTELLIGENT KEY ××××
Combination switch COMB SW ×
BCM BCM × × ×××
Immobilizer IMMU ×××
Interior room lamp battery saver BATTERY SAVER ××
Trunk open TRUNK ×
Vehicle security system THEFT ALM ×××
Revision: November 20132014 Altima NAMRevision: November 20132014 Altima NAM
Page 2836 of 4801
![NISSAN TEANA 2014 Service Manual
DIAGNOSIS SYSTEM (BCM)INL-15
< SYSTEM DESCRIPTION >
C
D E
F
G H
I
J
K
M A
B
INL
N
O P
ACTIVE TEST
WORK SUPPORT
DETE SW PWR [On/Off] Indicates condition of detent switch voltage.
ACC RLY -REQ [On/ NISSAN TEANA 2014 Service Manual
DIAGNOSIS SYSTEM (BCM)INL-15
< SYSTEM DESCRIPTION >
C
D E
F
G H
I
J
K
M A
B
INL
N
O P
ACTIVE TEST
WORK SUPPORT
DETE SW PWR [On/Off] Indicates condition of detent switch voltage.
ACC RLY -REQ [On/](/manual-img/5/57390/w960_57390-2835.png)
DIAGNOSIS SYSTEM (BCM)INL-15
< SYSTEM DESCRIPTION >
C
D E
F
G H
I
J
K
M A
B
INL
N
O P
ACTIVE TEST
WORK SUPPORT
DETE SW PWR [On/Off] Indicates condition of detent switch voltage.
ACC RLY -REQ [On/Off] Indicates condition of accessory relay control request.
RKE OPE COUN1 [0-19] ×When remote keyless entry receiver receives the signal transmitted while
operating on Intelligent Key, the numerical value start changing.
RKE OPE COUN2 [0-19] ×When remote keyless entry receiver receives the signal transmitted while
operating on Intelligent Key, the numerical value start changing.
TRNK/HAT MNTR [On/Off] Indicates condition of trunk room lamp switch.
RKE-LOCK [On/Off] Indicates condition of lock signal from Intelligent Key.
RKE-UNLOCK [On/Off] Indicates condition of unlock signal from Intelligent Key.
RKE-TR/BD [On/Off] Indicates condition of trunk open signal from Intelligent Key.
RKE-PANIC [On/Off] Indicates condition of panic signal from Intelligent Key.
RKE-MODE CHG [On/Off] Indicates condition of mode change signal from Intelligent Key. Monitor Item [Unit] Main Description
Test Item Description
INTELLIGENT KEY LINK (CAN) This test is able to check Intelligent Key iden
tification number [Off/ID No1/ID N02/ID No3/ID
No4/ID No5].
INT LAMP This test is able to check interior room lamp operation [On/Off].
FLASHER This test is able to check hazard lamp operation [LH/RH/Off].
HORN This test is able to check horn operation [On].
BATTERY SAVER This test is able to check battery saver operation [On/Off].
TRUNK/BACK DOOR This test is able to check trunk actuator operation [Open].
OUTSIDE BUZZER This test is able to check In telligent Key warning buzzer operation [On/Off].
INSIDE BUZZER This test is able to check combination meter warning chime operation [Take Out/Knob/Key/
Off].
INDICATOR This test is able to check combination meter warning lamp operation [KEY ON/KEY IND/Off].
IGN CONT2 This test is able to check ignition relay-2 control operation [On/Off].
ENGINE SW ILLUMI This test is able to check push-bu tton ignition switch START indicator operation [On/Off].
PUSH SWITCH INDICATOR This test is able to check push-button ignition switch indicator operation [On/Off].
ACC CONT This test is able to check ac cessory relay control operation [On/Off].
IGN CONT1 This test is able to check ignition relay-1 control operation [On/Off].
ST CONT LOW This test is able to check starter control relay operation [On/Off].
IGNITION RELAY This test is able to ignition relay operation [On/Off].
REVERSE LAMP TEST This test is able to check reverse lamp illuminatio n operation [On/Off].
TRUNK/LUGGAGE LAMP TEST This test is able to check cargo lamp illumination operation [On/Off].
KEYFOB PW TEST This test is able to check power window operation using the Inte lligent Key [Off/DOWN/UP].
SHIFTLOCK SOLENOID TEST This te st is able to check shift lock solenoid operation [On/Off].
Support Item Setting Description
IGN/ACC BATTERY SAVER On* Battery saver function ON.
Off Battery saver function OFF.
REMOTE ENGINE STARTER On* Remote engine start function ON.
Off Remote engine start function OFF.
Revision: November 20132014 Altima NAMRevision: November 20132014 Altima NAM
Page 2906 of 4801
FRONT DOOR FINISHERINT-15
< REMOVAL AND INSTALLATION >
C
D E
F
G H
I
K L
M A
B
INT
N
O P
REMOVAL AND INSTALLATION
FRONT DOOR FINISHER
Exploded ViewINFOID:0000000009461342
NOTE:
LH side shown; RH side similar.
Removal and InstallationINFOID:0000000009461343
REMOVAL
1. Remove the inside door handle escutcheon.
a. Release the inside door handle escutcheon by pushing down on the pawl shown with a suitable tool.
: Pawl
1. Front door finisher 2. Front door finisher bracket 3. Main power window and door lock/ unlock switch finisher
4. Inside door handle escutcheon 5. Front door pull handle outer finisher 6. Front door pull handle inner finisher
7. Door mirror remote control switch 8. Inside door handle finisher Front
ALJIA0895ZZ
ALJIA0909ZZ
Revision: November 20132014 Altima NAM
Page 2907 of 4801
INT-16
< REMOVAL AND INSTALLATION >
FRONT DOOR FINISHER
b. Remove the inside door handle escutcheon by sliding theremaining pawls forward out of the inside door handle cap inser-
tion point (A).
: Pawl
: Front
CAUTION:
Do not reuse inside door handle escutcheon. Replace with
new part after removal.
2. Remove the inside door handle bolt (A).
3. Remove the main power window and door lock/unlock switch (LH). Refer to PWC-142, "Removal and
Installation".
4. Remove the power window and door lock/unlock switch (RH). Refer to PWC-143, "Removal and Installa-
tion".
5. Remove the armrest cover bolt (A).
6. Remove the front door pull handle bolt (A).
ALJIA0910ZZ
ALJIA0891ZZ
ALJIA0893ZZ
ALJIA0892ZZ
Revision: November 20132014 Altima NAM
Page 2909 of 4801
INT-18
< REMOVAL AND INSTALLATION >
REAR DOOR FINISHER
REAR DOOR FINISHER
Exploded ViewINFOID:0000000009461344
Removal and InstallationINFOID:0000000009461345
REMOVAL
1. Remove the inside door handle escutcheon.
a. Release the inside door handle escutcheon by pushing down on the pawl shown with a suitable tool.
: Pawl
b. Remove the inside door handle escutcheon by sliding the remaining pawls forward out of the inside door handle cap inser-
tion point (A).
: Pawl
: Front
CAUTION:
Do not reuse inside door handle escutcheon. Replace with
new part after removal.
1. Rear door finisher 2. Rear door upper finisher 3. Rear door finisher bracket
4. Rear power window switch finisher 5. Inside door handle escutcheon 6. Inside door handle
7. Rear door tray escutcheon 8. Rear door tray Front
AWJIA1109ZZ
ALJIA0909ZZ
ALJIA0910ZZ
Revision: November 20132014 Altima NAM
Page 2910 of 4801

REAR DOOR FINISHERINT-19
< REMOVAL AND INSTALLATION >
C
D E
F
G H
I
K L
M A
B
INT
N
O P
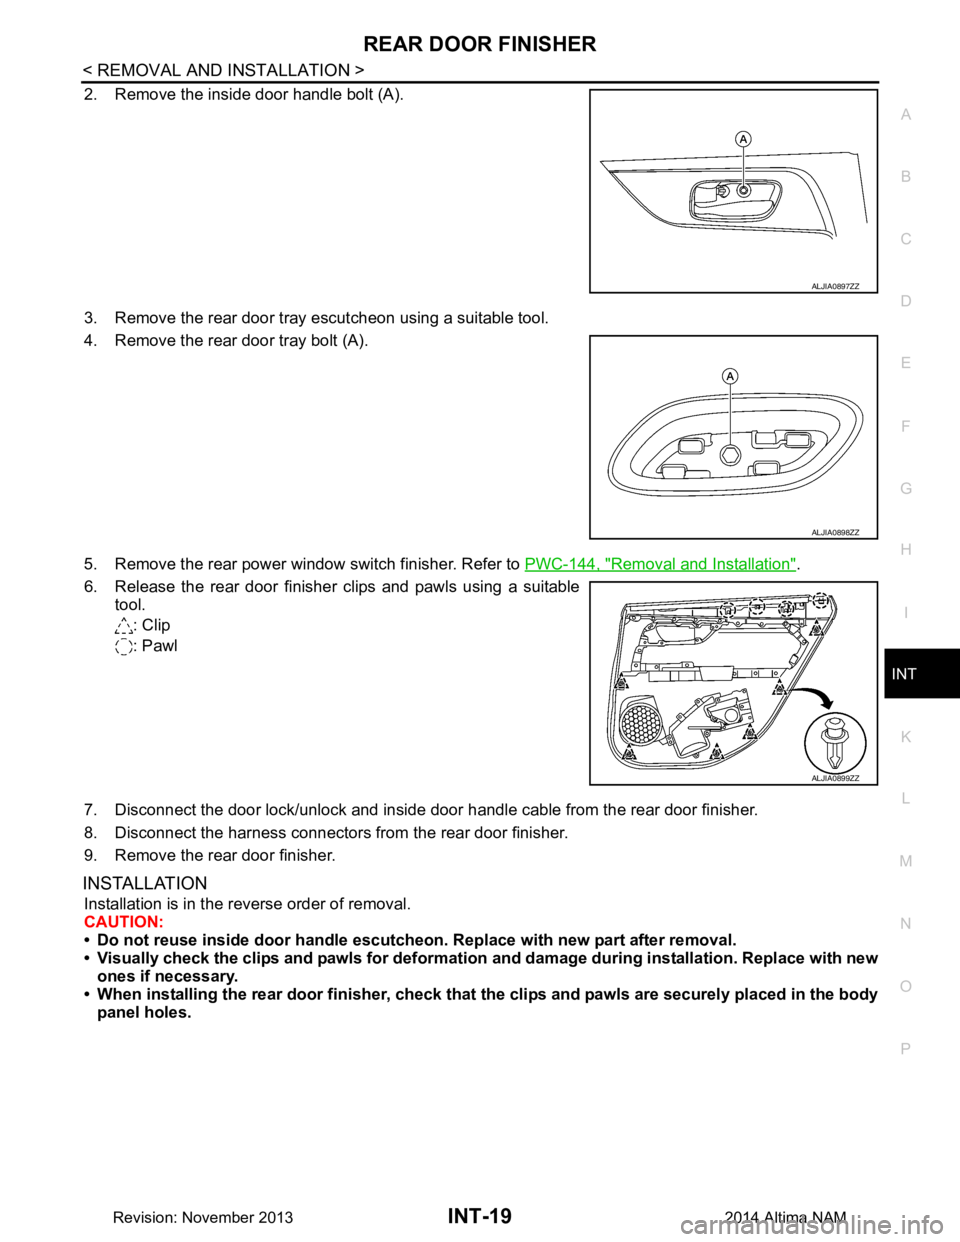
2. Remove the inside door handle bolt (A).
3. Remove the rear door tray escutcheon using a suitable tool.
4. Remove the rear door tray bolt (A).
5. Remove the rear power window switch finisher. Refer to PWC-144, "Removal and Installation"
.
6. Release the rear door finisher clips and pawls using a suitable tool.
: Clip
: Pawl
7. Disconnect the door lock/unlock and inside door handle cable from the rear door finisher.
8. Disconnect the harness connectors from the rear door finisher.
9. Remove the rear door finisher.
INSTALLATION
Installation is in the reverse order of removal.
CAUTION:
• Do not reuse inside door handle escutche on. Replace with new part after removal.
• Visually check the clips and pawls for deformation and damage during installation. Replace with new
ones if necessary.
• When installing the rear door fi nisher, check that the clips and pa wls are securely placed in the body
panel holes.
ALJIA0897ZZ
ALJIA0898ZZ
ALJIA0899ZZ
Revision: November 20132014 Altima NAM