2014 MITSUBISHI OUTLANDER SPORT key
[x] Cancel search: keyPage 177 of 388
Selector Lever (Joystick Type)7-14 Starting and driving
7
If the operation mode is in OFF and thedriver’s door is opened with the keyless oper-ation key in the key slot, the outer buzzersounds for approximately 3 seconds and theinner buzzer sounds for approximately 1 min-ute or warning display will appear to remindyou to remove the key.
E00636100054
E00636200026
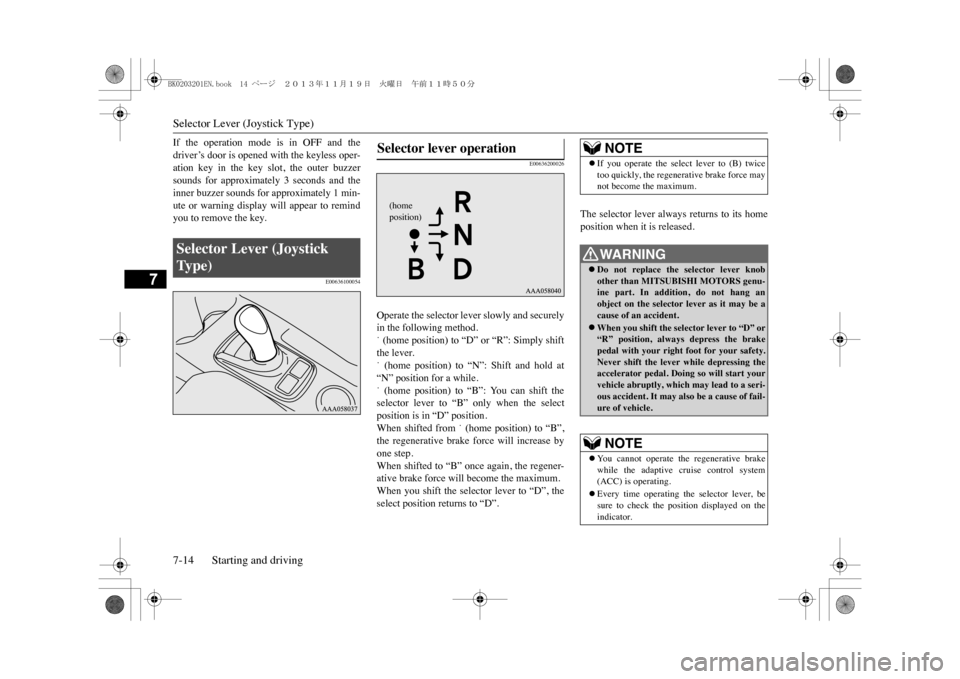
Operate the selector lever slowly and securelyin the following method.˙ (home position) to “D” or “R”: Simply shiftthe lever.˙ (home position) to “N”: Shift and hold at“N” position for a while.˙ (home position) to “B”: You can shift theselector lever to “B” only when the selectposition is in “D” position.When shifted from
˙ (home position) to “B”,
the regenerative brake force will increase byone step.When shifted to “B” once again, the regener-ative brake force will become the maximum.When you shift the selector lever to “D”, theselect position returns to “D”.
The selector lever always returns to its homeposition when it is released.
Selector Lever (Joystick Ty p e )
Selector lever operation
(home position)
NOTE
�zIf you operate the select lever to (B) twicetoo quickly, the regenerative brake force maynot become the maximum.WA R N I N G�zDo not replace the selector lever knobother than MITSUBISHI MOTORS genu-ine part. In addition, do not hang anobject on the selector
lever as it may be a
cause of an accident.�zWhen you shift the selector lever to “D” or“R” position, always
depress the brake
pedal with your right foot for your safety.Never shift the lever while depressing theaccelerator pedal. Doing so will start yourvehicle abruptly, which
may lead to a seri-
ous accident. It may also be a cause of fail-ure of vehicle.NOTE
�zYo u c a n n o t o p e r a t e t h e r e g e n e r a t i v e b r a k ewhile the adaptive cruise control system(ACC) is operating.�zEvery time operating the selector lever, besure to check the position displayed on theindicator.
BK0203201EN.book 14 ページ 2013年11月19日 火曜日 午前11時50分
Page 238 of 388
8
For pleasant drivingVe n t i l a t o r s . . . . . . . . . . . . . . . . . . . . . . . . . . . . . . . . . . . . . . . . . . . . . . . . . . . . . . . . . . . . . . . . . . . . . . . . . . . . . . . . . . . . . . . . . 8 - 2Automatic climate control air conditioner ........................................8-4Important operation tips for the air conditioner.............................. 8-11Air purifier ......................................................................................8-12Remote Climate Control ................................................................8-12Heating............................................................................................8-12AM/FM radio/CD player * .............................................................8-12Handling of Discs ..........................................................................8-15Audio Files (MP3/WMA/AAC) ....................................................8-17Important Points on Safety for the Customer ................................8-21Operation Keys ..............................................................................8-22Listen to Radio ...............................................................................8-24Listen to CDs .................................................................................8-26Listen to MP3s ...............................................................................8-26Listen to an iPod ............................................................................8-28Listen to Audio Files on a USB Device .........................................8-30Listen to Bluetooth Audio .............................................................8-32To l i s t e n t o a d i s c i n t h e r e a r - s e a t d i s p l a y (vehicles with rear-seat display) ................................................8-34Display Indicator ...........................................................................8-34Audio Quality and Volume Balance Adjustment ...........................8-35System Settings ..............................................................................8-36Troubleshooting .............................................................................. 8-38Antenna ...........................................................................................8-40Link System ....................................................................................8-40Bluetooth
® 2.0 interface .................................................................8-41
USB input terminal .........................................................................8-61Sun visors........................................................................................8-64
Ashtray ........................................................................................... 8-65Accessory socket ............................................................................ 8-66Interior lamps.................................................................................. 8-66Storage spaces................................................................................. 8-68Cup holder ...................................................................................... 8-70Bottle holder ................................................................................... 8-71Cargo area cover ............................................................................. 8-71Assist grips ..................................................................................... 8-72Coat hook........................................................................................ 8-72Luggage hooks................................................................................ 8-73
BK0203201EN.book 1 ページ 2013年11月19日 火曜日 午前11時50分
Page 259 of 388
Operation Keys8-22 For pleasant driving
8
E00737100023E00737200024
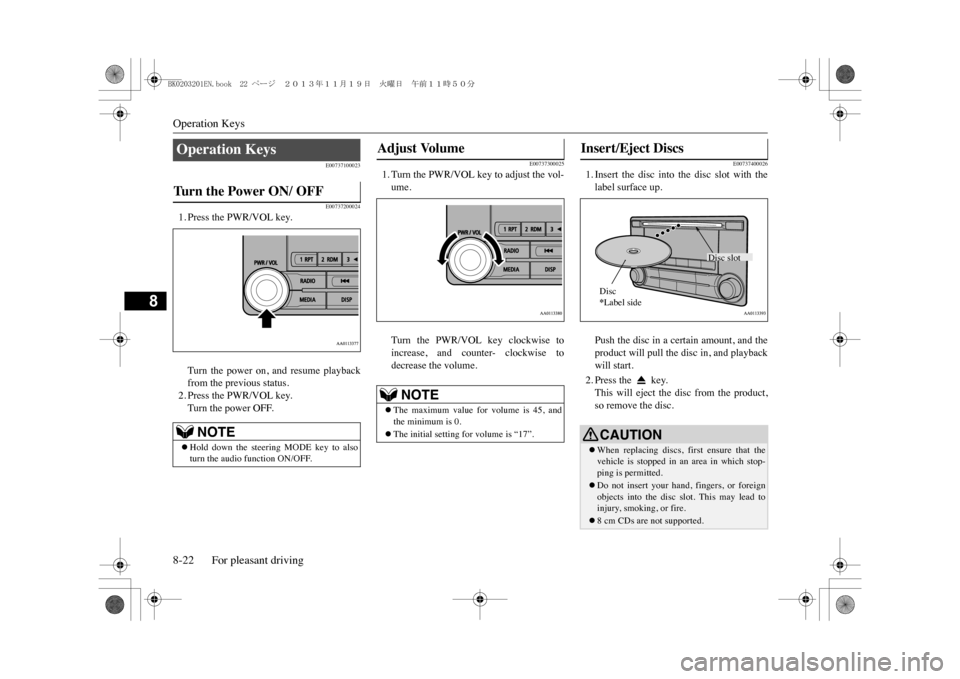
1. Press the PWR/VOL key.Turn the power on, and resume playbackfrom the previous status.2. Press the PWR/VOL key.Turn the power OFF.
E00737300025
1. Turn the PWR/VOL key to adjust the vol-ume.Turn the PWR/VOL key clockwise toincrease, and counter- clockwise todecrease the volume.
E00737400026
1. Insert the disc into the disc slot with thelabel surface up.Push the disc in a certain amount, and theproduct will pull the disc in, and playbackwill start.2. Press the key.This will eject the disc from the product,so remove the disc.
Operation Keys Tu r n t h e P o w e r O N / O F F
NOTE
�zHold down the steering MODE key to alsoturn the audio
function ON/OFF.
Adjust Volume
NOTE
�zThe maximum value for volume is 45, andthe minimum is 0.�zThe initial setting for volume is “17”.
Insert/Eject Discs
CAUTION�zWhen replacing discs, first ensure that thevehicle is stopped in an area in which stop-ping is permitted.�zDo not insert your hand, fingers, or foreignobjects into the disc slot. This may lead toinjury, smoking, or fire.�z8 cm CDs are not supported.
Disc slot
Disc*Label side
BK0203201EN.book 22 ページ 2013年11月19日 火曜日 午前11時50分
Page 260 of 388
Operation Keys
For pleasant driving 8-23
8
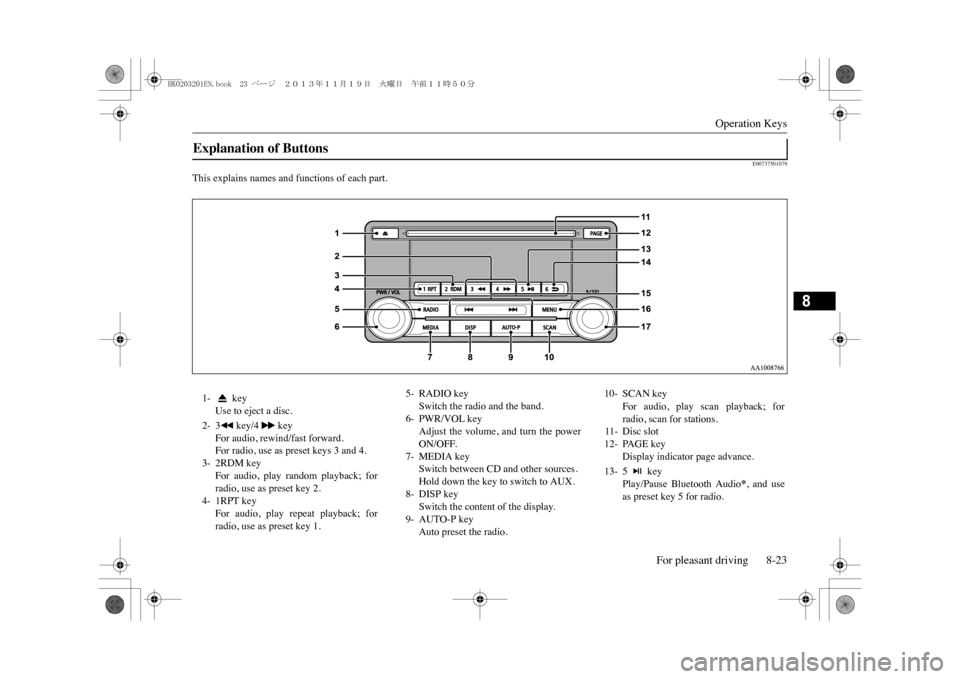
E00737501079
This explains names and functions of each part.Explanation of Buttons 1- key
Use to eject a disc.
2- 3 key/4 key
For audio, rewind/fast forward.For radio, use as preset keys 3 and 4.
3- 2RDM key
For audio, play random playback; forradio, use as preset key 2.
4- 1RPT key
For audio, play repeat playback; forradio, use as preset key 1.
5- RADIO key
Switch the radio and the band.
6- PWR/VOL key
Adjust the volume, and turn the powerON/OFF.
7- MEDIA key
Switch between CD and other sources.Hold down the key to switch to AUX.
8- DISP key
Switch the content of the display.
9- AUTO-P key
Auto preset the radio.
10- SCAN key
For audio, play scan playback; forradio, scan for stations.
11- Disc slot12- PAGE key
Display indicator page advance.
13- 5 key
Play/Pause Bluetooth Audio
*, and use
as preset key 5 for radio.
BK0203201EN.book 23 ページ 2013年11月19日 火曜日 午前11時50分
Page 261 of 388
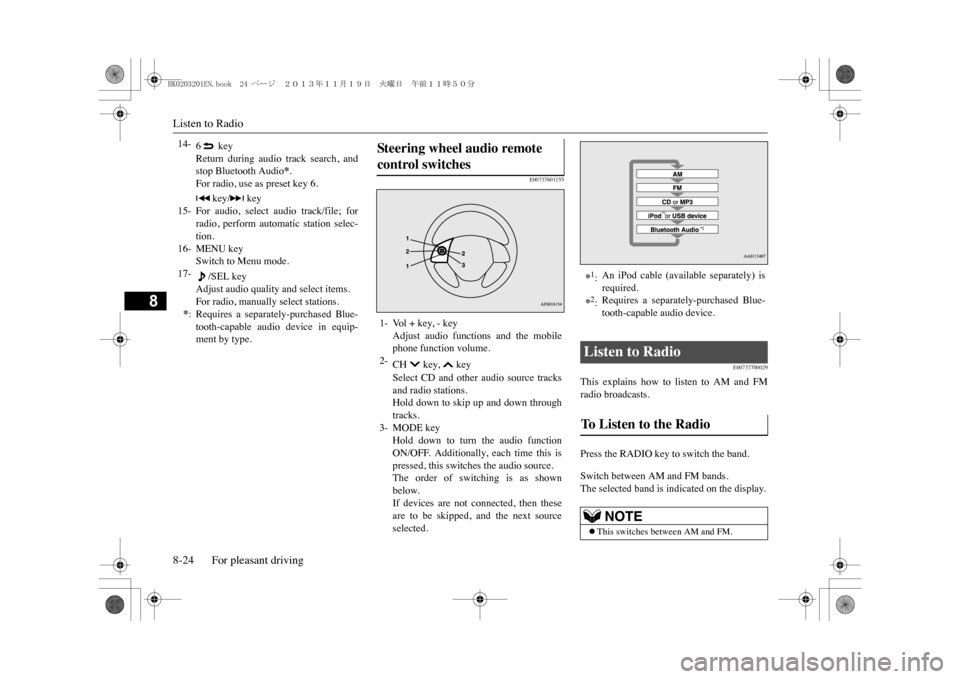
Listen to Radio8-24 For pleasant driving
8
E00737601155
E00737700029
This explains how to listen to AM and FMradio broadcasts.Press the RADIO key to switch the band.Switch between AM and FM bands.The selected band is indicated on the display.
14-
6 keyReturn during audio track search, andstop Bluetooth Audio
*.
For radio, use as preset key 6.
15-
key/ key
For audio, select audio track/file; forradio, perform automatic station selec-tion.
16- MENU key
Switch to Menu mode.
17-
/SEL key
Adjust audio quality and select items.For radio, manually select stations.
*:Requires a separately-purchased Blue-tooth-capable audio device in equip-ment by type.
Ste er in g wheel audio remot e control switches 1- Vol + key, - key
Adjust audio functions and the mobilephone function volume.
2-
CH key, keySelect CD and other audio source tracksand radio stations.Hold down to skip up and down throughtracks.
3- MODE key
Hold down to turn the audio functionON/OFF. Additionally, each time this ispressed, this switches the audio source.The order of switching is as shownbelow.If devices are not connected, then theseare to be skipped, and the next sourceselected.
*1:An iPod cable (available separately) isrequired.
*2:Requires a separately-purchased Blue-tooth-capable audio device.
Listen to Radio To Listen to the Radio
NOTE
�zThis switches between AM and FM.
BK0203201EN.book 24 ページ 2013年11月19日 火曜日 午前11時50分
Page 262 of 388
Listen to Radio
For pleasant driving 8-25
8
Turn the /SEL key to the frequency to lis-ten to.Collective search for stations that can bereceived.Press the SCAN key.When a station is received, this is played for 5seconds, then the product searches for thenext station.
Register the broadcast station in advance, andselect this at a later time.1. Tune in to the frequency to register.2. Hold down any of the keys from the 1RPTkey to the 6 key.A “Beep” sounds, and the preset key isregistered.
The top 6 stations with a strong signal can beautomatically registered in order with presetkeys in the AUTO-P mode.Hold down the AUTO-P key.Switch to the AUTO-P mode, and start auto-matic station selection.After completion of operations, the productwill receive the station registered in the presetkey [1].
Manual/Seek Station Selection
/SEL key(counter-clockwise)
Reduces the frequency being received.
/SEL key(clockwise)
Increases the frequency being received.
key
(hold down)
Release the button to start seek station selection, and when a station is received, scanning stops.
key
(hold down)Scan Station Selection
NOTE
�zPress this button again while receiving thestation to return to normal reception.
Preset Memory
NOTE
�zThe preset memory can register a maximumof 6 stations for each band.�zIf a preset key that al
ready has a station reg-
istered is selected, then this is overwrittenwith the new preset.�zPressing the preset key will select the previ-ously registered frequency.
Auto Preset
CAUTION�zPlease be aware that the formerly-registeredfrequency in the memory will be overwrit-ten.NOTE
�zSeparate to normal re
ception preset keys,
this registers in preset keys in the AUTO-Pmode.�zPressing the preset key will select the previ-ously registered frequency.�zEach time the AUTO-P key is pressed, thisswitches between normal reception andAUTO-P mode.�zIn the AUTO-P mode, manual/seek stationselection, as well as scan operation is alsopossible.
BK0203201EN.book 25 ページ 2013年11月19日 火曜日 午前11時50分
Page 263 of 388
Listen to CDs8-26 For pleasant driving
8
E00737800033
This explains how to listen to audio CDs(CD-DA/CD-TEXT).Insert the disc.Insert a disc to automatically start playback.�m “Insert/Eject Discs” (P.8-22)If a disc is already within the product, pressthe MEDIA key to switch to CD as thesource.Press the key or key to select thetrack.This enables selection of the next or previoustrack.Hold down the 3 key or the 4 key.Fast forward/rewind is possible.
Repeat playback, random playback, and scanplayback are possible.Press the 1RPT key.Repeat playback of the track currently beingplayed.Press the 2RDM key.Play the tracks on the disc in a random order.
Press the SCAN key.Play the first 10 seconds of each of the trackson the whole disc in order.
E00737900034
This explains how to listen to audio files on adisc.Insert the disc.Insert a disc to automatically start playback.�m “Insert/Eject Discs” (P.8-22)
Listen to CDs Play CDs Select the Track Fast Forward or Rewind
Switch Playback Mode Repeat Playback (RPT)
NOTE
�zPressing again will cancel.�zSelecting a track, ejecting, fast forwarding,or rewinding will cancel.
Random Playback (RDM)
NOTE
�zPressing again will cancel.�zEjecting will cancel this.
Scan Playback (SCAN)
NOTE
�zPress this button agai
n during playback if
you wish to hear that track, and that trackwill play normally.
Listen to MP3s
CAUTION�zCD-ROM and CD-R/RW media can onlyplay back MP3 format audio files.
To L i s t e n t o M P 3 s
BK0203201EN.book 26 ページ 2013年11月19日 火曜日 午前11時50分
Page 264 of 388

Listen to MP3s
For pleasant driving 8-27
8
If a disc is already within the product, pressthe MEDIA key to switch to CD as thesource.Press the key or key to select thetrack.This enables selection of the next or previoustrack.Hold down the 3 key or the 4 key.Fast forward/rewind is possible.Repeat playback, random playback, and scanplayback are possible.
Press the 1RPT key.Repeat playback of the track currently beingplayed.Hold down the 1RPT key.Repeat playback of the tracks within thefolder currently being played.Press the 2RDM key.
Play the tracks in the folder in a randomorder.Hold down the 2RDM key.Play all tracks in folders on the disc in a ran-dom order.Press the SCAN key.Play the first 10 seconds of each of the tracksin the folder currently being played in order.Search folders and files, and select a track.1. Turn the /SEL key to select the folder.
NOTE
�zDepending on the file structure, it may takesome time to read the contents of the disc.
Select the Track (File) Fast Forward or Rewind Switch Playback Mode
Repeat Playback (RPT)
NOTE
�zPressing again will cancel.�zSelecting a file, ejecti
ng, fast forwarding, or
rewinding will cancel.
Folder Repeat Playback
NOTE
�zPressing again will cancel.�zEven if the file is selected, folder repeatplayback will not be cancelled.
Random Playback (RDM)
NOTE
�zPressing again will cancel.
Folder Random Playback
NOTE
�zPressing again will cancel.
Scan Playback (SCAN) Search Tracks
BK0203201EN.book 27 ページ 2013年11月19日 火曜日 午前11時50分