2014 MITSUBISHI LANCER SPORTBACK tow
[x] Cancel search: towPage 347 of 422
Towing 8-14 For emergencies
8
Place the gearshift lever in the “Neutral” position. Turn the ignition switch to the “ACC” posi-tion and secure the steering wheel in a straight-ahead position with a rope or tie- down strap. Never place the ignition switch inthe “LOCK” position when towing. Release the parking brake. Place the gearshift lever in the “Neutral”position (manual transaxle) or the selector
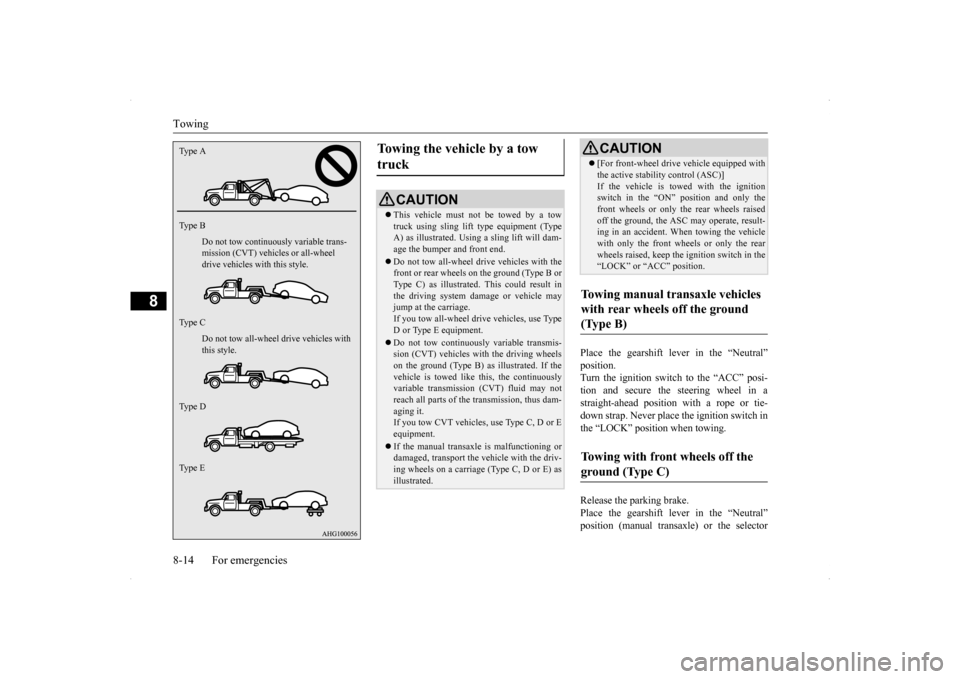
Type A Type B
Do not tow continuously variable trans- mission (CVT) vehicles or all-wheel drive vehicles with this style. Do not tow all-wheel drive vehicles with this style.
Type C Type D Type E
Towing the vehicle by a tow truck
CAUTION This vehicle must not be towed by a tow truck using sling lift type equipment (TypeA) as illustrated. Using a sling lift will dam- age the bumper and front end. Do not tow all-wheel drive vehicles with the front or rear wheels on the ground (Type B or Type C) as illustrated. This could result inthe driving system damage or vehicle may jump at the carriage. If you tow all-wheel drive vehicles, use TypeD or Type E equipment. Do not tow continuously variable transmis- sion (CVT) vehicles with the driving wheels on the ground (Type B) as illustrated. If the vehicle is towed like this, the continuouslyvariable transmission (CVT) fluid may not reach all parts of the transmission, thus dam- aging it.If you tow CVT vehicles, use Type C, D or E equipment. If the manual transaxle is malfunctioning or damaged, transport the vehicle with the driv- ing wheels on a carriage (Type C, D or E) as illustrated.
[For front-wheel drive vehicle equipped with the active stability control (ASC)] If the vehicle is towed with the ignition switch in the “ON” position and only the front wheels or only the rear wheels raisedoff the ground, the ASC may operate, result- ing in an accident. When towing the vehicle with only the front wheels or only the rearwheels raised, keep the ignition switch in the “LOCK” or “ACC” position.
Towing manual transaxle vehicles with rear wheels off the ground (Type B) Towing with front wheels off the ground (Type C)
CAUTION
BK0200700US.bo
ok 14 ページ 2013年2月15日 金曜日 午後12時17分
Page 348 of 422
Operation under adverse driving conditions
For emergencies 8-15
8
lever in the “N” (NEUTRAL) position (CVT).
N00837200705
If your vehicle becomes stuck in snow, sand, or mud, it can often be moved by a rocking motion. Rock your vehicle back and forth tofree it. Do not rev the engine or spin the wheels. Constant efforts to free a stuck vehicle cancause overheating and transaxle failure. Let the engine idle for a few minutes to cool the transaxle before trying again.If your vehicle is still stuck after several rock- ing attempts, call for a commercial tow truck service.
When driving on a road covered with snow or ice, use snow tires. Tire chains cannot be used on your vehicle. Theremay be state or local regulations about using snow tires. Always check the regu- lations in your local area before usingthem. Refer to the section entitled “Snow tires” on page 9-23 and “Tire chains” on page 9-24. Drive slowly. Do not make sudden starts or stops, sharp turns, or slam on the brakes. Allow extra distance between your vehi- cle and the vehicle in front of you, and avoid sudden braking. If a skid occurs when the accelerator pedal is depressed, take your foot off the pedal. Steer gently in the direction of the skid. Your vehicle is equipped with an anti-lock braking system (ABS). Hold the brake pedal down firmly and keep it depressed.Do not pump the brake pedal which will result in reduced braking performance.
WA R N I N G To prevent entry of exhaust gas from the towing vehicle, set the selection switch to the recirculation position.
Operation under adverse driving conditions If your vehicle becomes stuck in sand, mud or snow
WA R N I N G When trying to rock your vehicle out of a stuck position, make sure that there are no people nearby. The rocking motion can make your vehicle suddenly lurch forward or backward, and injure any bystanders.
On wet roads
CAUTION Avoid flooded roads. Water is often deeper than it looks, and you could be seriously hurt by driving into flood water. When driving in rain, on water-covered roads, or through a car wash, water could getinto the brake discs and make them fail tem- porarily. In such cases
, lightly press the
brake pedal to see if they are working prop-erly. If they are not, press the pedal lightly several times while driving to dry the brake pads or linings, then check them again. When driving in rain, a layer of water may form between the tires and the road surface(aquaplaning). This loosens your tires’ grip on the road, making it difficult to steer or brake properly. When driving on a wet road:• Drive your vehicle at a safe speed.• Do not drive on worn tires.• Always keep the tires at the correct infla- tion pressures.
On snowy or icy roads
BK0200700US.bo
ok 15 ページ 2013年2月15日 金曜日 午後12時17分
Page 352 of 422
Engine hood
Vehicle care and maintenance 9-3
9
To reduce the possibility of catalytic con- verter damage: Use UNLEADED GASOLINE ONLY of the type of recommended in “Fuel selec- tion”. Do not drive with an extremely low fuel level. Running out of gas could damage the catalytic converter. Do not try to start the engine by pushing or towing the vehicle. If the battery is weak or run down, use jumper cables to properly start the engine.
Do not idle the engine with any spark plug wires disconnected or removed, such as when performing diagnostic tests. Do not idle the engine for a long time if it is idling roughly or otherwise obviously malfunctioning. To prevent the catalytic converter from being damaged from unburned gas, do not race the engine when turning off the igni- tion switch. Stop driving the vehicle if you think the performance is noticeably low, or the engine has a malfunction. If you are not able to stop driving immediately, slowdown and drive for only a short time. Have an inspection made by an authorized Mitsubishi Motors dealer or a repair facil-ity of your choice as soon as possible. In unusual situations involving major engine problems, a burning odor mayindicate severe and abnormal catalytic converter overheating. If this occurs, stop in a safe place, shut the engine off and letthe vehicle cool. Once the engine is cool, immediately take your vehicle to an authorized Mitsubishi Motors dealer or arepair facility of your choice for service.
N00937500523
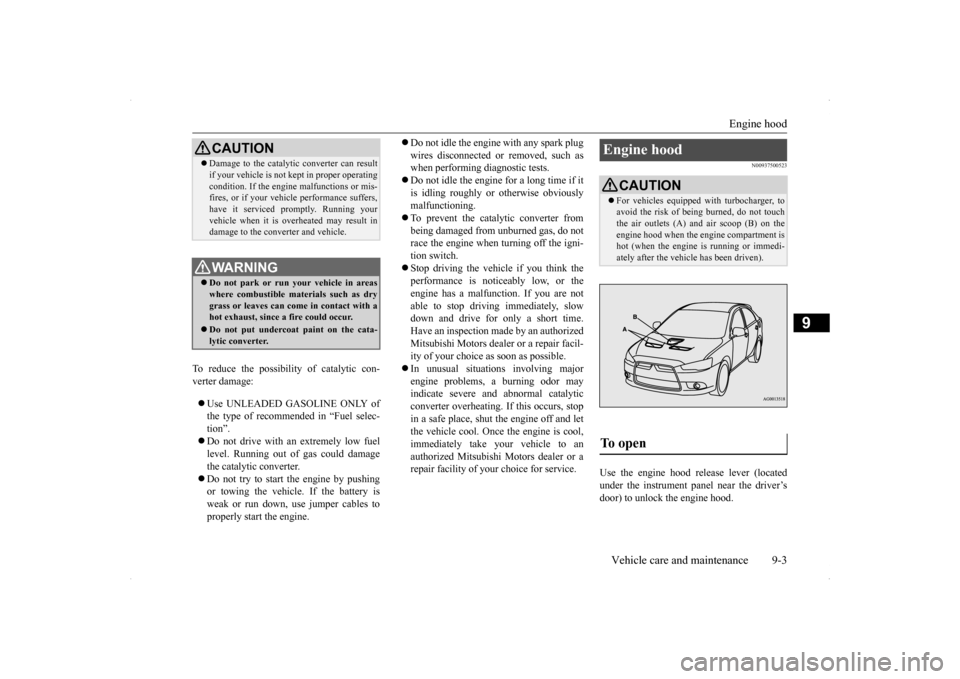
Use the engine hood release lever (locatedunder the instrument panel near the driver’sdoor) to unlock the engine hood.
CAUTION Damage to the catalytic converter can result if your vehicle is not kept in proper operating condition. If the engine malfunctions or mis- fires, or if your vehicle performance suffers, have it serviced promptly. Running yourvehicle when it is overheated may result in damage to the converter and vehicle.WA R N I N G Do not park or run your vehicle in areas where combustible materials such as dry grass or leaves can come in contact with a hot exhaust, since a fire could occur. Do not put undercoat paint on the cata- lytic converter.
Engine hood
CAUTION For vehicles equipped with turbocharger, to avoid the risk of being burned, do not touch the air outlets (A) and air scoop (B) on the engine hood when the engine compartment ishot (when the engine is running or immedi- ately after the vehicle has been driven).
To open
BK0200700US.bo
ok 3 ページ 2013年2月15日 金曜日 午後12時17分
Page 353 of 422
Engine hood 9-4 Vehicle care and maintenance
9
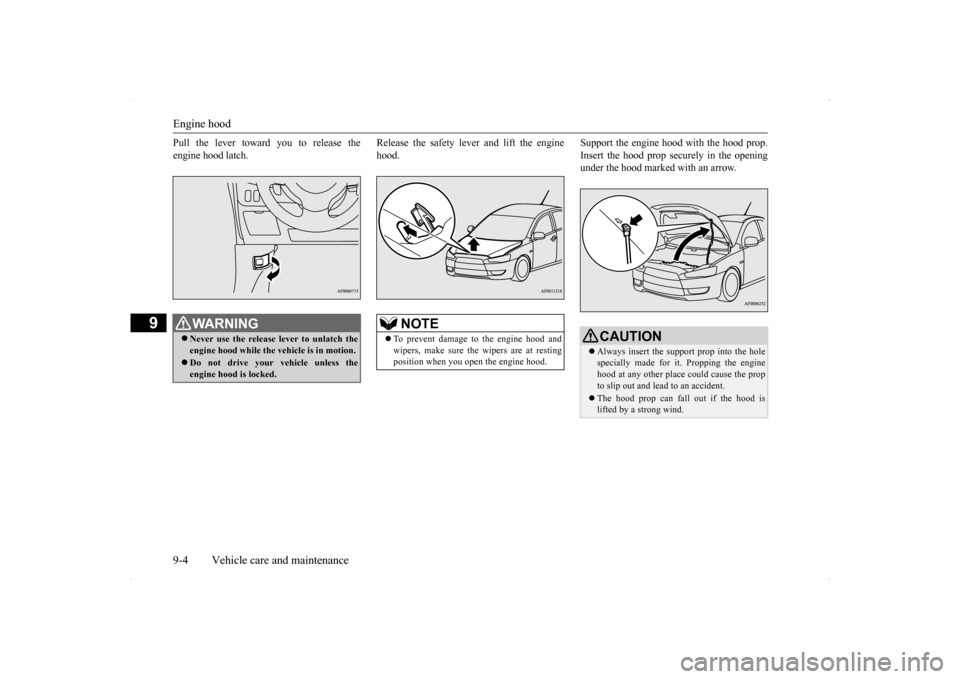
Pull the lever toward you to release the engine hood latch.
Release the safety lever and lift the engine hood.
Support the engine hood with the hood prop. Insert the hood prop securely in the opening under the hood marked with an arrow.
WA R N I N G Never use the release lever to unlatch the engine hood while the vehicle is in motion. Do not drive your vehicle unless the engine hood is locked.
NOTE
To prevent damage to the engine hood and wipers, make sure the wipers are at restingposition when you open the engine hood.
CAUTION Always insert the support prop into the hole specially made for it. Propping the engine hood at any other place could cause the propto slip out and lead to an accident. The hood prop can fall out if the hood is lifted by a strong wind.
BK0200700US.bo
ok 4 ページ 2013年2月15日 金曜日 午後12時17分
Page 384 of 422
Replacement of light bulbs
Vehicle care and maintenance 9-35
9
N00950400545
N00901800091
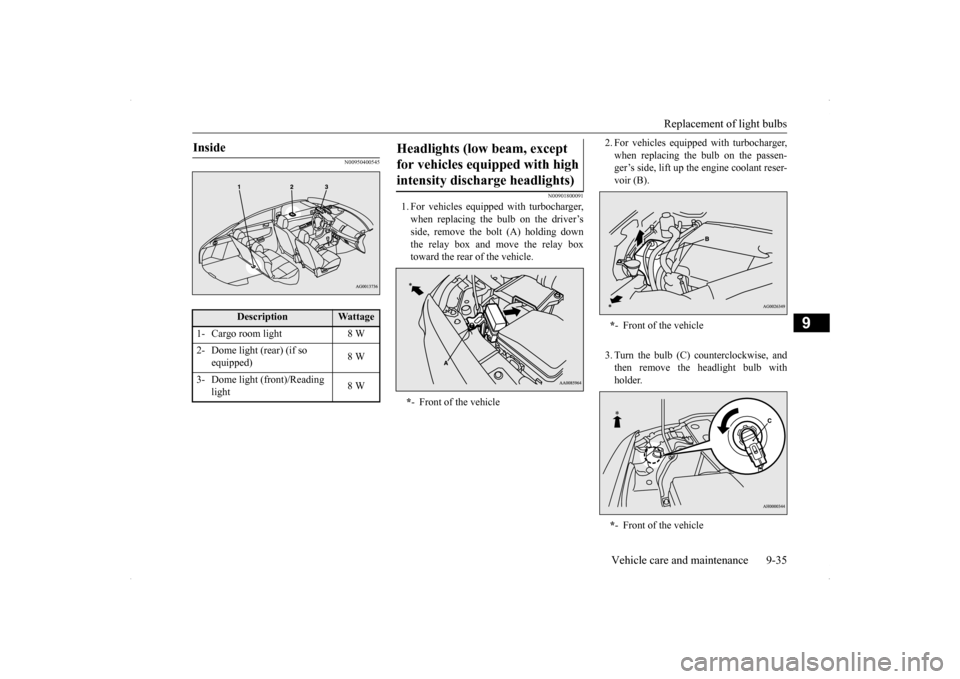
1. For vehicles equipped with turbocharger, when replacing the bulb on the driver’s side, remove the bolt (A) holding downthe relay box and move the relay box toward the rear of the vehicle.
2. For vehicles equipped with turbocharger, when replacing the bulb on the passen- ger’s side, lift up the engine coolant reser- voir (B). 3. Turn the bulb (C) counterclockwise, and then remove the headlight bulb with holder.
Inside
Description
Wattage
1- Cargo room light 8 W2- Dome light (rear) (if so
equipped)
8 W
3- Dome light (front)/Reading
light
8 W
Headlights (low beam, except for vehicles equipped with high intensity discharge headlights) * - Front of the vehicle
*- Front of the vehicle * - Front of the vehicle
BK0200700US.bo
ok 35 ページ 2013年2月15日 金曜日 午後12時17分
Page 385 of 422
Replacement of light bulbs 9-36 Vehicle care and maintenance
9
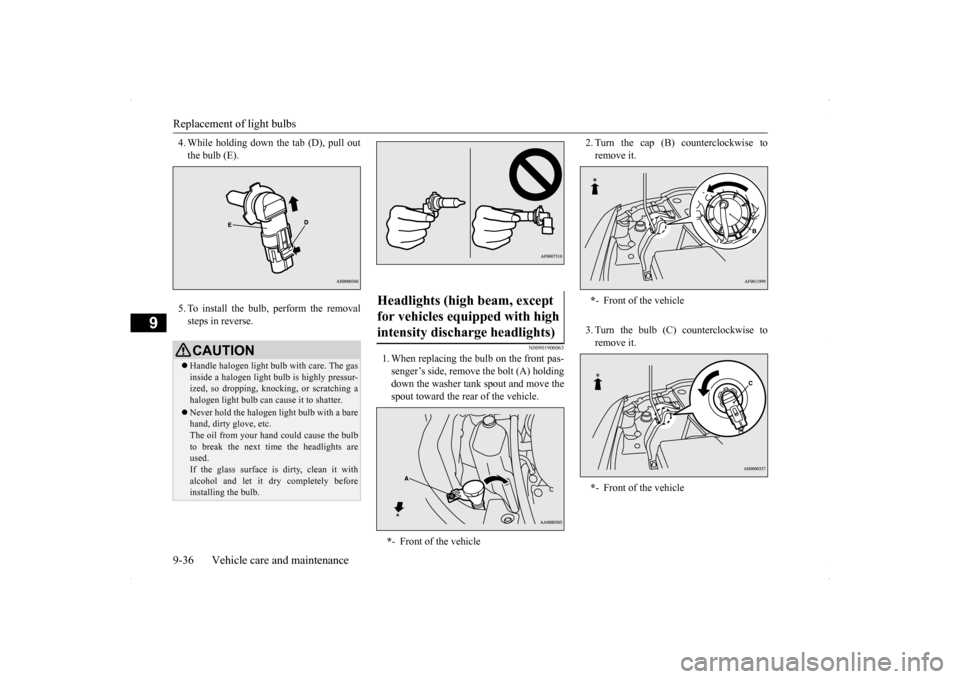
4. While holding down the tab (D), pull out the bulb (E). 5. To install the bulb, perform the removal steps in reverse.
N00901900063
1. When replacing the bulb on the front pas-senger’s side, remove the bolt (A) holdingdown the washer tank spout and move thespout toward the rear of the vehicle.
2. Turn the cap (B) counterclockwise to remove it. 3. Turn the bulb (C) counterclockwise to remove it.
CAUTION Handle halogen light bulb with care. The gas inside a halogen light bulb is highly pressur- ized, so dropping, knocking, or scratching ahalogen light bulb can cause it to shatter. Never hold the halogen light bulb with a bare hand, dirty glove, etc. The oil from your hand could cause the bulb to break the next time the headlights areused. If the glass surface is dirty, clean it with alcohol and let it dry completely beforeinstalling the bulb.
Headlights (high beam, except for vehicles equipped with high intensity discharge headlights) * - Front of the vehicle
*- Front of the vehicle * - Front of the vehicle
BK0200700US.bo
ok 36 ページ 2013年2月15日 金曜日 午後12時17分
Page 386 of 422
Replacement of light bulbs
Vehicle care and maintenance 9-37
9
4. While holding down
the tab (D), pull out
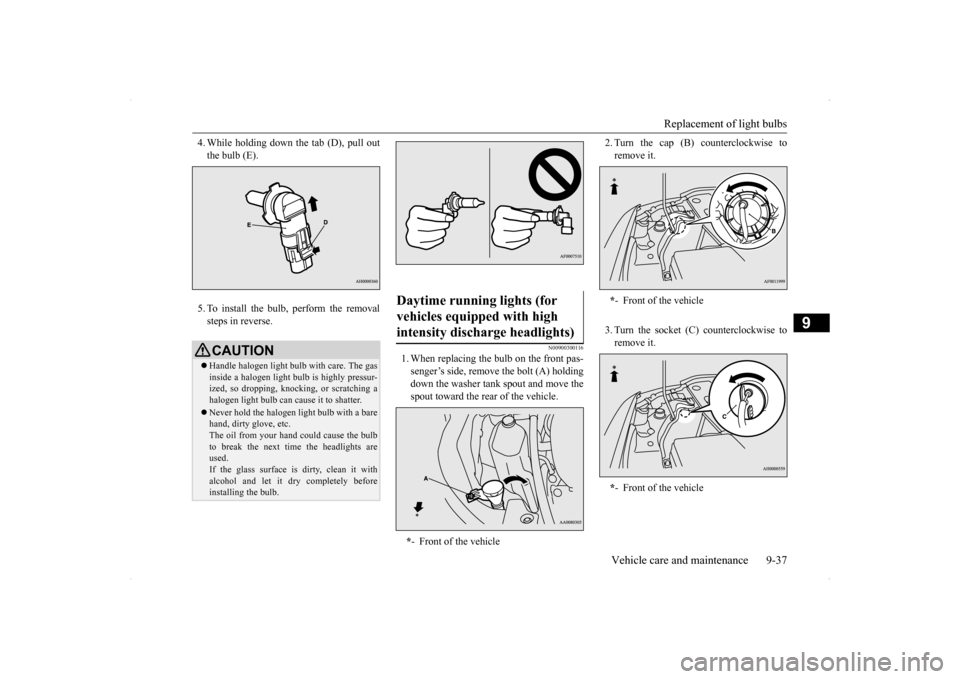
the bulb (E). 5. To install the bulb, perform the removal steps in reverse.
N00900300116
1. When replacing the bulb on the front pas-senger’s side, remove the bolt (A) holdingdown the washer tank spout and move thespout toward the rear of the vehicle.
2. Turn the cap (B) counterclockwise to remove it. 3. Turn the socket (C) counterclockwise to remove it.
CAUTION Handle halogen light bulb with care. The gas inside a halogen light bulb is highly pressur- ized, so dropping, knocking, or scratching ahalogen light bulb can cause it to shatter. Never hold the halogen light bulb with a bare hand, dirty glove, etc. The oil from your hand could cause the bulb to break the next time the headlights areused. If the glass surface is dirty, clean it with alcohol and let it dry completely beforeinstalling the bulb.
Daytime running lights (for vehicles equipped with high intensity discharge headlights) * - Front of the vehicle
*- Front of the vehicle * - Front of the vehicle
BK0200700US.bo
ok 37 ページ 2013年2月15日 金曜日 午後12時17分
Page 387 of 422

Replacement of light bulbs 9-38 Vehicle care and maintenance
9
4. Turn the bulb counterclockwise while pressing it and pull it out of the socket. 5. To install a bulb, perform the removal steps in reverse.
N00902000029
Do not attempt to disassemble or repair head- lights, and do not attempt to replace their bulbs.
N00943200121
The alignment of the headlights should bechecked by an authorized Mitsubishi Motorsdealer or a repair facility of your choice.
N00917300495
1. For vehicles equipped with turbocharger,when replacing the bulb on the driver’sside, remove the bo
lt (A) holding down
the relay box and move the relay box toward the rear of the vehicle.
2. For vehicles equipped with turbocharger, when replacing the bulb on the passen- ger’s side, lift up the engine coolant reser- voir (B). 3. Turn the socket (C) counterclockwise to remove it.
Headlights (low/high beam, for vehicles equipped with high intensity discharge lights)
WA R N I N G A high voltage is present in the power cir- cuit and in the bulbs and bulb terminals. To avoid the risk of an electric shock, con-tact an authorized Mitsubishi dealer whenever repair or replacement is neces- sary.
Adjustment of headlight aim Front side-marker and parking lights (except for vehicles equipped with high intensity discharge headlights) * - Front of the vehicle
*- Front of the vehicle * - Front of the vehicle
BK0200700US.bo
ok 38 ページ 2013年2月15日 金曜日 午後12時17分