2014 MERCEDES-BENZ E-SEDAN instrument cluster
[x] Cancel search: instrument clusterPage 132 of 430
take precedence over the daytime running
lamps.
Low-beam headlamps G
WARNING
When the light switch is set to Ã, the low-
beam headlamps may not be switched on
automatically if there is fog, snow or other
causes of poor visibility due to the weather
conditions such as spray. There is a risk of an
accident.
In such situations, turn the light switch to
L. 1W
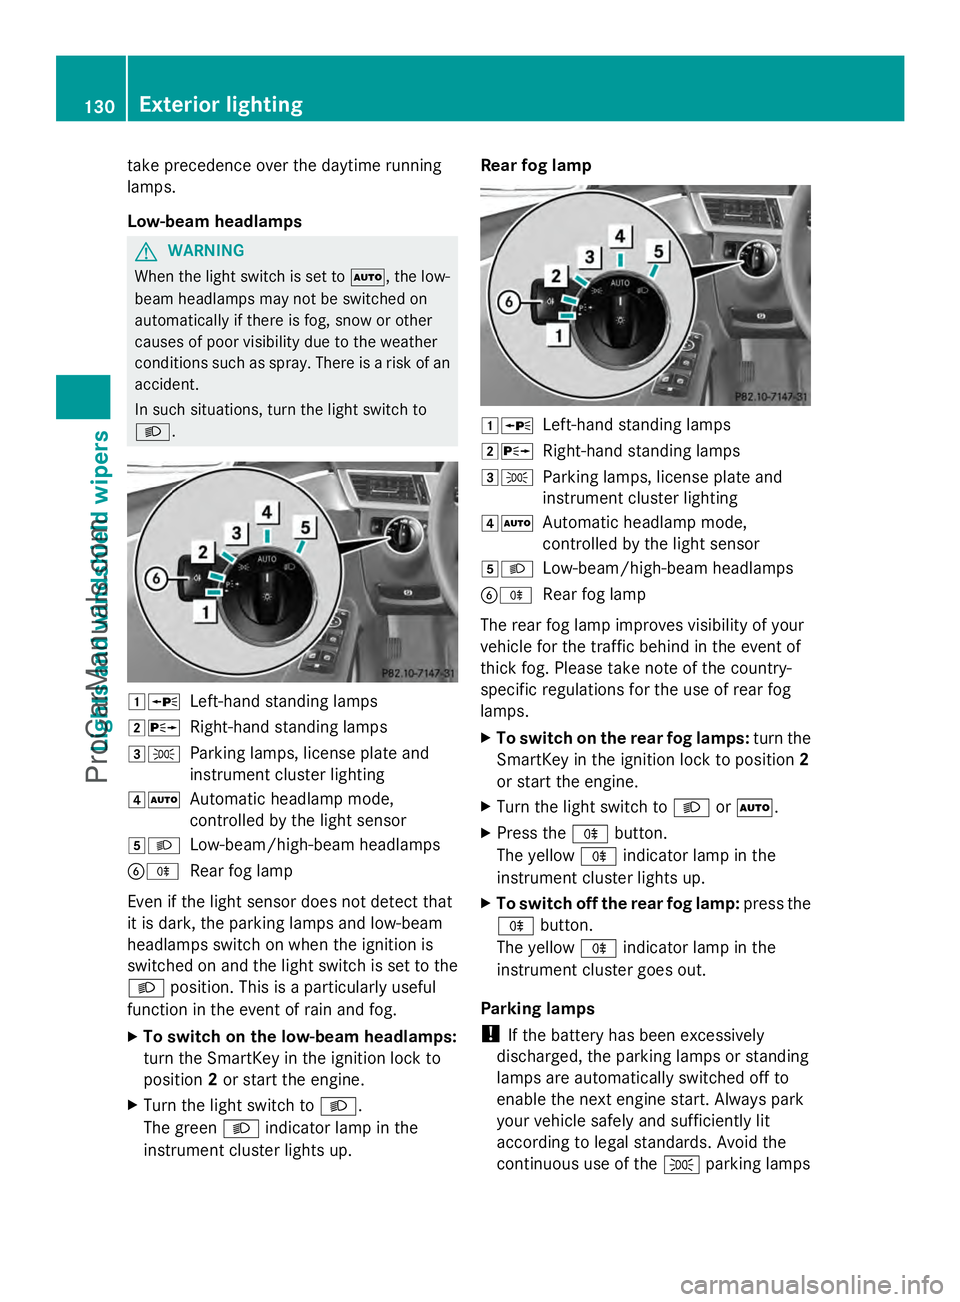
Left-hand standing lamps
2X Right-hand standing lamps
3T Parking lamps, license plate and
instrument cluster lighting
4Ã Automatic headlamp mode,
controlled by the light sensor
5L Low-beam/high-beam headlamps
BR Rear fog lamp
Even if the light sensor does not detect that
it is dark, the parking lamps and low-beam
headlamps switch on when the ignition is
switched on and the light switch is set to the
L position. This is a particularly useful
function in the event of rain and fog.
X To switch on the low-beam headlamps:
turn the SmartKey in the ignition lock to
position 2or start the engine.
X Turn the light switch to L.
The green Lindicator lamp in the
instrument cluster lights up. Rear fog lamp
1W
Left-hand standing lamps
2X Right-hand standing lamps
3T Parking lamps, license plate and
instrument cluster lighting
4Ã Automatic headlamp mode,
controlled by the light sensor
5L Low-beam/high-beam headlamps
BR Rear fog lamp
The rear fog lamp improves visibility of your
vehicle for the traffic behind in the event of
thick fog. Please take note of the country-
specific regulations for the use of rear fog
lamps.
X To switch on the rear fog lamps: turn the
SmartKey in the ignition lock to position 2
or start the engine.
X Turn the light switch to LorÃ.
X Press the Rbutton.
The yellow Rindicator lamp in the
instrument cluster lights up.
X To switch off the rear fog lamp: press the
R button.
The yellow Rindicator lamp in the
instrument cluster goes out.
Parking lamps
! If the battery has been excessively
discharged, the parking lamps or standing
lamps are automatically switched off to
enable the next engine start. Always park
your vehicle safely and sufficiently lit
according to legal standards. Avoid the
continuous use of the Tparking lamps 130
Exterior lightingLights and
windshield wipers
ProCarManuals.com
Page 133 of 430
for several hours. If possible, switch on the
X right or the Wleft standing lamp. 1W
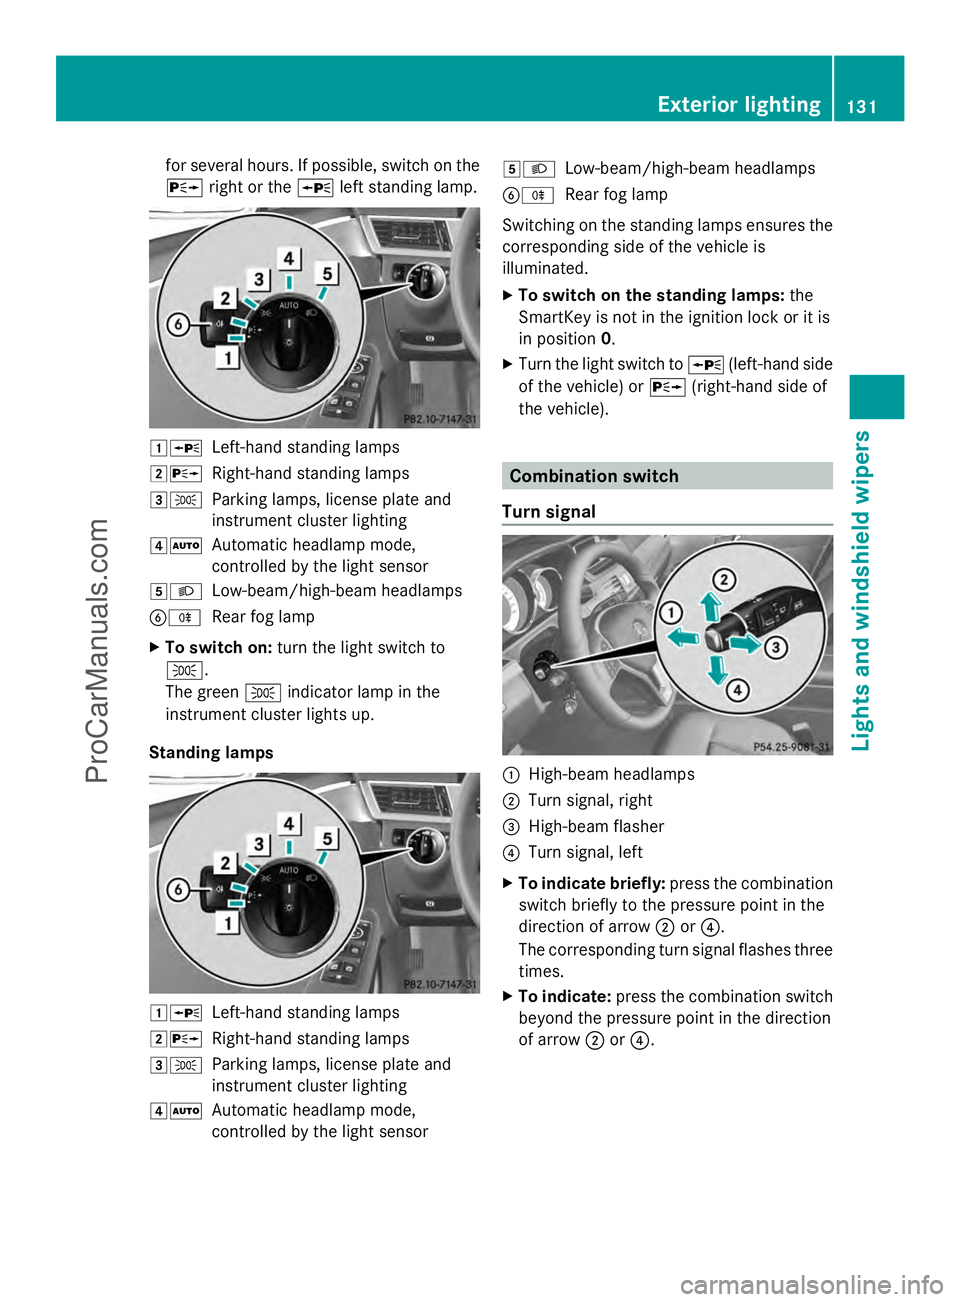
Left-hand standing lamps
2X Right-hand standing lamps
3T Parking lamps, license plate and
instrument cluster lighting
4Ã Automatic headlamp mode,
controlled by the light sensor
5L Low-beam/high-beam headlamps
BR Rear fog lamp
X To switch on: turn the light switch to
T.
The green Tindicator lamp in the
instrument cluster lights up.
Standing lamps 1W
Left-hand standing lamps
2X Right-hand standing lamps
3T Parking lamps, license plate and
instrument cluster lighting
4Ã Automatic headlamp mode,
controlled by the light sensor 5L
Low-beam/high-beam headlamps
BR Rear fog lamp
Switching on the standing lamps ensures the
corresponding side of the vehicle is
illuminated.
X To switch on the standing lamps: the
SmartKey is not in the ignition lock or it is
in position 0.
X Turn the light switch to W(left-hand side
of the vehicle) or X(right-hand side of
the vehicle). Combination switch
Turn signal :
High-beam headlamps
; Turn signal, right
= High-beam flasher
? Turn signal, left
X To indicate briefly: press the combination
switch briefly to the pressure point in the
direction of arrow ;or?.
The corresponding turn signal flashes three
times.
X To indicate: press the combination switch
beyond the pressure point in the direction
of arrow ;or?. Exterior lighting
131Lights and windshield wipers Z
ProCarManuals.com
Page 134 of 430
High-beam headlamps
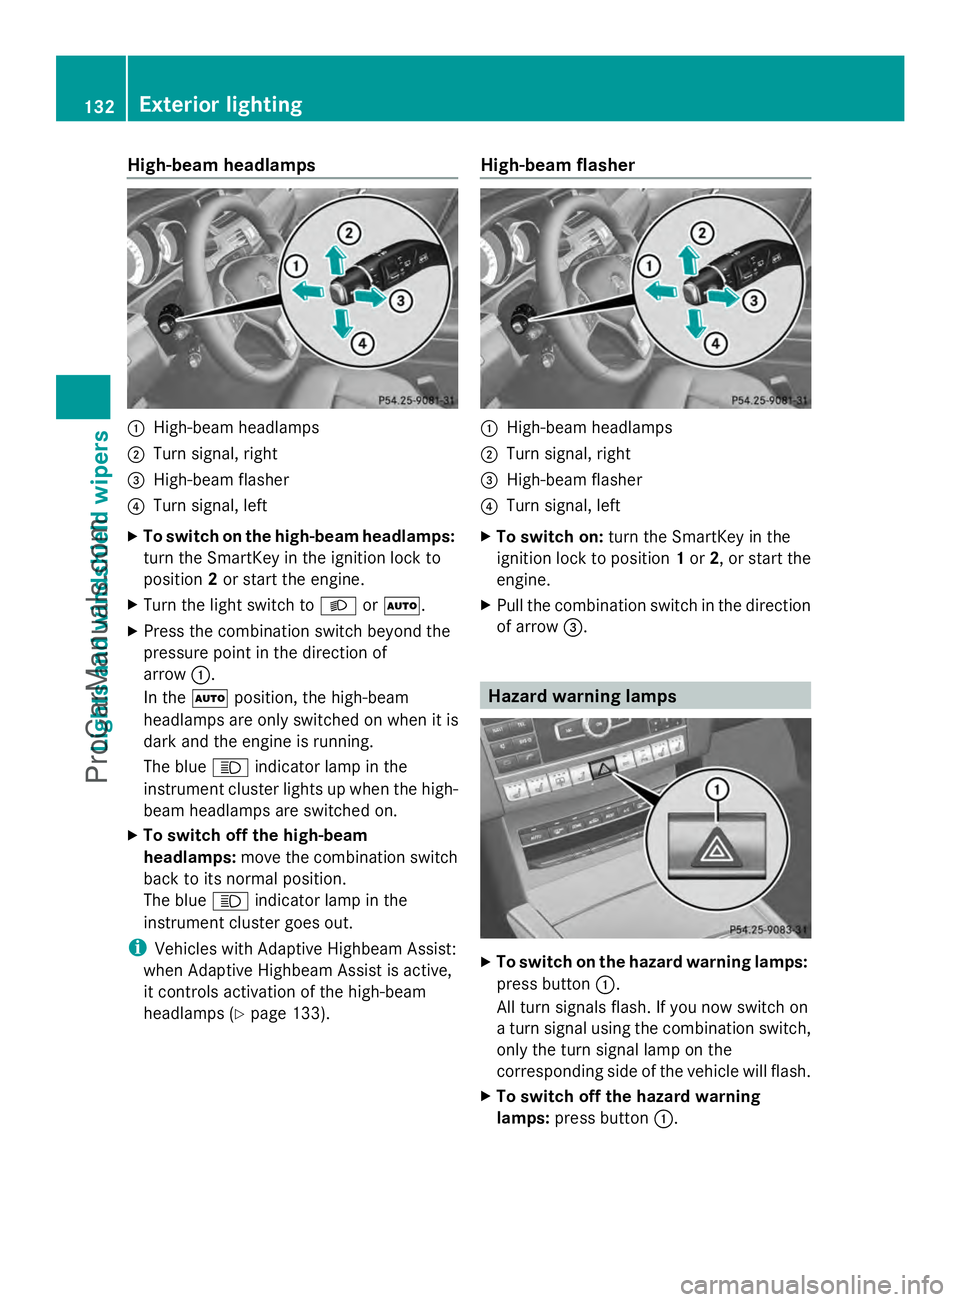
:
High-beam headlamps
; Turn signal, right
= High-beam flasher
? Turn signal, left
X To switch on the high-beam headlamps:
turn the SmartKey in the ignition lock to
position 2or start the engine.
X Turn the light switch to LorÃ.
X Press the combination switch beyond the
pressure point in the direction of
arrow :.
In the Ãposition, the high-beam
headlamps are only switched on when it is
dark and the engine is running.
The blue Kindicator lamp in the
instrument cluster lights up when the high-
beam headlamps are switched on.
X To switch off the high-beam
headlamps: move the combination switch
back to its normal position.
The blue Kindicator lamp in the
instrument cluster goes out.
i Vehicles with Adaptive Highbeam Assist:
when Adaptive Highbeam Assist is active,
it controls activation of the high-beam
headlamps (Y page 133). High-beam flasher :
High-beam headlamps
; Turn signal, right
= High-beam flasher
? Turn signal, left
X To switch on: turn the SmartKey in the
ignition lock to position 1or 2, or start the
engine.
X Pull the combination switch in the direction
of arrow =. Hazard warning lamps
X
To switch on the hazard warning lamps:
press button :.
All turn signals flash. If you now switch on
a turn signal using the combination switch,
only the turn signal lamp on the
corresponding side of the vehicle will flash.
X To switch off the hazard warning
lamps: press button :.132
Exterior lightingLights and windshield wipers
ProCarManuals.com
Page 136 of 430
Adaptive Highbeam Assist cannot take into
account road, weather or traffic conditions.
Adaptive Highbeam Assist is only an aid. You
are responsible for adjusting the vehicle's
lighting to the prevailing light, visibility and
traffic conditions.
In particular, the detection of obstacles can
be restricted if there is:
R poor visibility, e.g. due to fog, heavy rain or
snow
R dirt on the sensors or the sensors are
obscured
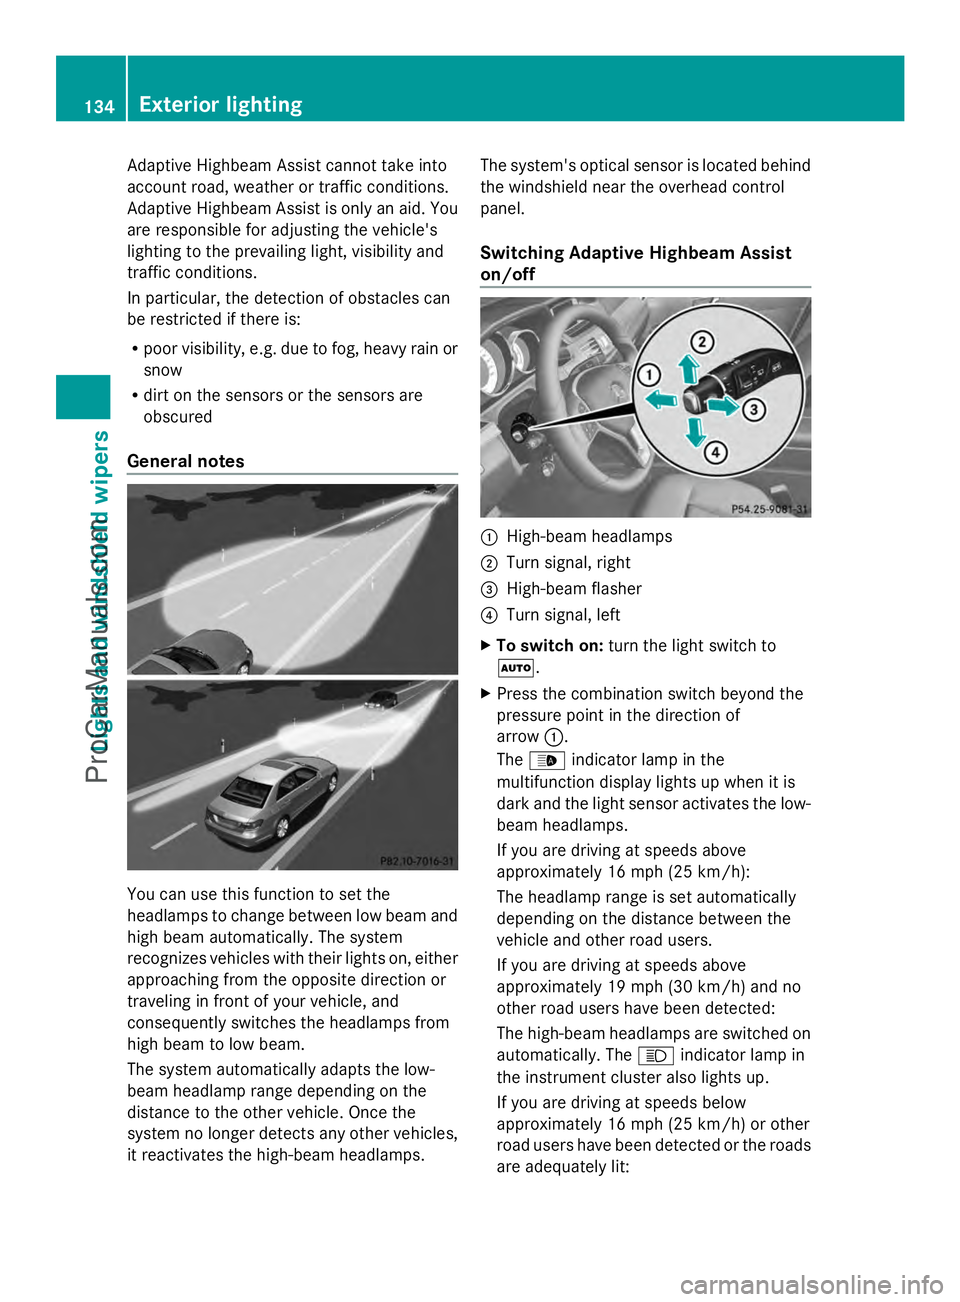
General notes You can use this function to set the
headlamps to change between low beam and
high beam automatically. The system
recognizes vehicles with their lights on, either
approaching from the opposite direction or
traveling in front of your vehicle, and
consequently switches the headlamps from
high beam to low beam.
The system automatically adapts the low-
beam headlamp range depending on the
distance to the other vehicle. Once the
system no longer detects any other vehicles,
it reactivates the high-beam headlamps. The system's optical sensor is located behind
the windshield near the overhead control
panel.
Switching Adaptive Highbeam Assist
on/off
:
High-beam headlamps
; Turn signal, right
= High-beam flasher
? Turn signal, left
X To switch on: turn the light switch to
Ã.
X Press the combination switch beyond the
pressure point in the direction of
arrow :.
The _ indicator lamp in the
multifunction display lights up when it is
dark and the light sensor activates the low-
beam headlamps.
If you are driving at speeds above
approximately 16 mph (25 km/h):
The headlamp range is set automatically
depending on the distance between the
vehicle and other road users.
If you are driving at speeds above
approximately 19 mph (30 km/h) and no
other road users have been detected:
The high-beam headlamps are switched on
automatically. The Kindicator lamp in
the instrument cluster also lights up.
If you are driving at speeds below
approximately 16 mph (25 km/h) or other
road users have been detected or the roads
are adequately lit: 134
Exterior lightingLights and
windshield wipers
ProCarManuals.com
Page 137 of 430
The high-beam headlamps are switched off
automatically. The
Kindicator lamp in
the instrument cluster goes out. The _
indicator lamp in the multifunction display
remains lit.
X To switch off: move the combination
switch back to its normal position or move
the light switch to another position.
The _ indicator lamp in the instrument
cluster goes out. Headlamps fogged up on the inside
The headlamps may fog up on the inside if
there is high atmospheric humidity.
X Switch on the light and drive off.
The level of moisture diminishes,
depending on the length of the journey and
the weather conditions (humidity and
temperature).
If the level of moisture does not diminish:
X Have the headlamps checked at a qualified
specialist workshop. Interior lighting
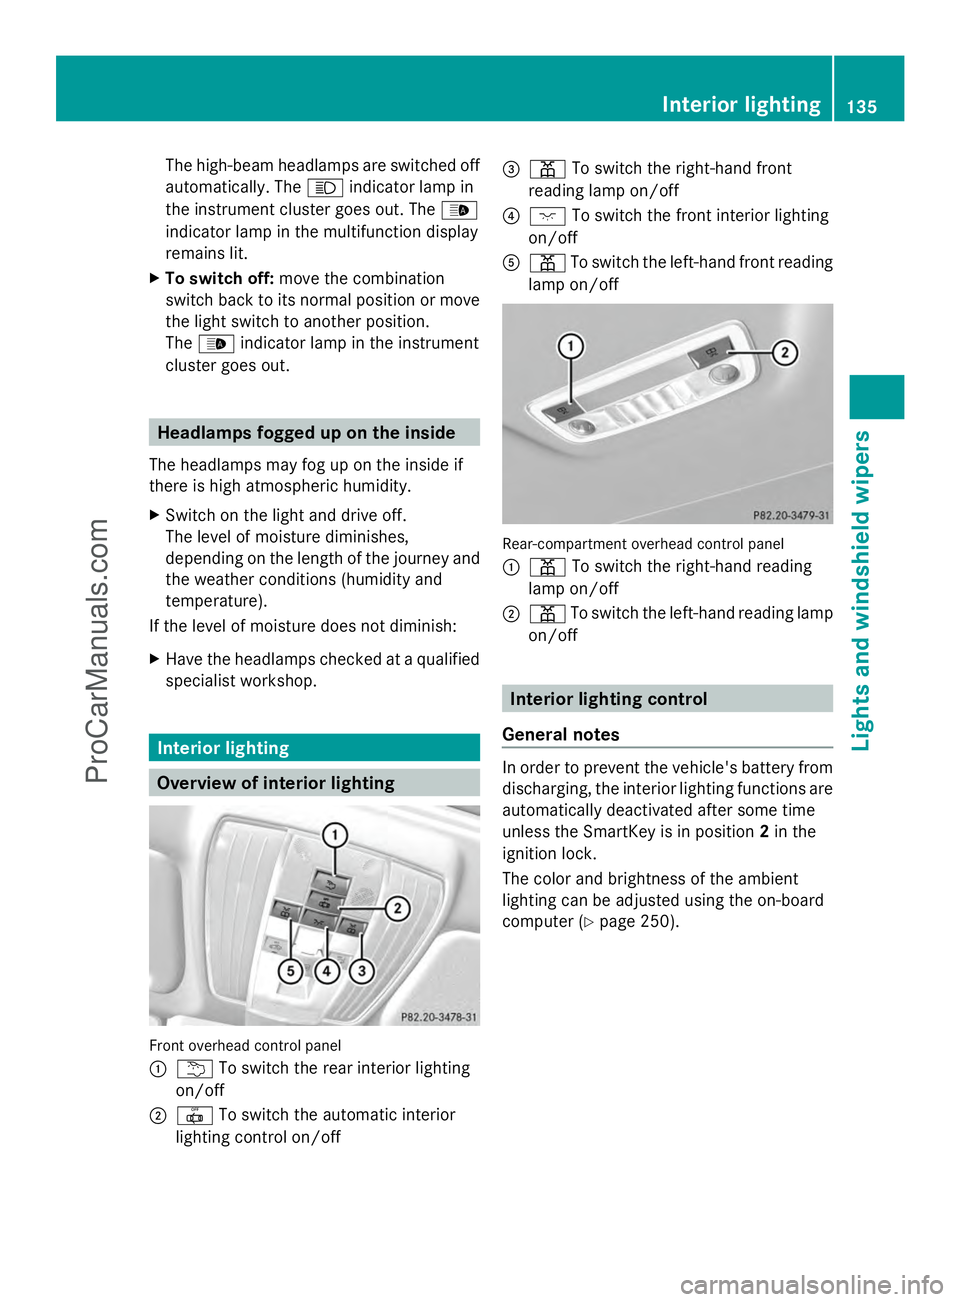
Overview of interior lighting
Front overhead control panel
:
u To switch the rear interior lighting
on/off
; | To switch the automatic interior
lighting control on/off =
p To switch the right-hand front
reading lamp on/off
? c To switch the front interior lighting
on/off
A p To switch the left-hand front reading
lamp on/off Rear-compartment overhead control panel
:
p To switch the right-hand reading
lamp on/off
; p To switch the left-hand reading lamp
on/off Interior lighting control
General notes In order to prevent the vehicle's battery from
discharging, the interior lighting functions are
automatically deactivated after some time
unless the SmartKey is in position
2in the
ignition lock.
The color and brightness of the ambient
lighting can be adjusted using the on-board
computer (Y page 250). Interior lighting
135Lights and windshield wipers Z
ProCarManuals.com
Page 141 of 430
3
Å Intermittent wipe, high (rain sensor
set to high sensitivity)
4 ° Continuous wipe, slow
5 ¯ Continuous wipe, fast
B í Single wipe/î To wipe the
windshield using washer fluid
X Switch on the ignition.
X Turn the combination switch to the
corresponding position.
In the ÄorÅ position, the appropriate
wiping frequency is set automatically
according to the intensity of the rain. In
the Å position, the rain sensor is more
sensitive than in the Äposition, causing
the windshield wipers to wipe more
frequently.
If the wiper blades are worn, the windshield
will no longer be wiped properly. This could
prevent you from observing the traffic
conditions. Replace the wiper blades twice a
year, ideally in spring and fall. Switching the rear window wiper on/
off
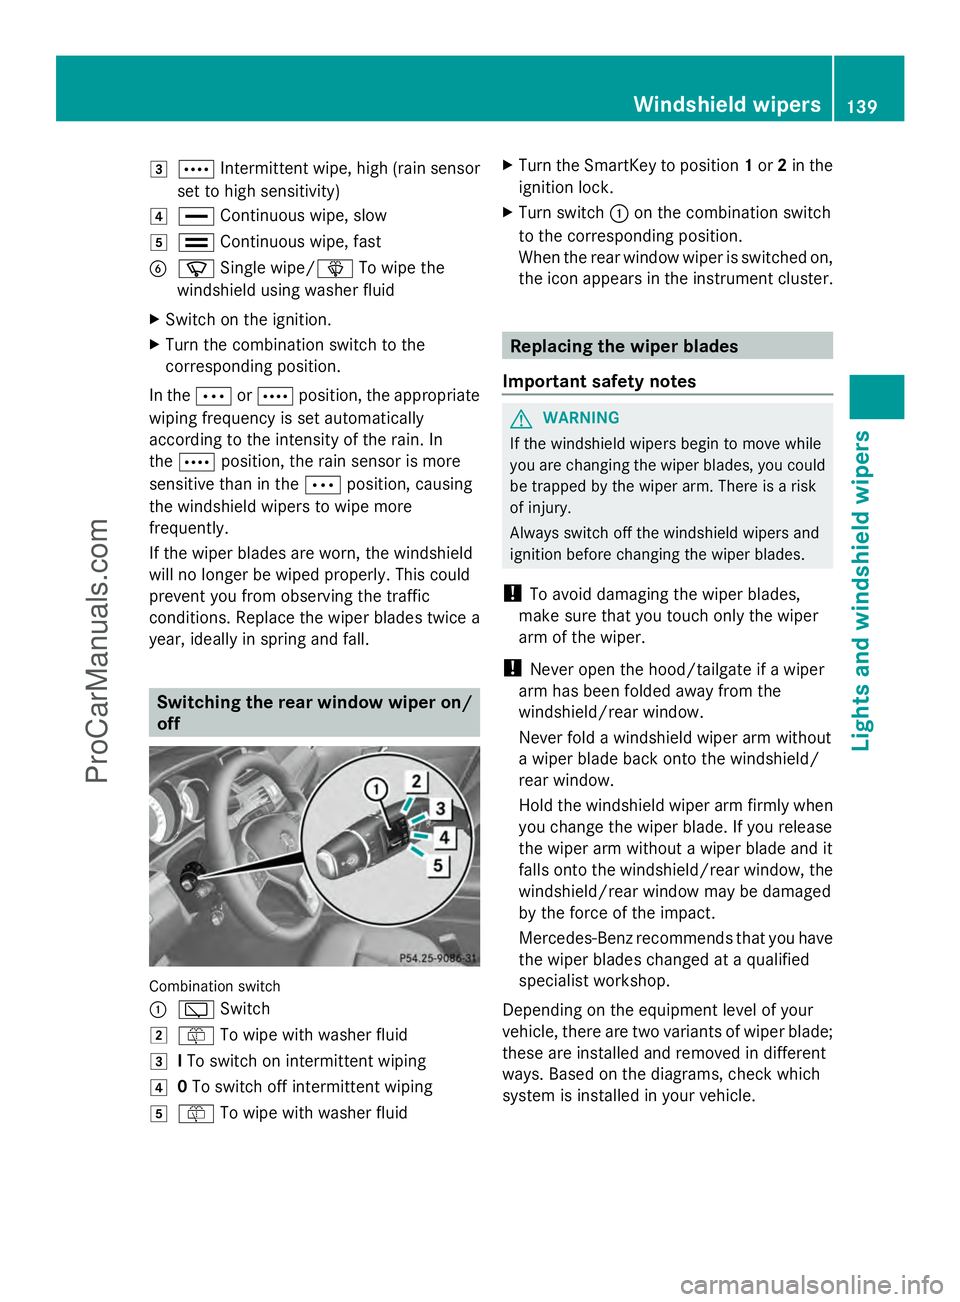
Combination switch
:
è Switch
2 ô To wipe with washer fluid
3 ITo switch on intermittent wiping
4 0To switch off intermittent wiping
5 ô To wipe with washer fluid X
Turn the SmartKey to position 1or 2in the
ignition lock.
X Turn switch :on the combination switch
to the corresponding position.
When the rear window wiper is switched on,
the icon appears in the instrument cluster. Replacing the wiper blades
Important safety notes G
WARNING
If the windshield wipers begin to move while
you are changing the wiper blades, you could
be trapped by the wiper arm. There is a risk
of injury.
Always switch off the windshield wipers and
ignition before changing the wiper blades.
! To avoid damaging the wiper blades,
make sure that you touch only the wiper
arm of the wiper.
! Never open the hood/tailgate if a wiper
arm has been folded away from the
windshield/rear window.
Never fold a windshield wiper arm without
a wiper blade back onto the windshield/
rear window.
Hold the windshield wiper arm firmly when
you change the wiper blade. If you release
the wiper arm without a wiper blade and it
falls onto the windshield/rear window, the
windshield/rear window may be damaged
by the force of the impact.
Mercedes-Benz recommends that you have
the wiper blades changed at a qualified
specialist workshop.
Depending on the equipment level of your
vehicle, there are two variants of wiper blade;
these are installed and removed in different
ways. Based on the diagrams, check which
system is installed in your vehicle. Windshield wipers
139Lights and windshield wipers Z
ProCarManuals.com
Page 162 of 430
This can affect the functionality of
KEYLESS-GO.
Vehicles with KEYLESS-GO are equipped with
SmartKeys featuring the integrated KEYLESS-
GO function and a detachable Start/Stop
button.
The Start/Stop button must be inserted in the
ignition lock and the SmartKey must be in the
vehicle.
Pressing the Start/Stop button several times
in succession corresponds to the different
SmartKey positions in the ignition lock. This
is only the case if you are not depressing the
brake pedal.
If you depress the brake pedal and press the
Start/Stop button, the engine starts
immediately.
The Start/Stop button can be removed from
the ignition lock. Then, you can insert the
SmartKey into the ignition lock.
i You do not have to remove the Start/Stop
button from the ignition lock when you
leave the vehicle. You should, however,
always take the SmartKey with you when
leaving the vehicle. As long as the
SmartKey is in the vehicle:
R the vehicle can be started using the
Start/Stop button and
R electrically powered equipment can be
operated.
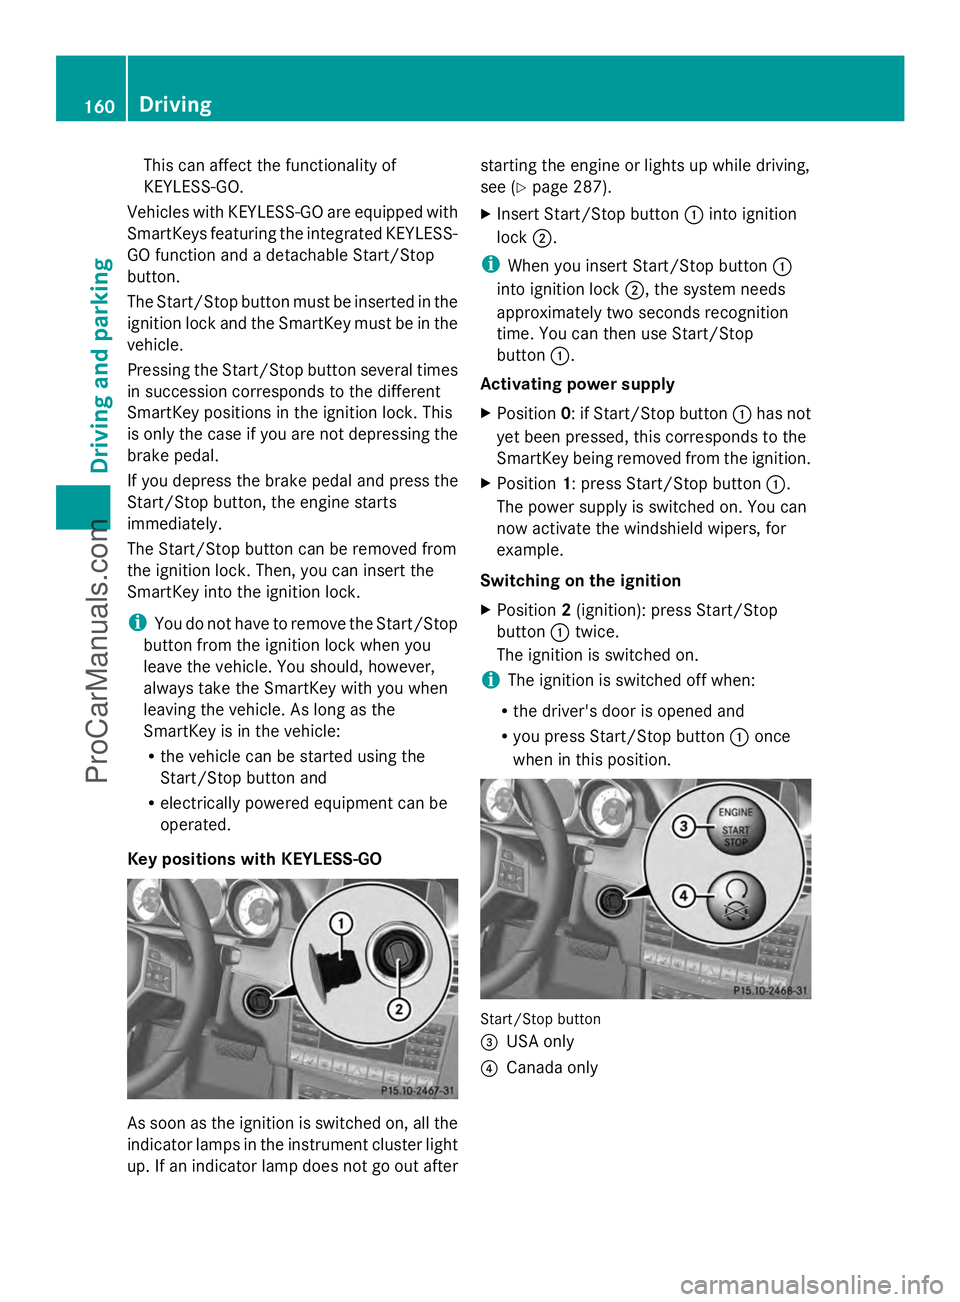
Key positions with KEYLESS-GO As soon as the ignition is switched on, all the
indicator lamps in the instrument cluster light
up. If an indicator lamp does not go out after starting the engine or lights up while driving,
see (Y
page 287).
X Insert Start/Stop button :into ignition
lock ;.
i When you insert Start/Stop button :
into ignition lock ;, the system needs
approximately two seconds recognition
time. You can then use Start/Stop
button :.
Activating power supply
X Position 0: if Start/Stop button :has not
yet been pressed, this corresponds to the
SmartKey being removed from the ignition.
X Position 1: press Start/Stop button :.
The power supply is switched on. You can
now activate the windshield wipers, for
example.
Switching on the ignition
X Position 2(ignition): press Start/Stop
button :twice.
The ignition is switched on.
i The ignition is switched off when:
R the driver's door is opened and
R you press Start/Stop button :once
when in this position. Start/Stop button
=
USA only
? Canada only 160
DrivingDriving and parking
ProCarManuals.com
Page 163 of 430
Starting the engine
Important safety notes G
WARNING
If children are left unsupervised in the vehicle,
they could:
R open the doors, thus endangering other
people or road users.
R get out and disrupt traffic.
R operate the vehicle's equipment.
Additionally, children could set the vehicle in
motion if, for example, they:
R release the parking brake.
R shift the automatic transmission out of
parking position P.
R starting the engine.
There is a risk of an accident and injury.
When leaving the vehicle, always take the
SmartKey with you and lock the vehicle. Never
leave children or animals unattended in the
vehicle. Always keep the SmartKey out of
reach of children. G
WARNING
Combustion engines emit poisonous exhaust
gases such as carbon monoxide. Inhaling
these exhaust gases leads to poisoning. There
is a risk of fatal injury. Therefore never leave
the engine running in enclosed spaces
without sufficient ventilation. G
WARNING
Flammable materials introduced through
environmental influence or by animals can
ignite if in contact with the exhaust system or
parts of the engine that heat up. There is a risk
of fire.
Carry out regular checks to make sure that
there are no flammable foreign materials in
the engine compartment or in the exhaust
system.
! Do not depress the accelerator pedal
when starting the engine. General notes i
Vehicles with a gasoline engine: the
catalytic converter is preheated for up to
30 seconds after a cold start. The sound of
the engine may change during this time.
Automatic transmission X
Shift the transmission to position P.
The transmission position display in the
multifunction display shows P.
i You can also start the engine when the
transmission is in position N.
Starting procedure with the SmartKey i
To start the engine using the SmartKey
instead of KEYLESS-GO, pull the Start/
Stop button out of the ignition lock.
X To start a gasoline engine: turn the
SmartKey to position 3in the ignition lock
(Y page 159) and release it as soon as the
engine is running.
X To start a diesel engine: turn the
SmartKey to position 2in the ignition lock
(Y page 159).
The % preglow indicator lamp in the
instrument cluster lights up.
X When the %preglow indicator lamp
goes out, turn the SmartKey to position
3(Y page 159) and release it as soon as the
engine is running.
i You can start the engine without preglow
if the engine is warm.
Using KEYLESS-GO to start the engine i
The Start/Stop button can be used to
start the vehicle manually without inserting
the SmartKey into the ignition lock. The
Start/Stop button must be inserted in the
ignition lock and the SmartKey must be in
the vehicle. This mode for starting the
engine operates independently of the ECO
start/stop automatic engine start function. Driving
161Driving and parking Z
ProCarManuals.com