2014 MERCEDES-BENZ E-SEDAN instrument cluster
[x] Cancel search: instrument clusterPage 168 of 430
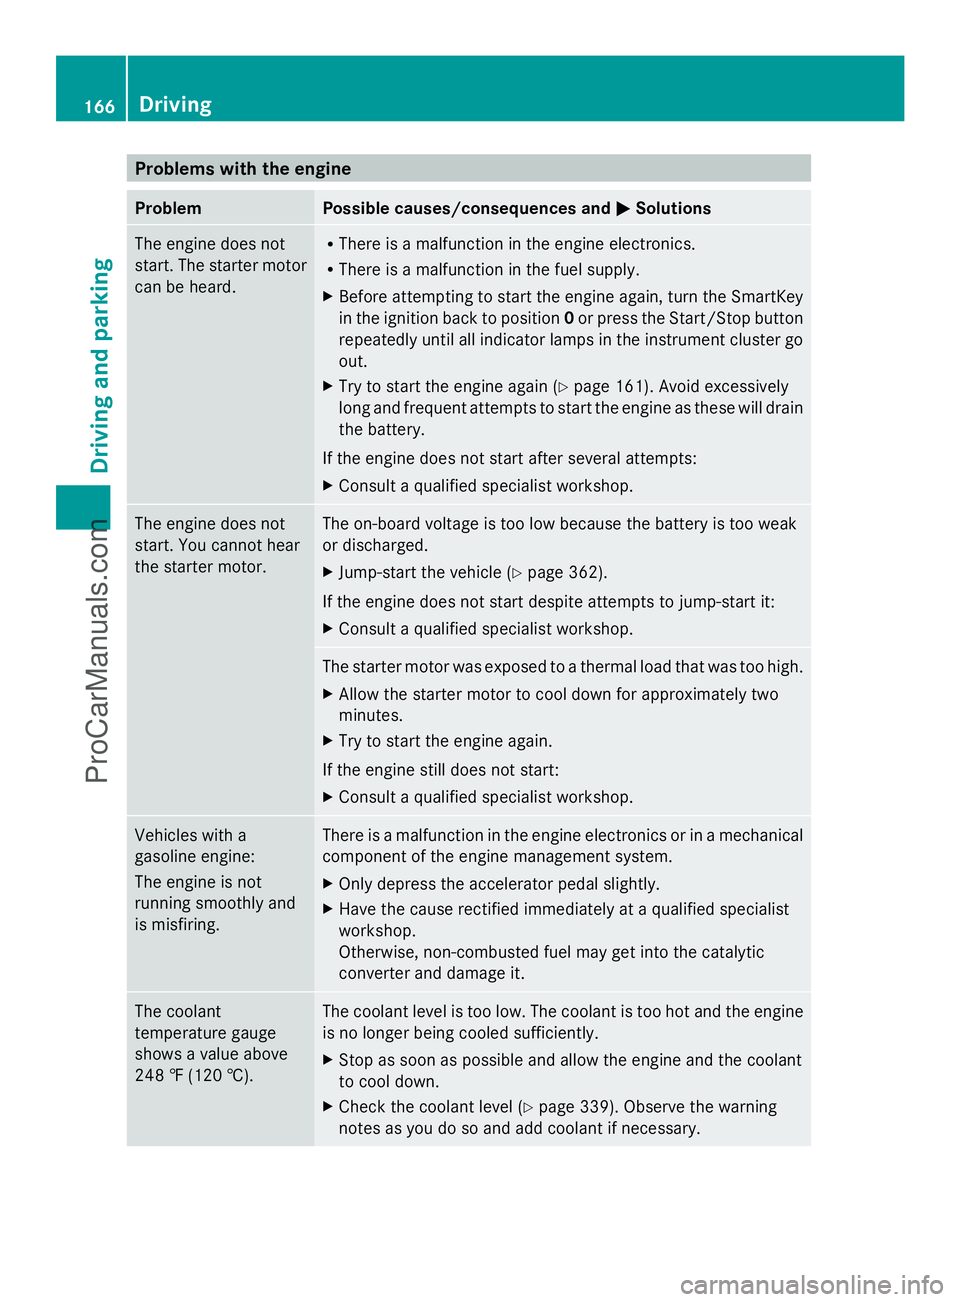
Problems with the engine
Problem Possible causes/consequences and
M
MSolutions The engine does not
start. The starter motor
can be heard. R
There is a malfunction in the engine electronics.
R There is a malfunction in the fuel supply.
X Before attempting to start the engine again, turn the SmartKey
in the ignition back to position 0or press the Start/Stop button
repeatedly until all indicator lamps in the instrument cluster go
out.
X Try to start the engine again (Y page 161). Avoid excessively
long and frequent attempts to start the engine as these will drain
the battery.
If the engine does not start after several attempts:
X Consult a qualified specialist workshop. The engine does not
start. You cannot hear
the starter motor. The on-board voltage is too low because the battery is too weak
or discharged.
X
Jump-start the vehicle (Y page 362).
If the engine does not start despite attempts to jump-start it:
X Consult a qualified specialist workshop. The starter motor was exposed to a thermal load that was too high.
X
Allow the starter motor to cool down for approximately two
minutes.
X Try to start the engine again.
If the engine still does not start:
X Consult a qualified specialist workshop. Vehicles with a
gasoline engine:
The engine is not
running smoothly and
is misfiring. There is a malfunction in the engine electronics or in a mechanical
component of the engine management system.
X
Only depress the accelerator pedal slightly.
X Have the cause rectified immediately at a qualified specialist
workshop.
Otherwise, non-combusted fuel may get into the catalytic
converter and damage it. The coolant
temperature gauge
shows a value above
248 ‡ (120 †). The coolant level is too low. The coolant is too hot and the engine
is no longer being cooled sufficiently.
X Stop as soon as possible and allow the engine and the coolant
to cool down.
X Check the coolant level (Y page 339). Observe the warning
notes as you do so and add coolant if necessary. 166
DrivingDriving and parking
ProCarManuals.com
Page 175 of 430
Activating
X
Shift the transmission to position D.
X Pull the left or right steering wheel paddle
shifter (Y page 172).
Manual drive program Mis temporarily
activated. The selected gear and Mappear
in the multifunction display.
Shifting gears
If you pull on the left or right steering wheel
paddle shifter, the automatic transmission
switches to manual drive program Mfor a
limited amount of time. Depending on which
paddle shifter is pulled, the automatic
transmission immediately shifts into the next
gear down or up, if permitted.
X To shift up: pull the right-hand steering
wheel paddle shifter (Y page 172).
The automatic transmission shifts up to the
next gear.
i If the maximum engine speed on the
currently engaged gear is reached and you
continue to accelerate, the automatic
transmission automatically shifts up in
order to prevent engine damage.
X To shift down: pull on the left-hand
steering wheel paddle shifter
(Y page 172).
The automatic transmission shifts down to
the next gear.
i If the engine exceeds the maximum
engine speed when shifting down, the
automatic transmission protects against
engine damage by not shifting down.
i Automatic down shifting occurs when
coasting.
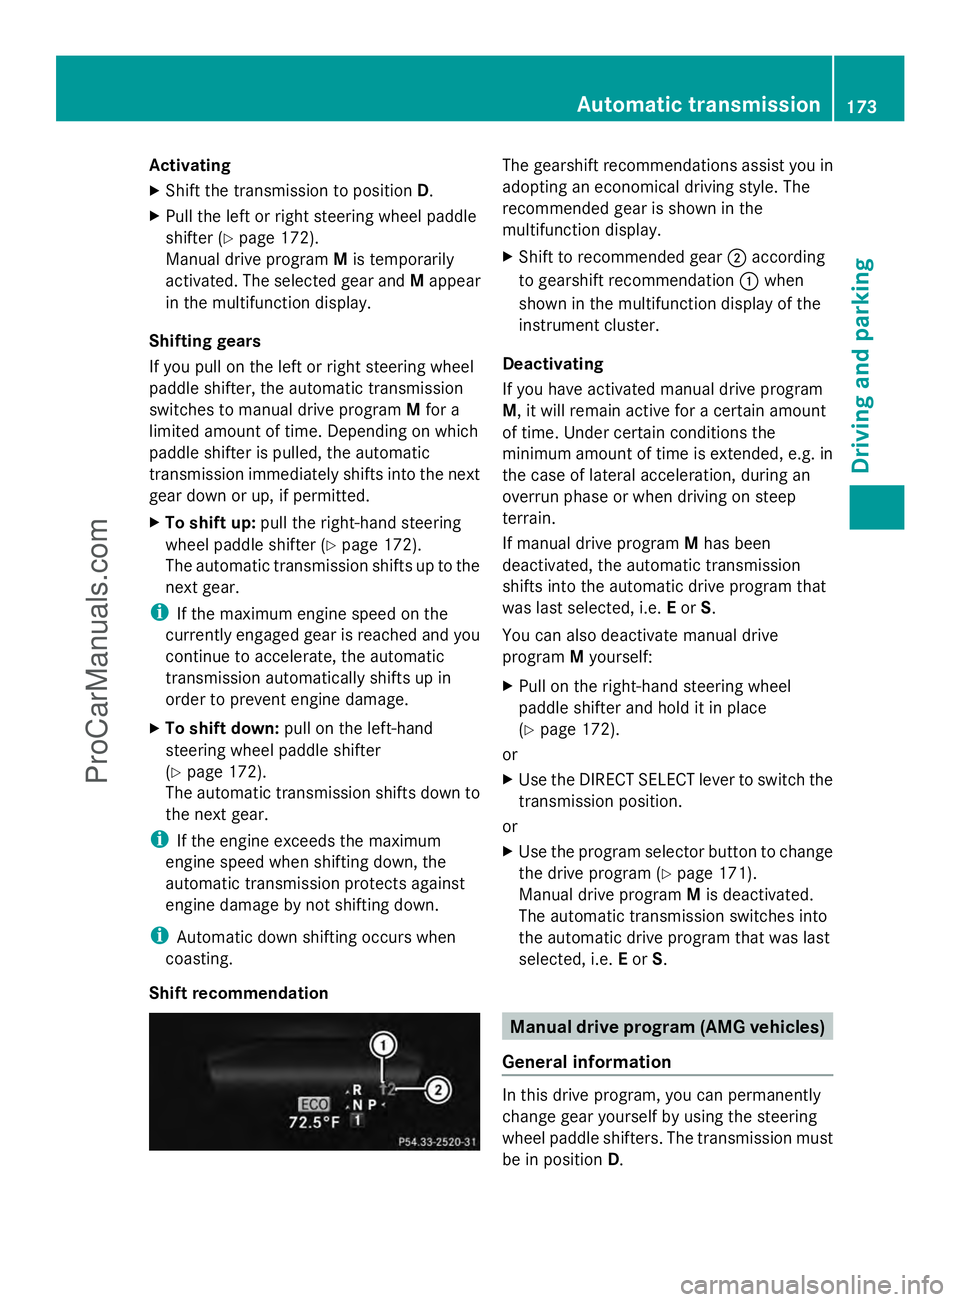
Shift recommendation The gearshift recommendations assist you in
adopting an economical driving style. The
recommended gear is shown in the
multifunction display.
X Shift to recommended gear ;according
to gearshift recommendation :when
shown in the multifunction display of the
instrument cluster.
Deactivating
If you have activated manual drive program
M, it will remain active for a certain amount
of time. Under certain conditions the
minimum amount of time is extended, e.g. in
the case of lateral acceleration, during an
overrun phase or when driving on steep
terrain.
If manual drive program Mhas been
deactivated, the automatic transmission
shifts into the automatic drive program that
was last selected, i.e. Eor S.
You can also deactivate manual drive
program Myourself:
X Pull on the right-hand steering wheel
paddle shifter and hold it in place
(Y page 172).
or
X Use the DIRECT SELECT lever to switch the
transmission position.
or
X Use the program selector button to change
the drive program (Y page 171).
Manual drive program Mis deactivated.
The automatic transmission switches into
the automatic drive program that was last
selected, i.e. Eor S. Manual drive program (AMG vehicles)
General information In this drive program, you can permanently
change gear yourself by using the steering
wheel paddle shifters. The transmission must
be in position
D. Automatic transmission
173Driving and parking Z
ProCarManuals.com
Page 179 of 430
vehicle with the SmartKey or with KEYLESS-
GO.
The position of the fuel filler cap is displayed
8 in the instrument cluster. The arrow
next to the filling pump indicates the side of
the vehicle.
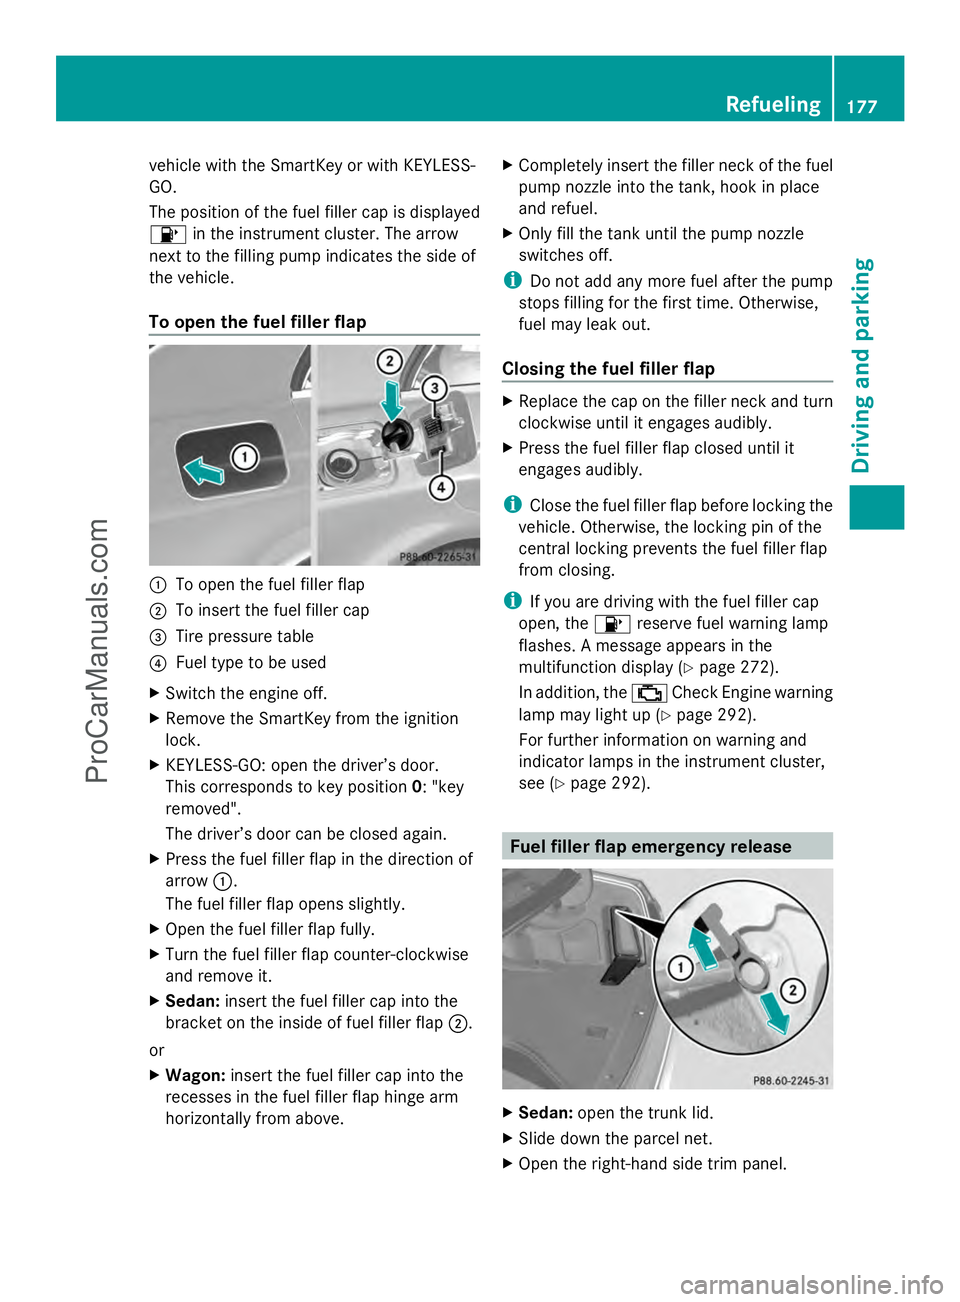
To open the fuel filler flap :
To open the fuel filler flap
; To insert the fuel filler cap
= Tire pressure table
? Fuel type to be used
X Switch the engine off.
X Remove the SmartKey from the ignition
lock.
X KEYLESS-GO: open the driver’s door.
This corresponds to key position 0: "key
removed".
The driver’s door can be closed again.
X Press the fuel filler flap in the direction of
arrow :.
The fuel filler flap opens slightly.
X Open the fuel filler flap fully.
X Turn the fuel filler flap counter-clockwise
and remove it.
X Sedan: insert the fuel filler cap into the
bracket on the inside of fuel filler flap ;.
or
X Wagon: insert the fuel filler cap into the
recesses in the fuel filler flap hinge arm
horizontally from above. X
Completely insert the filler neck of the fuel
pump nozzle into the tank, hook in place
and refuel.
X Only fill the tank until the pump nozzle
switches off.
i Do not add any more fuel after the pump
stops filling for the first time. Otherwise,
fuel may leak out.
Closing the fuel filler flap X
Replace the cap on the filler neck and turn
clockwise until it engages audibly.
X Press the fuel filler flap closed until it
engages audibly.
i Close the fuel filler flap before locking the
vehicle. Otherwise, the locking pin of the
central locking prevents the fuel filler flap
from closing.
i If you are driving with the fuel filler cap
open, the 8reserve fuel warning lamp
flashes. A message appears in the
multifunction display (Y page 272).
In addition, the ;Check Engine warning
lamp may light up (Y page 292).
For further information on warning and
indicator lamps in the instrument cluster,
see (Y page 292). Fuel filler flap emergency release
X
Sedan: open the trunk lid.
X Slide down the parcel net.
X Open the right-hand side trim panel. Refueling
177Driving and parking Z
ProCarManuals.com
Page 185 of 430
Vehicles with automatic transmission
X
Shift the transmission to position P.
Using the SmartKey
X Turn the SmartKey to position 0in the
ignition lock and remove it.
The immobilizer is activated.
X Apply the parking brake firmly.
i If you turn off the engine with the
SmartKey and then remove it from the
ignition lock or open a front door, the
automatic transmission shifts to P
automatically.
Using KEYLESS-GO
X Press the Start/Stop button (Y page 159).
The engine stops and all the indicator
lamps in the instrument cluster go out.
X Apply the parking brake firmly.
i If you turn off the engine with the Start/
Stop button, the automatic transmission
shifts to N. If you then open the driver's or
front-passenger door, the automatic
transmission shifts to Pautomatically.
i In the event of an emergency, the engine
can be turned off while the vehicle is in
motion by pressing and holding the Start/
Stop button for three seconds. Parking brake
G
WARNING
If you must brake the vehicle with the parking
brake, the braking distance is considerably
longer and the wheels could lock. There is an
increased danger of skidding and accidents.
Only use the parking brake to brake the
vehicle when the service brake is faulty. Do
not apply the parking brake too firmly. If the
wheels lock, release the parking brake until
the wheels begin turning again. G
WARNING
If you leave children unsupervised in the
vehicle, they could set it in motion by, for
example:
R releasing the parking brake
R shifting the automatic transmission out of
the parking position P
R starting the engine.
They could also operate the vehicle's
equipment. There is a risk of an accident and
injury.
When leaving the vehicle, always take the
SmartKey with you and lock the vehicle. Never
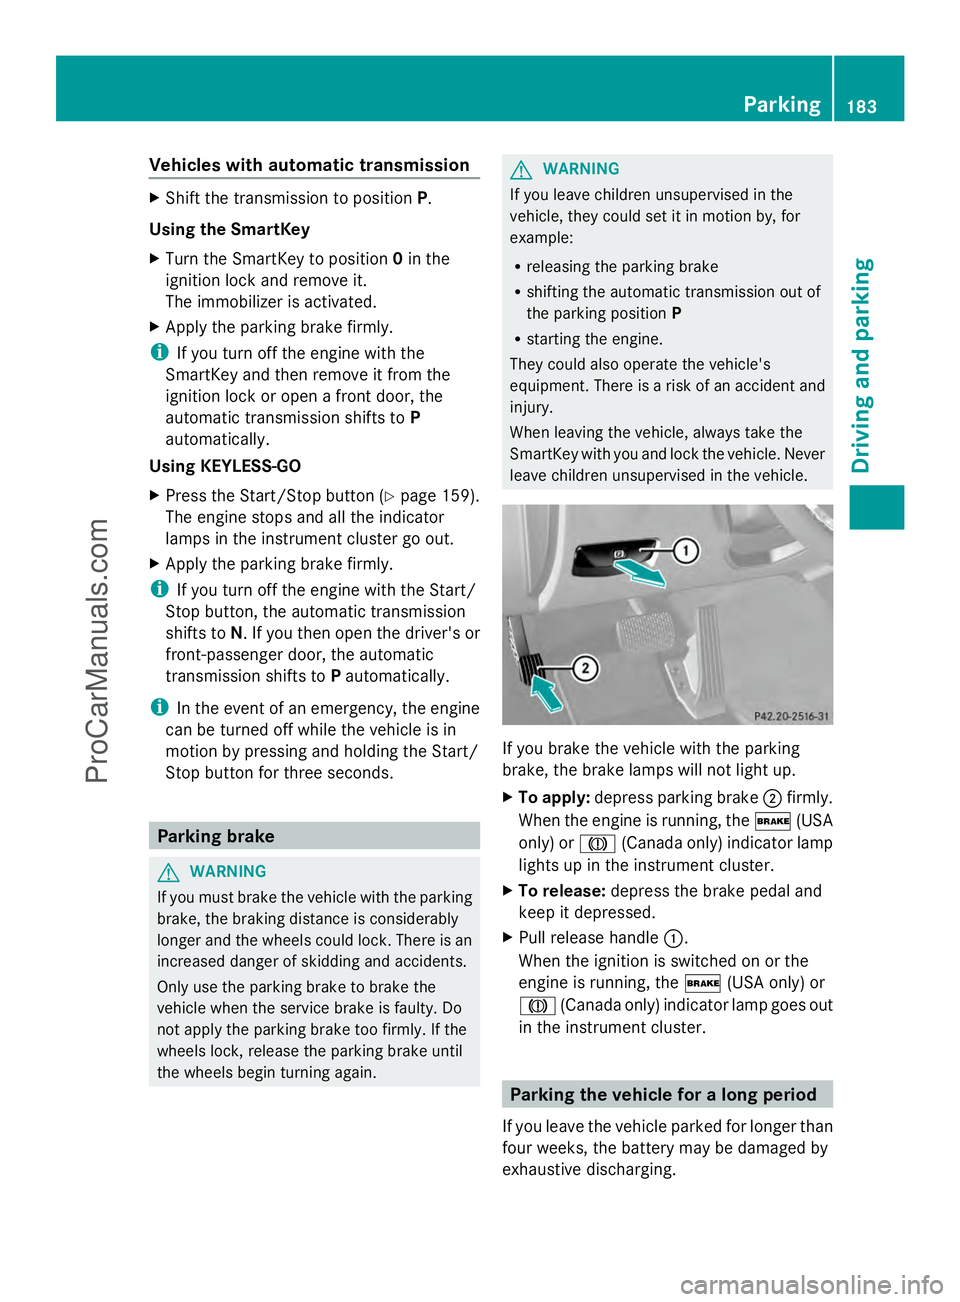
leave children unsupervised in the vehicle. If you brake the vehicle with the parking
brake, the brake lamps will not light up.
X
To apply: depress parking brake ;firmly.
When the engine is running, the $(USA
only) or J(Canada only) indicator lamp
lights up in the instrument cluster.
X To release: depress the brake pedal and
keep it depressed.
X Pull release handle :.
When the ignition is switched on or the
engine is running, the $(USA only) or
J (Canada only) indicator lamp goes out
in the instrument cluster. Parking the vehicle for a long period
If you leave the vehicle parked for longer than
four weeks, the battery may be damaged by
exhaustive discharging. Parking
183Driving an d parking Z
ProCarManuals.com
Page 189 of 430
R
Brake occasionally to remove any possible
salt residue. Make sure that you do not
endanger other road users when doing so.
R Carefully depress the brake pedal and the
beginning and end of a journey.
R Maintain a greater distance to the vehicle
ahead.
Servicing the brakes !
If the red brake warning lamp lights up in
the instrument cluster and you hear a
warning tone while the engine is running,
the brake fluid level may be too low.
Observe additional warning messages in
the multifunction display.
The brake fluid level may be too low due to
brake pad wear or leaking brake lines.
Have the brake system checked
immediately. This work should be carried
out at a qualified specialist workshop.
! Vehicles with 4MATIC: function or
performance tests may only be carried out
on a 2-axle dynamometer. If you are
planning to have the vehicle tested on such
a dynamometer, contact an authorized
Mercedes-Benz Center to obtain further
information first. Otherwise, you could
damage the drive train or the brake system.
! Vehicles with 4MATIC: as the ESP®
system operates automatically, the engine
and the ignition must be switched off
(SmartKey in position 0or 1in the ignition
lock or Start/Stop button in position 0or
1) while the parking brake is being tested
on a brake dynamometer.
Braking maneuvers triggered automatically
by ESP ®
may seriously damage the brake
system. !
Vehicles with 4MATIC: as the ESP®
system operates automatically, the engine
and the ignition system must be switched
off (SmartKey in position 0or 1in the
ignition lock or Start/Stop button in
position 0or 1) when:
R testing the parking brake on a brake
dynamometer.
R you intend to have the vehicle towed with
one of the axles raised.
Braking maneuvers triggered automatically
by ESP ®
may seriously damage the brake
system.
All checks and maintenance work on the
brake system must be carried out at a
qualified specialist workshop. Consult a
qualified specialist workshop to arrange this.
Have brake pads installed and brake fluid
replaced at a qualified specialist workshop.
If the brake system has only been subject to
moderate loads, you should test the
functionality of your brakes at regular
intervals. To do so, press firmly on the brake
pedal when driving at a high speed. This
improves the grip of the brake pads.
You can find a description of Brake Assist
(BAS) at (Y page 68) or of BAS PLUS with
Intersection Assist at (Y page 68).
The braking characteristics of the vehicle can
be seriously impaired if:
R brake pads other than those recommended
are installed
R the recommended brake fluid is not used
Safe braking can no longer be guaranteed.
AMG high-performance and ceramic
brakes The AMG brake systems are designed for
heavy loads. This may lead to noise when
braking. This will depend on:
R
Speed
R Braking force
R Environmental conditions, such as
temperature and humidity Driving tips
187Driving and parking Z
ProCarManuals.com
Page 190 of 430
The wear of individual components of the
brake system, such as the brake pads/linings
or brake discs, depends on the individual
driving style and operating conditions.
For this reason, it is impossible to state a
mileage that will be valid under all
circumstances. An aggressive driving style
will lead to high wear. You can obtain further
information about this from your authorized
Mercedes-Benz Center.
New and replaced brake pads and discs only
reach their optimum braking effect after
several hundred kilometers of driving.
Compensate for this by applying greater force
to the brake pedal. Keep this in mind, and
adapt your driving and braking accordingly
during this break-in period.
Excessive heavy braking results in
correspondingly high brake wear. Observe
the # brake wear warning lamp in the
instrument cluster and note any brake status
messages in the multifunction display.
Especially for high performance driving, it is
important to maintain and have the brake
system checked regularly. Driving on wet roads
Hydroplaning If water has accumulated to a certain depth
on the road surface, there is a danger of
hydroplaning occurring, even if:
R you drive at low speeds.
R the tires have adequate tread depth.
For this reason, in the event of heavy rain or
in conditions in which hydroplaning may
occur, you must drive in the following
manner:
R lower your speed.
R avoid ruts.
R brake carefully. Driving on flooded roads !
Do not drive through flooded areas.
Check the depth of any water before driving
through it. Drive slowly through standing
water. Otherwise, water may enter the
vehicle interior or the engine compartment.
This can damage the electronic
components in the engine or the automatic
transmission. Water can also be drawn in
by the engine's air suction nozzles and this
can cause engine damage. Winter driving
Important safety notes G
WARNING
If you shift down on a slippery road surface in
an attempt to increase the engine's braking
effect, the drive wheels could lose their grip.
There is an increased danger of skidding and
accidents.
Do not shift down for additional engine
braking on a slippery road surface. G
DANGER
If the exhaust pipe is blocked or adequate
ventilation is not possible, poisonous gases
such as carbon monoxide (CO) may enter the
vehicle. This is the case, e.g. if the vehicle
becomes trapped in snow. There is a risk of
fatal injury.
If you leave the engine or the auxiliary heating
running, make sure the exhaust pipe and area
around the vehicle are clear of snow. To
ensure an adequate supply of fresh air, open
a window on the side of the vehicle that is not
facing into the wind.
Have your vehicle winterproofed at a qualified
specialist workshop at the onset of winter.
i Vehicles with a diesel engine: do not
cover the radiator, e.g. with a protective
cover. The measuring function of the
onboard diagnosis system may otherwise
provide inaccurate values. Some of these 188
Driving tipsDriving and parking
ProCarManuals.com
Page 194 of 430
Change into a lower gear in good time on long
and steep downhill gradients. This is
especially important if the vehicle is laden. By
doing so, you will make use of the braking
effect of the engine. This relieves the load on
the brake system and prevents the brakes
from overheating and wearing too quickly.
If DISTRONIC PLUS detects that there is a risk
of a collision, you will be warned visually and
acoustically. DISTRONIC PLUS cannot
prevent a collision without your intervention.
An intermittent warning tone will then sound
and the distance warning lamp will light up in
the instrument cluster. Brake immediately in
order to increase the distance to the vehicle
in front or take evasive action provided it is
safe to do so.
For DISTRONIC PLUS to assist you, the radar
sensor system must be operational.
DISTRONIC PLUS operates in range between
0 mph (0 km/h) and 120 mph (200 km/h).
Do not use DISTRONIC PLUS while driving on
roads with steep gradients.
As DISTRONIC PLUS transmits radar waves,
it can resemble the radar detectors of the
responsible authorities. You can refer to the
relevant chapter in the Operator's Manual if
questions are asked about this.
i USA only: This device has been approved
by the FCC as a "Vehicular Radar System".
The radar sensor is intended for use in an
automotive radar system only. Removal,
tampering, or altering of the device will void
any warranties, and is not permitted by the
FCC. Do not tamper with, alter, or use in
any non-approved way.
Any unauthorized modification to this
device could void the user's authority to
operate the equipment.
i Canada only: This device complies with
RSS-210 of Industry Canada. Operation is
subject to the following two conditions:
1. This device may not cause harmful
interference, and 2. this device must accept any interference
received, including interference that may
cause undesired operation of the device.
Removal, tampering, or altering of the
device will void any warranties, and is not
permitted. Do not tamper with, alter, or use
in any non-approved way.
Any unauthorized modification to this
device could void the user's authority to
operate the equipment.
Important safety notes G
WARNING
Hybrid vehicles: be sure to read the "HYBRID"
supplement. Otherwise, you could fail to
recognize dangers. G
WARNING
DISTRONIC PLUS does not react to:
R people or animals
R stationary obstacles on the road, e.g.
stopped or parked vehicles
R oncoming and crossing traffic
As a result, DISTRONIC PLUS may neither give
warnings nor intervene in such situations.
There is a risk of an accident.
Always pay careful attention to the traffic
situation and be ready to brake. G
WARNING
DISTRONIC PLUS cannot always clearly
identify other road users and complex traffic
situations.
In such cases, DISTRONIC PLUS may:
R give an unnecessary warning and then
brake the vehicle
R neither give a warning nor intervene
R accelerate unexpectedly
There is a risk of an accident.
Continue to drive carefully and be ready to
brake, in particular when warned to do so by
DISTRONIC PLUS. 192
Driving systemsDriving and pa
rking
ProCarManuals.com
Page 216 of 430
Active Parking Assist is switched on
automatically when driving forwards. The
system is operational at speeds of up to
approximately 22 mph (35 km/h). While in
operation, the system independently locates
and measures parking spaces on both sides
of the vehicle.
Active Parking Assist will only detect parking
spaces:
R that are parallel or at right-angles to the
direction of travel
R that are parallel to the direction of travel
and at least 59 in (1.5 m) wide
R that are parallel to the direction of travel
and at least 39.5 in (1.0 m) longer than your
vehicle
R that are at right angles to the direction of
travel and at least 39.5 in (1.0 m) wider
than your vehicle
i In the case of parking spaces that are at
right angles to the direction of travel,
please ensure that the parking space is
long enough to accommodate your vehicle.
When driving at speeds below 19 mph
(30 km/h), you will see parking symbol as a
status indicator in the instrument cluster.
When a parking space has been detected, an
arrow towards the right or the left also
appears. By default, Active Parking Assist
only displays parking spaces on the front-
passenger side. Parking spaces on the
driver's side are displayed as soon as the turn
signal on the driver's side is activated. When
parking on the driver's side, this must remain
switched on until you acknowledge the use of
Active Parking Assist by pressing the a
button on the multifunction steering wheel.
The system automatically determines
whether the parking space is parallel or at
right-angles to the direction of travel.
A parking space is displayed while you are
driving past it, and until you are
approximately 50 ft (15 m) away from it. Parking i
Vehicles with automatic transmission:
When PARKTRONIC detects obstacles,
Active Parking Assist brakes automatically
during the parking process. You are
responsible for braking in good time.
X Stop the vehicle when the parking space
symbol shows the desired parking space in
the instrument cluster.
X Shift the transmission to position R.
The Start Park Assist? Yes: OK No: Start Park Assist? Yes: OK No:
% message appears in the multifunction
display.
X To cancel the procedure: press the
% button on the multifunction steering
wheel or pull away.
or
X To park using Active Parking Assist:
press the abutton on the multifunction
steering wheel.
The Park Assist Active Accelerate Park Assist Active Accelerate
and Brake Observe Surroundings
and Brake Observe Surroundings
message appears in the multifunction
display.
X Let go of the multifunction steering wheel.
X Back up the vehicle, being ready to brake
at all times. When backing up, drive at a
speed below approximately 6 mph
(10 km/h). Otherwise Active Parking Assist
will be canceled.
Active Parking Assist brakes the vehicle to
a standstill when the vehicle is in the
parking space.
Maneuvering may be required in tight
parking spaces.
The Park Assist Active Select D Park Assist Active Select D
Observe
Observe Surroundings
Surroundings message appears in
the multifunction display.
X Shift the transmission to position Dwhile
the vehicle is stationary.
Active Parking Assist immediately steers in
the other direction. 214
Driving systemsDriving an
d parking
ProCarManuals.com